Unity ugui Anchor锚点自动适配画布中的相对位置
本随笔参考了以下博客,在此基础上进行优化和改进:
https://blog.csdn.net/qq_39640124/article/details/88284191
ugui中的Anchor预设如下:

允许我们快速对齐父物体的一部分轴向顶点或边,但有时我们并不是要对齐这些,而是需要对齐特定位置的某个点,例如:

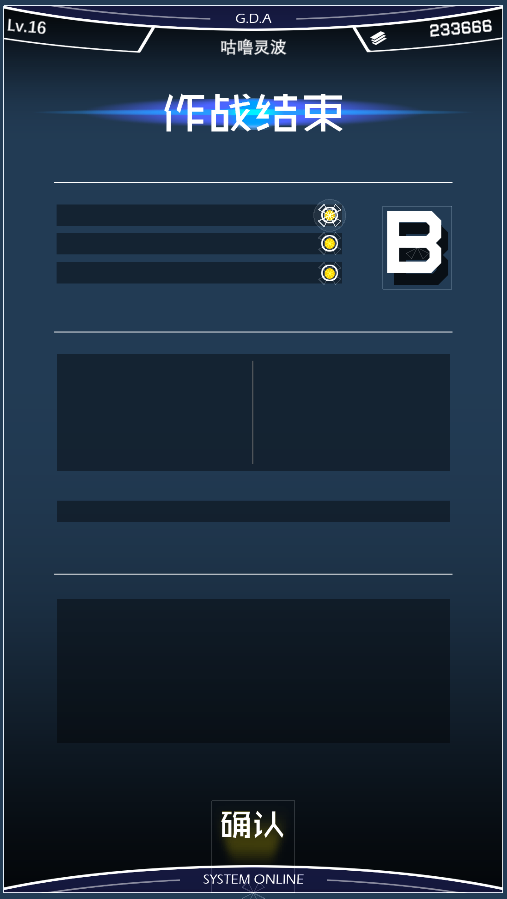
如上图,上面的作战结束之后的等级信息B它应该是对齐父物体面板的什么位置呢?
当然了,你可以简单的将它设置为对齐屏幕右侧中点或者右上,那么此时无论屏幕分辨率如何改变,它的锚点Pivot距离屏幕右边缘的距离都不变。
但如果出现一种极端例子,屏幕的宽度小到比预设的距离还小,那么B早就跑到屏幕左侧去了。
显然,这样的Anchor预设调整是不太精准的,在屏幕分辨率改变较大时,很多不同对齐方式的元素有极大几率出现位置偏移甚至重叠。
ugui除了通过自带的预设,也可以手动输入Anchor的最大值和最小值来调整,当最大值和最小值相同时,它对齐的是相对百分比的一个点:

例如上面的B字母的中点精准的对齐方式是,距离父物体画布宽的82.9%高72.7%左右的位置,这样无论父物体随着分辨率如何改变,B的相对位置都保持不变。
值得注意的是,为了保证无任何偏移的可能,需要保证anchoredPosition为零,也就是面板中Pos为零。

但很遗憾的是,Unity编辑器暂时还没有办法自动对齐Anchor到物体的锚点Pivot或边框,当然了你可以每次尝试手动拖动,但保证你马上就会有口区的感觉,而且总会差那么一点对不齐。
下面是自动对齐的编辑器脚本,在网上参考了之前网友写过的对齐边框的写法,但发现只要锚点Pivot不在物件中心就会自动移动物体位置,在这里进行了一些优化修正,并增加了另一种对齐模式:
 using UnityEngine;

 using UnityEditor;

 public class AnchorsAdapt

 {

     [MenuItem("Tools/AnchorsAdaptSize")]

     private static void SelectionMS()

     {

         GameObject[] gos = Selection.gameObjects;

         for (int i = ; i < gos.Length; i++)

         {

             if (gos[i].GetComponent<RectTransform>() == null)

                 continue;

             AdaptSize(gos[i]);

         }

     }

     [MenuItem("Tools/AnchorsAdaptPivot")]

     private static void SelectionMP()

     {

         GameObject[] gos = Selection.gameObjects;

         for (int i = ; i < gos.Length; i++)

         {

             if (gos[i].GetComponent<RectTransform>() == null)

                 continue;

             AdaptPivot(gos[i]);

         }

     }

     private static void AdaptPivot(GameObject go)

     {

         //------获取rectTransform----

         RectTransform partentRect = go.transform.parent.GetComponent<RectTransform>();

         RectTransform localRect = go.GetComponent<RectTransform>();

         //位置信息

         Vector3 partentPos = go.transform.parent.position;

         Vector3 localPos = go.transform.position;

         float partentWidth = partentRect.rect.width;

         float partentHeight = partentRect.rect.height;

         //---------位移差------

         float offX = localPos.x - partentPos.x;

         float offY = localPos.y - partentPos.y;

         float rateW = offX / partentWidth;

         float rateH = offY / partentHeight;

         var anchor = new Vector2(.5f + rateW, .5f + rateH);

         localRect.SetRtAnchorSafe(anchor, anchor);

     }

     private static void AdaptSize(GameObject go)

     {

         //位置信息

         Vector3 partentPos = go.transform.parent.position;

         Vector3 localPos = go.transform.position;

         //------获取rectTransform----

         RectTransform partentRect = go.transform.parent.GetComponent<RectTransform>();

         RectTransform localRect = go.GetComponent<RectTransform>();

         float partentWidth = partentRect.rect.width;

         float partentHeight = partentRect.rect.height;

         float localWidth = localRect.rect.width * 0.5f;

         float localHeight = localRect.rect.height * 0.5f;

         //---------位移差------

         float offX = localPos.x - partentPos.x;

         float offY = localPos.y - partentPos.y;

         float rateW = offX / partentWidth;

         float rateH = offY / partentHeight;

         localRect.anchorMax = localRect.anchorMin = new Vector2(0.5f + rateW, 0.5f + rateH);

         localRect.anchoredPosition = Vector2.zero;

         //大小偏移

         partentHeight = partentHeight * 0.5f;

         partentWidth = partentWidth * 0.5f;

         float rateX = (localWidth / partentWidth) * 0.5f;

         float rateY = (localHeight / partentHeight) * 0.5f;

         //锚点偏移值

         var pivotOffX = localRect.pivot.x-.5f;

         var pivotOffY = localRect.pivot.y-.5f;

         var pivotOff = new Vector2(localWidth * pivotOffX / partentWidth, localHeight * pivotOffY / partentHeight);

         localRect.anchorMax = new Vector2(localRect.anchorMax.x + rateX, localRect.anchorMax.y + rateY) - pivotOff;

         localRect.anchorMin = new Vector2(localRect.anchorMin.x - rateX, localRect.anchorMin.y - rateY) - pivotOff;

         localRect.offsetMax = localRect.offsetMin = Vector2.zero;

     }

 }
此脚本为编辑器Editor脚本,需要放在Editor文件夹下才能生效。其中安全设置Anchor的拓展方法如下:
     public static void SetRtAnchorSafe(this RectTransform rt, Vector2 anchorMin, Vector2 anchorMax)

     {

         if (anchorMin.x <  || anchorMin.x >  || anchorMin.y <  || anchorMin.y >  || anchorMax.x <  || anchorMax.x >  || anchorMax.y <  || anchorMax.y > )

             return;

         var lp = rt.localPosition;

         //注意不要直接用sizeDelta因为该值会随着anchor改变而改变

         var ls = new Vector2(rt.rect.width, rt.rect.height);

         rt.anchorMin = anchorMin;

         rt.anchorMax = anchorMax;

         //动态改变anchor后size和localPostion可能会发生变化需要重新设置

         rt.SetSizeWithCurrentAnchors(RectTransform.Axis.Horizontal, ls.x);

         rt.SetSizeWithCurrentAnchors(RectTransform.Axis.Vertical, ls.y);

         rt.localPosition = lp;

     }
Unity ugui Anchor锚点自动适配画布中的相对位置的更多相关文章
- Unity3D的UGUI布局锚点自动绑定关系
[MenuItem("CONTEXT/RectTransform/Auto")] public static void AutoRectAnior() { Debug.Log(&q ...
- Unity ugui屏幕适配与世界坐标到ugui屏幕坐标的转换
我们知道,如今的移动端设备分辨率五花八门,而开发过程中往往只取一种分辨率作为设计参考,例如采用1920*1080分辨率作为参考分辨率. 选定了一种参考分辨率后,美术设计人员就会固定以这样的分辨率来设计 ...
- Unity 基础-------------------------关于Anchor锚点的理解
Unity进阶技巧 - RectTransform详解 Zui 关注 2016.02.17 01:27 字数 1704 阅读 22157评论 13喜欢 57赞赏 2 RectTransform属性一览 ...
- Unity UGUI Layout自动排版组件用法介绍
Unity UGUI布局组件 本文提供全流程,中文翻译. Chinar 坚持将简单的生活方式,带给世人!(拥有更好的阅读体验 -- 高分辨率用户请根据需求调整网页缩放比例) Chinar -- 心分享 ...
- Unity UGUI —— 无限循环List
还记得大学毕业刚工作的时候是做flash的开发,那时候看到别人写的各种各样的UI组件就非常佩服,后来自己也慢慢尝试着写,发现其实也就那么回事.UI的开发其实技术的成分相对来说不算多,但是一个好的UI是 ...
- Unity UGUI
超详细的基础教程传送门:(持续更新中) Unity UGUI之Canvas&EventSystem:http://blog.csdn.net/qq992817263/article/detai ...
- Unity UGUI鼠标穿透UI问题(Unity官方的解决方法)
简述 最近在用UGUI的时候遇到了鼠标穿透的问题,就是说在UGUI和3D场景混合的情况下,点击UI区域同时也会 触发3D中物体的鼠标事件.比如下图中 这里给Cube加了一个鼠标点击改变颜色的代码,如下 ...
- iOS 4s-6Plus屏幕自动适配及颜色转换为十六进制
iOS各种屏幕自动适配及颜色转换为十六进制 ★★★XLJMatchScreen自动适配屏幕★★★ 支持pod导入 pod 'XLJScreenMatching', '~> 1.0.3' 如果发现 ...
- 【iOS开发】多屏尺的自动适配 AutoLayout (纯代码方式)
关于AutoLayout,最早从iOS6开始引入使用. 主要功能是使用约束,对视图进行相对布局,以适应不同屏尺的变换. 网上大量的资料都在介绍xib和storyboard,如何使用AutoLa ...
随机推荐
- Nginx 笔记(一)nginx简介与安装
个人博客网:https://wushaopei.github.io/ (你想要这里多有) Nginx 简介: 1.介绍 nginx 的应用场景和具体可以做什么事情 2.介绍什么是反向代理 3.介 ...
- 这才是你需要的最基础的.Net基础面试题(通俗易懂,最基础的.Net)2
51. 委托回调静态方法和实例方法有何区别? 当一个实例方法被调用时,需要通过实例对象来访问,绑定一个实例方法到委托必须同时让委托得到实例方法的代码段和实例对象的信息,这样在委托被回调时候.NET才能 ...
- Java实现 LeetCode 657 机器人能否返回原点(暴力大法)
657. 机器人能否返回原点 在二维平面上,有一个机器人从原点 (0, 0) 开始.给出它的移动顺序,判断这个机器人在完成移动后是否在 (0, 0) 处结束. 移动顺序由字符串表示.字符 move[i ...
- Java实现 蓝桥杯VIP 算法训练 幂方分解
问题描述 任何一个正整数都可以用2的幂次方表示.例如: 137=27+23+20 同时约定方次用括号来表示,即ab 可表示为a(b). 由此可知,137可表示为: 2(7)+2(3)+2(0) 进一步 ...
- Java实现 蓝桥杯VIP 算法训练 单词接龙
问题描述 单词接龙是一个与我们经常玩的成语接龙相类似的游戏,现在我们已知一组单词,且给定一个开头的字母,要求出以这个字母开头的最长的"龙"(每个单词都最多在"龙" ...
- java中Dateformat类的详细使用(详解)
DateFormat其本身是一个抽象类,SimpleDateFormat 类是DateFormat类的子类,一般情况下来讲DateFormat类很少会直接使用,而都使用SimpleDateFormat ...
- Java实现网格中移动字母
2x3=6个方格中放入ABCDE五个字母,右下角的那个格空着.如图[1.jpg]所示. 和空格子相邻的格子中的字母可以移动到空格中,比如,图中的C和E就可以移动,移动后的局面分别是: A B D E ...
- jmeter怎么衡量tps的值
jmeter也没有tps这么个报告数据,后来又翻了翻loadrunner关于tps的定义 1.TPS:Trasaction per second也就是事务数/秒.它是软件测试结果的测量单位.一个事务是 ...
- tensorflow2.0学习笔记
今天我们开始学习tensorflow2.0,用一种简单和循循渐进的方式,带领大家亲身体验深度学习.学习的目录如下图所示: 1.简单的神经网络学习过程 1.1张量生成 1.2常用函数 1.3鸢尾花数据读 ...
- mybatis 逆向工程使用姿势不对,把表清空了,心里慌的一比,于是写了个插件。
使用mybatis逆向工程的时候,delete方法的使用姿势不对,导致表被清空了,在生产上一刷新后发现表里没数据了,一股凉意从脚板心直冲天灵盖. 于是开发了一个拦截器,并写下这篇文章记录并分享. 这锅 ...
