曹工谈Spring Boot:Spring boot中怎么进行外部化配置,一不留神摔一跤;一路debug,原来是我太年轻了
背景
我们公司这边,目前都是spring boot项目,没有引入spring cloud config,也就是说,配置文件,还是放在resources下面的,为了区分多环境,是采用了profile这种方式,大致如下:
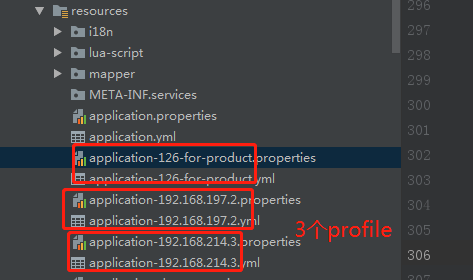
上面这里,就定义了3个profile,实际还不止这点,对应了3个环境。
每次启动的时候,只需要(省略无关 jvm 参数):
java -Dspring.profiles.active=dev -jar xxx.jar
这样来指定要使用的profile即可。
然后每次发测试版本,我们这边就得加1个profile,所以导致我们工作量也是巨大,因为我们这边环境比较多,地址总变。后来,经过开发和测试那边的协调,变成了我们只管jar包,不管测试环境的维护。每次发版本,只发个jar包过去,配置文件里的地址,由测试同学自己配置。
大致变成了如下的样子:
-rw-r--r--. 1 root root 111978406 May 19 13:24 xxx.jar

drwxr-xr-x. 2 root root       120 May 20 13:25 config

[root@localhost cad]# ll config/

total 16

-rw-r--r--. 1 root root  498 May 20 13:31 application.properties

-rw-r--r--. 1 root root  601 May 20 13:31 application.yml
即,在jar包旁边,放上一个config目录,然后在config目录里,放我们的配置文件,至于配置文件里的各种配置,比如数据库ip、redis等等,就由测试同学自己配置了,这样呢,我们的工作量,大大减小。
看起来很棒了,然而,前一阵,测试同学发现一个问题,即,只能在和config同级目录下,执行java -jar,这种情况下,config里面的配置才生效,换个目录执行,config里面的配置就不生效了。
[root@localhost cad]# ll   // 这里启动jar包,ok,没问题;换个目录执行,不行!

total 109356

-rw-r--r--. 1 root root 111978406 May 19 13:24 xxx.jar

drwxr-xr-x. 2 root root       120 May 20 13:25 config
还有这种事?我们看看到底怎么回事。
官方文档
24.3 Application Property Files
SpringApplicationloads properties fromapplication.propertiesfiles in the following locations and adds them to the SpringEnvironment:
- A
/configsubdirectory of the current directory- The current directory
- A classpath
/configpackage- The classpath root
这里说,SpringApplication加载application.properties配置文件,从如下位置:
- 当前目录的config子目录下
- 当前目录
- classpath下的config包
- classpath的根路径
我们这里,就是利用了第一点。但是,这个当前目录下的config目录,不是很清楚。当前目录,怎么才算当前目录,我在jar包同级目录算当前目录;换个目录用绝对路径,启动jar包,就不算当前目录了吗?
再往下翻一下看看。
Config locations are searched in reverse order. By default, the configured locations are
classpath:/,classpath:/config/,file:./,file:./config/. The resulting search order is the following:
file:./config/file:./classpath:/config/classpath:/
配置地址被以相反的顺序搜索,默认情况下,地址包括了:classpath:/,classpath:/config/,file:./,file:./config/,因此,被搜索的顺序如下:
file:./config/file:./classpath:/config/classpath:/
这里的第一项,file: ./config,应该就是我们目前的那种情况。
然后文档里,没提到我的问题,可能是太低级。。只能从源码找答案了。
源码分析
通过关键字查找,大致定位源码
我们直接用前面的关键字,搜索一波(记得把maven里设置为下载源码)
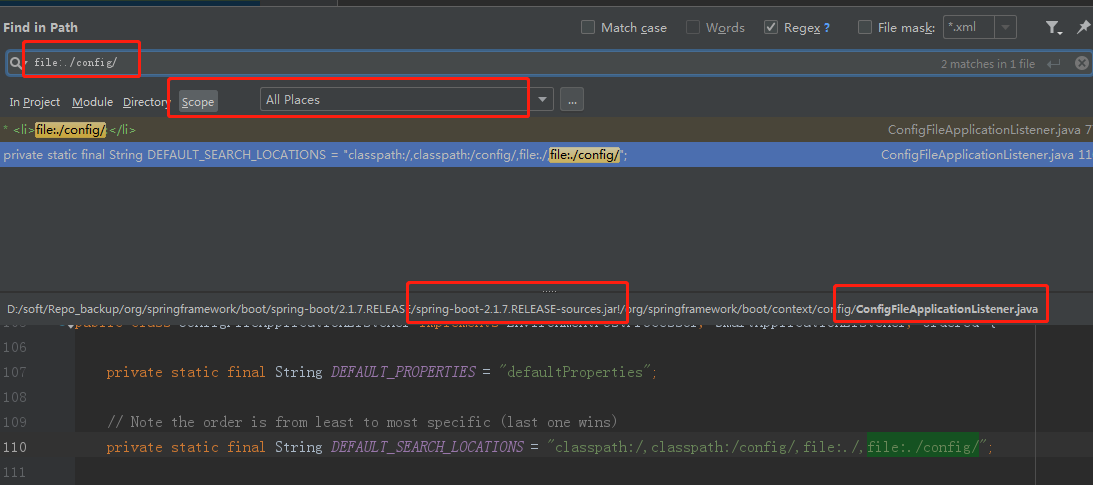
果然看到了一处地方:
org.springframework.boot.context.config.ConfigFileApplicationListener#DEFAULT_SEARCH_LOCATIONS

private static final String DEFAULT_SEARCH_LOCATIONS = "classpath:/,classpath:/config/,file:./,file:./config/";
查找这个变量被引用的地方:
org.springframework.boot.context.config.ConfigFileApplicationListener.Loader#getSearchLocations()

	private Set<String> getSearchLocations() {

			if (this.environment.containsProperty(CONFIG_LOCATION_PROPERTY)) {

				return getSearchLocations(CONFIG_LOCATION_PROPERTY);

			}

			Set<String> locations = getSearchLocations(CONFIG_ADDITIONAL_LOCATION_PROPERTY);

  			// 1

			locations.addAll(

					asResolvedSet(ConfigFileApplicationListener.this.searchLocations, DEFAULT_SEARCH_LOCATIONS));

			return locations;

		}
这里1处,就用到了前面的DEFAULT_SEARCH_LOCATIONS。
接着看看,上面这个函数被调用的地方:
		private void load(Profile profile, DocumentFilterFactory filterFactory, DocumentConsumer consumer) {

          	// 1

			getSearchLocations().forEach((location) -> {

				boolean isFolder = location.endsWith("/");

				Set<String> names = isFolder ? getSearchNames() : NO_SEARCH_NAMES;

                // 2

				names.forEach((name) -> load(location, name, profile, filterFactory, consumer));

			});

		}
这里的1处,就是前面的获取config location;这里1处,获取到了集合后,对其进行foreach处理。
2处,这里即会调用一个load函数,看名字就是加载,差不多可以猜到,是加载我们的那几个目录:
private static final String DEFAULT_SEARCH_LOCATIONS = "classpath:/,classpath:/config/,file:./,file:./config/";
好了,可以在这里打个断点,看看到底怎么加载,因为前面的file:./config/是一个相对路径,我们要看看,怎么被解析为绝对路径的。
断点debug,探求谜底
断点我们打在了load方法,运行项目,然后断点果然停在了我们想要的地方:
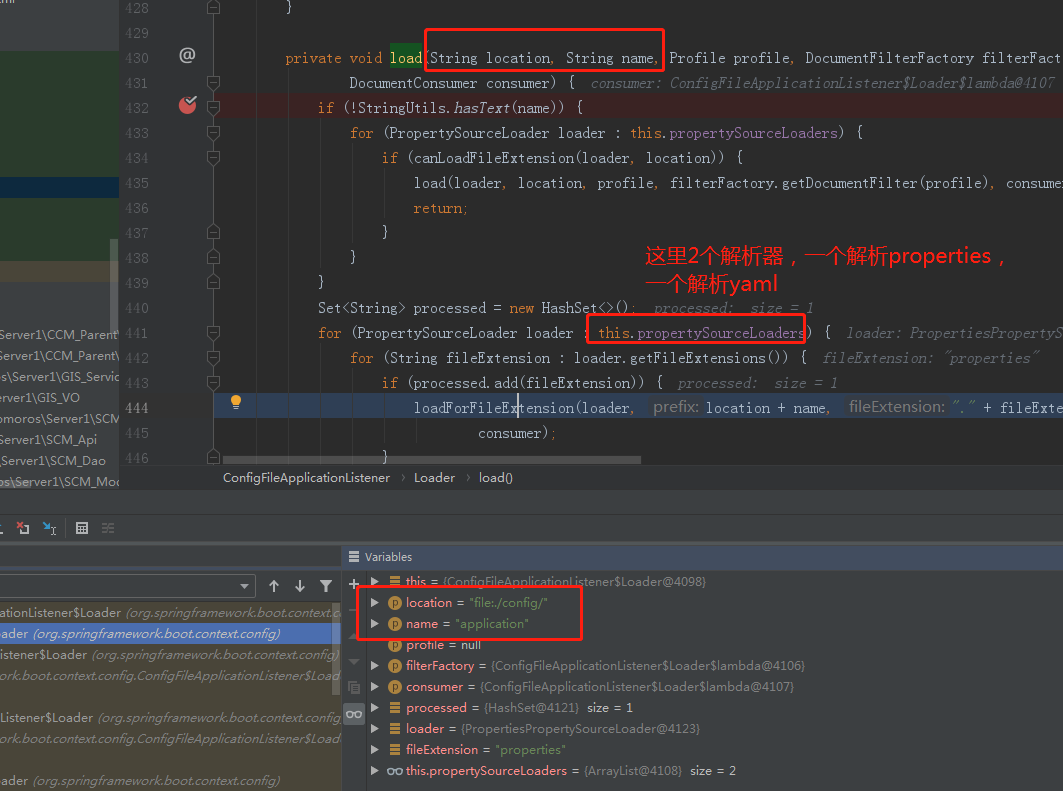
这个图就不多解释了,直接看圈出来的地方,我们接着要看下面的函数:
		private void loadForFileExtension(PropertySourceLoader loader, String prefix, String fileExtension,

				Profile profile, DocumentFilterFactory filterFactory, DocumentConsumer consumer) {

			DocumentFilter defaultFilter = filterFactory.getDocumentFilter(null);

			DocumentFilter profileFilter = filterFactory.getDocumentFilter(profile);

			if (profile != null) {

                // 1

				...

			}

			//2 Also try the profile-specific section (if any) of the normal file

			load(loader, prefix + fileExtension, profile, profileFilter, consumer);

		}
- 1处,省略了profile相关内容,我们本次启动,没指定profile
- 2处,继续load
load处代码:
		private void load(PropertySourceLoader loader, String location, Profile profile, DocumentFilter filter, DocumentConsumer consumer) {

  				// 1

				Resource resource = this.resourceLoader.getResource(location);

  				// 2

				if (resource == null || !resource.exists()) {

					if (this.logger.isTraceEnabled()) {

						StringBuilder description = getDescription("Skipped missing config ", location, resource, profile);

						this.logger.trace(description);

					}

					return;

				}

              ...

            }
- 1处,将location转换为Resource,这里传入的location为:
file:./config/application.properties - 2处,判断resource是否存在
resourceLoader怎么getResource
这里的resourceLoader,为 org.springframework.core.io.DefaultResourceLoader。这个类,直接实现了org.springframework.core.io.ResourceLoader接口。
这个类,位于spring-core.jar中,基本是核心类了。
其注释写道:
* Default implementation of the {@link ResourceLoader} interface.

* Used by {@link ResourceEditor}, and serves as base class for

* {@link org.springframework.context.support.AbstractApplicationContext}.

* Can also be used standalone.

*

* <p>Will return a {@link UrlResource} if the location value is a URL,

* and a {@link ClassPathResource} if it is a non-URL path or a

* "classpath:" pseudo-URL.
大体翻译:
ResourceLoader接口的默认实现,被ResourceEditor使用,同时,是AbstractApplicationContext的基类。
也能被单独使用。
当传入的value,是一个URL,则封装为一个UrlResource并返回;
当传入的是一个非URL,或者是一个类似于"classpath:"这样的,则返回一个ClassPathResource
对其的介绍到此打住。继续前面的代码:
	@Override

	public Resource getResource(String location) {

		Assert.notNull(location, "Location must not be null");

		...

        // 1

		if (location.startsWith("/")) {

			return getResourceByPath(location);

		} // 2

		else if (location.startsWith(CLASSPATH_URL_PREFIX)) {

			return new ClassPathResource(location.substring(CLASSPATH_URL_PREFIX.length()), getClassLoader());

		}

		else {

			try {

				// 3 Try to parse the location as a URL...

				URL url = new URL(location);

				return (ResourceUtils.isFileURL(url) ? new FileUrlResource(url) : new UrlResource(url));

			}

			catch (MalformedURLException ex) {

				// No URL -> resolve as resource path.

				return getResourceByPath(location);

			}

		}

	}
- 1,判断是否以
/开头 - 2,判断是否以classpath开头
- 3,作为参数,看看能不能 被解析为一个URL
然后3处这里,URL,是 jdk 的核心类,里面 debug 进去挺深的,直接执行完这一句之后,我们看看url这个参数的值:
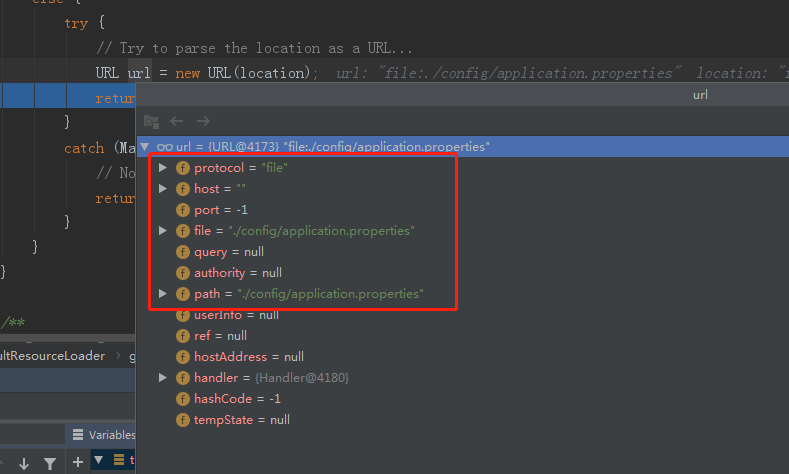
总的来说,这里就是:你给一个字符串,URL按照它的格式,来解析为各个字段:比如,协议,host,port,query等等。但是,不代表这个URL就是可以访问的,如果是file,不代表这个文件就存在。这里只是按照URL的格式去解析而已。
我们继续下一句:
URL url = new URL(location);

// 1

return (ResourceUtils.isFileURL(url) ? new FileUrlResource(url) : new UrlResource(url));
这里1处,判断是否为file,如果是,则会new一个FileUrlResource。
该类的类结构如下:

前面调用了new ,我们看看:
	public FileUrlResource(URL url) {

		super(url);

	}
调用了父类:
	/**

	 * Original URI, if available; used for URI and File access.

	 */

	@Nullable

	private final URI uri;

	/**

	 * Original URL, used for actual access.

	 */

	private final URL url;

	/**

	 * Cleaned URL (with normalized path), used for comparisons.

	 */

	private final URL cleanedUrl;

	public UrlResource(URL url) {

		this.url = url;

		this.cleanedUrl = getCleanedUrl(this.url, url.toString());

		this.uri = null;

	}
总的来说,就是利用你传入的URL,进行clean,然后保存到了cleanedUrl。
我们这里,经过clean后,
- clean后,cleanedUrl的值为:
file:config/application.properties - 原始的:
file:./config/application.properties
差别不大,主要是去掉了开头的./。
至此,我们的FileUrlResource就构造结束了,至此,我们完成了下面这行的解析。
Resource resource = this.resourceLoader.getResource(location);
判断resource是否存在
前面我们看到,FileUrlResource,继承了org.springframework.core.io.AbstractFileResolvingResource接口。
而我们这里调用:
resource.exists()
就会进入其父类的exists方法
	org.springframework.core.io.AbstractFileResolvingResource#exists

	public boolean exists() {

		try {

		    // 1

			URL url = getURL();

			if (ResourceUtils.isFileURL(url)) {

				//2 Proceed with file system resolution

				return getFile().exists();

			}

            ...

        }
- 1,获取url
- 2,获取file
- 3,判断是否存在。
其中2处,继续:
	@Override

	public File getFile() throws IOException {

        // 1

		File file = this.file;

		if (file != null) {

			return file;

		}

        // 2

		file = super.getFile();

        // 3

		this.file = file;

		return file;

	}
- 1,查询本地是否缓存
- 2,没缓存,则调用super类的getFile去获取
- 3,缓存。
继续进入2处,
	org.springframework.core.io.UrlResource#getFile

	public File getFile() throws IOException {

        // 1

		if (this.uri != null) {

			return super.getFile(this.uri);

		}

		else {

		    // 2

			return super.getFile();

		}

	}
- 1,我们这里uri是null,会进入2处
- 2,调用父类。
	org.springframework.core.io.AbstractFileResolvingResource#getFile()

	@Override

	public File getFile() throws IOException {

        // 1

		URL url = getURL();

        // 2

		return ResourceUtils.getFile(url, getDescription());

	}
- 1处,获取url
- 2处,获取file。
继续进入2处:
	org.springframework.util.ResourceUtils#getFile(java.net.URL, java.lang.String)

	public static File getFile(URL resourceUrl, String description) throws FileNotFoundException 	{

		try {

            // 1

			return new File(toURI(resourceUrl).getSchemeSpecificPart());

		}

		catch (URISyntaxException ex) {

			// Fallback for URLs that are not valid URIs (should hardly ever happen).

			return new File(resourceUrl.getFile());

		}

	}
这里,传入的resourceURL,类型为URL, 在idea中显示为:
file:./config/application.properties
toURI,大家可以大致看下,
	org.springframework.util.ResourceUtils#toURI(java.net.URL)

	public static URI toURI(URL url) throws URISyntaxException {

		return toURI(url.toString());

	}
	public static URI toURI(String location) throws URISyntaxException {

  		return new URI(StringUtils.replace(location, " ", "%20"));

	}
上面干了啥,就是把路径里的" "换成了"%20"。然后new了一个URI。
URI、URL的差别简述
这两个东西,太学术了,简单理解,就是URI,指代的东西更多,包含的范围更广,URI表示中国的话,URL可能只能表示台湾省。(我他么一颗红心)
总的来说,uri 不一定可以访问,url基本是可以的。
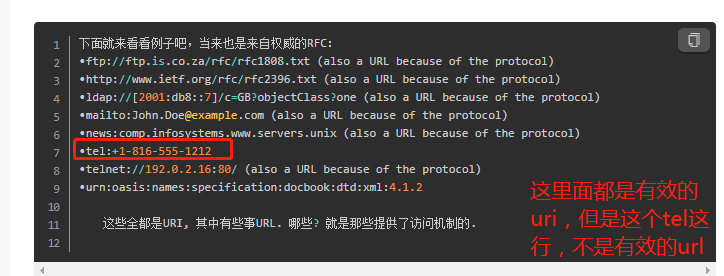
参考:https://www.jianshu.com/p/81dfc203ab4a
最终是如何new file,判断file是否存在的
经过前面的步骤后,
return new File(toURI(resourceUrl).getSchemeSpecificPart());
我们获取了一个URI,然后调用其getSchemeSpecificPart,最终拿到一个String,其值为:
./config/application.properties
然后传入了 File,用于构造一个file。
然后接着调用
	java.io.File#exists

    public boolean exists() {

    	// 1

        return ((fs.getBooleanAttributes(this) & FileSystem.BA_EXISTS) != 0);

    }
然后这里,1处调用了一个native方法:
java.io.WinNTFileSystem#getBooleanAttributes

public native int getBooleanAttributes(File f);
都到native方法了,没法继续了。
但是,最终呢,我们知道,现在的问题,变成了:
File file = new file("./config/application.properties");

file.exists();
new file,传入相对路径,这个相对路径,到底相对于哪里
经过我一番探索,最终写了下面这个测试类,注意,该类使用默认包:
	public class Test {

    public static void main(String[] args) throws IOException{

        // 1

        File file = new File("a.txt");

        // 2

        if (file.exists()) {

            System.out.println("file exists.path:" + file.getAbsolutePath());

        } else {

            // 3

            boolean newFile = file.createNewFile();

            if (newFile) {

                System.out.println("create new file");

            } else {

                System.out.println("create failed. file exists.path:" + file.getAbsolutePath());

            }

        }

    }

}
- 1,new file,使用了相对路径,即当前路径,模拟之前我们的问题
- 2,判断是否存在
- 3,如果不存在,创建文件。
idea中执行
我目前的idea中,project路径为:
F:\workproject_codes\xxxx
第一次执行,结果:
create new file
说明文件不存在,进行了文件创建。然后我用everything搜索了下该文件,发现:

就在我的project路径下。
然后我在想,为啥会创建到这个地方去?
然后我加了一段代码:
Properties properties = System.getProperties();

for (Map.Entry<Object, Object> entry : properties.entrySet()) {

  System.out.println(entry.getKey() + ", " + entry.getValue());

}
发现打印出来的properties中,有一个属性:
user.dir, F:\workproject_codes\saltillo
说明这个地址,就是user.dir搞出来的。
在idea中,user.dir,就是project的路径。
直接和class同级目录下,java执行class
直接执行那个class文件,我放到了centos下的/home/test目录下:
[root@localhost test]# ll

-rw-r--r--. 1 root root 2013 May 20 13:40 Test.class

[root@localhost test]# java Test
这种情况下,创建的file,就是这个目录下。
而且,看了下user.dir,就是当前目录:
[root@localhost test]# java Test|grep user.dir

user.dir, /home/test
和class不在同级目录下,java执行class
切换到上层目录,即home下:
[root@localhost home]# pwd

/home

[root@localhost home]#  java -cp test/ Test |grep user.dir

user.dir, /home

...会在本目录下生产a.txt,删除后再次执行:

[root@localhost home]#  java -cp test/ Test |grep create

create new file result
看上面,此时的user.dir,就变成了/home目录。
同时,创建了新的文件a.txt,就在当前home目录下。
打成spring boot jar后,在centos运行,结果如何
在spring boot jar包里的main,注释了原来的启动代码,我加了这段代码:
@SpringBootApplication

@EnableTransactionManagement

@EnableAspectJAutoProxy(exposeProxy = true)

@EnableFeignClients

//@Slf4j

@Controller

@EnableScheduling

public class xxx {

    private static Logger log= null;

    static {

    public static void main(String[] args) throws IOException {

        Properties properties = System.getProperties();

        for (Map.Entry<Object, Object> entry : properties.entrySet()) {

            System.out.println(entry.getKey() + ", " + entry.getValue());

        }

        File file = new File("a.txt");

        if (file.exists()) {

            System.out.println("file exists.path:" + file.getAbsolutePath());

        } else {

            boolean newFile = file.createNewFile();

            if (newFile) {

                System.out.println("create new file");

            } else {

                System.out.println("create failed. file exists.path:" + file.getAbsolutePath());

            }

        }

//        new SpringApplicationBuilder(xxx.class).web(WebApplicationType.SERVLET).run(args);

    }

}
在/root/tt下运行,用java -jar xxx.jar运行后,
user.dir, /root/tt

...

create new file
然后,果然,在/root/tt下,就建了一个a.txt文件。
[root@localhost tt]# ll

total 109412

-rw-r--r--. 1 root root         0 May 20 16:41 a.txt

-rw-r--r--. 1 root root 112035602 May 20 16:40 xxx.jar

[root@localhost tt]# pwd

/root/tt
user.dir是个什么东西
为此,我专门把那个class,拷贝到了root目录下,执行:
[root@localhost ~]# java Test |grep user.dir

user.dir, /root
这,看起来,在哪里运行java,user.dir就是哪儿啊,类似于pwd了。
大家如果直接去网上搜user.dir,基本都是很混乱,各说各的,大家按照上面这样实践下就知道了。
总结
我们已经找到了问题原因了,总的来说,就是spring boot外部化配置时,
file:./config/
这个路径,相对路径,相对的是user.dir。
而user.dir怎么来,就是你在哪个目录下执行java,哪个目录就是user.dir。
题目中这个问题怎么解决,可以直接在java -jar xxx.jar中,加一个参数(注意,这里config是一个目录,注意最后要加一个/):
java -jar -Dspring.config.location=file:///home/xxx/config/ springbootrestdemo-0.0.1-SNAPSHOT.jar
可参考:
https://www.cnblogs.com/xiaoqi/p/6955288.html
我这边的操作系统,pc是win7,centos是:
[root@localhost tt]# cat /etc/centos-release

CentOS Linux release 7.6.1810 (Core)
ps:经过实测后,发现如果在logback中指定相对路径的话,
    <appender name="FILE"

              class="ch.qos.logback.core.rolling.RollingFileAppender">

        <File>logs/${APP_NAME}.log</File>
这里的相对路径,也是基于前面的user.dir的。
谢谢大家。
可参考:
https://www.jianshu.com/p/982d8759edde
曹工谈Spring Boot:Spring boot中怎么进行外部化配置,一不留神摔一跤;一路debug,原来是我太年轻了的更多相关文章
- Spring Boot外部化配置实战解析
一.流程分析 1.1 入口程序 在 SpringApplication#run(String... args) 方法中,外部化配置关键流程分为以下四步 public ConfigurableAppli ...
- Spring Boot 外部化配置(一)- Environment、ConfigFileApplicationListener
目录 前言 1.起源 2.外部化配置的资源类型 3.外部化配置的核心 3.1 Environment 3.1.1.ConfigFileApplicationListener 3.1.2.关联 Spri ...
- Spring Boot 外部化配置(二) - @ConfigurationProperties 、@EnableConfigurationProperties
目录 3.外部化配置的核心 3.2 @ConfigurationProperties 3.2.1 注册 Properties 配置类 3.2.2 绑定配置属性 3.1.3 ConfigurationP ...
- 玩转Spring Boot 自定义配置、导入XML配置与外部化配置
玩转Spring Boot 自定义配置.导入XML配置与外部化配置 在这里我会全面介绍在Spring Boot里面如何自定义配置,更改Spring Boot默认的配置,以及介绍各配置的优先 ...
- Spring中的Environment外部化配置管理详解
Environment的中文意思是环境,它表示整个spring应用运行时的环境信息,它包含两个关键因素 profiles properties profiles profiles这个概念相信大家都已经 ...
- Spring配置文件外部化配置及.properties的通用方法
摘要:本文深入探讨了配置化文件(即.properties)的普遍应用方式.包括了Spring.一般的.远程的三种使用方案. 关键词:.properties, Spring, Disconf, Java ...
- Spring配置文件中如何使用外部配置文件配置数据库连接
直接在spring的配置文件中applicationContext.xml文件中配置数据库连接也可以,但是有个问题,需要在url后带着使用编码集和指定编码集,出现了如下问题,&这个符号报错-- ...
- spring外部化配置
例如 <bean id="dataSource" class="....." p:username="aa" p:password=& ...
- spring boot:在项目中引入第三方外部jar包集成为本地jar包(spring boot 2.3.2)
一,为什么要集成外部jar包? 不是所有的第三方库都会上传到mvnrepository, 这时我们如果想集成它的第三方库,则需要直接在项目中集成它们的jar包, 在操作上还是很简单的, 这里用luos ...
随机推荐
- php sprintf() 函数把格式化的字符串写入一个变量中。
来源:https://blog.csdn.net/zxh1220/article/details/79709207 HP sprintf() 函数用到的参数 printf — 输出格式化字符串 spr ...
- 2019-2020-1 20199325《Linux内核原理与分析》第十一周作业
实验简介: Set-UID 是 Unix 系统中的一个重要的安全机制.当一个 Set-UID 程序运行的时候,它被假设为具有拥有者的权限.例如,如果程序的拥有者是root,那么任何人运行这个程序时都会 ...
- 2019-2020-1 20199325《Linux内核原理与分析》第四周作业
start_kernel函数的执行过程 asmlinkage __visible void __init start_kernel(void) { char *command_line; char * ...
- SpringBoot中使用Fastjson/Jackson对JSON序列化格式化输出的若干问题
来源 :https://my.oschina.net/Adven/blog/3036567 使用springboot-web编写rest接口,接口需要返回json数据,目前国内比较常用的fastjso ...
- 使用react脚手架create-react-app创建react应用
Create React App是一种官方支持的创建单页React应用程序的方法.它提供了一个没有配置的现代构建设置. 一.全局安装脚手架: npm install -g create-react-a ...
- 比特大陆发布终端 AI 芯片 端云联手聚焦安防
雷帝网 乐天 10月17日报道 比特大陆今日正式发布终端人工智能芯片BM1880,一同发布的还有基于云端人工智能芯片 BM1682 的算丰智能服务器 SA3.嵌入式AI迷你机 SE3.3D 人脸识别智 ...
- BeanDefinition源码解析
我们知道BeanDefintion定义了Bean在IoC容器内的基本数据结构.在学习IoC之前先了解BeanDefition对我们理解IoC容器是有帮助的. 首先BeanDefinition是一个接口 ...
- Codeforces Round #587
题目链接:Round #587 题目答案:官方Editorial.My Solution A. Prefixes 题意:给一字符串,只含有'a'或'b',需要改变某些位置('a'变'b'或'b'变'a ...
- Nginx编译与安装
我的系统是CentOS-7,Nginx的源码可以在官网下载,网址为:http://nginx.org/en/download.html,我下载了目前的最新版本nginx-1.9.3.tar.gz 下载 ...
- 如何使用thrift 服务引擎组件
在本文中将介绍如果通过thrift 组件集成到surging 微服务引擎中,然后可以选择dotnetty 或thrift作为服务远程调用RPC,也可以通过其它语言的thrift 调用surging 服 ...
