SpringCloud入门(十): Config 统一配置中心
SpringCloud Config 简介
在分布式系统中,由于服务组件过多,为了方便争对不通的环境下的服务配置文件统一管理,实时更新,所以出现了分布式配置中心组件。市面上开源的配置中心有很多,360的QConf、淘宝的diamond、百度的disconf都是解决这类问题。国外也有很多开源的配置中心Apache的Apache Commons Configuration等。SpringCloud中选用的是SpringCloud Config。
SpringCloud Config分为Config Server和Config Client两部分,为分布式系统外部化配置提供了支持。 由于Config Server和Config Client都实现了对Spring Environment和PropertySource抽象的映射,因此SpringCloud Config非常适合Spring应用程序,当然也可与其他语言应用程序配合使用。
Config Server是一个可横向扩展、集中式的配置服务器,它用于集中管理应用程序各个环境下的配置(开发,测试,生产,灰度),默认使用Git存储配置内容(也可使用Subversion、本地文件系统或Vault存储配置),因此可以方便的实现对配置的版本控制与内容审计。 Config Client 是Config Server的客户端,用于操作存储在Config Server中的配置属性。
SpringCloud Config带来的便利
1、集中管理配置,通过Config来对集群中所有组件服务的配置信息进行集中管理;
2、争对不同的环境进行不同的配置(开发,联调,测试,灰度,生产);
3、运行期间可动态调整,根据服务器的负载情况动态的设置连接池信息或者熔断阈值;
4、配置修改后,不需要关闭服务可自动更新配置;
SpringCloud Config入门
1、申请一个自己的git仓库,将测试项目得yml或properties文件上传至Git目录;
2、构建Config Service
<!-- 、引入Jar包 -->

<dependency>

    <groupId>org.springframework.cloud</groupId>

    <artifactId>spring-cloud-config-server</artifactId>

</dependency>

<!-- 、配置属性信息 -->

server:

  port:

spring:

  application:

    name: ms-cfg-service

  cloud:

    config:

      server:

        git:

          uri: https://gitee.com/******/springcloudconfig.git

          username: ******

          password: ******

<!-- 3、加注解@EnableConfigServer -->
@SpringBootApplication
@EnableConfigServer
public class ConfigServiceApplication {

    public static void main(String[] args) {
        SpringApplication.run(ConfigServiceApplication.class, args);
    }
}
备注:配置文件有三种访问方式,分别是:
1)通过application-{profiles}.yml来访问,eg:http://localhost:8080/application-dev.yml
2)通过/application/{profiles}/{lable}来访问, eg:http://localhost:8080/application/dev/master
3)通过/{lable}/application-{profiles}.yml来访问,eg:http://localhost:8080/master/application-dev.yml
3、构建Config Client
<!-- 1. 引入Jar包 -->

<dependency>

    <groupId>org.springframework.cloud</groupId>

    <artifactId>spring-cloud-starter-config</artifactId>

</dependency>

<!-- 2. 创建配置文件bootstrap.yml -->

spring:

  application:

    name: application

  cloud:

    config:

      uri: http://localhost:8080/

      profile: dev

      label: master
备注: spring.application.name 对应访问规则中的{application}
spring.cloud.config.profile 对应访问规则中的{profiles}
spring.cloud.config.label 对应访问规则中的{lable}
SpringCloud config的常规用法
我们定义一个openTest开关,来控制业务逻辑代码走新的逻辑分支还是走老的业务逻辑分支
方法一:
<!-- 1、在属性文件中定义一个变量 -->

ycdhz.openTest=dev

<!-- 2、在代码中通过@Value注解引用 -->

@Value("${ycdhz.openTest}")

private String openTest;

public void findInfo(){

    if(openTest.equal("dev")){

        System.out.print("开发环境")

    } else if (openTest.equal("test")){

        System.out.print("测试环境")

    } else {

        System.out.print("生产环境")

    }

}

<!-- 3、修改属性文件,重启生效-->
方法二:
<!-- 1、再Client端工程,引入jar包 -->

<dependency>

    <groupId>org.springframework.boot</groupId>

    <artifactId>spring-boot-starter-actuator</artifactId>

</dependency>

<!-- 2、再Client端工程,开启refresh的监控端点 -->

management:

  endpoints:

    web:

      exposure:

        include: "*"   开启所有的端点

<!-- 3、在读取配置文件中的类上加入@RefreshScope -->

@RestController

@RequestMapping("/order")

@RefreshScope

public class OrderController {

    @Value("${openTest}")

    private String openTest;

}

<!-- 4、在git上修改openTest的配置文件 -->

通过Post请求,执行http://localhost:8001/actuator/refresh刷新接口
备注:不在需要重启,只需要通过Post执行刷新方法即可。但是当需要在集群中大面积修改的情况下依旧很繁琐,需要对每一个服务进行刷新。
方法三:
配置Config Client
<!-- 1、在client端工程,引入jar包 -->

<dependency>

    <groupId>org.springframework.cloud</groupId>

    <artifactId>spring-cloud-starter-bus-amqp</artifactId>

</dependency>

<dependency>

    <groupId>org.springframework.boot</groupId>

    <artifactId>spring-boot-starter-actuator</artifactId>

</dependency>

<!-- 2、在client端工程,配置属性 -->

spring:

  application:

    name: application

  cloud:

    config:

      uri: http://localhost:9000/

      label: master

  rabbitmq:

    host: ****IP地址****

    port: ****端口号****

    virtual-host: ****host名****

    username: root

    password: root

    connection-timeout: 10000

    template:

      mandatory: true

management:

  endpoints:

    web:

      exposure:

        include: "*"

  server:

    port: 8080
配置 config Service
<!-- 1、在Service端工程,引入jar包 -->

<dependency>

    <groupId>org.springframework.cloud</groupId>

    <artifactId>spring-cloud-starter-bus-amqp</artifactId>

</dependency>

<dependency>

    <groupId>org.springframework.boot</groupId>

    <artifactId>spring-boot-starter-actuator</artifactId>

</dependency>

<!-- 2、在Service端工程,配置属性 -->

server:

  port: 9000

spring:

  application:

    name: ms-cfg-service

  cloud:

    config:

      server:

        git:

          uri: https://gitee.com/******/springcloudconfig.git

          username: ******

          password: ******

  rabbitmq:

    host: ****IP地址****

    port: ****端口号****

    virtual-host: ****host名****

    username: root

    password: root

    connection-timeout: 10000

    template:

      mandatory: true

<!-- 3、在Git上更新配置信息,访问bus-refresh刷新服务配置 -->

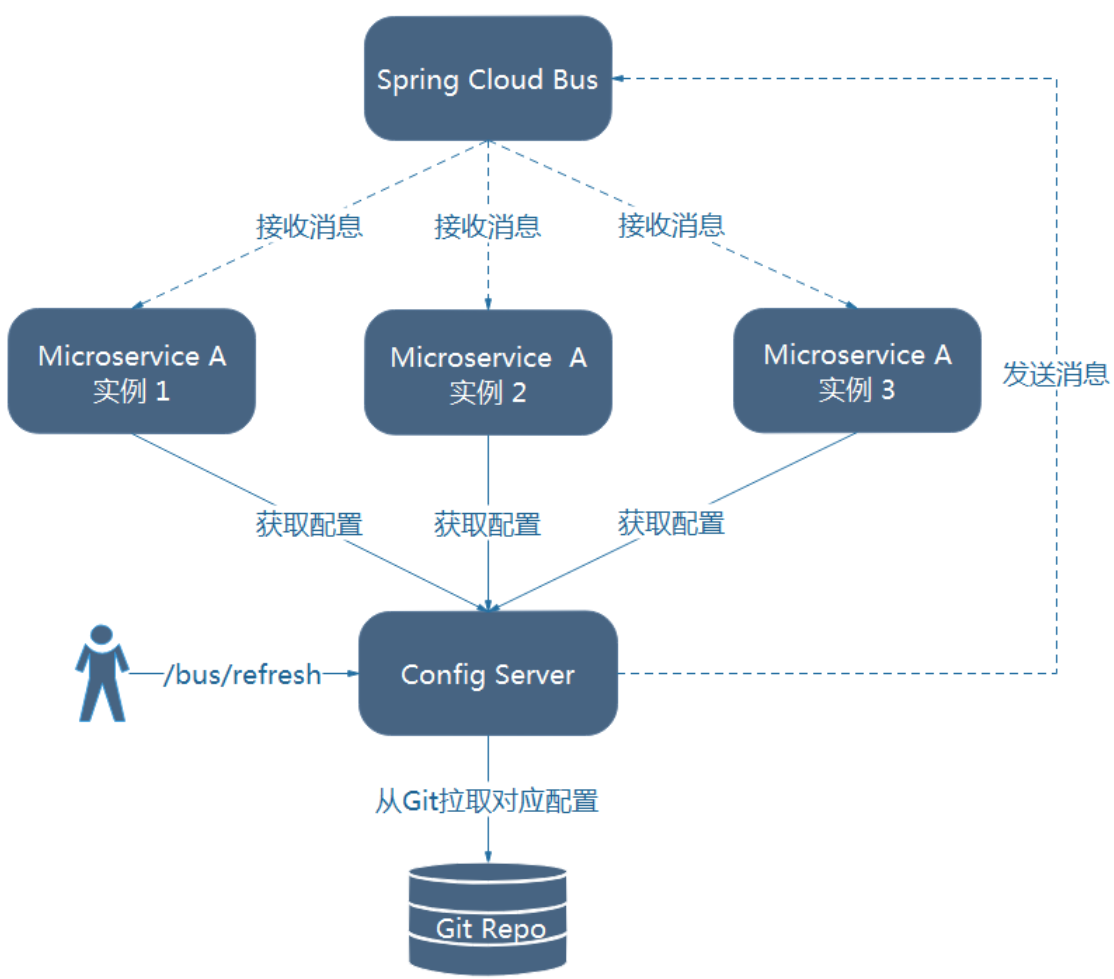
访问监控端点http://localhost:9000/actuator/bus-refresh刷新所有服务的配置信息
备注:使用消息总线bus来实现,不再需要去争对一个个服务组件做刷新。原理如图:

SpringCloud入门(十): Config 统一配置中心的更多相关文章
- SpringCloud学习之Config分布式配置中心(八)
统一配置中心概述 如果微服务架构中没有使用统一配置中心时,所存在的问题: 配置文件分散在各个项目里,不方便维护 配置内容安全与权限,实际开发中,开发人员是不知道线上环境的配置的 更新配置后,项目需要重 ...
- springcloud-spring cloud config统一配置中心
统一配置中心 为什么需要统一配置中心? 统一配置中心顾名思义,就是将配置统一管理,配置统一管理的好处是在日后大规模集群部署服务应用时相同的服务配置一致,日后再修改配置只需要统一修改全部同步,不需要一个 ...
- Spring Cloud第十篇 | 分布式配置中心Config
本文是Spring Cloud专栏的第十篇文章,了解前九篇文章内容有助于更好的理解本文: Spring Cloud第一篇 | Spring Cloud前言及其常用组件介绍概览 Spring Clo ...
- SpringCloud初体验:二、Config 统一配置管理中心
Spring Cloud Config : 配置管理工具包,让你可以把配置放到远程服务器,集中化管理集群配置,目前支持本地存储.Git以及Subversion. 配置中心也区分为服务端和客户端,本次体 ...
- 跟我学SpringCloud | 第六篇:Spring Cloud Config Github配置中心
SpringCloud系列教程 | 第六篇:Spring Cloud Config Github配置中心 Springboot: 2.1.6.RELEASE SpringCloud: Greenwic ...
- Spring Cloud之——Config(配置中心)
Spring Cloud Config(配置中心) 大家好,有一段时间没有写技术博客了.由于工作上的事情,这方面很难分配时间.近几年随着服务化的兴起,一批服务化的框架应运而生,像dubbo,thrif ...
- 基于ZK构建统一配置中心的方案和实践
背景: 近期使用Zk实现了一个简单的配置管理的小东西,在此开源出来,有兴趣的希望提出您的宝贵意见.如果恰巧您也使用或者接触过类似的东西, 也希望您可以分享下您觉得现在这个项目可以优化和改进的地方. 项 ...
- .NET Core微服务之基于Apollo实现统一配置中心
Tip: 此篇已加入.NET Core微服务基础系列文章索引 一.关于统一配置中心与Apollo 在微服务架构环境中,项目中配置文件比较繁杂,而且不同环境的不同配置修改相对频繁,每次发布都需要对应修改 ...
- Spring Cloud实战之初级入门(五)— 配置中心服务化与配置实时刷新
目录 1.环境介绍 2.配置中心服务化 2.1 改造mirco-service-spring-config 2.2 改造mirco-service-provider.mirco-service-con ...
随机推荐
- android studio 添加 apache.http
- Selenium系列(四) - 鼠标、键盘操作详细解读
如果你还想从头学起Selenium,可以看看这个系列的文章哦! https://www.cnblogs.com/poloyy/category/1680176.html 其次,如果你不懂前端基础知识, ...
- ASP.NET MVC升级到ASP.NET Core MVC踩坑小结
写在前面 ASP.NET Core是微软新推出的支持跨平台.高性能.开源的开发框架,它的优势不必多说,因为已经说得太多了.当然,现在依然有着数量庞大的系统运行于.NET Framework上,由于有大 ...
- 使用TensorFlow v2张量的一个简单的“hello world”示例
使用TensorFlow v2张量的一个简单的"hello world"示例 import tensorflow as tf # 创建一个张量 hello = tf.constan ...
- Java生鲜电商平台-电商中"再来一单"功能架构与详细设计(APP/小程序)
Java生鲜电商平台-电商中"再来一单"功能架构与详细设计(APP/小程序) 说明:在实际的业务场景中(无论是TO B还是TO C)不管是休闲食品.餐饮.水果.日用百货.母婴等高频 ...
- coding++:error Could not read JSON: Unexpected token (START_OBJECT), expected START_ARRAY: need JSON Array to contain As.WRAPPER_ARRAY type information for class java.lang.Object
Spring源码中是使用容器中的ObjectMapper对象进行序列化和反序列化. 当我们将自定义的ObjectMapper对象放入IOC容器中后,会自动覆盖SpringBoot自动装载的Object ...
- 如何理解EventLoop--浏览器篇
前言 最近在准备春招,刷到了JS中的主要运行机制--Event Loop,觉得它的实现思路有必要整理一下,以防忘记.关于它在浏览器上的实现,我结合了自己的理解以及示例代码,想用最通俗的语言表达出来.如 ...
- Oauth2.0详解,Oauth2.0协议原理
角色: RO (resource owner): 资源所有者,对资源具有授权能力的人,通常比喻为用户 RS (resource server): 资源服务器,存储资源.并处理对资源的访问请求 Clie ...
- x86汇编利用int 16h中断实现伪多线程输入
x86汇编利用int 16h中断实现伪多线程输入 我们都知道,如果想让一个程序,同时又干这个,又干那个,最好的办法就是多线程.这个在高级语言里面已经用烂了. 但是,DOS是只有单线程的.我如果想让程序 ...
- 在Android Studio中导入jar包
#1 下载jar包文件, #2 拷贝到libs目录下 #3 打开你的build.gradle,在dependencies加入如下代码 dependencies {compile files('libs ...
