SpringBoot | 第十章:Swagger2的集成和使用
前言
前一章节介绍了
mybatisPlus的集成和简单使用,本章节开始接着上一章节的用户表,进行Swagger2的集成。现在都奉行前后端分离开发和微服务大行其道,分微服务及前后端分离后,前后端开发的沟通成本就增加了。所以一款强大的RESTful API文档就至关重要了。而目前在后端领域,基本上是Swagger的天下了。
Swagger2介绍
Swagger是一款RESTful接口的文档在线自动生成、功能测试功能框架。一个规范和完整的框架,用于生成、描述、调用和可视化RESTful风格的Web服务,加上swagger-ui,可以有很好的呈现。

SpringBoot集成
这里选用的swagger版本为:2.8.0
0.pom依赖
    <!--swagger -->

    <dependency>

        <groupId>io.springfox</groupId>

        <artifactId>springfox-swagger2</artifactId>

        <version>2.8.0</version>

    </dependency>

    <dependency>

        <groupId>io.springfox</groupId>

        <artifactId>springfox-swagger-ui</artifactId>

        <version>2.8.0</version>

    </dependency>
1.编写配置文件(Swagger2Config.java)
主要是添加注解
@EnableSwagger2和定义Docket的bean类。
@EnableSwagger2

@Configuration

public class SwaggerConfig {

    //是否开启swagger,正式环境一般是需要关闭的,可根据springboot的多环境配置进行设置

    @Value(value = "${swagger.enabled}")

    Boolean swaggerEnabled;

    @Bean

    public Docket createRestApi() {

        return new Docket(DocumentationType.SWAGGER_2).apiInfo(apiInfo())

                // 是否开启

                .enable(swaggerEnabled).select()

                // 扫描的路径包

                .apis(RequestHandlerSelectors.basePackage("cn.lqdev.learning.springboot.chapter10"))

                // 指定路径处理PathSelectors.any()代表所有的路径

                .paths(PathSelectors.any()).build().pathMapping("/");

    }

    private ApiInfo apiInfo() {

        return new ApiInfoBuilder()

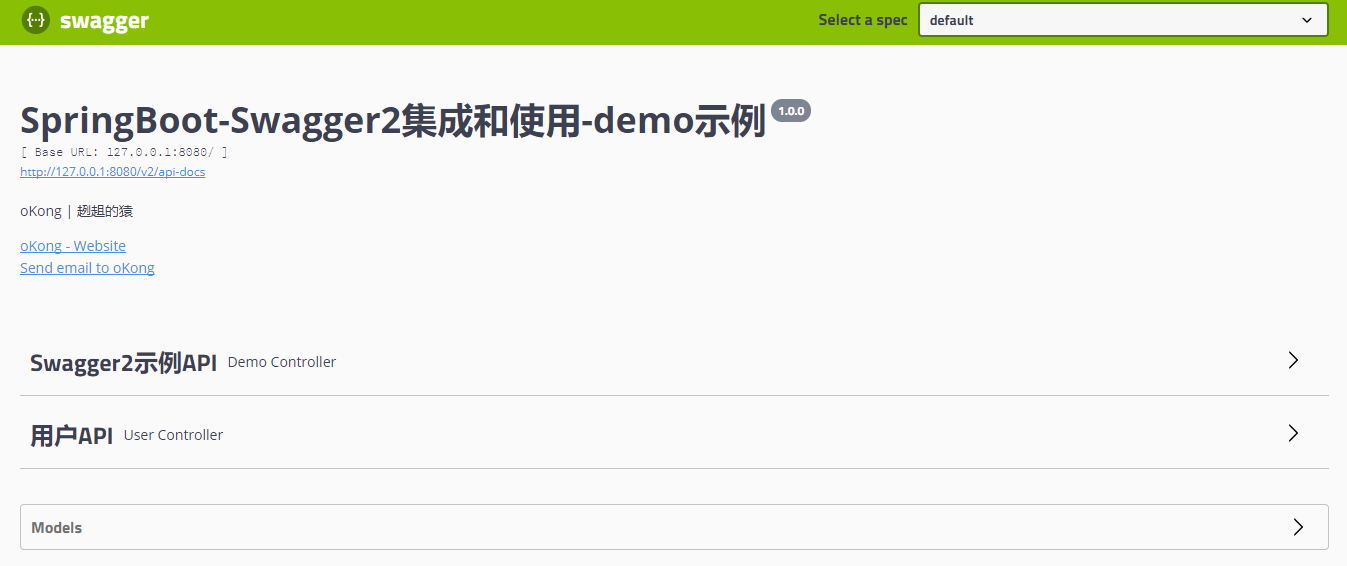
                .title("SpringBoot-Swagger2集成和使用-demo示例")

                .description("oKong | 趔趄的猿")

                // 作者信息

                .contact(new Contact("oKong", "https://blog.lqdev.cn/", "499452441@qq.com"))

                .version("1.0.0")

                .build();

    }

}
3.添加文档内容(一般上是在Controller,请求参数上进行注解,这里以上章节的UserController进行配置)
UserController
/**

 * 用户控制层 简单演示增删改查及分页

 * 新增了swagger文档内容 2018-07-21

 * @author oKong

 *

 */

@RestController

@RequestMapping("/user")

@Api(tags="用户API")

public class UserController {

    @Autowired

    IUserService userService;

    @PostMapping("add")

    @ApiOperation(value="用户新增")

    //正常业务时, 需要在user类里面进行事务控制,控制层一般不进行业务控制的。

    //@Transactional(rollbackFor = Exception.class)

    public Map<String,String> addUser(@Valid @RequestBody UserReq userReq){

        User user = new User();

        user.setCode(userReq.getCode());

        user.setName(userReq.getName());

        //由于设置了主键策略 id可不用赋值 会自动生成

        //user.setId(0L);

        userService.insert(user);

        Map<String,String> result = new HashMap<String,String>();

        result.put("respCode", "01");

        result.put("respMsg", "新增成功");

        //事务测试

        //System.out.println(1/0);

        return result;

    }

    @PostMapping("update")

    @ApiOperation(value="用户修改")

    public Map<String,String> updateUser(@Valid @RequestBody UserReq userReq){

        if(userReq.getId() == null || "".equals(userReq.getId())) {

            throw new CommonException("0000", "更新时ID不能为空");

        }

        User user = new User();

        user.setCode(userReq.getCode());

        user.setName(userReq.getName());

        user.setId(Long.parseLong(userReq.getId()));

        userService.updateById(user);

        Map<String,String> result = new HashMap<String,String>();

        result.put("respCode", "01");

        result.put("respMsg", "更新成功");

        return result;

    }

    @GetMapping("/get/{id}")

    @ApiOperation(value="用户查询(ID)")

    @ApiImplicitParam(name="id",value="查询ID",required=true)

    public Map<String,Object> getUser(@PathVariable("id") String id){

        //查询

        User user = userService.selectById(id);

        if(user == null) {

            throw new CommonException("0001", "用户ID:" + id + ",未找到");

        }

        UserResp resp = UserResp.builder()

                .id(user.getId().toString())

                .code(user.getCode())

                .name(user.getName())

                .status(user.getStatus())

                .build();

        Map<String,Object> result = new HashMap<String,Object>();

        result.put("respCode", "01");

        result.put("respMsg", "成功");

        result.put("data", resp);

        return result;

    }

    @GetMapping("/page")

    @ApiOperation(value="用户查询(分页)")

    public Map<String,Object> pageUser(int current, int size){

        //分页

        Page<User> page = new Page<>(current, size);

        Map<String,Object> result = new HashMap<String,Object>();

        result.put("respCode", "01");

        result.put("respMsg", "成功");

        result.put("data", userService.selectPage(page));

        return result;

    }

}
UserReq.java
@Data

@Builder

@NoArgsConstructor

@AllArgsConstructor

//加入@ApiModel

@ApiModel

public class UserReq {

    @ApiModelProperty(value="ID",dataType="String",name="ID",example="1020332806740959233")

    String id;

    @ApiModelProperty(value="编码",dataType="String",name="code",example="001")

    @NotBlank(message = "编码不能为空")

    String code;

    @ApiModelProperty(value="名称",dataType="String",name="name",example="oKong")

    @NotBlank(message = "名称不能为空")

    String name;

}
Swagger访问与使用
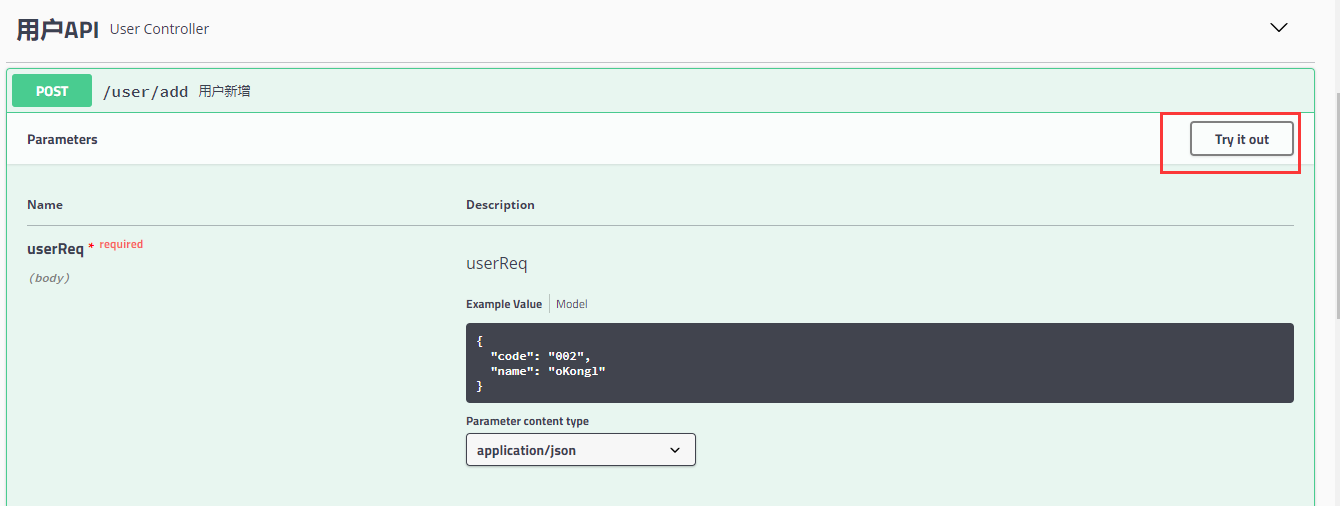
调试:点击需要访问的api列表,点击try it out!按钮,即可弹出一下页面:

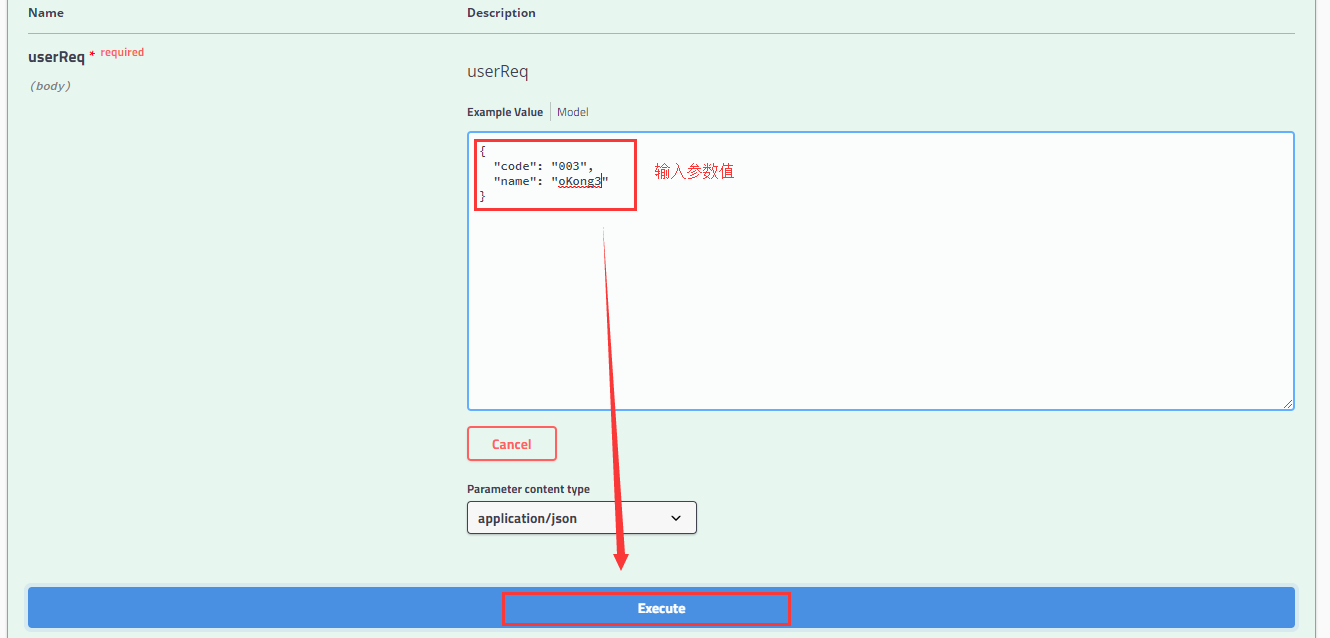
执行:

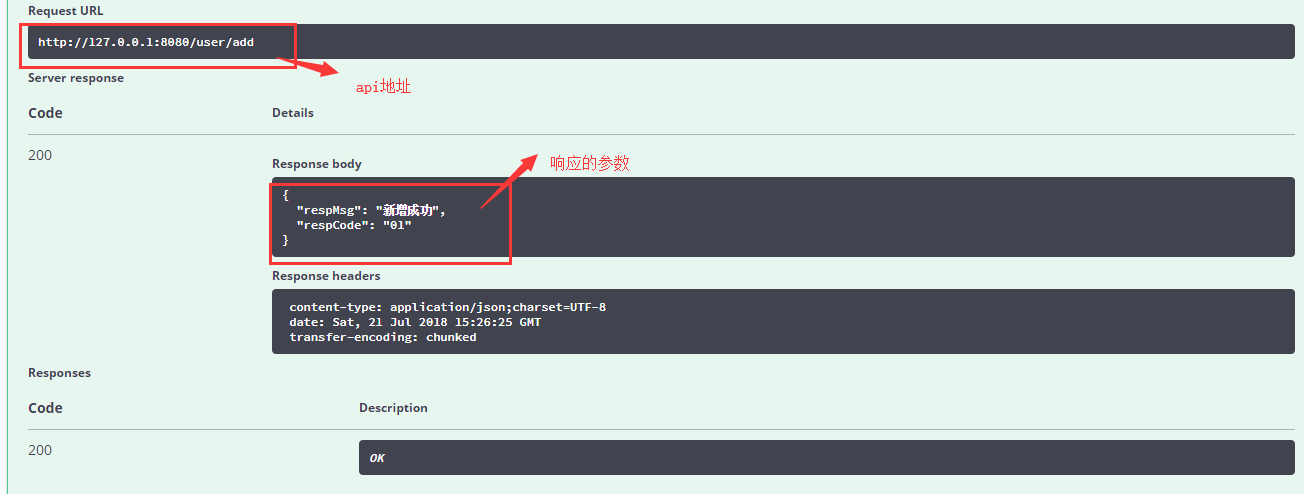
结果:

大家可下载示例,查看自定义的字符出现的位置,这样可以对其有个大致了解,各字段的作用领域是哪里。
Swagger常用属性说明
| 作用范围 | API | 使用位置 |
|---|---|---|
| 对象属性 | @ApiModelProperty | 用在出入参数对象的字段上 |
| 协议集描述 | @Api | 用于controller类上 |
| 协议描述 | @ApiOperation | 用在controller的方法上 |
| Response集 | @ApiResponses | 用在controller的方法上 |
| Response | @ApiResponse | 用在 @ApiResponses里边 |
| 非对象参数集 | @ApiImplicitParams | 用在controller的方法上 |
| 非对象参数描述 | @ApiImplicitParam | 用在@ApiImplicitParams的方法里边 |
| 描述返回对象的意义 | @ApiModel | 用在返回对象类上 |
常用的注解@Api、@ApiOperation、@ApiModel、@ApiModelProperty示例中有进行标注,对于其他注解,大家可自动谷歌,毕竟常用的就这几个了。有了swagger之后,原本一些post请求需要postman这样的调试工具来进行发起,而现在直接在页面上就可以进行调试了,是不是很爽!对于服务的调用者而已,有了这份api文档也是一目了然,不需要和后端多少沟通成本,按着api说明进行前端开发即可。
总结
本章节主要是对
Swagger的集成和简单使用进行了说明,详细的用法,可自行搜索相关资料下,这里就不阐述了。因为对于百分之八十之上的文档要求基本能满足了。一些比如前端根据swagger的api-docs进行前端的快速开发,这就需要实际情况实际约定了,比如快速的生成表单页等也是很方便的事情。最后,强烈建议在生产环境关闭swagger,避免不必要的漏洞暴露!
最后
目前互联网上很多大佬都有
SpringBoot系列教程,如有雷同,请多多包涵了。本文是作者在电脑前一字一句敲的,每一步都是实践的。若文中有所错误之处,还望提出,谢谢。
老生常谈
- 个人QQ:
499452441 - 微信公众号:
lqdevOps

完整示例:chapter-10
原文地址:http://blog.lqdev.cn/2018/07/21/springboot/chapter-ten/
SpringBoot | 第十章:Swagger2的集成和使用的更多相关文章
- springboot与swagger2的集成
springboot与swagger2的集成 1.出现的背景 随着互联网技术的发展,现在的网站架构基本都由原来的后端渲染变成了:前端渲染.先后端分离的形态,而前端和后端的唯一联系,变成了API接口: ...
- Springboot+swagger2.7集成开发
Springboot+swagger2.7集成开发 本篇文章是介绍最新的springboot和swagger2.7集成开发和2.0稍微有一些出入: Springboot集成环境配置 Swagger2. ...
- 基于Maven的Springboot+Mybatis+Druid+Swagger2+mybatis-generator框架环境搭建
基于Maven的Springboot+Mybatis+Druid+Swagger2+mybatis-generator框架环境搭建 前言 最近做回后台开发,重新抓起以前学过的SSM(Spring+Sp ...
- Springboot系列(七) 集成接口文档swagger,使用,测试
Springboot 配置接口文档swagger 往期推荐 SpringBoot系列(一)idea新建Springboot项目 SpringBoot系列(二)入门知识 springBoot系列(三)配 ...
- SpringBoot中Shiro使用Pac4j集成CAS认证
SpringBoot中Shiro使用Pac4j集成CAS认证 Pac4j 简介 Pac4j与Shiro,Spring Security一样都是权限框架,并且提供了OAuth - SAML - CAS ...
- SpringBoot系列(六)集成thymeleaf详解版
SpringBoot系列(六)集成thymeleaf详解版 1. thymeleaf简介 1. Thymeleaf是适用于Web和独立环境的现代服务器端Java模板引擎. 2. Thymeleaf ...
- CAS学习笔记五:SpringBoot自动/手动配置方式集成CAS单点登出
本文目标 基于SpringBoot + Maven 分别使用自动配置与手动配置过滤器方式实现CAS客户端登出及单点登出. 本文基于<CAS学习笔记三:SpringBoot自动/手动配置方式集成C ...
- 微服务学习二:springboot与swagger2的集成
现在测试都提倡自动化测试,那我们作为后台的开发人员,也得进步下啊,以前用postman来测试后台接口,那个麻烦啊,一个字母输错就导致测试失败,现在swagger的出现可谓是拯救了这些开发人员,便捷之处 ...
- 微服务:springboot与swagger2的集成
现在测试都提倡自动化测试,那我们作为后台的开发人员,也得进步下啊,以前用postman来测试后台接口,那个麻烦啊,一个字母输错就导致测试失败,现在swagger的出现可谓是拯救了这些开发人员,便捷之处 ...
随机推荐
- javascript如何判断手机是什么系统
做H5页面的时候,经常会用到判断手机是什么系统,根据系统的型号,实现不同的效果,那么如何判断显示页面的手机型号呢? (function(){ var isMobile={ Android:functi ...
- mongodb 修改操作
$addToSet与$each结合完成批量数组更新 db.text.update({_id:1000},{$addToSet:{books:{$each:["js","d ...
- elasticsearch 复合查询
常用查询 固定分数查询 127.0.0.1/_search(全文搜索) { "query":{ "match"{ "title":" ...
- 业务逻辑:完成客户下单后前台系统的数据处理并调用后台系统服务处理业务 webservice接口调用 有用
思路: 页面提交表单后,在Action类中将页面提交的参数进行组装,随后通过使用Webservice技术来远程调用后台系统的业务接口服务来进行订单的保存操作 操作步骤: 在前台系统的Action类中通 ...
- NIPT需要多大的数据量(reads number)?
NIPT需要多大的数据量(reads number)? 调研 2014 Noninvasive prenatal diagnosis of common aneuploidies by semicon ...
- Hibernate存储date/datetime问题,解决java的date与mysql的datetime不兼容
主要原因是出在Hibernate的配置文件中. 症状 1. java文件类型java.util.Date,数据库类型datetime,Hibernate配置文件用date,存储进数据库的时间只有年月日 ...
- 【机器学习】EM最大期望算法
EM, ExpectationMaximization Algorithm, 期望最大化算法.一种迭代算法,用于含有隐变量(hidden variable)的概率参数模型的最大似然估计或极大后验概率估 ...
- hdu1056
#include <cstdio> void main(){ double length; double l[300]; l[1] = 1.0/2; int i; for (i = 2;; ...
- Java实现WC基本功能
GitHub仓库:https://github.com/douyazai/WCbase 一.WC 项目要求 wc.exe 是一个常见的工具,它能统计文本文件的字符数.单词数和行数.这个项目要求写一个命 ...
- ASP.NET jquery 获取服务器控件ID
一般方法: jQuery("#txtUserName").val(); 如果页面加载了母版页或者自定义控件:该页面的ID有可能会被篡改(可能是因为避免控件ID冲突的机制),因此强烈 ...
