springMVC入门二
一、准备工作
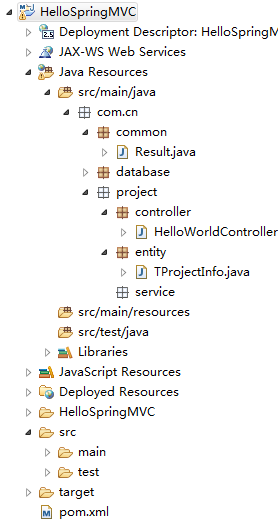
参考springMVC入门一,搭建maven项目如下:
前台结构如下:

项目介绍:使用springMVC实现前后台数据交互,例如controller返回json,页面传入pojo
二、具体代码
controller类:HelloWorldController
package com.cn.project.controller;

import java.util.ArrayList;

import java.util.List;

import org.springframework.stereotype.Controller;

import org.springframework.ui.Model;

import org.springframework.web.bind.annotation.RequestBody;

import org.springframework.web.bind.annotation.RequestMapping;

import org.springframework.web.bind.annotation.ResponseBody;

import com.cn.common.Result;

import com.cn.project.entity.TProjectInfo;

@Controller

public class HelloWorldController {

    /**

     * 返回json

     *  1、@ResponseBody

     *  2、引入 jackson包

     *  3、配置spring json转换器、或者spring驱动注解 <mvc:annotation-driven/>

     * @param model

     * @return

     */

    @RequestMapping("/hello1")   //访问http://localhost:8080/HelloSpringMVC/hello1

    @ResponseBody

    public List<TProjectInfo> query(Model model){

        List<TProjectInfo> projectInfos = new ArrayList<TProjectInfo>();

        projectInfos.add(new TProjectInfo("1", "项目1"));

        projectInfos.add(new TProjectInfo("2", "项目2"));

        projectInfos.add(new TProjectInfo("3", "项目3"));

        projectInfos.add(new TProjectInfo("4", "项目4"));

        projectInfos.add(new TProjectInfo("5", "项目5"));

        return projectInfos;  //前台接收:response.data

    }

    /**

     * 封装返回值与自定义状态码

     * @param model

     * @return

     */

    @RequestMapping("/hello2")   //访问http://localhost:8080/HelloSpringMVC/hello2

    @ResponseBody

    public Result query2(Model model){

        List<TProjectInfo> projectInfos = new ArrayList<TProjectInfo>();

        projectInfos.add(new TProjectInfo("1", "项目1"));

        projectInfos.add(new TProjectInfo("2", "项目2"));

        projectInfos.add(new TProjectInfo("3", "项目3"));

        projectInfos.add(new TProjectInfo("4", "项目4"));

        projectInfos.add(new TProjectInfo("5", "项目5"));

        return Result.ok().put("data", projectInfos);  //前台接收:response.data.data

    }

    /**

     * 前台传入pojo

     *  传入的是pojo的json字符串

     *      如data : angular.toJson($scope.project)

     *       data:'{"projectNo":"11","projectName":"22"}'

     *       data:JSON.stringify($scope.project)

     *       data:$scope.project

     *

     *  注意:@RequestBody json转pojo,pojo一定要有空的构造函数,否则,前台找不到路径

     *      "Content-Type": "application/json; charset=UTF-8"

     * @param projectInfo

     * @return

     */

    @RequestMapping("/insert")

    @ResponseBody

    public void insert(@RequestBody TProjectInfo projectInfo){

        System.out.println(projectInfo);

    }

    /**

     * 前台传入 json字符串

     *     data:$.param({jsonStr:JSON.stringify($scope.project)})  //后台接收String jsonStr

     *

     * 注意:content-type:application/x-www-form-urlencoded

     *

     * @param jsonStr

     */

    @RequestMapping("/insert2")

    @ResponseBody

    public void insert2(String jsonStr){

        System.out.println(jsonStr);

    }

    /**

     * 返回字符串

     * @param model

     * @return

     */

    @RequestMapping("/hello")   //访问http://localhost:8080/HelloSpringMVC/hello

    public String hay(Model model){

        model.addAttribute("greeting","hello Spring MVC");  //jsp页面接收 ${greeting}

        return "index";  //跳转到 index.html  页面需要遵循 spring视图配置

    }

}
html页面:project.html
<!DOCTYPE html>

<html>

<head>

<!-- 兼容edge页面 -->

<meta http-equiv="X-UA-Compatible" content="IE=edge">

<title>Insert title here</title>

<link href="../css/bootstrap.min.css" rel="stylesheet">

</head>

<body data-ng-app="projectApp" data-ng-controller="projectCtrl">

    <div class="container-fluid" ng-if="cx">

        <!-- 面包屑  -->

        <ol class="breadcrumb">

            <li><a href="#">Home</a></li>

            <li><a href="#">人员管理</a></li>

            <li class="active">人员查询</li>

        </ol>

        <!-- 查询条件 -->

        <form class="form-inline" role="form">

            <div class="form-group">

                <label for="" class="control-label">姓名:</label> <input type="text"

                    class="form-control" id="" placeholder="" ng-model="usreName">

            </div>

            <div class="form-group">

                <label for="" class="control-label">身份证号:</label> <input type="text"

                    class="form-control" id="" placeholder="" ng-model="passPort">

            </div>

            <div class="form-group">

                <button type="button" class="btn btn-success" ng-click="query()">查询</button>

                <button type="reset" class="btn btn-success" ng-click="reset()">重置</button>

            </div>

            <div class="form-group">

                <button type="button" class="btn btn-success" ng-click="add()">新增</button>

            </div>

        </form>

        <!-- 查询结果  -->

        <div class="row-fluid">

            <div class="span12">

                <table class="table">

                    <thead>

                        <tr>

                            <th>编号</th>

                            <th>项目号</th>

                            <th>项目名称</th>

                        </tr>

                    </thead>

                    <tbody>

                        <tr data-ng-repeat="x in dataItems" repeat-finish href="#">

                            <td ng-bind="$index + 1"></td>

                            <td>

                                <div ng-bind=x.projectNo></div>

                            </td>

                            <td>

                                <div ng-bind=x.projectName></div>

                            </td>

                        </tr>

                    </tbody>

                </table>

            </div>

        </div>

    </div>

    <!-- 编辑页 -->

    <div ng-if="xz">

        <form class="form-inline" role="form">

            <div class="form-group">

                <label for="" class="control-label">项目号:</label> <input type="text"

                    class="form-control" id="" placeholder="" ng-model="project.projectNo">

            </div>

            <div class="form-group">

                <label for="" class="control-label">项目名称:</label> <input type="text"

                    class="form-control" id="" placeholder="" ng-model="project.projectName">

            </div>

        </form>

        <div>

            <div class="form-group">

                <button type="button" class="btn btn-success" ng-click="save()">保存</button>

            </div>

        </div>

    </div>

</body>

<script src="../js/lib/jquery.min.js"></script>

<script src="../js/lib/bootstrap.min.js"></script>

<script src="../js/lib/angular-1.3.1.min.js"></script>

<script>

var app = angular.module('projectApp', []);

app.controller('projectCtrl',function($scope,$http) {

    //变量设置

    $scope.cx = true;

    $scope.project={};  //保证修改页面$scope.project能取到值

    //查询方法

    $scope.query = function() {

        $http(

                {

                    method : 'POST',

                    headers : {

                        "Content-Type": "application/x-www-form-urlencoded; charset=UTF-8"  //或者application/json  x-www-form-urlencoded

                    },

                    url : '../hello1',

                    data :''

                })

                .then(

                        function successCallback(response) {

                            debugger;

                            console.log(response);

                            $scope.dataItems = response.data;

                        },

                        function errorCallback(response) {

                            debugger;

                            alert("查询失败");

                        });

    }

    $scope.add = function(){

        $scope.cx = false;

        $scope.xz = true;

    }

    //保存方法

    $scope.save = function() {

        debugger;

        $http(

                {

                    method : 'POST',

                    headers : {

                        "Content-Type": "application/json; charset=UTF-8"  //或者application/json

                    },

                    url : '../insert',

                    //data : angular.toJson($scope.project)  //"{"projectNo":"11","projectName":"22"}"

                    //data:'{"projectNo":"11","projectName":"22"}'

                    //data:$.param({jsonStr:JSON.stringify($scope.project)})  //后台接收String jsonStr,注意:content-type:application/x-www-form-urlencoded

                    //data:JSON.stringify($scope.project),  //"{"projectNo":"11","projectName":"22"}"

                    data:$scope.project

                })

                .then(

                        function successCallback(response) {

                            debugger;

                            alert("新增成功");

                        },

                        function errorCallback(response) {

                            debugger;

                            alert("新增失败");

                        });

    }

});

</script>

</html>
springMVC配置:spring-mvc-servlet.xml
<?xml version="1.0" encoding="UTF-8"?>

<beans xmlns="http://www.springframework.org/schema/beans"

    xmlns:xsi="http://www.w3.org/2001/XMLSchema-instance" xmlns:p="http://www.springframework.org/schema/p"

    xmlns:context="http://www.springframework.org/schema/context"

    xmlns:mvc="http://www.springframework.org/schema/mvc"

    xsi:schemaLocation="http://www.springframework.org/schema/beans

      http://www.springframework.org/schema/beans/spring-beans-4.1.xsd

      http://www.springframework.org/schema/context

      http://www.springframework.org/schema/context/spring-context-4.1.xsd

      http://www.springframework.org/schema/mvc

      http://www.springframework.org/schema/mvc/spring-mvc-4.1.xsd">

    <!-- 自动扫描注解 -->

    <context:component-scan base-package="com.cn"/>

    <!--

        处理静态资源,如img等,这类资源不通过DispatcherServlet转发,由容器自己处理

        <mvc:default-servlet-handler default-servlet-name="所使用的Web服务器默认使用的Servlet名称" />

        对静态资源文件的访问

        <mvc:resources mapping="/img/**" location="/img/" />

     -->

    <mvc:default-servlet-handler />

    <!-- <mvc:resources /> -->

    <!--

        使用注解时需要配置这个,springMVC为@Controller分发请求所必须的

     -->

    <mvc:annotation-driven/>

    <!-- <mvc:annotation-driven /> 该配置会默认注入以下两个bean,如果需要对以下bean进行修改,需要显示的注入这两个bean -->

    <!-- <bean class="org.springframework.web.servlet.mvc.annotation.DefaultAnnotationHandlerMapping" /> -->

    <!-- spring MVC提供的适配器 spring默认加载 (如果不修改默认加载的4类转换器,该bean可不配置)-->

    <!-- <bean class="org.springframework.web.servlet.mvc.annotation.AnnotationMethodHandlerAdapter">

        <property name="messageConverters">

            该适配器默认加载以下4类转换器,spring提供了很多转换器

            <list>

                <bean class="org.springframework.http.converter.BufferedImageHttpMessageConverter" />

                <bean class="org.springframework.http.converter.ByteArrayHttpMessageConverter" />

                <bean class="org.springframework.http.converter.xml.SourceHttpMessageConverter" />

                <bean class="org.springframework.http.converter.xml.XmlAwareFormHttpMessageConverter" />

                前台json传后台,否则报415

                <bean class="org.springframework.http.converter.StringHttpMessageConverter" />

                controller返回json

                <bean class="org.springframework.http.converter.json.MappingJackson2HttpMessageConverter">

                    <property name="supportedMediaTypes">

                        <list>

                            <value>application/json;charset=UTF-8</value>

                        </list>

                    </property>

                </bean>

            </list>

        </property>

    </bean> -->

    <!--

        视图控制器:

            如果返回的是视图逻辑名称,如success,那么视图解析器就必须配置

            如果返回的是真实视图名称,如/index.jsp,那么视图解析器为可选配置

     -->

    <bean class="org.springframework.web.servlet.view.InternalResourceViewResolver">

        <property name="prefix" value="/html/" />  <!-- 前缀 -->

        <property name="suffix" value=".html" />     <!-- 后缀 -->

    </bean>

</beans>
web.xml配置:
<?xml version="1.0" encoding="UTF-8"?>

<web-app version="2.5" xmlns="http://java.sun.com/xml/ns/javaee"

    xmlns:xsi="http://www.w3.org/2001/XMLSchema-instance"

    xsi:schemaLocation="http://java.sun.com/xml/ns/javaee

http://java.sun.com/xml/ns/javaee/web-app_2_5.xsd" id="WebApp_ID">

    <display-name>HelloSpringMVC</display-name>

    <servlet>

        <!-- 加载springmvc配置: 1、这里的servlet-name默认指向“spring-mvc-servlet.xml” 2、手动指定:<init-param> -->

        <servlet-name>spring-mvc</servlet-name>

        <servlet-class>org.springframework.web.servlet.DispatcherServlet</servlet-class>

        <!-- <init-param> <param-name>contextConfigLocation</param-name> <param-value>classpath:spring-mvc-servlet.xml</param-value>

            </init-param> -->

        <!-- <load-on-startup>:容器启动时,加载这个servlet的顺序 取值:0,1,2,3... 数字越小,越先加载 -->

        <load-on-startup>1</load-on-startup>

    </servlet>

    <!-- url-pattern:servlet访问地址url配置 /* path.endsWith("/*") *. path.starsWith("*.")

        / path.equals("/") 其他 -->

    <servlet-mapping>

        <servlet-name>spring-mvc</servlet-name>

        <url-pattern>/</url-pattern>

    </servlet-mapping>

    <!-- 加载其他的xml配置 -->

    <context-param>

        <param-name>contextConfigLocation</param-name>

        <param-value>/WEB-INF/root-context.xml</param-value>

    </context-param>

    <!-- Spring 监听器 -->

    <listener>

        <listener-class>org.springframework.web.context.ContextLoaderListener</listener-class>

    </listener>

    <!-- 页面编码设置 -->

    <filter>

        <filter-name>encodingFilter</filter-name>

        <filter-class>org.springframework.web.filter.CharacterEncodingFilter</filter-class>

        <init-param>

            <param-name>encoding</param-name>

            <param-value>UTF-8</param-value>

        </init-param>

        <init-param>

            <param-name>forceEncoding</param-name>

            <param-value>true</param-value>

        </init-param>

    </filter>

    <filter-mapping>

        <filter-name>encodingFilter</filter-name>

        <url-pattern>/*</url-pattern>

    </filter-mapping>

    <welcome-file-list>

        <welcome-file>index.html</welcome-file>

        <welcome-file>index.htm</welcome-file>

        <welcome-file>index.jsp</welcome-file>

        <welcome-file>default.html</welcome-file>

        <welcome-file>default.htm</welcome-file>

        <welcome-file>default.jsp</welcome-file>

    </welcome-file-list>

</web-app>
controller返回封装类:Result.java
package com.cn.common;

import java.util.HashMap;

import java.util.Map;

/**

 * 返回数据封装类

 *

 */

public class Result extends HashMap<String, Object> {

    private static final long serialVersionUID = 1L;

    public Result() {

        this.put("code", 0);

    }

    public static Result error() {

        return error(500, "未知异常,请联系管理员");

    }

    public static Result error(String msg) {

        return error(500, msg);

    }

    public static Result error(int code, String msg) {

        Result r = new Result();

        r.put("code", code);

        r.put("msg", msg);

        return r;

    }

    public static Result ok(String msg) {

        Result r = new Result();

        r.put("msg", msg);

        return r;

    }

    public static Result ok(Map<String, Object> map) {

        Result r = new Result();

        r.putAll(map);

        return r;

    }

    public static Result ok() {

        return new Result();

    }

    public Result put(String key, Object value) {

        super.put(key, value);

        return this;

    }

}
三、页面访问

springMVC入门二的更多相关文章
- SpringMVC入门二: 1规范结构, 2简单整合MyBatis
昨天拿springMVC写的helloworld结构不好, 这次先调整一下体系结构 , 然后简单整合一下MyBatis spring的配置还是以注解为主, 不过MyBatis的映射文件什么的还是拿xm ...
- springMvc 入门二
目的:请求参数接受,输出,常见的注解(在上一篇入门1基础上) 1:请求参数的绑定 1.1绑定的机制 表单中请求参数都是基于key=value的. SpringMVC绑定请求参数的过程是通过把表单提交请 ...
- SpringMVC入门二:SSM整合(spring+springmvc+mybatis)
一.编程步骤 1.引入依赖 spring.springmvc.mybatis.mybatis-spring.mysql.druid.log4j.servlet-api.jstl.fastjson 2. ...
- SpringMvc入门二----HelloWorld
1. 导入需要的架包: 2. 配置web.xml,添加Servlet <servlet> <servlet-name>springmvc</servlet-name> ...
- <SpringMvc>入门二 常用注解
1.@RequestMapping @Target({ElementType.METHOD, ElementType.TYPE}) @Retention(RetentionPolicy.RUNTIME ...
- Spring+SpringMVC+MyBatis深入学习及搭建(十二)——SpringMVC入门程序(一)
转载请注明出处:http://www.cnblogs.com/Joanna-Yan/p/6999743.html 前面讲到:Spring+SpringMVC+MyBatis深入学习及搭建(十一)——S ...
- SpringMVC入门学习(二)
SpringMVC入门学习(二) ssm框架 springMVC 在上一篇博客中,我简单介绍了一下SpringMVC的环境配置,和简单的使用,今天我们将进一步的学习下Springmvc的操作. mo ...
- SpringMVC.入门篇《二》form表单
SpringMVC.入门篇<二>form表单 项目工程结构: 在<springmvc入门篇一.HelloWorld>基础上继续添加代码,新增:FormController.ja ...
- Java开发学习(二十三)----SpringMVC入门案例、工作流程解析及设置bean加载控制
一.SpringMVC概述 SpringMVC是隶属于Spring框架的一部分,主要是用来进行Web开发,是对Servlet进行了封装.SpringMVC是处于Web层的框架,所以其主要的作用就是用来 ...
随机推荐
- 错误处理(Operation Result)方法
自己开发的公众号,可以领取淘宝内部优惠券 问题 现在有一个FileStorageService类,继承自IStorageService,具体实现如下 public interface IStorage ...
- [Java][Liferay] 如何从Javascript的function中获取language property的值
问题描述 在Portlet中,Javascript中通过Liferay.Language.get("key")的方式是拿不到自己添加的property的值,原因是Liferay.L ...
- Controller的使用
- Jquery插件之ajaxForm简介
我们平常在使用jQuery异步提交表单的时候,一般都是加载在submit事件中,如下所示: $(document).ready(function(){ $('#myForm').submit(func ...
- Lua相关函数整理
1.asset(a==b,tipmsg);错误处理 2.pcall,xpcall,debug,保护函数执行,并且查看相关信息 3.collectgarbage()函数相关: collectgarbag ...
- Azure 2 月新公布
Azure 2 月新发布:关于虚机和云服务的降价通告,Azure SQL 数据仓库正式发布,Microsoft 认知服务:人脸识别 API 定价模式和名称更新,以及计量名称变更 关于虚机和云服务的降价 ...
- 解析Excel文件 Apache POI框架使用
本文整理了,使用Apache POI 框架解析.读取Excel文件,过程中,程序代码出现的一些问题,并解决 1..xls 和 .xlsx 我们知道Excel文档,在Windows下,分为Excel20 ...
- 如何获得C4C里某个code字段对应的描述信息
通过我这篇文章介绍的方法使用C4C OData服务去取服务订单数据(Sales Order): 如何用代码的方式取出SAP C4C销售订单创建后所有业务伙伴的数据 https://www.jiansh ...
- Recent plan + Summary (two weeks)
Plan: Homework: B365 (next week) B392, B335 Interview: Friday, do the assignment Thursday Summary: I ...
- OpenCV视觉库
视频会议软件的视频质量除了与外置设备.编码器相关外,还与视频的后处理技术相关,视频图像通过后处理技术,如图像增强.图像去噪等,图像质量会得到主观上较大的提高.而我们通常的视频后处理技术会采用开源的项目 ...