【Java并发编程实战】-----“J.U.C”:Semaphore
信号量Semaphore是一个控制访问多个共享资源的计数器,它本质上是一个“共享锁”。
Java并发提供了两种加锁模式:共享锁和独占锁。前面LZ介绍的ReentrantLock就是独占锁。对于独占锁而言,它每次只能有一个线程持有,而共享锁则不同,它允许多个线程并行持有锁,并发访问共享资源。
独占锁它所采用的是一种悲观的加锁策略, 对于写而言为了避免冲突独占是必须的,但是对于读就没有必要了,因为它不会影响数据的一致性。如果某个只读线程获取独占锁,则其他读线程都只能等待了,这种情况下就限制了不必要的并发性,降低了吞吐量。而共享锁则不同,它放宽了加锁的条件,采用了乐观锁机制,它是允许多个读线程同时访问同一个共享资源的。
Semaphore简介
Semaphore,在API中是这样介绍的,一个计数信号量。从概念上讲,信号量维护了一个许可集。如有必要,在许可可用前会阻塞每一个 acquire(),然后再获取该许可。每个 release() 添加一个许可,从而可能释放一个正在阻塞的获取者。但是,不使用实际的许可对象,Semaphore 只对可用许可的号码进行计数,并采取相应的行动。
Semaphore 通常用于限制可以访问某些资源(物理或逻辑的)的线程数目。下面LZ以理发为例来简述Semaphore。
为了简单起见,我们假设只有三个理发师、一个接待人。一开始来了五个客人,接待人则安排三个客人进行理发,其余两个人必须在那里等着,此后每个来理发店的人都必须等待。一段时间后,一个理发师完成理发后,接待人则安排另一个人(公平还是非公平机制呢??)来理发。在这里理发师则相当于公共资源,接待人则相当于信号量(Semaphore),客户相当于线程。
进一步讲,我们确定信号量Semaphore是一个非负整数(>=1)。当一个线程想要访问某个共享资源时,它必须要先获取Semaphore,当Semaphore >0时,获取该资源并使Semaphore – 1。如果Semaphore值 = 0,则表示全部的共享资源已经被其他线程全部占用,线程必须要等待其他线程释放资源。当线程释放资源时,Semaphore则+1;
当信号量Semaphore = 1 时,它可以当作互斥锁使用。其中0、1就相当于它的状态,当=1时表示其他线程可以获取,当=0时,排他,即其他线程必须要等待。
Semaphore源码分析
Semaphore的结构如下:
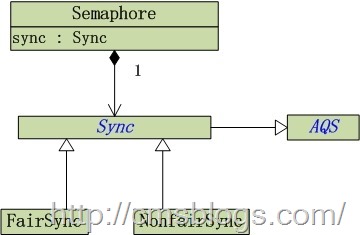
从上面可以看出,Semaphore和ReentrantLock一样,都是包含公平锁(FairySync)和非公平锁(NonfairSync),两个锁都是继承Sync,而Sync也是继承自AQS。其构造函数如下:
- /**
- * 创建具有给定的许可数和非公平的公平设置的 Semaphore。
- */
- public Semaphore(int permits) {
- sync = new NonfairSync(permits);
- }
- /**
- * 创建具有给定的许可数和给定的公平设置的 Semaphore。
- */
- public Semaphore(int permits, boolean fair) {
- sync = fair ? new FairSync(permits) : new NonfairSync(permits);
- }
信号量的获取:acquire()
在ReentrantLock中已经阐述过,公平锁和非公平锁获取锁机制的差别:对于公平锁而言,如果当前线程不在CLH队列的头部,则需要排队等候,而非公平锁则不同,它无论当前线程处于CLH队列的何处都会直接获取锁。所以公平信号量和非公平信号量的区别也一样。
- public void acquire() throws InterruptedException {
- sync.acquireSharedInterruptibly(1);
- }
- public final void acquireSharedInterruptibly(int arg)
- throws InterruptedException {
- if (Thread.interrupted())
- throw new InterruptedException();
- if (tryAcquireShared(arg) < 0)
- doAcquireSharedInterruptibly(arg);
- }
对于公平信号量和非公平信号量,他们机制的差异就体现在traAcquireShared()方法中:
公平锁
- protected int tryAcquireShared(int acquires) {
- for (;;) {
- //判断该线程是否位于CLH队列的列头,如果是的话返回 -1,调用doAcquireSharedInterruptibly()
- if (hasQueuedPredecessors())
- return -1;
- //获取当前的信号量许可
- int available = getState();
- //设置“获得acquires个信号量许可之后,剩余的信号量许可数”
- int remaining = available - acquires;
- //如果剩余信号量 > 0 ,则设置“可获取的信号量”为remaining
- if (remaining < 0 || compareAndSetState(available, remaining))
- return remaining;
- }
- }
tryAcquireShared是尝试获取 信号量,remaining表示下次可获取的信号量。
对于hasQueuedPredecessors、compareAndSetState在ReentrantLock中已经阐述了,hasQueuedPredecessors用于判断该线程是否位于CLH队列列头,compareAndSetState用于设置state的,它是进行原子操作的。代码如下:
- public final boolean hasQueuedPredecessors() {
- Node t = tail; // Read fields in reverse initialization order
- Node h = head;
- Node s;
- return h != t &&
- ((s = h.next) == null || s.thread != Thread.currentThread());
- }
- protected final boolean compareAndSetState(int expect, int update) {
- return unsafe.compareAndSwapInt(this, stateOffset, expect, update);
- }
doAcquireSharedInterruptibly源代码如下:
- private void doAcquireSharedInterruptibly(int arg)
- throws InterruptedException {
- /*
- * 创建CLH队列的node节点,Node.SHARED表示该节点为共享锁
- */
- final Node node = addWaiter(Node.SHARED);
- boolean failed = true;
- try {
- for (;;) {
- //获取该节点的前继节点
- final Node p = node.predecessor();
- //当p为头节点时,基于公平锁机制,线程尝试获取锁
- if (p == head) {
- //尝试获取锁
- int r = tryAcquireShared(arg);
- if (r >= 0) {
- setHeadAndPropagate(node, r);
- p.next = null; // help GC
- failed = false;
- return;
- }
- }
- //判断当前线程是否需要阻塞,如果阻塞的话,则一直处于阻塞状态知道获取共享锁为止
- if (shouldParkAfterFailedAcquire(p, node) &&
- parkAndCheckInterrupt())
- throw new InterruptedException();
- }
- } finally {
- if (failed)
- cancelAcquire(node);
- }
- }
doAcquireSharedInterruptibly主要是做两个工作;1、尝试获取共享锁,2、阻塞线程直到线程获取共享锁。
addWaiter(Node.SHARED):创建”当前线程“的Node节点,且Node中记录的锁的类型是”共享锁“(Node.SHARED);并将该节点添加到CLH队列末尾。
shouldParkAfterFailedAcquire:如果在尝试获取锁失败之后,线程应该等待,返回true;否则返回false。
parkAndCheckInterrupt:当前线程会进入等待状态,直到获取到共享锁才继续运行。
对于addWaiter、shouldParkAfterFailedAcquire、parkAndCheckInterruptLZ在“【Java并发编程实战】-----“J.U.C”:ReentrantLock之二lock方法分析”中详细介绍了。
非公平锁
对于非公平锁就简单多了,她没有那些所谓的要判断是不是CLH队列的列头,如下:
- final int nonfairTryAcquireShared(int acquires) {
- for (;;) {
- int available = getState();
- int remaining = available - acquires;
- if (remaining < 0 ||
- compareAndSetState(available, remaining))
- return remaining;
- }
- }
在非公平锁中,tryAcquireShared直接调用AQS的nonfairTryAcquireShared()。通过上面的代码我可看到非公平锁并没有通过if (hasQueuedPredecessors())这样的条件来判断该节点是否为CLH队列的头节点,而是直接判断信号量。
信号量的释放:release()
信号量Semaphore的释放和获取不同,它没有分公平锁和非公平锁。如下:
- public void release() {
- sync.releaseShared(1);
- }
- public final boolean releaseShared(int arg) {
- //尝试释放共享锁
- if (tryReleaseShared(arg)) {
- doReleaseShared();
- return true;
- }
- return false;
- }
release()释放线索所占有的共享锁,它首先通过tryReleaseShared尝试释放共享锁,如果成功直接返回,如果失败则调用doReleaseShared来释放共享锁。
tryReleaseShared:
- protected final boolean tryReleaseShared(int releases) {
- for (;;) {
- int current = getState();
- //信号量的许可数 = 当前信号许可数 + 待释放的信号许可数
- int next = current + releases;
- if (next < current) // overflow
- throw new Error("Maximum permit count exceeded");
- //设置可获取的信号许可数为next
- if (compareAndSetState(current, next))
- return true;
- }
- }
doReleaseShared:
- private void doReleaseShared() {
- for (;;) {
- //node 头节点
- Node h = head;
- //h != null,且h != 尾节点
- if (h != null && h != tail) {
- //获取h节点对应线程的状态
- int ws = h.waitStatus;
- //若h节点状态为SIGNAL,表示h节点的下一个节点需要被唤醒
- if (ws == Node.SIGNAL) {
- //设置h节点状态
- if (!compareAndSetWaitStatus(h, Node.SIGNAL, 0))
- continue;
- //唤醒h节点对应的下一个节点
- unparkSuccessor(h);
- }
- //若h节点对应的状态== 0 ,则设置“文件点对应的线程所拥有的共享锁”为其它线程获取锁的空状态
- else if (ws == 0 &&
- !compareAndSetWaitStatus(h, 0, Node.PROPAGATE))
- continue;
- }
- //h == head时,则退出循环,若h节点发生改变时则循环继续
- if (h == head)
- break;
- }
- }
在这里有关的方法,请参考:【Java并发编程实战】-----“J.U.C”:ReentrantLock之三unlock方法分析。
实例
该实例来源于《java7并发编程实战手册》
打印任务:
- public class PrintQueue {
- private final Semaphore semaphore; //声明信号量
- public PrintQueue(){
- semaphore = new Semaphore(1);
- }
- public void printJob(Object document){
- try {
- semaphore.acquire();//调用acquire获取信号量
- long duration = (long) (Math.random() * 10);
- System.out.println( Thread.currentThread().getName() +
- "PrintQueue : Printing a job during " + duration);
- Thread.sleep(duration);
- } catch (InterruptedException e) {
- e.printStackTrace();
- } finally{
- semaphore.release(); //释放信号量
- }
- }
- }
Job:
- public class Job implements Runnable{
- private PrintQueue printQueue;
- public Job(PrintQueue printQueue){
- this.printQueue = printQueue;
- }
- @Override
- public void run() {
- System.out.println(Thread.currentThread().getName() + " Going to print a job");
- printQueue.printJob(new Object());
- System.out.println(Thread.currentThread().getName() + " the document has bean printed");
- }
- }
Test:
- public class Test {
- public static void main(String[] args) {
- Thread[] threads = new Thread[10];
- PrintQueue printQueue = new PrintQueue();
- for(int i = 0 ; i < 10 ; i++){
- threads[i] = new Thread(new Job(printQueue),"Thread_" + i);
- }
- for(int i = 0 ; i < 10 ; i++){
- threads[i].start();
- }
- }
- }
运行结果:
- Thread_0 Going to print a job
- Thread_0PrintQueue : Printing a job during 1
- Thread_4 Going to print a job
- Thread_1 Going to print a job
- Thread_2 Going to print a job
- Thread_3 Going to print a job
- Thread_0 the document has bean printed
- Thread_4PrintQueue : Printing a job during 7
- Thread_4 the document has bean printed
- Thread_1PrintQueue : Printing a job during 1
- Thread_2PrintQueue : Printing a job during 3
- Thread_1 the document has bean printed
- Thread_2 the document has bean printed
- Thread_3PrintQueue : Printing a job during 1
- Thread_3 the document has bean printed
参考资料
1、Java多线程系列--“JUC锁”11之 Semaphore信号量的原理和示例
【Java并发编程实战】-----“J.U.C”:Semaphore的更多相关文章
- 【Java并发编程实战】-----“J.U.C”:CountDownlatch
上篇博文([Java并发编程实战]-----"J.U.C":CyclicBarrier)LZ介绍了CyclicBarrier.CyclicBarrier所描述的是"允许一 ...
- 【Java并发编程实战】-----“J.U.C”:CyclicBarrier
在上篇博客([Java并发编程实战]-----"J.U.C":Semaphore)中,LZ介绍了Semaphore,下面LZ介绍CyclicBarrier.在JDK API中是这么 ...
- 【Java并发编程实战】-----“J.U.C”:ReentrantReadWriteLock
ReentrantLock实现了标准的互斥操作,也就是说在某一时刻只有有一个线程持有锁.ReentrantLock采用这种独占的保守锁直接,在一定程度上减低了吞吐量.在这种情况下任何的"读/ ...
- 【Java并发编程实战】-----“J.U.C”:ReentrantLock之三unlock方法分析
前篇博客LZ已经分析了ReentrantLock的lock()实现过程,我们了解到lock实现机制有公平锁和非公平锁,两者的主要区别在于公平锁要按照CLH队列等待获取锁,而非公平锁无视CLH队列直接获 ...
- 【Java并发编程实战】-----“J.U.C”:ReentrantLock之一简介
注:由于要介绍ReentrantLock的东西太多了,免得各位客官看累,所以分三篇博客来阐述.本篇博客介绍ReentrantLock基本内容,后两篇博客从源码级别分别阐述ReentrantLock的l ...
- 【Java并发编程实战】----- AQS(二):获取锁、释放锁
上篇博客稍微介绍了一下AQS,下面我们来关注下AQS的所获取和锁释放. AQS锁获取 AQS包含如下几个方法: acquire(int arg):以独占模式获取对象,忽略中断. acquireInte ...
- 【Java并发编程实战】----- AQS(四):CLH同步队列
在[Java并发编程实战]-–"J.U.C":CLH队列锁提过,AQS里面的CLH队列是CLH同步锁的一种变形.其主要从两方面进行了改造:节点的结构与节点等待机制.在结构上引入了头 ...
- java并发编程实战学习(3)--基础构建模块
转自:java并发编程实战 5.3阻塞队列和生产者-消费者模式 BlockingQueue阻塞队列提供可阻塞的put和take方法,以及支持定时的offer和poll方法.如果队列已经满了,那么put ...
- 【Java并发编程实战】—– AQS(四):CLH同步队列
在[Java并发编程实战]-–"J.U.C":CLH队列锁提过,AQS里面的CLH队列是CLH同步锁的一种变形. 其主要从双方面进行了改造:节点的结构与节点等待机制.在结构上引入了 ...
随机推荐
- make: *** [out/host/linux-x86/obj/EXECUTABLES/aidl_intermediates/aidl] 错误 1,make: *** [out/host/linux-x86/obj/lib/libESR_Portable.so] 错误 1
错误3: g++: g++: selected multilib '32' not installed selected multilib '32' not installed make: *** [ ...
- 【leetcode】Add Binary
题目简述: Given two binary strings, return their sum (also a binary string). For example, a = "11&q ...
- git客服端基本操作
以下操作基于git+gerrit 1.生成公钥 ssh -keygen -t rsa 默认公钥生成路径 C:\Documents and Settings\用户名\.ssh 2.配置姓名和邮箱地址 ...
- webpack初试
前言: 知道这完儿,没用过.关于webpack有很多介绍了,就不多说了.放几个链接,方便新手理解.这是给纯没用过的人了解的.这里只是简单介绍一下webpack的基本用法.大多内容都是来自webpack ...
- Design and Implementation of the Sun Network File System
Introduction The network file system(NFS) is a client/service application that provides shared file ...
- WebGL入门教程(一)-初识webgl
一.WebGL和传统网页的区别: 普通网页组成成分:HTML.JavaScript: WebGL网页组成成分:HTML5.JavaScript和GLSL ES(着色器语言 OpenGL ES): 二. ...
- Linux学习笔记(15)-信号量
在多线程或者多进程编程中,有一个非常需要关注的东西,那就是同步以及互斥问题. 同步是指多个进程之间的协作,而互斥是指多个进程之间,为了争夺有限的资源,而进行的竞争. 理论很高端,但经过自己几天的学习, ...
- 【MongoDB初识】-条件操作符
1.条件>,<,>=,<=在MongoDB中的写法 >:$gt,<:$lt,>=:$gte,<=:$lte,<>:$ne 具体使用方法: d ...
- install hdp 2.2 on ubuntu 14.04
http://www.swiss-scalability.com/2014/12/install-hdp-22-on-ubuntu-1404-trusty.html 在新加节点上运行 sed -e & ...
- ubuntu 用apt-get 安装apache 和php 之后php不能解析的问题
sudo apt-get install apache2 sudo apt-get install php7.0 sudo apt-get install libapache2-mod-php //关 ...