无所不能的Embedding4 - Doc2vec第二弹[skip-thought & tf-Seq2Seq源码解析]
前一章Doc2Vec里提到,其实Doc2Vec只是通过加入Doc_id捕捉了文本的主题信息,并没有真正考虑语序以及上下文语义,n-gram只能在局部解决这一问题,那么还有别的解决方案么?依旧是通用文本向量,skip-thought尝试应用encoder-decoder来学习包含上下文信息和语序的句子向量。魔改后的实现可以看这里( ´▽`) github-DSXiangLi-Embedding-skip_thought
Skip-Thought模型分析

Skip-Thought顾名思义是沿用了skip-gram的路子,不熟悉的童鞋看这里 无所不能的Embedding1 - Word2vec模型详解&代码实现
skip-gram是用中间词来预测周围单词,skip-Thought是用中间句子来预测前一个句子和后一个句子,模型思路就是这么简单粗暴,具体实现就涉及到句子的信息要如何提取,以及loss function的选择。作者选择了encoder-decoder来提取句子信息,用翻译模型常用的log-perplrexity作为loss。
这里想提一句不同模型,在不同的样本上,训练出的文本向量所包含的信息是不同的。例如word2vec的假设就是context(windo_size内周围词)相似的单词更相似(向量空间距离更近)。skip-thought作者对于文本向量的假设是:能更好reconstruct前后句子的信息,就是当前句子的所含信息,换言之前后句子相似的句子,文本向量的空间距离更近。
第一次读到这里感觉哇make perfect sense!可越琢磨越觉着这个task有些迷幻,word2vec skip-gram可以这么搞,是因为给定中间词window_size内的单词选择是相对有限的。你给我个句子就让我精准预测前后句子的每一个词,这能收敛?you what?! 不着急后面似乎有反转~
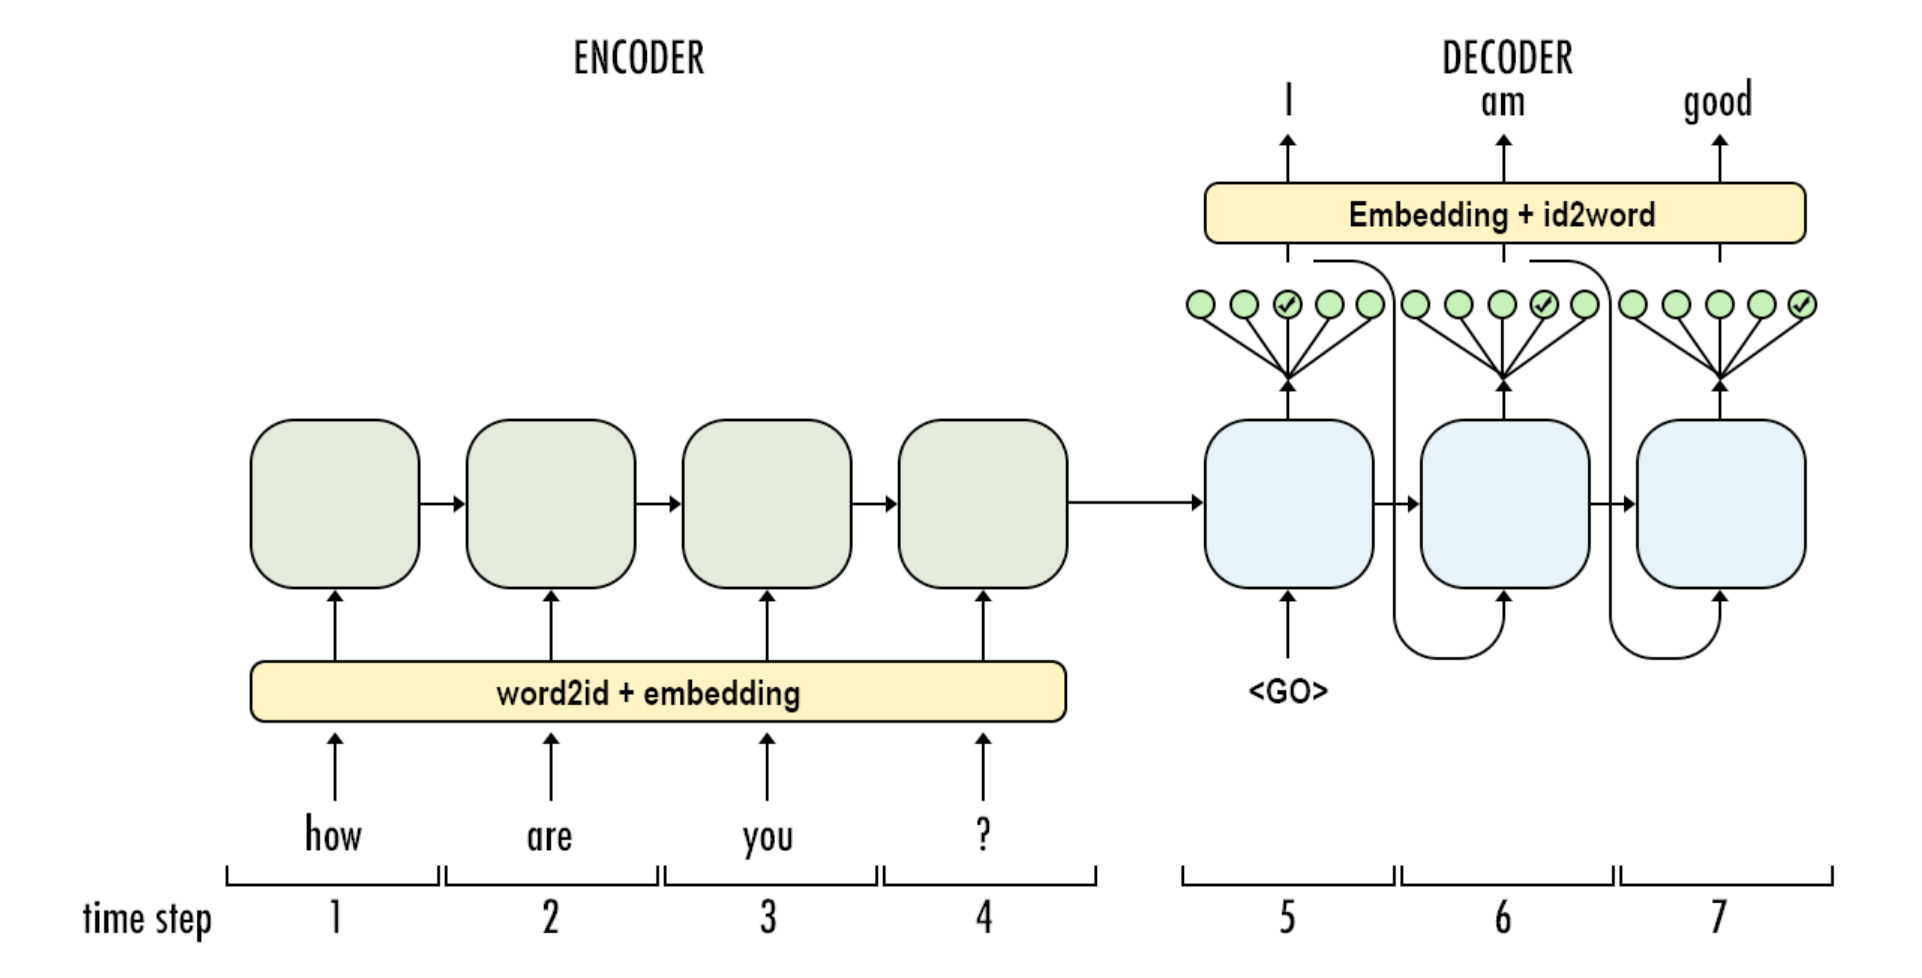
Encoder部分负责提取中间句子的信息生成定长向量output_state,Decoder则基于ouput_state进行迭代生成前(后)句子。Encoder-Decoder支持任意记忆单元,这里作者选择了GRU-GRU。
简单回顾下GRU Cell,GRU有两个Gate,从两个角度衡量历史sequence信息和当前token的相关程度,\(\Gamma_r\)控制多少历史信息参与state的重新计算是reset gate,\(\Gamma_u\)控制多少历史信息直接进入当前state是update gate,这里安利一篇博客 Illustrated Guide to LSTM’s and GRU’s: A step by step explanation
\Gamma_u & =\sigma(w_{u}[h^{<t-1>},x^{<t>}]+ b_{u})\\
\Gamma_r & =\sigma(w_{r}[h^{<t-1>},x^{<t>}]+ b_{r})\\
h^{<t>} &= tanh( w_{a}[ \Gamma_r \odot h^{<t-1>},x^{<t>}]+ b_{a} )\\
h^{<t>} &= \Gamma_u \odot h^{<t>} + (1-\Gamma_u) \odot
h^{<t-1>}
\end{align}
\]
Encoder部分经过GRU把长度为T的sequence信息压缩到hidden_size的\(h^{<T>}\),这里\(h^{<T>}\)也是最终skip-thought为每一个句子生成的通用向量表达。
Decoder部分基于\(h^{<T>}\)向前预测下一个/上一个句子中的每一个单词。Decoder比Encoder略复杂,在于训练阶段和预测阶段对于input的处理存在差异。
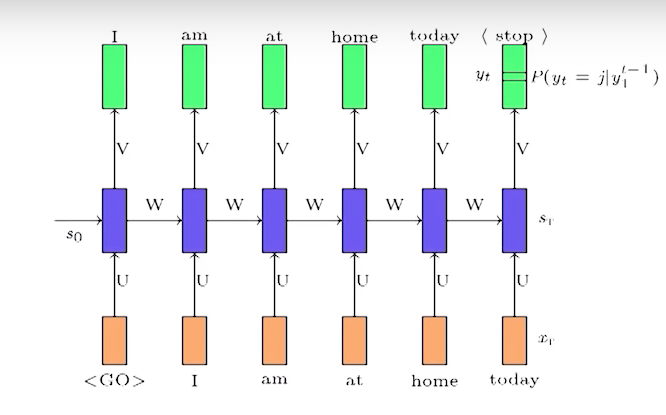
训练阶段使用了100%的Teacher Forcing,每个cell的输入除了上一个cell的hidden state,还有预测句子中前一个真实token对应的embedding,如图

而在预测阶段真实序列未知,因此会转而使用前一个cell的output来预测前一个token,再用预测token的embedding作为输入,如图

对于翻译模型来说,在训练阶段使用TeacherForcing的好处是可以加速模型收敛,避免向前迭代预测的误差进一步放大。坏处自然是训练和预测时decoder的表现存在差异(Exposure Bias),以及预测时decode的output会受到训练样本的约束。这里最常用的解决方案是Scheduled Sampling, 简单来说就是在训练阶段有P的概率输入用teacher forcing,1-P的概率用预测output。但是!skip-thought并没有使用这个解决方案,为啥嘞?反转来了V(^_^)V
看到无采样的teacherforcing这里,前面的迷惑已然解答。其实skip-thought并不只是使用中间句子来预测前后句子,而是基于中间句子的ouput_state,用前后句子中T-1前的单词来预测第T个单词(感觉和missing imputation只有一步之遥)。encoder部分只需要在output_state中最大程度的提取句子信息,保证在不同的前后句子上output state都可以generalize。至于decoder的预测部分效果如何模型并不关心,因为skip-thought的预测输出就是encoder部分的output state,所以自然是不需要使用Scheduled Sampling
skip-thought的Decoder还有两点特殊:
- 前/后句子用两个decoder来训练,两个decoder除了word embedding共享之外,参数独立
- encoder state不只作为decoder的initial_state,而是直接传入decoder的每一个cell,起到类似residual/connditional的作用,避免encoder的信息传着传着给传没了。这里感觉不用attention而是直接传入outpu_state也是为了保证这个output_state能最大程度的学到用来reconstruct前后句子的信息
loss部分作者用了语言模型的log-perplexity把前后句子的loss加总得到loss function
\]
论文比较有意思的一个点还有vocabulary expansion,就是如何把word embedding扩展到训练集之外。作者尝试用linear-mapping的方式学习word2vec和skip-thought里面word-embedding的映射关系,就是找到word2vec和skip-thought交集的word, 对他们的embedding做regression $ X_{word2vec} \sim W \cdot X_{skipthought} $,这样对样本外但是word2vec内的单词直接用W映射就能得到skip-thougt的词向量
这里直接用word2vec/glove的word embedding来初始化skip-thougt的词向量是不是更好?在后面的模型实现里我就是直接用word2vec来初始化了embedding, word2vec之外词用random.uniform(-0.1,0.1)来初始化
最终在生成文本向量的时候,作者给出了几种方案,遵循大力一定出奇迹的原则自然方案3效果更好
- 2400-dim的uni-skip, 就是以上encoder生成的output state
- 两个1200-dim的bi-skip向量拼接得到2400-dim的向量,是在处理训练样本时一个用正常语序训练,一个reverse语序训练
- 把上面两个2400-dim拼接得到4800-dim
skip-thought 模型实现
这里有点任性的对论文做了魔改。。。部分细节和论文已经天差地别,可以拿来了解encoder-decoder的实现但不保证完全reproduce skip-thought的结果。。。以下只保留代码核心部分,完整代码在 github-DSXiangLi-Embedding-skip_thought。 这里用了tensorflow seq2seq的框架,不熟悉的童鞋可以先看后面seq2seq的代码解析~
dataset
论文中是\((s_{i-1}, s_i, s_{i+1})\)作为一组样本,其中\(s_i\)是encoder source,\(s_{i-1}\)和\(s_{i+1}\)是decoder target,这里我直接处理成\((s_i,s_{i-1})\),\((s_i,s_{i+1})\)两组样本。
其中encoder source不需要多做处理,但是decoder source在Train和Eval时需要在sequence前后加入start和end_token标记序列的开始和结束,在Predict时需要加入start_token标记开始。最后通过word_table把token映射到token_id,再Padding到相同长度就齐活。
这里在Dataset的部分加入了获取word2vec embedding的部分, word2vec以外的单词默认random.uniform(-0.1,0.1)
class SkipThoughtDataset(BaseDataset):def __init__(self, data_file, dict_file, epochs, batch_size, buffer_size, min_count, max_count,special_token, max_len):...def parse_example(self, line, prepend, append):features = {}tokens = tf.string_split([tf.string_strip(line)]).valuesif prepend:tokens = tf.concat([[self.special_token.SEQ_START], tokens], 0)if append:tokens = tf.concat([tokens, [self.special_token.SEQ_END]], 0)features['tokens'] = tokensfeatures['seq_len'] = tf.size(tokens)return features...def make_source_dataset(self, file_path, data_type, is_predict, word_table_func):prepend, append = self.prepend_append_logic(data_type, is_predict)dataset = tf.data.TextLineDataset(file_path).\map(lambda x: self.parse_example(x, prepend, append), num_parallel_calls=tf.data.experimental.AUTOTUNE).\map(lambda x: word_table_func(x), num_parallel_calls=tf.data.experimental.AUTOTUNE)return datasetdef build_dataset(self, is_predict=0):def input_fn():word_table_func = self.word_table_lookup(self.build_wordtable())_ = self.build_tokentable() # initialize here to ensure lookup table is in the same graphencoder_source = self.make_source_dataset(self.data_file['encoder'], 'encoder', is_predict, word_table_func)decoder_source = self.make_source_dataset(self.data_file['decoder'], 'decoder', is_predict, word_table_func)dataset = tf.data.Dataset.zip((encoder_source, decoder_source)).\filter(self.sample_filter_logic)if not is_predict:dataset = dataset.\repeat(self.epochs)dataset = dataset. \padded_batch( batch_size=self.batch_size,padded_shapes=self.padded_shape,padding_values=self.padding_values,drop_remainder=True ). \prefetch( tf.data.experimental.AUTOTUNE )else:dataset = dataset.batch(1)return datasetreturn input_fndef load_pretrain_embedding(self):if self.embedding is None:word_vector = gensim.downloader.load(PretrainModel)embedding = []for i in self._dictionary.keys():try:embedding.append( word_vector.get_vector( i ) )except KeyError:embedding.append( np.random.uniform(low=-0.1, high=0.1, size=300))self.embedding = np.array(embedding, dtype=np.float32)return self.embedding
Encoder-Decoder
Encoder的部分很常规,确认cell类型,然后经过dynamic_rnn迭代,输出output和state
def gru_encoder(input_emb, input_len, params):gru_cell = build_rnn_cell('gru', params)# state: batch_size * hidden_size, output: batch_size * max_len * hidden_sizeoutput, state = tf.nn.dynamic_rnn(cell=gru_cell, # one rnn unitsinputs=input_emb, # batch_size * max_len * feature_sizesequence_length=input_len, # batch_size * seq_leninitial_state=None,dtype=params['dtype'],time_major=False # whether reshape max_length to first dim)return ENCODER_OUTPUT(output=output, state=state)
Decoder的部分可以分成helper, decoder, 以及最终dynamic_decode的部分。比较容易踩坑的有几个点
- dynamic_decode部分的max_iteration在训练时可以不设定,train_helper会基于seq_len判断finish,在Eval时因为用GreedyEmbeddingHelper所以需要手动传入pad_len,在predict部分只需给定最大max_iter保证预测一定会停止就好
- Decoder的output layer必须要有, 因为需要做hidden_size -> vocab_size(softmax)的转换,用于预测每个cell的token输出
- 前面dataset的decoder_source我们在前后都加了开始/停止token,训练时需要移除最后一个token(对于trainHelper可以改inputs也可以改sequence_length), 这样在计算loss时可以和移除第一个token的target对齐。
这里针对上面提到的把encoder的output_state直接传入每个decoder cell做了实现,直接把encoder state和embedding input做了拼接作为输入。
def get_helper(encoder_output, input_emb, input_len, batch_size, embedding, mode, params):if mode == tf.estimator.ModeKeys.TRAIN:if params['conditional']:# conditional train helper with encoder output state as direct input# Reshape encoder state as auxiliary input: 1* batch_size * hidden -> batch_size * max_len * hiddendecoder_length = tf.shape(input_emb)[1]state_shape = tf.shape(encoder_output.state)encoder_state = tf.tile(tf.reshape(encoder_output.state, [state_shape[1],state_shape[0],state_shape[2]]),[1, decoder_length, 1])input_emb = tf.concat([encoder_state, input_emb], axis=-1)helper = seq2seq.TrainingHelper( inputs=input_emb, # batch_size * max_len-1 * emb_sizesequence_length=input_len-1, # exclude last tokentime_major=False,name='training_helper' )else:helper = seq2seq.GreedyEmbeddingHelper( embedding=embedding_func( embedding ),start_tokens=tf.fill([batch_size], params['start_token']),end_token=params['end_token'] )return helperdef get_decoder(decoder_cell, encoder_output, input_emb, input_len, embedding, output_layer, mode, params):batch_size = tf.shape(encoder_output.output)[0]if params['beam_width'] >1 :# If beam search multiple prediction are uesd at each time stepdecoder = seq2seq.BeamSearchDecoder( cell=decoder_cell,embedding=embedding_func( embedding ),initial_state=encoder_output,beam_width=params['beam_width'],start_tokens=tf.fill([batch_size], params['start_token']),end_token=params['end_token'],output_layer=output_layer )else:helper = get_helper(encoder_output, input_emb, input_len, batch_size, embedding, mode, params)decoder = seq2seq.BasicDecoder( cell=decoder_cell,helper=helper,initial_state=encoder_output.state,output_layer=output_layer )return decoderdef gru_decoder(encoder_output, input_emb, input_len, embedding, params, mode):gru_cell = build_rnn_cell( 'gru', params )if mode == tf.estimator.ModeKeys.TRAIN:max_iteration = Noneelif mode == tf.estimator.ModeKeys.EVAL:max_iteration = tf.reduce_max(input_len) # decode max sequence length(=padded_length)in EVALelse:max_iteration = params['max_decode_iter'] # decode pre-defined max_decode iter in predictoutput_layer=tf.layers.Dense(units=params['vocab_size']) # used for infer helper sample or train loss calculationdecoder = get_decoder(gru_cell, encoder_output, input_emb, input_len, embedding, output_layer, mode, params)output, state, seq_len = seq2seq.dynamic_decode(decoder=decoder,output_time_major=False,impute_finished=True,maximum_iterations=max_iteration)return DECODER_OUTPUT(output=output, state = state, seq_len=seq_len)
loss
loss这了自己实现的一版sequence_loss,把计算loss和按不同维度聚合拆成了两块。感觉tf.sequence_loss只针对train,对eval的部分并不友好,因为trainHelper可以保证source和target的长度一致,但是infer时调用GreedyEmbeddingHelper是无法保证输出长度的(不知道是不是我哪里理解错了,如果是请大神指正(o^^o)), 所以对eval部分也做了特殊处理。
def sequence_loss(logits, target, mask, mode):with tf.variable_scope('Sequence_loss_matrix'):n_class = tf.shape(logits)[2]decode_len = tf.shape(logits)[1] # used for infer only, max_len is determined by decoderlogits = tf.reshape(logits, [-1, n_class])if mode == tf.estimator.ModeKeys.TRAIN:# In train, targettarget = tf.reshape(target[:, 1:], [-1]) # (batch * (padded_len-1)) * 1elif mode == tf.estimator.ModeKeys.EVAL:# In eval, target has paded_len, logits have decode_lentarget = tf.reshape(target[:, : decode_len], [-1]) # batch * (decode_len) *1else:raise Exception('sequence loss is only used in train or eval, not in pure prediction')loss_mat = tf.nn.sparse_softmax_cross_entropy_with_logits(labels = target, logits = logits)loss_mat = tf.multiply(loss_mat, tf.reshape(mask, [-1])) # apply padded mask on output lossreturn loss_matdef agg_sequence_loss(loss_mat, mask, axis):with tf.variable_scope('Loss_{}'.format(axis)):if axis == 'scaler':loss = tf.reduce_sum(loss_mat)n_sample = tf.reduce_sum(mask)loss = loss/n_sampleelse:loss_mat = tf.reshape(loss_mat, tf.shape(mask)) # (batch_size * max_len) * 1-> batch_size * max_lenif axis == 'batch':loss = tf.reduce_sum(loss_mat, axis=1) # batchn_sample = tf.reduce_sum(mask, axis=1) # batchloss = tf.math.divide_no_nan(loss, n_sample) # batchelif axis == 'time':loss = tf.reduce_sum(loss_mat, axis=0) # max_lenn_sample = tf.reduce_sum(mask, axis=0) # max_lenloss = tf.math.divide_no_nan(loss, n_sample) # max_lenelse:raise Exception('Only scaler/batch/time are supported in axis param')return loss
model
encoder, decoder, loss都ready,拼一块就齐活了, 这里embedding我们用了前面加载的word2vec来进行初始化。
class QuickThought(object):def __init__(self, params):self.params = paramsself.init()def init(self):with tf.variable_scope('embedding', reuse=tf.AUTO_REUSE):self.embedding = tf.get_variable(dtype = self.params['dtype'],initializer=tf.constant(self.params['pretrain_embedding']),name='word_embedding' )add_layer_summary(self.embedding.name, self.embedding)def build_model(self, features, labels, mode):encoder_output = self._encode(features)decoder_output = self._decode(encoder_output, labels, mode )loss_output = self.compute_loss( decoder_output, labels, mode )...def _encode(self, features):with tf.variable_scope('encoding'):encoder = ENCODER_FAMILY[self.params['encoder_type']]seq_emb_input = tf.nn.embedding_lookup(self.embedding, features['tokens']) # batch_size * max_len * emb_sizeencoder_output = encoder(seq_emb_input, features['seq_len'], self.params) # batch_sizereturn encoder_outputdef _decode(self, encoder_output, labels, mode):with tf.variable_scope('decoding'):decoder = DECODER_FAMILY[self.params['decoder_type']]if mode == tf.estimator.ModeKeys.TRAIN:seq_emb_output = tf.nn.embedding_lookup(self.embedding, labels['tokens']) # batch_size * max_len * emb_sizeinput_len = labels['seq_len']elif mode == tf.estimator.ModeKeys.EVAL:seq_emb_output = Noneinput_len = labels['seq_len']else:seq_emb_output = Noneinput_len = Nonedecoder_output = decoder(encoder_output, seq_emb_output, input_len,\self.embedding, self.params, mode)return decoder_outputdef compute_loss(self, decoder_output, labels, mode):with tf.variable_scope('compute_loss'):mask = sequence_mask(decoder_output, labels, self.params, mode)loss_mat = sequence_loss(logits=decoder_output.output.rnn_output,target=labels['tokens'],mask=mask,mode=mode)loss = []for axis in ['scaler', 'batch', 'time']:loss.append(agg_sequence_loss(loss_mat, mask, axis))return SEQ_LOSS_OUTPUT(loss_id=loss_mat,loss_scaler=loss[0],loss_per_batch=loss[1],loss_per_time=loss[2])
tf.seq2seq 代码解析
稀里糊涂开始用seq2seq,结果盯着shape mismatch的报错险些看到地老天荒,索性咱老老实实看一遍tf的实现, 以下代码只保留了核心部分,完整的官方代码在这里哟 tf.seq2seq.contrib
Encoding
Encoding部分就是一个dynamic_rnn,先看下输入
- cell:任意类型记忆单元rnn,gru, lstm
- inputs:rnn输入,一般是[batch_size, max_len, emb_siz] 也就是padding的序列token,经过embedding映射之后作为输入
- sequence_length: 真实序列长度(不包含padding),用于判断序列是遍历完
- initial_state: encoder最初state,None则默认是zero_state
- dtype: output数据类型,建议全局设置统一数据类型,不然会有各种mismatch,不要问我是怎么知道的>.<
- parallel_iteration:内存换速度,没有上下文依赖的op进行并行计算
- time_major:如果你的输入数据是[max_len, batch_size,emb_siz]则为True,一般为False在dynamic_rnn内部再做reshape。
dynamic_rnn主函数其实只做了输入/输出数据的处理部分,包括
- reshape_input:对应上面time_major=False, 把输入数据从[batch_size, max_len, emb_siz]转换为[max_len, batch_size,emb_siz]
- inital_state: 默认是batch size的zero_state
- reshape_output: output输出是[max_len, batch_size,hidden_siz]转换为[batch_size, max_len, hidden_size]
def dynamic_rnn(cell, inputs, sequence_length=None, initial_state=None,dtype=None, parallel_iterations=None, swap_memory=False,time_major=False, scope=None):flat_input = nest.flatten(inputs)if not time_major:flat_input = [ops.convert_to_tensor(input_) for input_ in flat_input]flat_input = tuple(_transpose_batch_time(input_) for input_ in flat_input)batch_size = _best_effort_input_batch_size(flat_input)state = cell.zero_state(batch_size, dtype)inputs = nest.pack_sequence_as(structure=inputs, flat_sequence=flat_input)(outputs, final_state) = _dynamic_rnn_loop(cell,inputs,state,parallel_iterations=parallel_iterations,swap_memory=swap_memory,sequence_length=sequence_length,dtype=dtype)if not time_major:# (T,B,D) => (B,T,D)outputs = nest.map_structure(_transpose_batch_time, outputs)return (outputs, final_state)
核心计算部分都在_dynamic_rnn_loop,是一个while_loop, 所以需要定义三要素[loop_var, body, condition]
- loop_var:(time, output_ta, state)
- time:遍历到第几个token
- output_ta: 每个cell的输出,padding部分是zero-output
- state: 最后一个cell的输出,对于padding的序列,只计算到最后一个真实token,之后的state是直接copy through
这里output_ta的shape是(batch, max_len, hidden_units), 对于rnn和GRU,state就是最后一个output, 那shape自然是(1, batch, hidden_units), 但LSTM是有两个hidden state的,一个用于向前传递信息一个用于输出,所以这里state的shape会是(2, batch, hidden_units)
- body
loop的核心计算部分是lambda: cell(input_t, state),也就是相应记忆单元的计算。当sequence_length给定时,_rnn_step的额外操作其实是对已经遍历完的序列直接copy through(zero_output, last_state)
def _time_step(time, output_ta_t, state):input_t = tuple(ta.read(time) for ta in input_ta)input_t = nest.pack_sequence_as(structure=inputs, flat_sequence=input_t)call_cell = lambda: cell(input_t, state)if sequence_length is not None:(output, new_state) = _rnn_step(time=time,sequence_length=sequence_length,min_sequence_length=min_sequence_length,max_sequence_length=max_sequence_length,zero_output=zero_output,state=state,call_cell=call_cell,state_size=state_size,skip_conditionals=True)else:(output, new_state) = call_cell()# Pack state if using state tuplesoutput = nest.flatten(output)output_ta_t = tuple(ta.write(time, out) for ta, out in zip(output_ta_t, output))return (time + 1, output_ta_t, new_state)
- condition
停止loop的条件loop_bound=min(max_sequence_length, max(1,time_steps) , 其中time_step是输入的max_len维度,也就是padding length, max_sequence_length是输入batch的最大真实长度,如果是batch_padding这两个取值应该是一样的
time_steps = input_shape[0]if sequence_length is not None:min_sequence_length = math_ops.reduce_min(sequence_length)max_sequence_length = math_ops.reduce_max(sequence_length)else:max_sequence_length = time_stepsloop_bound = math_ops.minimum(time_steps, math_ops.maximum(1, max_sequence_length))_, output_final_ta, final_state = control_flow_ops.while_loop(cond=lambda time, *_: time < loop_bound,body=_time_step,loop_vars=(time, output_ta, state),parallel_iterations=parallel_iterations,maximum_iterations=time_steps,swap_memory=swap_memory)
Decoding
Decoding主要有三个组件,Decoder,Helper和dynamic_decode。还有比较特殊独立出来的BeamSearch和Attention,这两个后面用到再说
BasicDecoder
BasicDecoder主要接口有2个
- initialize生成decode阶段的最初input
- step实现每一步decode的计算,之后被dynamic_decode的while_loop调用
其中initialize拼接了helper的初始化返回再加上initial_state,也就是encoder最后一步的output_state,helper返回的部分我们放在后面说。
def initialize(self, name=None):return self._helper.initialize() + (self._initial_state,)
step部分做了如下操作
- 输入上一步的output, state计算下一步的output,这是Decoder的核心计算
- 如果定义了output_layer,对output做transform,为啥需要output_layer嘞? 这个看到Helper你就明白了
- sample, next_inputs: 都是调用Helper的接口
- 输出: BasicDecoderOutput(rnn_output, sample_id), next_state, next_inputs, finished
class BasicDecoderOutput(collections.namedtuple("BasicDecoderOutput", ("rnn_output", "sample_id"))):passclass BasicDecoder(decoder.Decoder):"""Basic sampling decoder."""def __init__(self, cell, helper, initial_state, output_layer=None):def step(self, time, inputs, state, name=None):with ops.name_scope(name, "BasicDecoderStep", (time, inputs, state)):cell_outputs, cell_state = self._cell(inputs, state)if self._output_layer is not None:cell_outputs = self._output_layer(cell_outputs)sample_ids = self._helper.sample(time=time, outputs=cell_outputs, state=cell_state)(finished, next_inputs, next_state) = self._helper.next_inputs(time=time,outputs=cell_outputs,state=cell_state,sample_ids=sample_ids)outputs = BasicDecoderOutput(cell_outputs, sample_ids)return (outputs, next_state, next_inputs, finished)
这里发现BasicDecoder的实现只包括了承上的部分,启下的部分都放在了Helper里面,下面我们具体看下Helper的next_input和Sample接口干了啥
Helper
我们主要看两个helper一个用于训练,一个用于预测,主要实现3个接口
- initialize:生成decode阶段的最初input
- sample:生成decode下一步的input id
- next_inputs:生成decode下一步的input
TrainHelper用于训练,sample接口实际并没有用,next_input把sample_id定义为unused_kwargs.
- initialize返回 (finished, next_inputs)
- finished: 判断当前batch每个sequence是否已经遍历完, sequence_length是不包含padded的实际sequencec长度
- 除非batch里所有seq_length的长度都是0,否则直接读取每个sequence的第一个token作为decoder的初始输入
decoder输入sequence会在预处理时加入start_token标记seq的开始,对应上图的\(<go>\)标记,同时加入start_token也为了形成source和target的错位,做到输入T-1个字符预测T个字符。例如source是[\(<go>\), I, love, you],target是[I, love, you, \(<eos>\)]
- next_inputs输出(finished, next_inputs, state)
- finished: 判断当前batch每个sequence是否已经遍历完, sequence_length是不包含padded的实际sequencec长度
- next_inputs: 训练时使用Teaching Force,传入下一个decoder cell的就是前一个位置的实际token embedding,所以这里next_input直接读取input sequence的下一个值,如果finished都是True就返回0【其实返回啥都无所谓因为在loss那里padded的部分会被mask掉】
- state: 这里是打酱油的,直接pass-throuh
class TrainingHelper(Helper):def __init__(self, inputs, sequence_length, time_major=False, name=None):...def initialize(self, name=None):with ops.name_scope(name, "TrainingHelperInitialize"):finished = math_ops.equal(0, self._sequence_length)all_finished = math_ops.reduce_all(finished)next_inputs = control_flow_ops.cond(all_finished, lambda: self._zero_inputs,lambda: nest.map_structure(lambda inp: inp.read(0), self._input_tas))return (finished, next_inputs)def next_inputs(self, time, outputs, state, name=None, **unused_kwargs):"""next_inputs_fn for TrainingHelper."""with ops.name_scope(name, "TrainingHelperNextInputs",[time, outputs, state]):next_time = time + 1finished = (next_time >= self._sequence_length)all_finished = math_ops.reduce_all(finished)def read_from_ta(inp):return inp.read(next_time)next_inputs = control_flow_ops.cond(all_finished, lambda: self._zero_inputs,lambda: nest.map_structure(read_from_ta, self._input_tas))return (finished, next_inputs, state)
GreedyHelper用于预测
initialize返回 (finished, next_inputs)
- finished: 都是False,因为infer阶段不用判断input_sequence长度
- next_inputs: 返回start_token对应的embedding,和训练保持一致
sample返回sample_id
负责根据每个decoder cell的output计算出现概率最大的token,作为下一个decoder cell的输入,这里也是上面提到需要output_layer的原因,因为需要hidden_size -> vocab_size的变换,才能进一步计算softmax
- next_input
- finished: 如果sequence预测为end_token则该sequence预测完成,判断batch里所有sequence是否预测完成
- next_inputs: 对sample_id做embedding_lookup作为下一步的输入,如果finished都是True就返回start_token
- state: 继续打酱油
class GreedyEmbeddingHelper(Helper):def __init__(self, embedding, start_tokens, end_token):self._start_tokens = ops.convert_to_tensor(start_tokens, dtype=dtypes.int32, name="start_tokens")self._end_token = ops.convert_to_tensor(end_token, dtype=dtypes.int32, name="end_token")self._start_inputs = self._embedding_fn(self._start_tokens)。。。def sample(self, time, outputs, state, name=None):sample_ids = math_ops.cast(math_ops.argmax(outputs, axis=-1), dtypes.int32)return sample_idsdef initialize(self, name=None):finished = array_ops.tile([False], [self._batch_size])return (finished, self._start_inputs)def next_inputs(self, time, outputs, state, sample_ids, name=None):finished = math_ops.equal(sample_ids, self._end_token)all_finished = math_ops.reduce_all(finished)next_inputs = control_flow_ops.cond(all_finished,lambda: self._start_inputs,lambda: self._embedding_fn(sample_ids))return (finished, next_inputs, state)
dynamic_decode
承上启下的工具都齐活了,要实现对sequence的预测,只剩下一步就是loop,于是有了dynamic_decode,它其实就干了个while_loop的活,于是还是loop三兄弟[loop_vars, condition, body]
loop_vars=[initial_time, initial_outputs_ta, initial_state, initial_inputs, initial_finished, initial_sequence_lengths]
- initial_finished, initial_inputs, initial_state是上面decoder的initialize返回
- initial_time, initial_sequennce=0
- initial_output_ta是每个elemennt都是batch * decoder.output_size的不定长TensorArray, 这里output_size=(rnn_output_size,sample_id_shape),预测返回1个token的sample_id_shape都是scaler, 有output_layer时rnn_output_size=output_layer_size, default= hidden_size
condition: 判断是否所有finished都为True,都遍历完则停止loop
body: loop的核心计算逻辑
step:调用Decoder进行每一步的decode计算
finished: 这里finished主要由三个逻辑判断(tracks_own_finished我没用过先忽略了哈哈)其余两个是:
- helper的next_inputs回传的finished:trainHelper判断输入sequence是否遍历完,GreedyEmbeddingHelper判断预测token是否为end_token。
- max_iteration:只用于预测,为了避免预测token一直不是end_token导致预测无限循环下去,设置一个最大预测长度,训练时max_iteraion应该为空
sequence_length: 记录实际预测sequence长度,没有finished的sequence+1
impute_finished: 如果sequence已遍历完, 后面的output补0,后面的state不再计算直接pass through当前state
def body(time, outputs_ta, state, inputs, finished, sequence_lengths):(next_outputs, decoder_state, next_inputs,decoder_finished) = decoder.step(time, inputs, state)if maximum_iterations is not None:next_finished = math_ops.logical_or(next_finished, time + 1 >= maximum_iterations)next_sequence_lengths = array_ops.where(math_ops.logical_and(math_ops.logical_not(finished), next_finished),array_ops.fill(array_ops.shape(sequence_lengths), time + 1),sequence_lengths)# Zero out output values past finishif impute_finished:emit = nest.map_structure(lambda out, zero: array_ops.where(finished, zero, out),next_outputs,zero_outputs)else:emit = next_outputs# Copy through states past finishdef _maybe_copy_state(new, cur):# TensorArrays and scalar states get passed through.if isinstance(cur, tensor_array_ops.TensorArray):pass_through = Trueelse:new.set_shape(cur.shape)pass_through = (new.shape.ndims == 0)return new if pass_through else array_ops.where(finished, cur, new)if impute_finished:next_state = nest.map_structure(_maybe_copy_state, decoder_state, state)else:next_state = decoder_stateoutputs_ta = nest.map_structure(lambda ta, out: ta.write(time, out),outputs_ta, emit)return (time + 1, outputs_ta, next_state, next_inputs, next_finished,next_sequence_lengths)
欢迎留言吐槽以及评论哟~
Reference
skip-thought
- Ryan Kiros, yukun Zhu. 2015. SKip-Thought Vectors
- Lajanugen logeswaran, Honglak Lee. 2018. An Efficient Framework for Learning Sentence Representations.
- https://zhuanlan.zhihu.com/p/64342563
- https://towardsdatascience.com/document-embedding-techniques-fed3e7a6a25d
- https://towardsdatascience.com/the-best-document-similarity-algorithm-in-2020-a-beginners-guide-a01b9ef8cf05
- https://blog.floydhub.com/when-the-best-nlp-model-is-not-the-best-choice/
- https://towardsdatascience.com/document-embedding-techniques-fed3e7a6a25d
- https://zhuanlan.zhihu.com/p/72575806
- Scheduled Sampling for Sequence Prediction with Recurrent Neural Networks
tensorflow seq2seq
- https://github.com/google/seq2seq/tree/master/seq2seq
- https://zhuanlan.zhihu.com/p/27608348
- https://zhuanlan.zhihu.com/p/47929039
- https://blog.csdn.net/llh_1178/article/details/89322373
无所不能的Embedding4 - Doc2vec第二弹[skip-thought & tf-Seq2Seq源码解析]的更多相关文章
- tp6源码解析-第二天,ThinkPHP6编译模板流程详解,ThinkPHP6模板源码详解
TP6源码解析,ThinkPHP6模板编译流程详解 前言:刚开始写博客.如果觉得本篇文章对您有所帮助.点个赞再走也不迟 模板编译流程,大概是: 先获取到View类实例(依赖注入也好,通过助手函数也好) ...
- 第二章 Google guava cache源码解析1--构建缓存器
1.guava cache 当下最常用最简单的本地缓存 线程安全的本地缓存 类似于ConcurrentHashMap(或者说成就是一个ConcurrentHashMap,只是在其上多添加了一些功能) ...
- Linq分区操作之Skip,SkipWhile,Take,TakeWhile源码分析
Linq分区操作之Skip,SkipWhile,Take,TakeWhile源码分析 二:linq的分区操作 常用的分区操作:Take,TakeWhile,Skip,SkipWhile 三:Take ...
- 第二篇:Spark SQL Catalyst源码分析之SqlParser
/** Spark SQL源码分析系列文章*/ Spark SQL的核心执行流程我们已经分析完毕,可以参见Spark SQL核心执行流程,下面我们来分析执行流程中各个核心组件的工作职责. 本文先从入口 ...
- Android 仿 新闻阅读器 菜单弹出效果(附源码DEMO)
这一系列博文都是:(android高仿系列)今日头条 --新闻阅读器 (一) 开发中碰到问题之后实现的,觉得可能有的开发者用的到或则希望独立成一个小功能DEMO,所以就放出来这么一个DEMO. 原本觉 ...
- ExcelReport第二篇:ExcelReport源码解析
导航 目 录:基于NPOI的报表引擎——ExcelReport 上一篇:使用ExcelReport导出Excel 下一篇:扩展元素格式化器 概述 针对上一篇随笔收到的反馈,在展开对ExcelRep ...
- 第二章 ArrayList源码解析
一.对于ArrayList需要掌握的七点内容 ArrayList的创建:即构造器 往ArrayList中添加对象:即add(E)方法 获取ArrayList中的单个对象:即get(int index) ...
- 第二章 ConcurrentHashMap源码解析
注:在看这篇文章之前,如果对HashMap的层不清楚的话,建议先去看看HashMap源码解析. http://www.cnblogs.com/java-zhao/p/5106189.html 1.对于 ...
- Apktool源码解析——第二篇
上一篇讲到ApkDecoder这个类,大部分调用到还是Androlib类,而且上次发现brutall的代码竟然不是最新的,遂去找iBotP.的代码了. 今天来看Androlib的代码: private ...
随机推荐
- 每天一个linux命令:ps命令
Linux中的ps命令是Process Status的缩写.ps命令用来列出系统中当前运行的那些进程.ps命令列出的是当前那些进程的快照,就是执行ps命令的那个时刻的那些进程,如果想要动态的显示进 ...
- sql 操作表常用语句,语法
新增列:alter table 表名 add 新列名 数据类型 删除列:alter table 表名 drop column 列名 删除约束:alter table 表名 drop constrain ...
- 装java开发环境 报client/jvm.dll找不到
jdk安装成功,明明有jvm.dll就是找不到,导致eclipse打不开.此时eclipse为64位,jdk为32位:查了好多方法,不起作用.最后将jdk换位64位问题解决. 所以,一般64位的系统建 ...
- toolbox docker国内镜像(阿里云加速器)
docker-machine create --engine-registry-mirror=加速地址 -d virtualbox default# 若虚拟机已经创建好docker-machine s ...
- promise解决微信小程序中的request回调地狱
//使用 request(url,methods ,data).then(res => { //服务器返回数据 console.log(res ); return request(url,met ...
- leetcode学习总结
转自https://leetcode-cn.com/ 1.两数之和 给定一个整数数组 nums 和一个目标值 target,请你在该数组中找出和为目标值的那 两个 整数,并返回他们的数组下标. 你可以 ...
- 安装 WSL2、Ubuntu 及 docker(详细步骤)
本文链接:https://www.cnblogs.com/tujia/p/13438639.html 一.更新Windows版本 WSL 2 随着 Windows build 19041 而推出,能更 ...
- KVM虚拟化管理平台WebVirtMgr部署及使用
KVM虚拟化管理平台WebVirtMgr部署及使用 需求: 公司机房有一台2U的服务器(64G内存,32核),由于近期新增业务比较多,测试机也要新增,服务器资源十分有限.所以打算在这台2U服务器上 ...
- Docker部署Mysql, Tomcat, Nginx, Redis
1. Mysql部署 问题及解决方案 容器内的网络和外部机器不能直接通信 外部机器和宿主机可以直接通信 宿主机和容器可以直接通信 当容器中的网络服务需要被外部机器访问时,可以将容器中提供服务的端口映射 ...
- 4G工业路由器的信号强度应该怎么保证呢?
在M2M无线方面,最薄弱的环节是差的间歇性的信号强度.低信号电平导致系统性能差,响应时间慢和可靠性问题.对于系统安装人员和其他4G工业路由器供应商,如何确保最佳的蜂窝信号强度? 检查2G/3G/4G信 ...
