【Arduino学习笔记05】Arduino数字输入、输出和脉冲宽带调制 -- 小项目:彩色小台灯
基本功能:
- 长按控制按钮开机,长按控制按钮关机(>3s)
- 通过三个调节按钮调节灯的颜色,每一个按钮分别对应R,G,B值
- 模式切换:短按控制按钮切换模式(长亮模式/闪烁模式)
元器件清单:
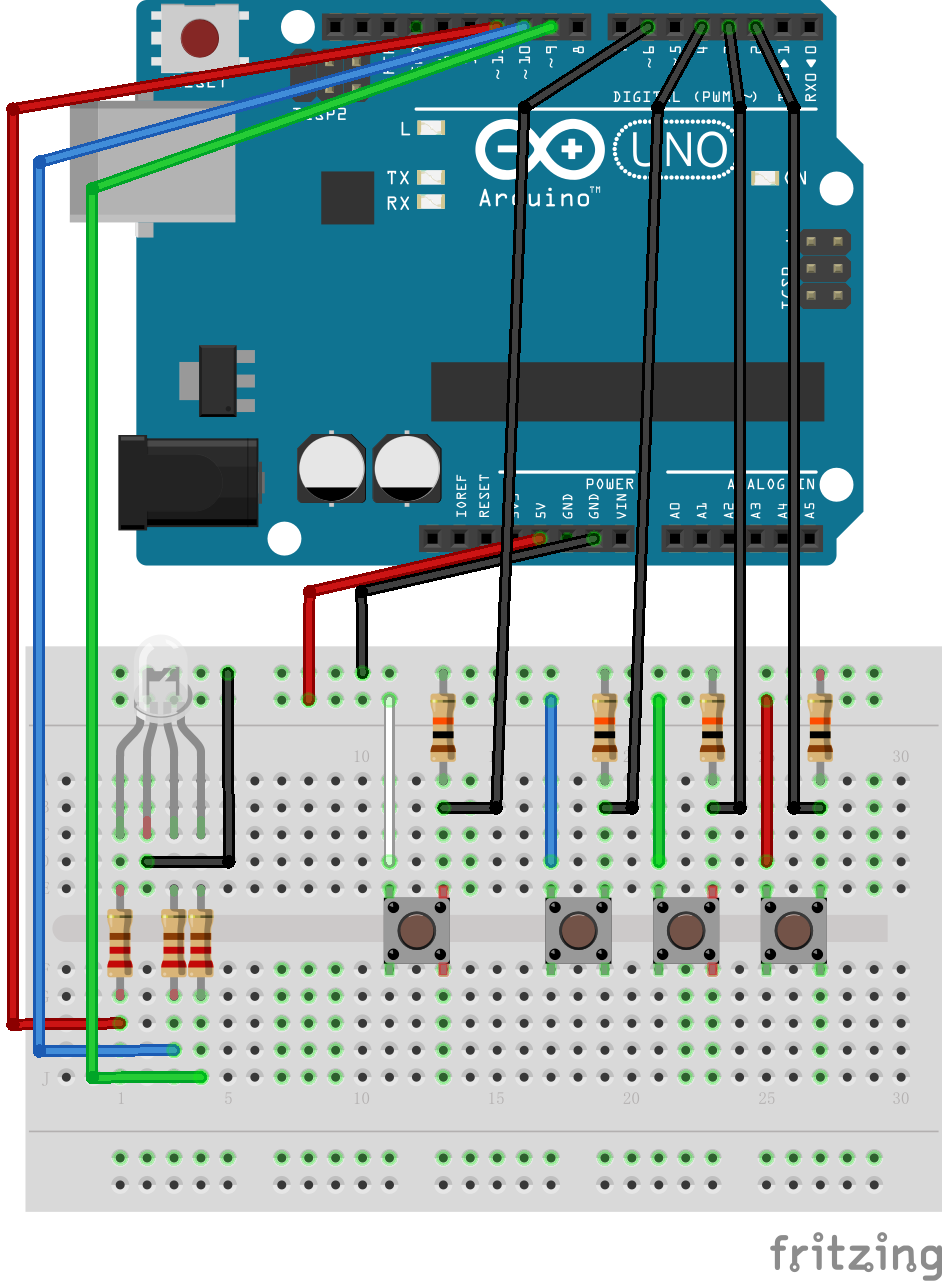
- Arduino Uno R3
- 小号面包板
- 跳线
- 10kΩ 电阻(×4)
- 220Ω 电阻(×3)
- USB电缆
- 按键 (×4)
- 5mm 共阴极 RGB LED
知识回顾:(参考书目《Arduino魔法书》)
1. 脉冲宽度调制(P25 - P27)
- PWM的输出可以写入数值的范围:0~255
- PWM的工作原理:方波(占空比的概念)
- “你并没有改变输送到LED的电压,为何又能在降低占空比时让LED变暗呢?......如果LED每1ms就开关一次,它看起来就是近乎一半的亮度,这是因为它闪烁的速度超过了人眼能察觉的速度。因此,大脑实际上时平均了这个信号,并欺骗你相信这个LED只有一半的亮度。”
2. 上拉电阻和下拉电阻(P28 ~ P30)
- 没有使用下拉电阻的情况
- 按键没有按下时,要读取的输入引脚什么也没有接——这个输入引脚被称为“悬空”。由于这个引脚没有实际地接到0V或者5V,读取它时会导致意料之外的结果,因为附近的电气噪声会导致其值在高低电平之间来回波动。
- 下拉电阻:将输出端拉一根导线连接到地
上拉电阻:将输出端拉一根导线连接到电源
3. 按钮的消抖动(P30 ~ P33)
 1 /*

 2  * 消抖动函数:

 3  * button: 要消抖动的按钮

 4  * last: 该按钮的上一个状态

 5  * 返回值:消抖动后读回的按钮状态

 6

 7   * - 这里所谓的消抖动,实际上就是如果检测到电压变化后先不操作,因为可能是抖动阶段的

 8   * 电压改变,等5m之后再读取当前值,避开抖动阶段。

 9   * - 如果没有使用消抖动函数,在抖动的过程中电压多次变化,会得到很多次“按钮按下”的

10   * 结论,从而造成短时间内频繁的开灯关灯。

11 */

12 boolean debounce(int button, boolean last) {

13     boolean current = digitalRead(button);

14     if (last != current) {

15         delay(5);

16         current = digitalRead(button);

17     }

18     return current;

19 }
4. BlinkWithoutDelay:
这里的bilink借鉴的是examples中的BlinkWithoutDelay.ino中的blink方法,这种写法允许在blink的同时做其它工作。比如:读取按钮的输入等。但是如果使用的是Blink.ino中的写法,在delay()的时候是不能做其它工作的。
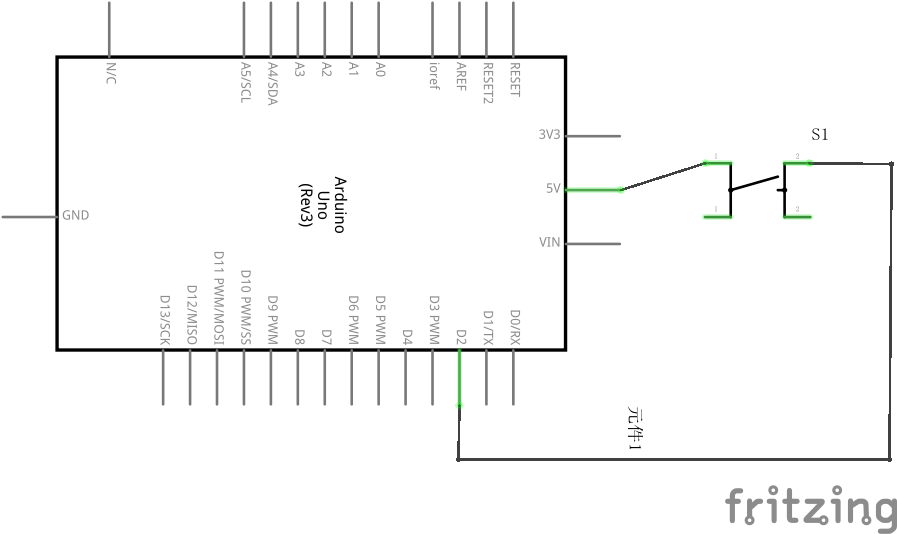
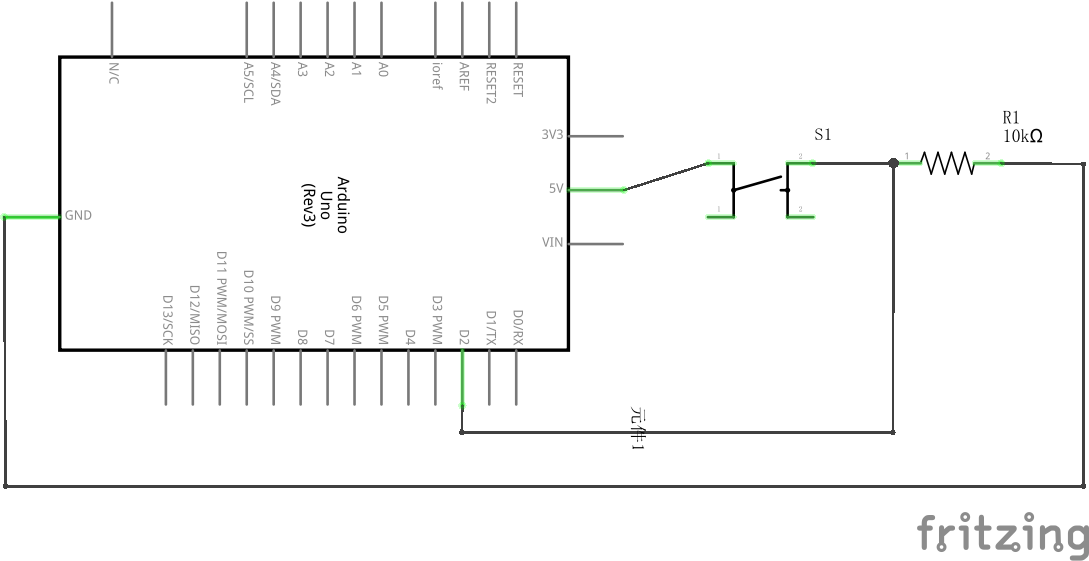
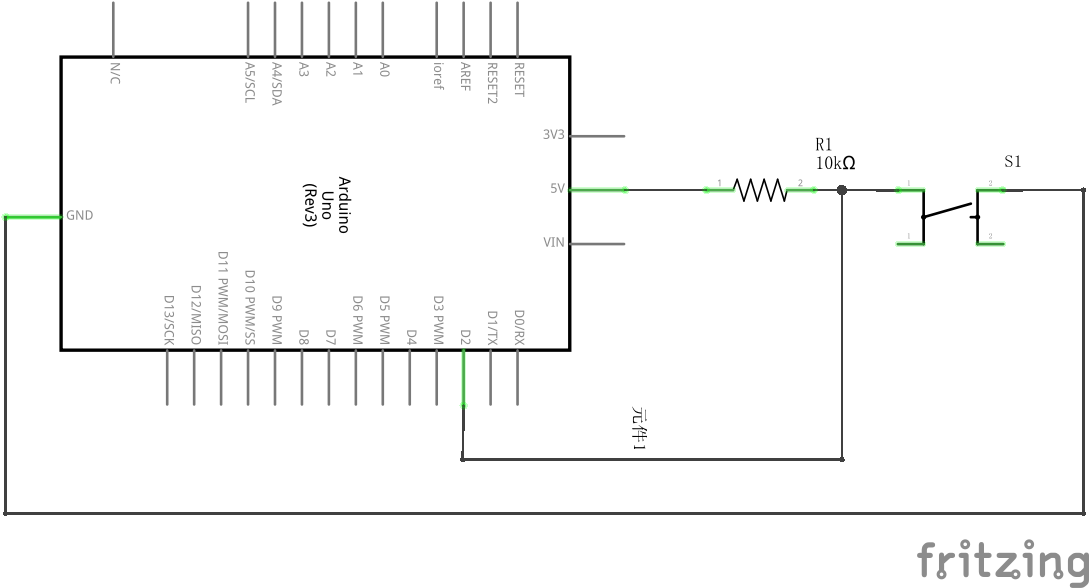
电路图:
完整源代码:
  1 /* 彩色小台灯

  2

  3  * 基本功能:   长按控制按钮开机,长按控制按钮关机(>3s);

  4                         通过三个调节按钮调节灯的颜色,每一个按钮分别对应R,G,B值;

  5                         模式切换:短按控制按钮切换模式(长亮模式/闪烁模式)

  6

  7  * 作者:Shadow

  8  * 时间 : 2020/09/08

  9  */

 10

 11 const int BLED = 9;

 12 const int GLED = 10;

 13 const int RLED = 11;

 14

 15 const int R_BUTTON = 2;

 16 const int G_BUTTON = 3;

 17 const int B_BUTTON = 4;

 18

 19 // 用来记录当前灯颜色对应的RGB值

 20 int R = 0;

 21 int G = 0;

 22 int B = 0;

 23

 24 // lastButton_X是按钮的上一个状态;currentButton_X是按钮的当前状态

 25 // 这里所讲的按钮状态实际上是指按钮所连接的引脚读入的电平值是HIGH还是LOW

 26 // 用来辅助实现按钮消抖函数debounce()

 27 boolean lastButton_R = LOW;

 28 boolean currentButton_R = LOW;

 29 boolean lastButton_G = LOW;

 30 boolean currentButton_G = LOW;

 31 boolean lastButton_B = LOW;

 32 boolean currentButton_B = LOW;

 33

 34 // 辅助实现blink()函数的变量

 35 int ledState = LOW;                      // 记录LED灯的当前状态,LOW: dark; HIGH: light

 36 unsigned long previousMillis = 0;        // will store last time LED was updated

 37 const long interval = 500;               // interval at which to blink (milliseconds)

 38

 39 // 与控制按钮相关的变量

 40 const int MODE_BUTTON = 6;

 41 int mode = 0;                            // 0: 关机; 1: 长亮; 2: blink

 42 boolean lastButton_mode = LOW;

 43 boolean currentButton_mode = LOW;

 44

 45 void setup()

 46 {

 47     pinMode(BLED, OUTPUT);

 48     pinMode(GLED, OUTPUT);

 49     pinMode(RLED, OUTPUT);

 50     pinMode(R_BUTTON, INPUT);

 51     pinMode(G_BUTTON, INPUT);

 52     pinMode(B_BUTTON, INPUT);

 53     pinMode(MODE_BUTTON, INPUT);

 54 }

 55

 56 /*

 57  * 消抖动函数:

 58  * button: 要消抖动的按钮

 59  * last: 该按钮的上一个状态

 60  * 返回值:消抖动后读回的按钮状态

 61 */

 62 boolean debounce(int button, boolean last) {

 63     boolean current = digitalRead(button);

 64     if (last != current) {

 65         delay(5);

 66         current = digitalRead(button);

 67     }

 68     return current;

 69 }

 70

 71 // light the led

 72 void light() {

 73     analogWrite(RLED, R);

 74     analogWrite(BLED, B);

 75     analogWrite(GLED, G);

 76 }

 77

 78 // turn off the led

 79 void dark() {

 80     digitalWrite(RLED, LOW);

 81     digitalWrite(BLED, LOW);

 82     digitalWrite(GLED, LOW);

 83 }

 84

 85 // blink

 86 void blink() {

 87     // 这里的bilink借鉴的是examples中的BlinkWithoutDelay.ino中的blink方法,这种写法允许在blink的同时做其它工作

 88     // 比如:读取按钮的输入等。但是如果使用的是Blink.ino中的写法,在delay()的时候是不能做其它工作的。

 89     unsigned long currentMillis = millis();

 90

 91     if (currentMillis - previousMillis >= interval) {

 92         // save the last time you blinked the LED

 93         previousMillis = currentMillis;

 94

 95         // if the LED is off turn it on and vice-versa:

 96         if (ledState == LOW) {

 97             ledState = HIGH;

 98             light();

 99         }

100         else {

101             ledState = LOW;

102             dark();

103         }

104

105     }

106 }

107

108 void loop()

109 {

110     // Step1: check the current mode

111     if (mode == 0)

112     {

113         dark();

114     }

115     else if (mode == 1) {

116         light();

117     }

118     else {

119         blink();

120     }

121

122

123     // Step2: change the color if some buttons were pressed

124     // read the current state of buttons

125     currentButton_R = debounce(R_BUTTON, lastButton_R);

126     currentButton_G = debounce(G_BUTTON, lastButton_G);

127     currentButton_B = debounce(B_BUTTON, lastButton_B);

128

129     // if button is pressed, change the related rgb value

130     if (lastButton_R == LOW && currentButton_R == HIGH) {

131         // button_R is pressed

132         R += 5;

133         if (R == 260)

134             R = 0;

135     }

136     if (lastButton_G == LOW && currentButton_G == HIGH) {

137         // button_G is pressed

138         G += 5;

139         if (G == 260)

140             G = 0;

141     }

142     if (lastButton_B == LOW && currentButton_B == HIGH) {

143         // button_B is pressed

144         B += 5;

145         if (B == 260)

146             B = 0;

147     }

148

149     // update last state of each button

150     lastButton_R = currentButton_R;

151     lastButton_G = currentButton_G;

152     lastButton_B = currentButton_B;

153

154     //Step3: change the mode if mode_button is pressed, turn on or off if mode_button is pressed more than 3 seconds

155     currentButton_mode = debounce(MODE_BUTTON, lastButton_mode);

156     if (lastButton_mode == LOW && currentButton_mode == HIGH) {

157         // button_mode is pressed, start timing

158         unsigned long pressMillis = millis();

159         unsigned long releaseMillis = millis();

160         while (digitalRead(MODE_BUTTON) == HIGH) {

161             releaseMillis = millis();

162         }

163         // button_mode is released, record the period from press to release

164         unsigned long periodMillis = releaseMillis - pressMillis;

165

166         if (periodMillis > 3000 && mode != 0) {

167             mode = 0;

168         }

169         else if (periodMillis > 3000 && mode == 0) {

170             // if the previous state is dark, then light

171             mode = 1;

172         }

173         else if (mode == 1) {

174             mode = 2;

175         }

176         else {

177             mode = 1;

178         }

179     }

180

181 }
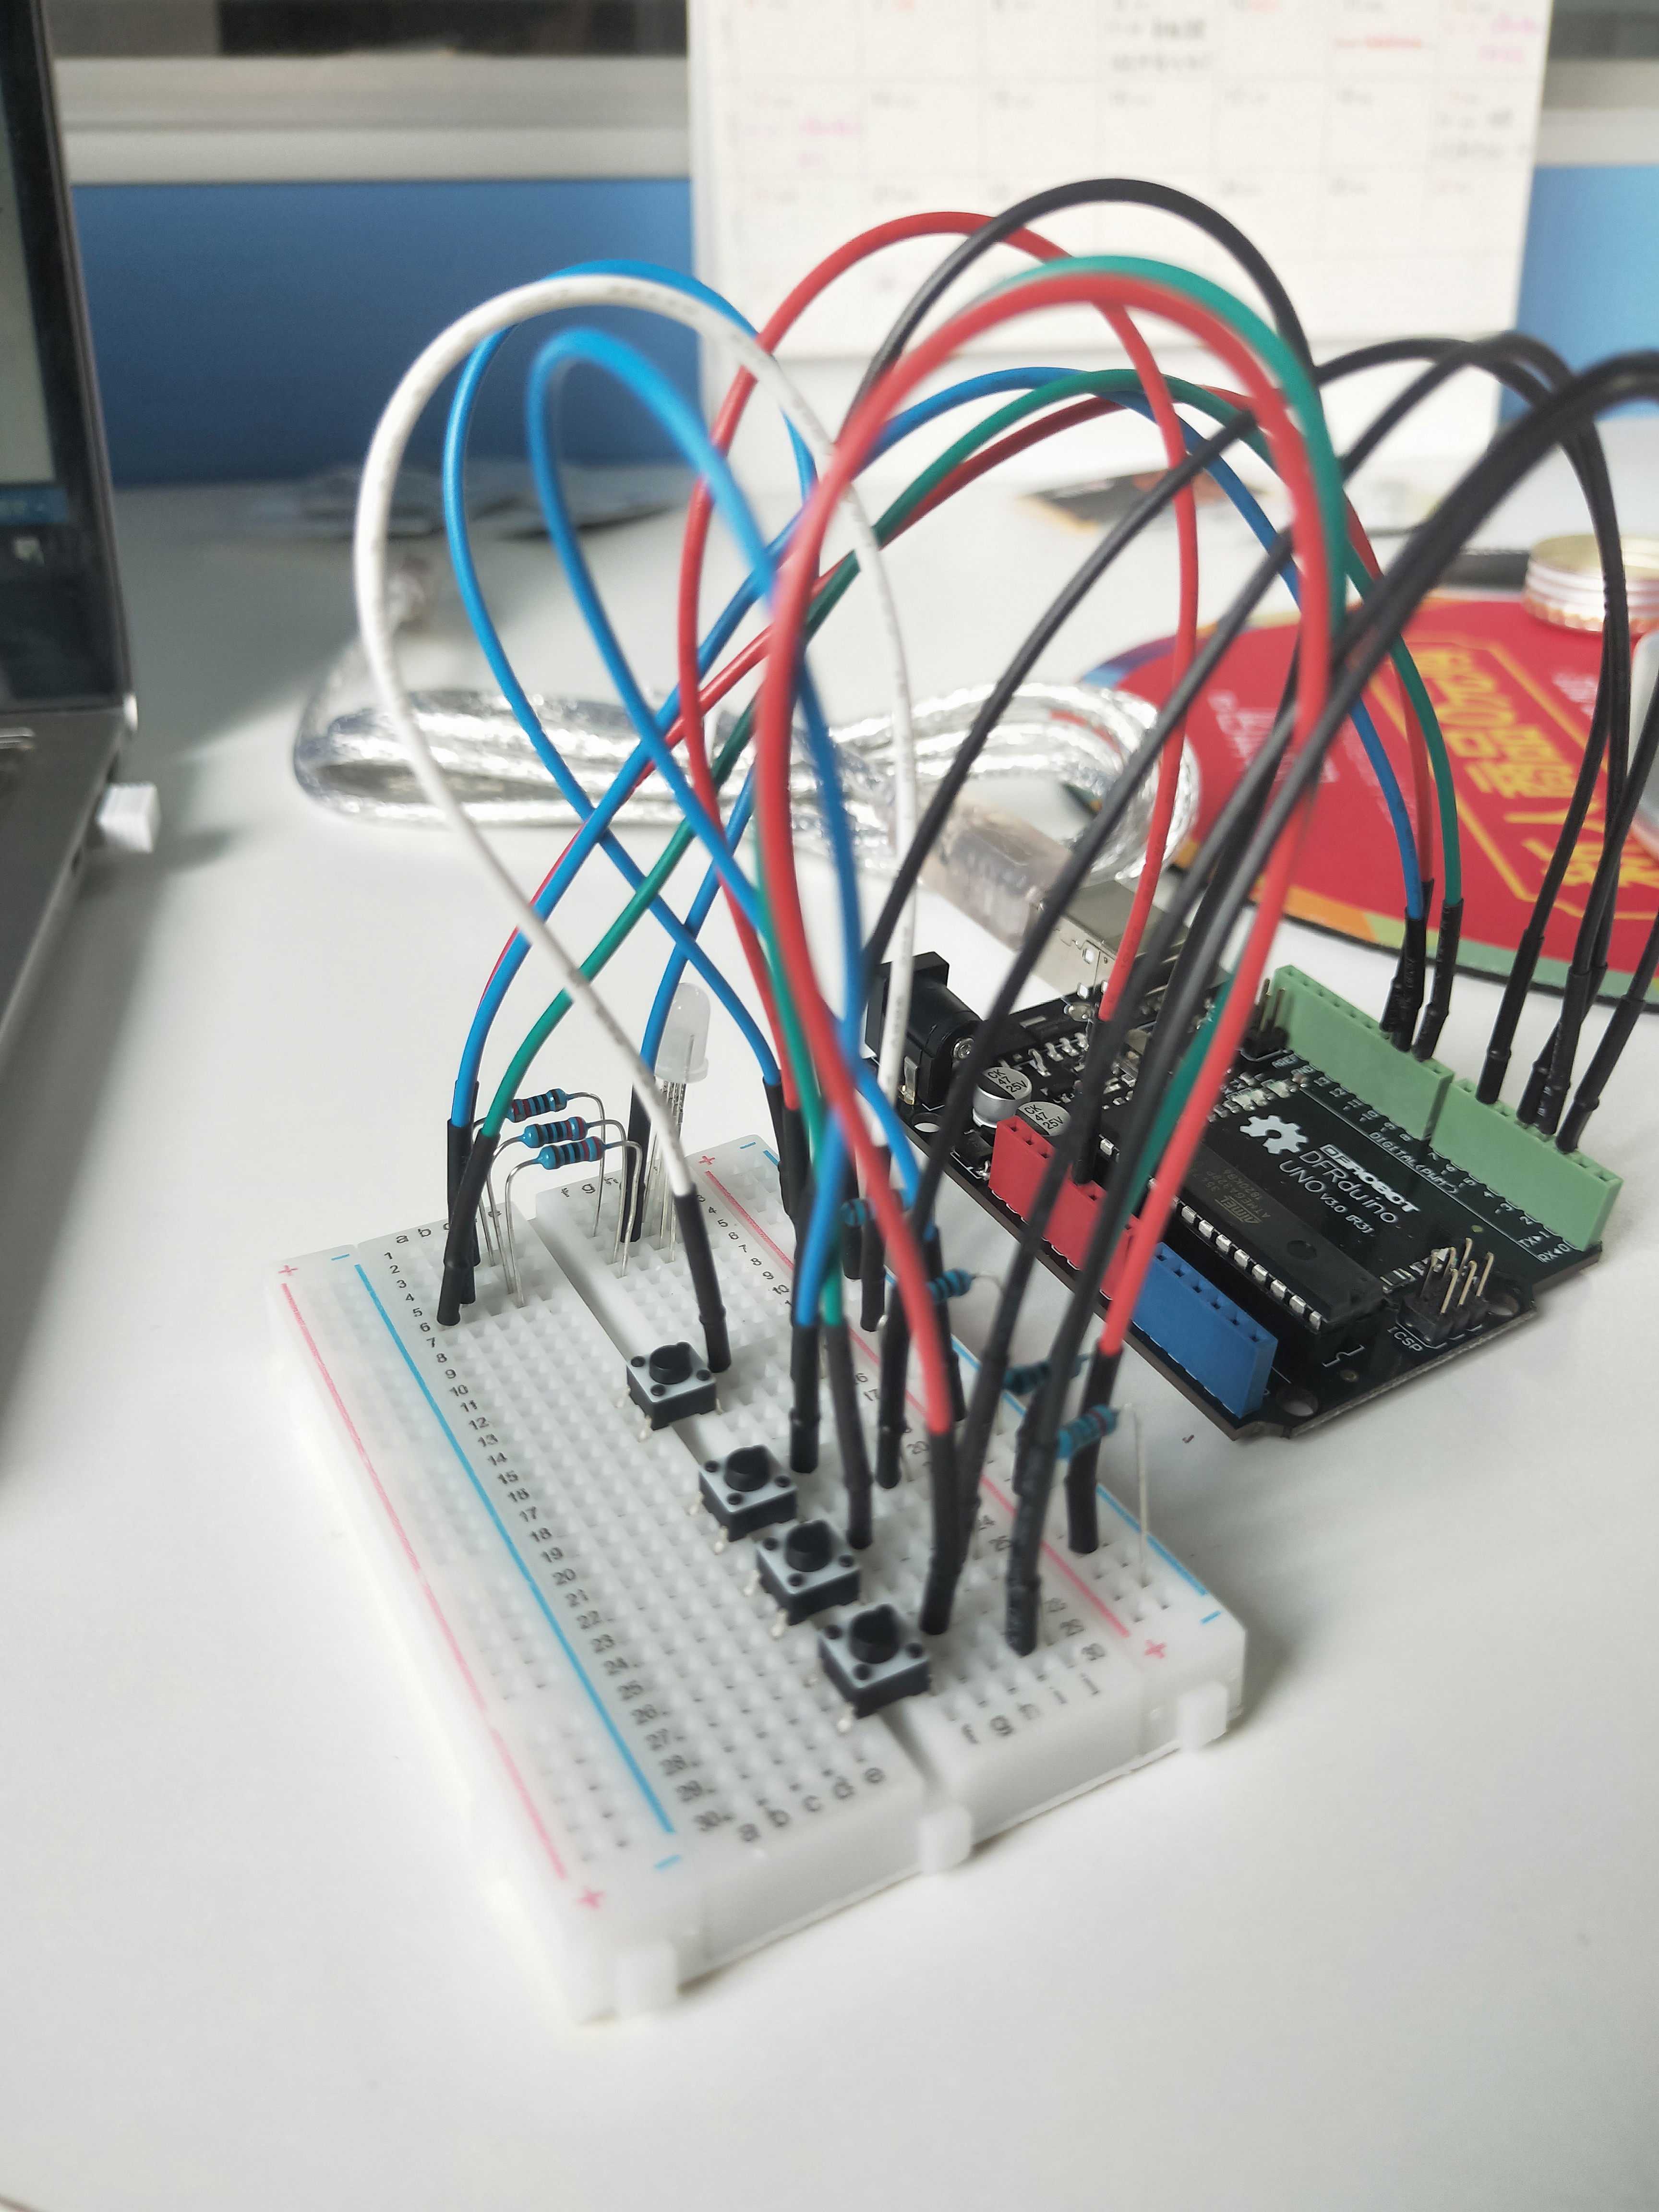
实验截图:
自己设计完成的第一个小项目,留两张照片记录一下吧~

【Arduino学习笔记05】Arduino数字输入、输出和脉冲宽带调制 -- 小项目:彩色小台灯的更多相关文章
- Arduino学习笔记① 初识Arduino
1.前言 近段时间,博主陆续更新了ESP8266学习笔记,主要开发平台是Arduino.但是,对于很多无基础的初学者来说,甚至不了解Arduino是什么.因此,博主决定加入一个Arduino学 ...
- 【Arduino学习笔记01】关于Arduino引脚的一些笔记
参考链接:https://www.yiboard.com/thread-831-1-1.html Arduino Uno R3 - 引脚图 Arduino Uno R3 - 详细参数 Arduino ...
- 机器学习实战(Machine Learning in Action)学习笔记————05.Logistic回归
机器学习实战(Machine Learning in Action)学习笔记————05.Logistic回归 关键字:Logistic回归.python.源码解析.测试作者:米仓山下时间:2018- ...
- C++ GUI Qt4学习笔记05
C++ GUI Qt4学习笔记05 qtc++正则表达式 QIntValidator -- 只让用户输入整数 QDoubleValidator -- 只让用户输入浮 ...
- stm32寄存器版学习笔记05 PWM
STM32除TIM6和TIM7外都可以产生PWM输出.高级定时器TIM1和TIM8可以同时产生7路PWM,通用定时器可以产生4路PWM输出. 1.TIM1 CH1输出PWM配置步骤 ①开启TIM1时钟 ...
- [Golang学习笔记] 05 程序实体2 作用域访问权限和变量重声明
作用域访问权限: 程序实体访问权限(作用域)有三种:1. 包级私有(代码包)2. 模块级私有(代码包)3. 公开(全域). 一个函数是一个代码块.一个程序实体的作用域总是会被限制在某个代码块中.好处: ...
- [原创]java WEB学习笔记05:Servlet中的ServletConfig对象
本博客为原创:综合 尚硅谷(http://www.atguigu.com)的系统教程(深表感谢)和 网络上的现有资源(博客,文档,图书等),资源的出处我会标明 本博客的目的:①总结自己的学习过程,相当 ...
- Bash脚本编程学习笔记05:用户交互与脚本调试
用户交互 在<学习笔记04>中我们有提到位置参数,位置参数是用来向脚本传递参数的一种方式.还有一种方式,是read命令. [root@c7-server ~]# read name alo ...
- 【Arduino学习笔记07】模拟信号的输入与输出 analogRead() analogWrite() map() constrain()
模拟信号:Arduino中的模拟信号就是0v~5v的连续的电压值 数字信号:Arduino中的数字信号就是高电平(5V)或者低电平(0V),是两个离散的值 模拟信号->数字信号:ADC(模数转换 ...
随机推荐
- Codeforces Round #644 (Div. 3) D. Buying Shovels (数学)
题意:商店里有\(k\)个包裹,第\(i\)个包裹中含有\(i\)个物品,现在想要买\(n\)物品,你可以选择某一个包裹购买任意次,使得物品数刚好等于\(n\),求最少的购买次数. 题解:首先,假如\ ...
- git忽略规则以及.gitignore文件不生效解决办法
正文 Git忽略规则: #此为注释 – 内容被 Git 忽略 .sample # 忽略所有 .sample 结尾的文件 !lib.sample # 但 lib.sample 除外 /TODO # 仅仅 ...
- CF1462-E2. Close Tuples (hard version)
本题为hard版,还有一个easy版,区别在于k和m的取值不同. 题意: 给出一个由n个数字组成的数组 \(a\).现在定义一种子集为\(\{A_1, A_2, A_3, ..., A_m\}\),使 ...
- InstallShield 2013 Limited Edition for Visual Studio
新建打包项目后,解决方案资源管理器中的结构如下: Project Assistant界面如下: 在Project Assistant中按照步骤创建打包项目: 1.Application Informa ...
- codeforces 876B
B. Divisiblity of Differences time limit per test 1 second memory limit per test 512 megabytes input ...
- IP的地址的划分
IP地址的划分是计算机网络中很重要的一个知识点,曾经考过三级,但是长时间不用就会忘掉,现在重新将IP的地址划分整理一遍. 首先IP地址的编址方法经历了三个阶段:分类的IP地址.子网的划分.构成超网 我 ...
- Netty(六)揭开 BootStrap 的神秘面纱
6.1 客户端 BootStrap 6.1.1 Channel 简介 在 Netty 中,Channel 是一个 Socket 的抽象,它为用户提供了关于 Socket 状态(是否是连接还是断开)以及 ...
- 九种姿势运行Mimikatz
https://www.freebuf.com/articles/web/176796.html
- proto3 协议指引
一.protocal buffer 是什么? 一种序列化机制. 什么是序列化? 一种转化为可存储和传输对象的过程. 序列化的方式有很多,那么proto有什么特殊的呢? 它的英文介绍里提到了neutra ...
- vue & this.$router.resolve
vue & this.$router.resolve gotoAutoUpdate (query = {}) { const { href } = this.$router.resolve({ ...