Android系统Recovery工作原理之使用update.zip升级过程分析(六)---Recovery服务流程细节【转】
本文转载自:http://blog.csdn.net/mu0206mu/article/details/7465439
Android系统Recovery工作原理之使用update.zip升级过程分析(六)---Recovery服务流程细节
Recovery服务毫无疑问是Recovery启动模式中最核心的部分。它完成Recovery模式所有的工作。Recovery程序对应的源码文件位于:/gingerbread0919/bootable/recovery/recovery.c。
一、 Recovery的三类服务:
先看一下在这个源码文件中开始部分的一大段注释,这将对我们理解Recovery服务的主要功能有很大帮助。代码如下:
- /*
- * The recovery tool communicates with the main system through /cache files.
- * /cache/recovery/command - INPUT - command line for tool, one arg per line
- * /cache/recovery/log - OUTPUT - combined log file from recovery run(s)
- * /cache/recovery/intent - OUTPUT - intent that was passed in
- *
- * The arguments which may be supplied in the recovery.command file:
- * --send_intent=anystring - write the text out to recovery.intent
- * --update_package=path - verify install an OTA package file
- * --wipe_data - erase user data (and cache), then reboot
- * --wipe_cache - wipe cache (but not user data), then reboot
- * --set_encrypted_filesystem=on|off - enables / diasables encrypted fs
- *
- * After completing, we remove /cache/recovery/command and reboot.
- * Arguments may also be supplied in the bootloader control block (BCB).
- * These important scenarios must be safely restartable at any point:
- *
- * FACTORY RESET
- * 1. user selects "factory reset"
- * 2. main system writes "--wipe_data" to /cache/recovery/command
- * 3. main system reboots into recovery
- * 4. get_args() writes BCB with "boot-recovery" and "--wipe_data"
- * -- after this, rebooting will restart the erase --
- * 5. erase_volume() reformats /data
- * 6. erase_volume() reformats /cache
- * 7. finish_recovery() erases BCB
- * -- after this, rebooting will restart the main system --
- * 8. main() calls reboot() to boot main system
- *
- * OTA INSTALL
- * 1. main system downloads OTA package to /cache/some-filename.zip
- * 2. main system writes "--update_package=/cache/some-filename.zip"
- * 3. main system reboots into recovery
- * 4. get_args() writes BCB with "boot-recovery" and "--update_package=..."
- * -- after this, rebooting will attempt to reinstall the update --
- * 5. install_package() attempts to install the update
- * NOTE: the package install must itself be restartable from any point
- * 6. finish_recovery() erases BCB
- * -- after this, rebooting will (try to) restart the main system --
- * 7. ** if install failed **
- * 7a. prompt_and_wait() shows an error icon and waits for the user
- * 7b; the user reboots (pulling the battery, etc) into the main system
- * 8. main() calls maybe_install_firmware_update()
- * ** if the update contained radio/hboot firmware **:
- * 8a. m_i_f_u() writes BCB with "boot-recovery" and "--wipe_cache"
- * -- after this, rebooting will reformat cache & restart main system --
- * 8b. m_i_f_u() writes firmware image into raw cache partition
- * 8c. m_i_f_u() writes BCB with "update-radio/hboot" and "--wipe_cache"
- * -- after this, rebooting will attempt to reinstall firmware --
- * 8d. bootloader tries to flash firmware
- * 8e. bootloader writes BCB with "boot-recovery" (keeping "--wipe_cache")
- * -- after this, rebooting will reformat cache & restart main system --
- * 8f. erase_volume() reformats /cache
- * 8g. finish_recovery() erases BCB
- * -- after this, rebooting will (try to) restart the main system --
- * 9. main() calls reboot() to boot main system
- *
- * SECURE FILE SYSTEMS ENABLE/DISABLE
- * 1. user selects "enable encrypted file systems"
- * 2. main system writes "--set_encrypted_filesystems=on|off" to
- * /cache/recovery/command
- * 3. main system reboots into recovery
- * 4. get_args() writes BCB with "boot-recovery" and
- * "--set_encrypted_filesystems=on|off"
- * -- after this, rebooting will restart the transition --
- * 5. read_encrypted_fs_info() retrieves encrypted file systems settings from /data
- * Settings include: property to specify the Encrypted FS istatus and
- * FS encryption key if enabled (not yet implemented)
- * 6. erase_volume() reformats /data
- * 7. erase_volume() reformats /cache
- * 8. restore_encrypted_fs_info() writes required encrypted file systems settings to /data
- * Settings include: property to specify the Encrypted FS status and
- * FS encryption key if enabled (not yet implemented)
- * 9. finish_recovery() erases BCB
- * -- after this, rebooting will restart the main system --
- * 10. main() calls reboot() to boot main system
- */
从注释中我们可以看到Recovery的服务内容主要有三类:
①FACTORY RESET,恢复出厂设置。
②OTA INSTALL,即我们的update.zip包升级。
③ENCRYPTED FILE SYSTEM ENABLE/DISABLE,使能/关闭加密文件系统。具体的每一类服务的大概工作流程,注释中都有,我们在下文中会详细讲解OTA INSTALL的工作流程。这三类服务的大概的流程都是通用的,只是不同操作体现与不同的操作细节。下面我们看Recovery服务的通用流程。
二、Recovery服务的通用流程:
在这里我们以OTA INSTALL的流程为例具体分析。并从相关函数的调用过程图开始,如下图:
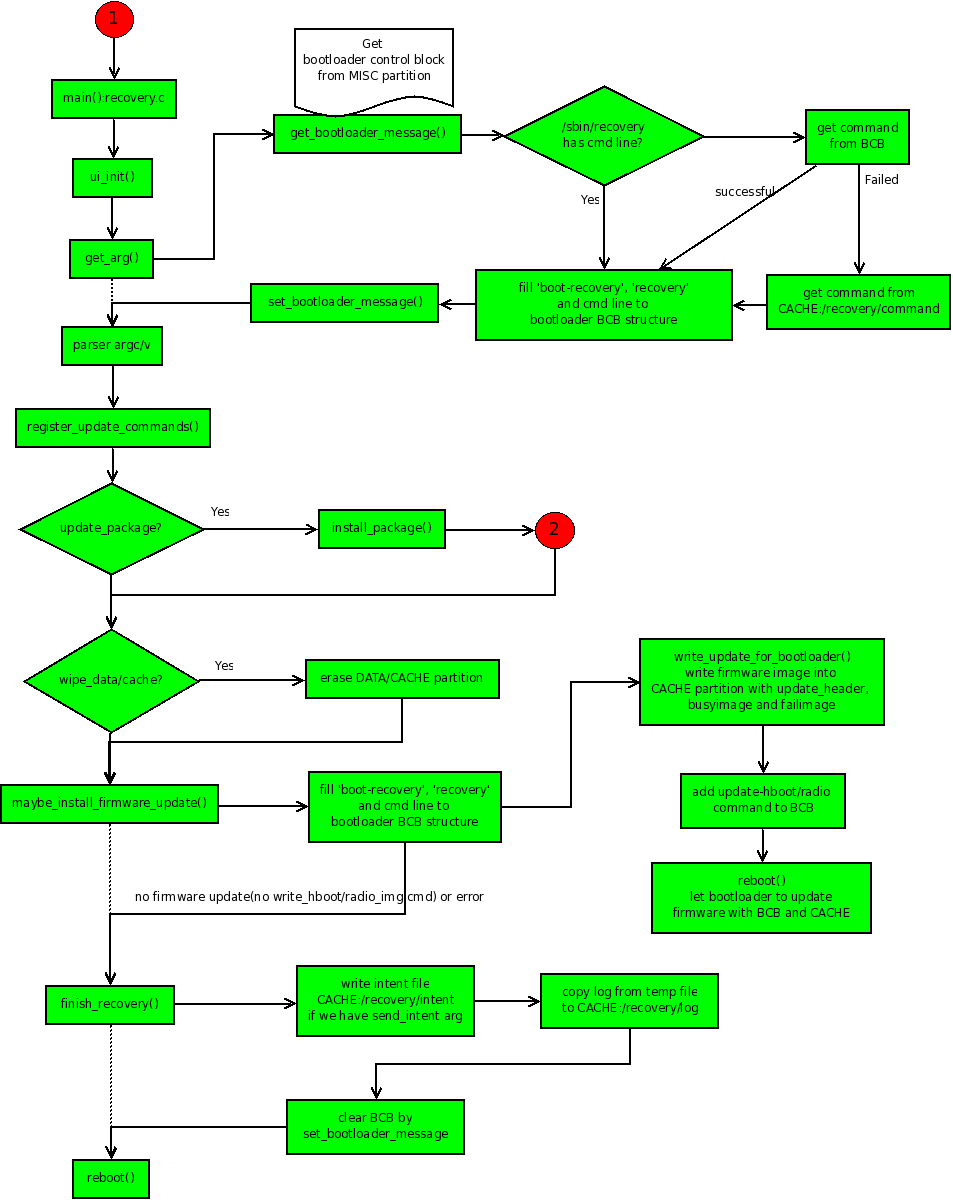
我们顺着流程图分析,从recovery.c的main函数开始:
1. ui_init():Recovery服务使用了一个基于framebuffer的简单ui(miniui)系统。这个函数对其进行了简单的初始化。在Recovery服务的过程中主要用于显示一个背景图片(正在安装或安装失败)和一个进度条(用于显示进度)。另外还启动了两个线程,一个用于处理进度条的显示(progress_thread),另一个用于响应用户的按键(input_thread)。
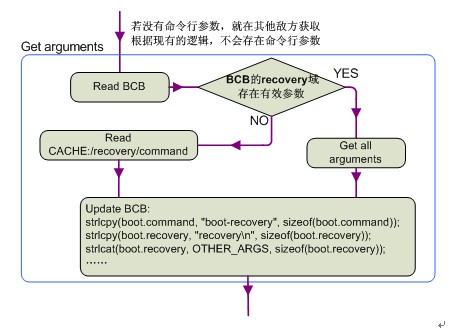
2. get_arg():这个函数主要做了上图中get_arg()往右往下直到parse arg/v的工作。我们对照着流程一个一个看。
①get_bootloader_message():主要工作是根据分区的文件格式类型(mtd或emmc)从MISC分区中读取BCB数据块到一个临时的变量中。
②然后开始判断Recovery服务是否有带命令行的参数(/sbin/recovery,根据现有的逻辑是没有的),若没有就从BCB中读取recovery域。如果读取失败则从/cache/recovery/command中读取然后。这样这个BCB的临时变量中的recovery域就被更新了。在将这个BCB的临时变量写回真实的BCB之前,又更新的这个BCB临时变量的command域为“boot-recovery”。这样做的目的是如果在升级失败(比如升级还未结束就断电了)时,系统在重启之后还会进入Recovery模式,直到升级完成。
③在这个BCB临时变量的各个域都更新完成后使用set_bootloader_message()写回到真正的BCB块中。
这个过程可以用一个简单的图来概括,这样更清晰:
3. parserargc/argv:解析我们获得参数。注册所解析的命令(register_update_command),在下面的操作中会根据这一步解析的值进行一步步的判断,然后进行相应的操作。
4. if(update_package):判断update_package是否有值,若有就表示需要升级更新包,此时就会调用install_package()(即图中红色的第二个阶段)。在这一步中将要完成安装实际的升级包。这是最为复杂,也是升级update.zip包最为核心的部分。我们在下一节详细分析这一过程。为从宏观上理解Recovery服务的框架,我们将这一步先略过,假设已经安装完成了。我们接着往下走,看安装完成后Recovery怎样一步步结束服务,并重启到新的主系统的。
5. if(wipe_data/wipe_cache):这一步判断实际是两步,在源码中是先判断是否擦除data分区(用户数据部分)的,然后再判断是否擦除cache分区。值得注意的是在擦除data分区的时候必须连带擦除cache分区。在只擦除cache分区的情形下可以不擦除data分区。
6. maybe_install_firmware_update():如果升级包中包含/radio/hboot firmware的更新,则会调用这个函数。查看源码发现,在注释中(OTA INSTALL)有这一个流程。但是main函数中并没有显示调用这个函数。目前尚未发现到底是在什么地方处理。但是其流程还是向上面的图示一样。即,① 先向BCB中写入“boot-recovery”和“—wipe_cache”之后将cache分区格式化,然后将firmware image 写入原始的cache分区中。②将命令“update-radio/hboot”和“—wipe_cache”写入BCB中,然后开始重新安装firmware并刷新firmware。③之后又会进入图示中的末尾,即finish_recovery()。
7. prompt_and_wait():这个函数是在一个判断中被调用的。其意义是如果安装失败(update.zip包错误或验证签名失败),则等待用户的输入处理(如通过组合键reboot等)。
8. finish_recovery():这是Recovery关闭并进入Main System的必经之路。其大体流程如下:
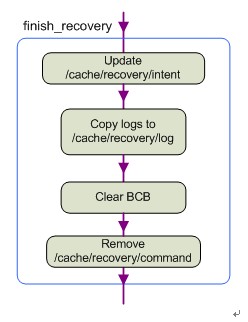
① 将intent(字符串)的内容作为参数传进finish_recovery中。如果有intent需要告知Main System,则将其写入/cache/recovery/intent中。这个intent的作用尚不知有何用。
② 将内存文件系统中的Recovery服务的日志(/tmp/recovery.log)拷贝到cache(/cache/recovery/log)分区中,以便告知重启后的Main System发生过什么。
③ 擦除MISC分区中的BCB数据块的内容,以便系统重启后不在进入Recovery模式而是进入更新后的主系统。
④ 删除/cache/recovery/command文件。这一步也是很重要的,因为重启后Bootloader会自动检索这个文件,如果未删除的话又会进入Recovery模式。原理在上面已经讲的很清楚了。
9. reboot():这是一个系统调用。在这一步Recovery完成其服务重启并进入Main System。这次重启和在主系统中重启进入Recovery模式调用的函数是一样的,但是其方向是不一样的。所以参数也就不一样。查看源码发现,其重启模式是RB_AUTOBOOT。这是一个系统的宏。
至此,我们对Recovery服务的整个流程框架已有了大概的认识。下面就是升级update.zip包时特有的也是Recovery服务中关于安装升级包最核心的第二个阶段。即我们图例中的红色2的那个分支。
我们将在下一篇详细讲解这一部分,即Recovery服务的核心部分install_package函数
Android系统Recovery工作原理之使用update.zip升级过程分析(六)---Recovery服务流程细节【转】的更多相关文章
- Android系统Recovery工作原理之使用update.zip升级过程分析(九)---updater-script脚本语法简介以及执行流程【转】
本文转载自:http://blog.csdn.net/mu0206mu/article/details/7465603 Android系统Recovery工作原理之使用update.zip ...
- Android系统Recovery工作原理之使用update.zip升级过程分析(八)---解析并执行升级脚本updater-script【转】
本文转载自:http://blog.csdn.net/mu0206mu/article/details/7465551 Android系统Recovery工作原理之使用update.zip升级过程分 ...
- Android系统Recovery工作原理之使用update.zip升级过程分析(一)
通过分析update.zip包在具体Android系统升级的过程,来理解Android系统中Recovery模式服务的工作原理.我们先从update.zip包的制作开始,然后是Android系统的启动 ...
- Android系统Recovery工作原理之使用update.zip升级过程分析(一)---update.zip包的制作【转】
本文转载自:http://blog.csdn.net/mu0206mu/article/details/7399822 这篇及以后的篇幅将通过分析update.zip包在具体Android系统升级的过 ...
- Android系统Recovery工作原理之使用update.zip升级过程分析(七)---Recovery服务的核心install_package函数【转】
本文转载自:http://blog.csdn.net/mu0206mu/article/details/7465514 一. Recovery服务的核心install_package(升级 ...
- Android系统Recovery工作原理之使用update.zip升级过程分析(三)【转】
本文转载自:http://blog.csdn.net/mu0206mu/article/details/7464699 以下的篇幅开始分析我们在上两个篇幅中生成的update.zip包在具体更新中所经 ...
- Android系统Recovery工作原理之使用update.zip升级过程---updater-script脚本语法简介以及执行流程(转)
目前update-script脚本格式是edify,其与amend有何区别,暂不讨论,我们只分析其中主要的语法,以及脚本的流程控制. 一.update-script脚本语法简介: 我们顺着所生成的脚本 ...
- Android系统Recovery工作原理
Android系统Recovery工作原理之使用update.zip升级过程分析(一)---update.zip包的制作 http://blog.csdn.net/mu0206mu/article/d ...
- (转)Android 系统 root 破解原理分析
现在Android系统的root破解基本上成为大家的必备技能!网上也有很多中一键破解的软件,使root破解越来越容易.但是你思考过root破解的 原理吗?root破解的本质是什么呢?难道是利用了Lin ...
随机推荐
- Android 8.0 启动后台service 出错 IllegalStateException: Not allowed to start service Intent
错误原因: Android 8.0 不再允许后台service直接通过startService方式去启动, 具体行为变更如下: 如果针对 Android 8.0 的应用尝试在不允许其创建后台服务的情况 ...
- 正则表达式提取String子串
最近遇到了一个字符串处理的功能,忽然发现了正则表达式的强大,深深的被她的迷人魅力所吸引,以前只是听说,今天亲眼所见,亲身经历,真的彻底折服. 言归正传:java中String类里面封装了很多字符串处理 ...
- Java_Web三大框架之Struts2
今天正式接触Java_Web三大框架之Struts2框架.对于初学者来说,先来了解什么是框架技术: 一.“框架技术”帮我们更快更好地构建程序: 1.是一个应用程序的半成品 2.提供可重用的公共结构 3 ...
- Python常用的标准库及第三方库
标准库Python拥有一个强大的标准库.Python语言的核心只包含数字.字符串.列表.字典.文件等常见类型和函数,而由Python标准库提供了系统管理.网络通信.文本处理.数据库接口.图形系统.XM ...
- (C/C++学习)5.C++中的虚继承-虚函数-多态解析
说明:在C++学习的过程中,虚继承-虚函数经常是初学者容易产生误解的两个概念,它们与C++中多态形成的关系,也是很多初学者经常产生困惑的地方,这篇文章将依次分别对三者进行解析,并讲述其之间的联系与不同 ...
- JS练习:切换图片
代码: <!DOCTYPE html> <html> <head> <meta charset="UTF-8"> <title ...
- C#学习笔记_12_枚举&结构体
12_枚举&结构体 枚举 是一种数据类型 适用于某些取值范围有限的数据 语法: [访问权限修饰符] enum 枚举名 { 枚举值 } 枚举名遵循大驼峰命名法 枚举一般情况下是和switch c ...
- Ubuntu_linux系统与网络服务管理
1.远程telnet联机:telnetd: 2.远程加密ssh联机:openssh: 3.webmin远程联机:webmin: 3.VNC远程图像界面控制:vino: 4.NAT网关服务器:iptab ...
- 【codeforces 797C】Minimal string
[题目链接]:http://codeforces.com/contest/797/problem/C [题意] 一开始,给你一个字符串s:两个空字符串t和u; 你有两种合法操作; 1.将s的开头字符加 ...
- (43). Spring Boot动态数据源(多数据源自动切换)【从零开始学Spring Boot】
在上一篇我们介绍了多数据源,但是我们会发现在实际中我们很少直接获取数据源对象进行操作,我们常用的是jdbcTemplate或者是jpa进行操作数据库.那么这一节我们将要介绍怎么进行多数据源动态切换.添 ...