Python开发【第三章】:文件操作
一、文件操作模式概述
1、打开文件的模式:
- r, 只读模式【默认】
- w,只写模式【不可读;不存在则创建;存在则删除内容;】
- a, 追加模式【不可读;不存在则创建;存在则只追加内容;】
2、"+" 同时读写某个文件:
- r+,可读写文件。【可读;可写;可追加】
- w+,写读
- a+,追加读
3、"U"表示在读取时,可以将 \r \n \r\n自动转换成 \n (与 r 或 r+ 模式同使用)
- rU
- r+U
4、"b"表示处理二进制文件(如:FTP发送上传ISO镜像文件,linux可忽略,windows处理二进制文件时需标注)
- rb
- wb
- ab
5、所有功能
- class TextIOWrapper(_TextIOBase):
- """
- Character and line based layer over a BufferedIOBase object, buffer.
- encoding gives the name of the encoding that the stream will be
- decoded or encoded with. It defaults to locale.getpreferredencoding(False).
- errors determines the strictness of encoding and decoding (see
- help(codecs.Codec) or the documentation for codecs.register) and
- defaults to "strict".
- newline controls how line endings are handled. It can be None, '',
- '\n', '\r', and '\r\n'. It works as follows:
- * On input, if newline is None, universal newlines mode is
- enabled. Lines in the input can end in '\n', '\r', or '\r\n', and
- these are translated into '\n' before being returned to the
- caller. If it is '', universal newline mode is enabled, but line
- endings are returned to the caller untranslated. If it has any of
- the other legal values, input lines are only terminated by the given
- string, and the line ending is returned to the caller untranslated.
- * On output, if newline is None, any '\n' characters written are
- translated to the system default line separator, os.linesep. If
- newline is '' or '\n', no translation takes place. If newline is any
- of the other legal values, any '\n' characters written are translated
- to the given string.
- If line_buffering is True, a call to flush is implied when a call to
- write contains a newline character.
- """
- def close(self, *args, **kwargs): # real signature unknown
- pass
- def detach(self, *args, **kwargs): # real signature unknown
- pass
- def fileno(self, *args, **kwargs): # real signature unknown
- pass
- def flush(self, *args, **kwargs): # real signature unknown
- pass
- def isatty(self, *args, **kwargs): # real signature unknown
- pass
- def read(self, *args, **kwargs): # real signature unknown
- pass
- def readable(self, *args, **kwargs): # real signature unknown
- pass
- def readline(self, *args, **kwargs): # real signature unknown
- pass
- def seek(self, *args, **kwargs): # real signature unknown
- pass
- def seekable(self, *args, **kwargs): # real signature unknown
- pass
- def tell(self, *args, **kwargs): # real signature unknown
- pass
- def truncate(self, *args, **kwargs): # real signature unknown
- pass
- def writable(self, *args, **kwargs): # real signature unknown
- pass
- def write(self, *args, **kwargs): # real signature unknown
- pass
- def __getstate__(self, *args, **kwargs): # real signature unknown
- pass
- def __init__(self, *args, **kwargs): # real signature unknown
- pass
- @staticmethod # known case of __new__
- def __new__(*args, **kwargs): # real signature unknown
- """ Create and return a new object. See help(type) for accurate signature. """
- pass
- def __next__(self, *args, **kwargs): # real signature unknown
- """ Implement next(self). """
- pass
- def __repr__(self, *args, **kwargs): # real signature unknown
- """ Return repr(self). """
- pass
- buffer = property(lambda self: object(), lambda self, v: None, lambda self: None) # default
- closed = property(lambda self: object(), lambda self, v: None, lambda self: None) # default
- encoding = property(lambda self: object(), lambda self, v: None, lambda self: None) # default
- errors = property(lambda self: object(), lambda self, v: None, lambda self: None) # default
- line_buffering = property(lambda self: object(), lambda self, v: None, lambda self: None) # default
- name = property(lambda self: object(), lambda self, v: None, lambda self: None) # default
- newlines = property(lambda self: object(), lambda self, v: None, lambda self: None) # default
- _CHUNK_SIZE = property(lambda self: object(), lambda self, v: None, lambda self: None) # default
- _finalizing = property(lambda self: object(), lambda self, v: None, lambda self: None) # default
file
二、文件操作常用功能
注:默认以下操作都是基于下面文件操作的:
- 我越无所适从
- 越会事与愿违
- 在交错的时空
- 灵魂加速下坠
- Here we are, here we are, here we are
here_we_are
1、read()、readline()、readlines()的区别
- #!/usr/bin/env python
- # -*- coding:utf-8 -*-
- #-Author-Lian
- info_file = open("here_we_are",encoding="utf-8") #默认读取模式
- print(info_file) #不加参数,直接打印
- #<_io.TextIOWrapper name='here_we_are' mode='r' encoding='utf-8'>
- print(info_file.read()) #read参数,读取文件所有内容
- #我越无所适从
- #越会事与愿违
- #在交错的时空
- #灵魂加速下坠
- #Here we are, here we are, here we are
- print(info_file.readline()) #readline,只读取文章中的一行内容
- #我越无所适从
- print(info_file.readlines()) #readlines,把文章内容以换行符分割,并生成list格式,数据量大的话不建议使用
- #['我越无所适从\n', '越会事与愿违\n', '在交错的时空\n', '灵魂加速下坠\n', 'Here we are, here we are, here we are\n']
2、seek、tell光标
- #!/usr/bin/env python
- # -*- coding:utf-8 -*-
- #-Author-Lian
- #读取文件光标问题
- info_file = open("here_we_are",encoding="utf-8") #文件句柄
- data = info_file.read() #默认光标在起始位置,.read()读取完后,光标停留到文件末尾
- data2 = info_file.read() #data2读取到的内容为空
- print(data)
- print("--------",data2)
- info_file.close() #关闭文件
- #我越无所适从
- #越会事与愿违
- #在交错的时空
- #灵魂加速下坠
- #Here we are, here we are, here we are
- #--------
- #用seek移动光标位置
- info_file = open("here_we_are",encoding="utf-8")
- print(info_file.tell()) #tell 获取当前的光标位
- print(info_file.readline().strip())
- print(info_file.readline().strip())
- print(info_file.readline().strip())
- print(info_file.tell())
- info_file.seek(0) #seek 移动光标到文件首部
- print(info_file.readline().strip()) #从文件首部开始打印
- info_file.close() #关闭文件
- #0
- #我越无所适从
- #越会事与愿违
- #在交错的时空
- #60
- #我越无所适从
3、文件循环
- #!/usr/bin/env python
- # -*- coding:utf-8 -*-
- #-Author-Lian
- #读取文件,并把第4行内容换成"-----我是分割线-------"
- info_file = open("here_we_are",encoding="utf-8")
- for index,line in enumerate(info_file.readlines()): #先把文件内容以行为分割生成列表,数据量大不能用
- if index == 3:
- print("-----我是分割线-------")
- continue
- print(line.strip())
- count = 0
- for line in info_file: #建议使用方法,每读取一行,内存会把之前的空间清空,不会占用太多内存
- count +=1
- if count == 4:
- print("-----我是分割线-------")
- continue
- print(line.strip())
- #我越无所适从
- #越会事与愿违
- #在交错的时空
- #-----我是分割线-------
- #Here we are, here we are, here we are
4、flush 刷新
- #!/usr/bin/env python
- # -*- coding:utf-8 -*-
- #-Author-Lian
- #模拟安装进度条
- import sys,time #加载模块
- for i in range(40):
- sys.stdout.write("#")
- sys.stdout.flush() #flush 强制刷新缓存到内存的数据写入硬盘
- time.sleep(0.1)
5、truncate 截断
- #!/usr/bin/env python
- # -*- coding:utf-8 -*-
- #-Author-Lian
- info_file = open("here_we_are","a") #非r、w模式
- info_file.seek(10)
- info_file.truncate(40)
- ###########文件内容###########
- #我越无所适从
- #越会事与愿违
注:truncate跟光标位置无关,从文件首部开始截取字符;如果是truncate(0)会把文件清空
6、with 语句
为了避免打开文件后忘记关闭,可以通过管理上下文,即:
- with open('log','r') as f:
- ...
如此方式,当with代码块执行完毕时,内部会自动关闭并释放文件资源。
在Python 2.7 后,with又支持同时对多个文件的上下文进行管理,即:
- with open('log1') as obj1, open('log2') as obj2:
- pass
7、r+ 读写
- #!/usr/bin/env python
- # -*- coding:utf-8 -*-
- #-Author-Lian
- #读写模式
- info_file = open("here_we_are","r+",encoding="utf-8") #读写模式
- print(info_file.readline().strip())
- print(info_file.readline().strip())
- print(info_file.tell()) #查看读取两行后光标的位置
- info_file.write("\nfffffffff") #没有写入数据到光标的位置,而是以追加的模式写到了文件最后
- print(info_file.tell()) #查看写入数据后光标的位置
- print("----------\n",info_file.read()) #从上次读取的光标的位置开始读取到最后 注:新加入的内容不会打印
- info_file.close()
- ###########打印输出###########
- #我越无所适从 #注: 读写模式下文件以追加的方式进行写入
- #越会事与愿违
- #40
- #130
- #----------
- #在交错的时空
- #灵魂加速下坠
- #Here we are, here we are, here we are
- ###########文件内容###########
- #我越无所适从
- #越会事与愿违
- #在交错的时空
- #灵魂加速下坠
- #Here we are, here we are, here we are
- #fffffffff
由上面的实例可知,读写模式下写入是追加写的,没有添加到指定行,而是写到文件的末尾。 r+模式下真的只是读和追加写吗?!看看下面的程序
- #!/usr/bin/env python
- # -*- coding:utf-8 -*-
- #-Author-Lian
- #r+模式下对文件进行修改,文件修改在博客下面进行描述
- with open("here_we_are","r+",encoding="utf-8") as info_file:
- file_read = info_file.read()
- info_file.seek(0) #seek 光标移到文件首部
- new_file = file_read.replace("灵魂加速下坠","灵魂加速shangsheng") #把文件进行修改
- info_file.write(new_file) #写入到文件中
- ############执行完后文件内容############
- #我越无所适从
- #越会事与愿违
- #在交错的时空
- #灵魂加速shangsheng
- #Here we are, here we are, here we are
看完上面代码你可能会想,擦,what are you 弄啥嘞?第一个程序不是说光标跟文件的写入文件没关系吗?不应该会把修改的内容添加到文件末尾吗?怎么替换了?(黑人问号脸),来看看下面的程序
- #!/usr/bin/env python
- # -*- coding:utf-8 -*-
- #-Author-Lian
- #r+模式下对文件进行修改,文件修改在博客下面进行详细描述
- with open("here_we_are","r+",encoding="utf-8") as info_file:
- file_read = info_file.read()
- info_file.seek(0) #seek 光标移到文件首部
- print(info_file.readline()) #新增一行文件打印,光标到第一行未
- new_file = file_read.replace("灵魂加速下坠","灵魂加速shangsheng") #把文件进行修改
- info_file.write(new_file) #写入到文件中
- ############执行完后文件内容############
- #我越无所适从
- #越会事与愿违
- #在交错的时空
- #灵魂加速下坠
- #Here we are, here we are, here we are我越无所适从
- #越会事与愿违
- #在交错的时空
- #灵魂加速shangsheng
- #Here we are, here we are, here we are
这次在seek光标位置和对文件修改之间加了一条print,此刻会发现虽然光标在第一行尾末,但是新添加的内容写到了文件末尾,用的是追加模式。下面我们可以坐下总结了
总结:r+模式下,如果在.write()进行写入内容前,有print()输出,则要写的内容会从文件尾部开始写入,使用的是读、追加模式;如果在.write()进行写入内容前,是seek()移动光标,则要写的内容会从移动到的光标开始进行写入,会把原来的内容覆盖掉,而不是整体后移,这点要记住;如果在.write()进行写入内容前,既没有print()也没有seek()光标移动,这种情况之前想的的情况,就是r+读写模式能先写后读吗?r+模式下默认光标在文件的首部,此时会直接从文件开头进行写入,效果等同于seek(0)。关于最后一点,参考a+模式。
8、 w+ 写读
- #!/usr/bin/env python
- # -*- coding:utf-8 -*-
- #-Author-Lian
- #写读模式
- info_file = open("here_we_are2","w+",encoding="utf-8") #写读模式 此模式一般不用
- info_file.write("我越无所适从\n") #向文件中写入四行内容
- info_file.write("越会事与愿违\n")
- info_file.write("在交错的时空\n")
- info_file.write("灵魂加速下坠\n")
- print(info_file.tell()) #打印光标 此时光标在写入文件末尾
- info_file.seek(0) #光标回到文件首部 如果不seek的话会从文件末尾打印,即为空
- print(info_file.tell())
- print(info_file.readline()) #打印第一行,光标回到第一行末尾
- info_file.write("------这一行应该写到第二行------") #理论上应该写在第一行的末尾后面
- info_file.close()
- ###########打印输出###########
- #80
- #0
- #我越无所适从
- ###########文件内容###########
- #我越无所适从
- #越会事与愿违
- #在交错的时空
- #灵魂加速下坠
- #------这一行应该写到第二行------
总结:读写模式一定要先写后读吗?能不能先读后写? 如果先读的话,由于用的是w+模式打开的文件,打开后会清空原文件内容,所有读取的到东西是空的。另W+模式后期用的很少,了解即可,包括a+追加读这种模式;另w+模式下,光标会跟随文件写入移到到文件末尾,不用seek移到光标的话,打印内容为空
注:w+模式下,关于.write()跟seek()和print()的关系与r+模式下是一样一样的。w+打开文件后先清空,然后追加写,如果.write()前有seek()的话会从光标位置覆盖写。
9、a+ 追加读
虽然a+不重要,但还是要通过下面的例子做下简单了解:
- #!/usr/bin/env python
- # -*- coding:utf-8 -*-
- #-Author-Lian
- #a+ 追加写
- with open("here_we_are","a+",encoding="utf-8") as info_file: #追加写
- print(info_file.tell()) #打印光标 默认在文件尾部
- info_file.seek(0) #seek 光标移到文件首部
- info_file.write("----我是第一行------") #判断.write()与seek的关系
- ###########打印输出###########
- #117
- ###########执行后文件内容###########
- #我越无所适从
- #越会事与愿违
- #在交错的时空
- #灵魂加速下坠
- #Here we are, here we are, here we are----我是第一行------
总结:通过上面的程序可以得出,a+模式下光标位置为文件末尾,如果要print()的话要结合seek()进行使用;另外与r+、w+不同的是,.write()与seek()没有关系,只能写内容到文件末尾,一直都是追加模式!
10、rb 二进制读
- #!/usr/bin/env python
- # -*- coding:utf-8 -*-
- #-Author-Lian
- #二进制读取
- info_file = open("here_we_are","rb") #二进制模式读取
- #应用场景:网络传输
- print(info_file.readline())
- print(info_file.readline())
- print(info_file.readline())
- #b'\xe6\x88\x91\xe8\xb6\x8a\xe6\x97\xa0\xe6\x89\x80\xe9\x80\x82\xe4\xbb\x8e\r\n'
- #b'\xe8\xb6\x8a\xe4\xbc\x9a\xe4\xba\x8b\xe4\xb8\x8e\xe6\x84\xbf\xe8\xbf\x9d\r\n'
- #b'\xe5\x9c\xa8\xe4\xba\xa4\xe9\x94\x99\xe7\x9a\x84\xe6\x97\xb6\xe7\xa9\xba\r\n'
11、wb 二进制写(ab也一样)
- #!/usr/bin/env python
- # -*- coding:utf-8 -*-
- #-Author-Lian
- #二进制写入
- info_file = open("here_we_are2","wb") #二进制模式写入
- #应用场景与rb相似
- info_file.write("我越无所适从\n".encode()) #对写入的字符串进行编码
- info_file.write("越会事与愿违\n".encode())
- info_file.close()
12、文件的修改
文件修改方式:
- 把文件读取到内存当中,对内存进行修改,把修改后的内容写入到原文件(旧内容被清空)
- 如果在硬盘上直接写,会进行覆盖,硬盘上不能进行插入,原来的内容不会整体后移,而是直接覆盖掉
- 把文件读取到内存当中,对内存进行修改,把修改的内容另存为新的文件(旧文件保留)
① 另存方式
- info_file = open("here_we_are","r",encoding="utf-8")
- new_file = open("here_we_are2","w",encoding="utf-8")
- for line in info_file:
- if "灵魂加速下坠" in line:
- line = line.replace("灵魂加速下坠","灵魂加速shangsheng")
- new_file.write(line)
- ##########执行后文件here_we_are2内容#########
- #我越无所适从
- #越会事与愿违
- #在交错的时空
- #灵魂加速shangsheng
- #Here we are, here we are, here we are
② r+模式
- #r+模式下对文件进行修改,
- with open("here_we_are","r+",encoding="utf-8") as info_file:
- file_read = info_file.read() #加载内容到内存,此时光标在文件末尾
- new_file = file_read.replace("灵魂加速下坠","灵魂加速shangsheng") #把文件进行修改
- info_file.truncate(0) #清空原文件,不会影响光标位置
- info_file.seek(0) #移动光标到文件首部,不做操作的话,新的内容会添加到之前光标的位置
- info_file.write(new_file) #修改的内容写入到文件中
- ############执行完后文件内容############
- #我越无所适从
- #越会事与愿违
- #在交错的时空
- #灵魂加速shangsheng
- #Here we are, here we are, here we are
③ a+模式
- #a+模式下对文件进行修改,
- with open("here_we_are","a+",encoding="utf-8") as info_file:
- info_file.seek(0) #默认光标在文件末尾
- file_read = info_file.read() #加载内容到内存,此时光标在文件末尾
- new_file = file_read.replace("灵魂加速下坠","灵魂加速shangsheng") #把文件进行修改
- info_file.truncate(0) #清空原文件,不会影响光标位置
- info_file.seek(0) #移动光标到文件首部,不做操作的话,新的内容会添加到之前光标的位置
- info_file.write(new_file) #修改的内容写入到文件中
- ############执行完后文件内容############
- #我越无所适从
- #越会事与愿违
- #在交错的时空
- #灵魂加速shangsheng
- #Here we are, here we are, here we are
三、练习
1、对文件实现替换功能
操作文件
- Somehow, it seems the love I knew was always the most destructive kind
- 不知为何,我经历的爱情总是最具毁灭性的的那种
- Yesterday when I was young
- 昨日当我年少轻狂
- The taste of life was sweet
- 生命的滋味是甜的
- As rain upon my tongue
- 就如舌尖上的雨露
- I teased at life as if it were a foolish game
- 我戏弄生命 视其为愚蠢的游戏
- The way the evening breeze
- 就如夜晚的微风
- May tease the candle flame
- 逗弄蜡烛的火苗
- The thousand dreams I dreamed
- 我曾千万次梦见
- The splendid things I planned
- 那些我计划的绚丽蓝图
- I always built to last on weak and shifting sand
- 但我总是将之建筑在易逝的流沙上
- I lived by night and shunned the naked light of day
- 我夜夜笙歌 逃避白昼赤裸的阳光
- And only now I see how the time ran away
- 事到如今我才看清岁月是如何匆匆流逝
yesterday
流程图
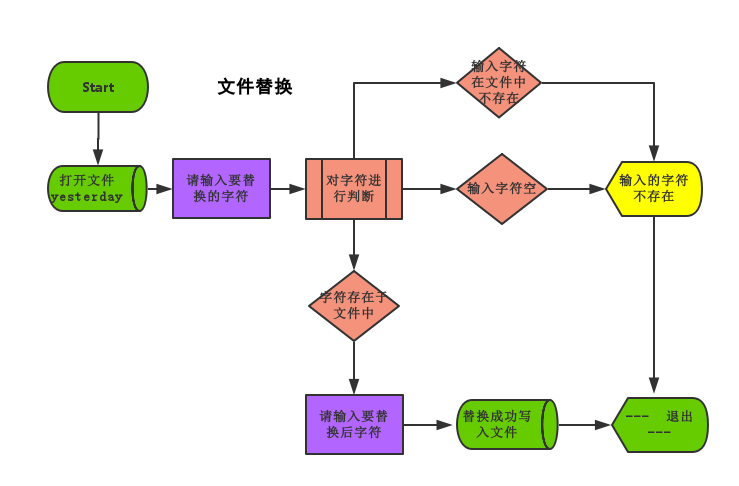
程序code
- #!/usr/bin/env python
- # -*- coding:utf-8 -*-
- #-Author-Lian
- ##实现简单的替换功能
- with open("yesterday","r+",encoding="utf-8") as info_file: #with 方式打开文件yesterday
- old_data = input("Please input to modify content:")
- if old_data in info_file.read() and old_data != "": #判断输入的字符是否存在或不为空
- new_data = input("Please input to the content of the modified:")
- info_file.seek(0) #光标回到文件首部
- new_file = info_file.read().replace(old_data,new_data) #文件内容替换
- info_file.seek(0)
- info_file.truncate(0) #清空原文件
- info_file.write(new_file) #写入修改的内容到文件
- else:
- print("The content of the input does not exist")
2、修改haproxy配置文件
- 可查询
- 可增加
- 可删除
- 具体实现参考readme
操作文件:
- global
- log 127.0.0.1 local2
- daemon
- maxconn 256
- log 127.0.0.1 local2 info
- defaults
- log global
- mode http
- timeout connect 5000ms
- timeout client 50000ms
- timeout server 50000ms
- option dontlognull
- listen stats :8888
- stats enable
- stats uri /admin
- stats auth admin:1234
- frontend oldboy.org
- bind 0.0.0.0:80
- option httplog
- option httpclose
- option forwardfor
- log global
- acl www hdr_reg(host) -i www.oldboy.org
- use_backend www.oldboy.org if www
- backend www.oldboy.org
- server 100.1.7.9 100.1.7.9 weight 20 maxconn 3000
haproxy
需知readme:
- # 实现简单的替换功能
- ### 作者介绍:
- * author:lzl
- ### 博客地址:
- * http://www.cnblogs.com/lianzhilei/p/5722771.html(第八 集合)
- * http://www.cnblogs.com/lianzhilei/p/5749932.html
- * http://www.cnblogs.com/lianzhilei/p/5754069.html
- * http://www.cnblogs.com/lianzhilei/p/5754810.html
- ### 实现效果:
- * 查看yesterday文件,输入想要替换的字符,然后输入新替换的字符,然后查看文件旧的字符被新的字符所替换
- ### 运行环境:
- * Python3.0+
- ### 目录结构:
- Day3
- ├── 文件替换
- │ ├── file_relpace.py
- │ └── yesterday
- │ ├── file_relpace.png
- │ └── readme.txt
- ### linux 运行说明:
- * 上述文件都拷贝到同一级目录下
- * 加执行权限 chmod 755 file_relpace.py
- * 执行程序 python file_relpace.py
readme
流程图:
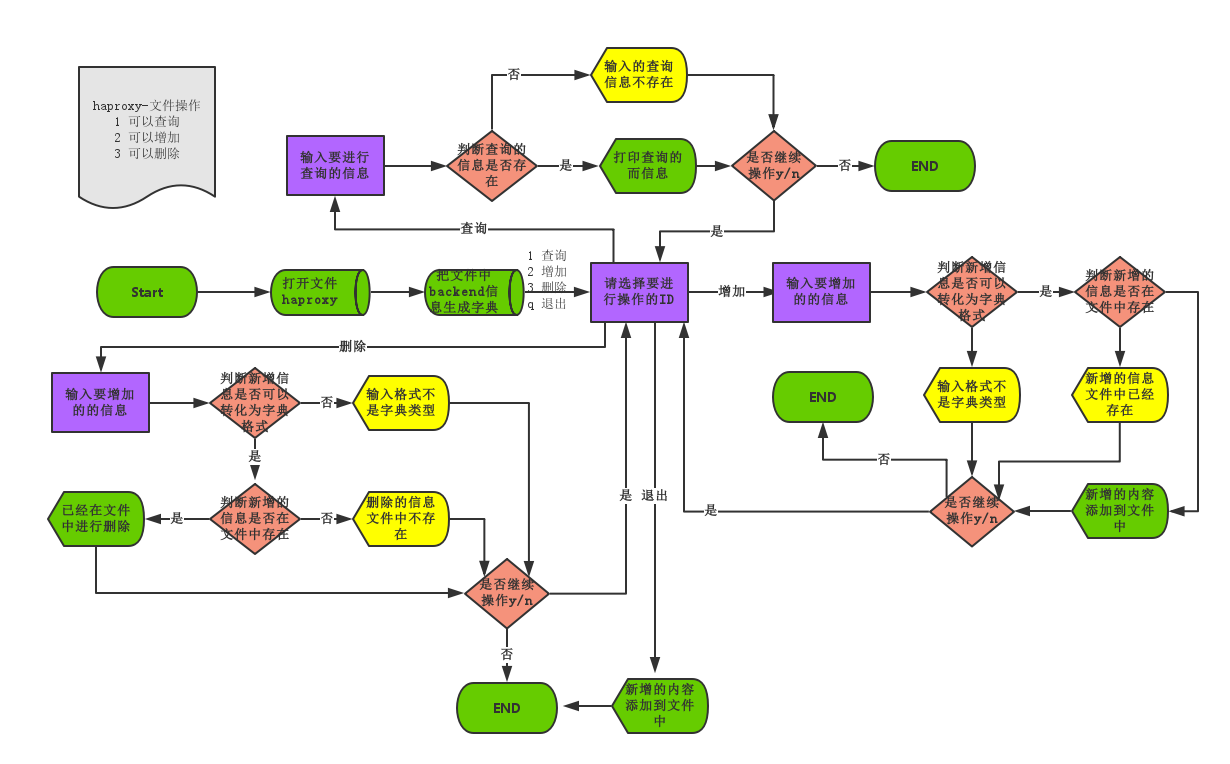
程序code:
- #!/usr/bin/env python
- # -*- coding:utf-8 -*-
- #-Author-Lian
- def if_continue(): #定义函数if_continue() 提示用户是否继续操作
- if_cont = input("\n\33[34;1mDo you want to continue to operate on files【y】/【n】:\33[0m\n")
- if if_cont == "y":
- pass
- else:
- exit()
- def info_message(options): #定义函数info_message() 提示用户操作信息
- print("\33[31;1mInfo of %s\33[0m".center(50,"-")%options)
- with open("haproxy","a+",encoding="utf-8") as file_haproxy: #a+模式打开haproxy文件
- while True: #设置while循环
- dict_file = {}
- file_haproxy.seek(0) #移动光标到文件首部
- for line in file_haproxy:
- if "backend" in line and "use_backend" not in line: #提前文件中backend信息并生成字典dict_file
- dict_file[line.split()[1]]=file_haproxy.readline().strip()
- print("File_Operations_Backend".center(50,"*"),"\n1\tQuery\n2\tAdd\n3\tDel\nq\tQuit")
- user_choice = input("\33[34;1mSelect the ID to operate:\33[0m") #让用户选择操作文件的模式
- if user_choice == "1":
- info_query = input("\33[34;1mInput information to query:\33[0m")
- if info_query in dict_file.keys(): #判断输入的查询的信息是否存在
- info_message("Query")
- print(dict_file[info_query]) #如果查询的backend存在 打印查询的信息
- else: #否则提示没有查询到相关信息
- print("\33[31;1mError:No query to the corresponding information!\33[0m")
- if_continue()
- elif user_choice == "2":
- info_add = input("\33[34;1mInput information to add:\33[0m")
- try: #判断输入的类型是否可以转换成字典格式
- dict_add = eval(info_add) #字符串转换成字典
- if dict_add["backend"] not in dict_file.keys(): #判断新增的信息没有存在于文件中
- dict_add_record = dict_add["record"] #把要添加的信息定义到变量file_add 中
- file_add = "backend %s\n\t\tserver %s weight %s maxconn %s\n"%(dict_add["backend"],
- dict_add_record["server"],dict_add_record["weight"],dict_add_record["maxconn"],)
- file_haproxy.write(file_add) #把新增的信息写到文件中
- info_message("Add") #打印增加成功
- print("\33[32;1mSuccessfully adding information backend %s to a file\33[0m"%(dict_add["backend"]))
- else: #如果已经存在 打印信息已经存在
- print("\33[31;1mError:Add the information already exists!\33[0m")
- if_continue()
- except Exception: #如果输入的字符不能转换为字典格式 提示错误
- print("\33[31;1mError:Please enter the dict format!\33[0m")
- if_continue()
- elif user_choice == "3":
- info_del = input("\33[34;1mInput information to del:\33[0m")
- try: #判断输入的类型是否可以转换成字典格式
- dict_del = eval(info_del) #字符串转换成字典
- if dict_del["backend"] in dict_file.keys(): #判断要删除的信息有没有存在于文件中
- file_haproxy.seek(0)
- list_del = file_haproxy.readlines() #把文件信息写入列表list_del
- index = list_del.index("backend %s\n"%(dict_del["backend"])) #获取要删除信息的下标
- del list_del[index] #在列表中删除输入信息
- del list_del[index]
- file_haproxy.seek(0)
- file_haproxy.truncate(0) #文件清空
- for line in list_del: #把list_del内容写入到文件中
- file_haproxy.write(line)
- info_message("Del") #提示删除成功
- print("\33[32;1mSuccessfully delect information backend %s to a file\33[0m" % (dict_del["backend"]))
- else: #如果要删除的信息不再文件中,打印信息不存在
- print("\33[31;1mError:Delect the information is not exists!\33[0m")
- if_continue()
- except Exception: #如果输入的字符不能转换为字典格式 提示错误
- print("\33[31;1mError:Please enter the dict format!\33[0m")
- if_continue()
- elif user_choice == "q":
- print("\33[31;1mExit\33[0m".center(30,"-"))
- exit()
- else:
- print("\33[31;1mError:Select the ID does not exist!\33[0m")
Python开发【第三章】:文件操作的更多相关文章
- 2 python第三章文件操作
1.三元运算 三元运算又称三目运算,是对简单的条件语句的简写,如: 简单条件语句: if 条件成立: val = 1 else: val = 2 改成三元运算: val = 1 if 条件成立 els ...
- Python之路:Python 基础(三)-文件操作
操作文件时,一般需要经历如下步骤: 打开文件 操作文件 一.打开文件 文件句柄 = file('文件路径', '模式') # 还有一种方法open 例1.创建文件 f = file('myfile. ...
- python基础(三)-- 文件操作
一. 文件操作: 对文件操作流程 1.打开文件,得到文件句柄并赋值给一个变量 2.通过句柄对文件进行操作 3.关闭文件 现有文件如下 : Somehow, it seems the love I kn ...
- python开发_xml.etree.ElementTree_XML文件操作_该模块在操作XML数据是存在安全隐患_慎用
xml.etree.ElementTree模块实现了一个简单而有效的用户解析和创建XML数据的API. 在python3.3版本中,该模块进行了一些修改: xml.etree.cElementTree ...
- Python基础(三)文件操作
[对文件进行循环操作] fw = open('nhy','w') for line in fw: print('line:',line) #直接循环文件对象,每次循环的时候就是取每一行的数据 fw ...
- 路飞学城-Python开发-第三章
# 数据结构: # goods = [ # {"name": "电脑", "price": 1999}, # {"name&quo ...
- 基于Html5 Plus + Vue + Mui 移动App开发(三)-文件操作(读取、保存、更新数据)
随着手机的发展,现在越来越多的人选择在手机上看书.无论是专业书籍.文学.英语还是网络小说,在手机上看新闻成了人们处理零碎时间的办法.在智能手机里安装一个资讯APP,可以随时.随地查看自己想看的资讯 ...
- 第三章 JavaScript操作BOM对象
第三章 JavaScript操作BOM对象 一.window对象 浏览器对象模型(BOM)是javascript的组成之一,它提供了独立与浏览器窗口进行交换的对象,使用浏览器对象模型可以实现与HT ...
- (Python )格式化输出、文件操作、json
本节学习Python的格式化输出,文件操作以及json的简单用法 1.格式化输出 将非字符串类型转换成字符串,可以使用函数:str() 或者repr() ,(这两个函数的区别目前我还没搞懂,求解答) ...
- ASP.NET自定义控件组件开发 第三章 为控件添加事件 前篇
原文:ASP.NET自定义控件组件开发 第三章 为控件添加事件 前篇 第三章 为控件添加事件 好了,我们之前以前开发一个控件.而且也添加了属性,开发也很规范,但是那个控件还差最后一点:添加事件. 系列 ...
随机推荐
- linux下如何删除乱码文件
首先执行ls -i命令,此时在文件前面会出现一个数字,这个数字是文件的节点号 接着,执行命令 find -inum 节点号 -delete 即可将乱码文件成功删除
- postman测试API
首先创建环境变量 再次在请求参数中,可以应用环境变量,只需要在地址中引用环境变量即可 将返回的参数设置到环境变量中 如已经设置好环境变量,在认证中,选择Bearer Token,然后设置Token为环 ...
- GitHub OAuth 第三方登录示例教程
这组 OAuth 系列教程,第一篇介绍了基本概念,第二篇介绍了获取令牌的四种方式,今天演示一个实例,如何通过 OAuth 获取 API 数据. 很多网站登录时,允许使用第三方网站的身份,这称为&quo ...
- Flutter移动电商实战 --(43)详细页_补充首页跳转到详细页
首页轮播点击到详细页 修改我们轮播这里的代码:SwiperDiy这个类这里的代码 return InkWell( onTap: (){ Application.router.navigateTo(co ...
- Qt代码配色VS2015风格
通过本文的方法可以将VS2015的深色主题界面应用到Qt上,对于喜欢VS代码风格配色的人应该会比较有用 效果图: 1. 设置IDE主题 为了配合vs深色的代码编辑背景,将Qt的主题也换成深色版本 2 ...
- C# WinForm快捷键设置技巧
C# WinForm快捷键设置技巧 1.Alt+*(按钮快捷键) 按钮快捷键也为最常用快捷键,其设置也故为简单.在大家给button.label.menuStrip等其他控件的Text属性指定名称时, ...
- insmod某个内核模块时提示“Failed to find the folder holding the modules”如何处理?
答: 创建/lib/modules/$(uname -r)目录,命令如下: mkdir /lib/modules/$(uname -r)
- 学习笔记——C++编程cin测试记录
cin读取输入流,遇到空格会暂停,下次继续读入剩下的,+++. #include <iostream> using namespace std; int main() { cout< ...
- IOS APP开发入门案例
1.创建新项目 2.设计布局,main.storyboard中,在控件库中 3.布局控件关联控制器 4.设置事件或者显示模式 5.编写代码: import UIKit class ViewContro ...
- Oracle查看表结构的方法【我】
Oracle查看表结构的方法 方法一: 在命令窗口下输入 DESC table_name; 回车 方法二: 在sql窗口下 SELECT DBMS_METADATA.GET_ ...