QT之UDP通信
前言:前一篇讲了TCP通信,这篇来看看UDP通信。
这里说明一下,UDP通信中分为三种通信分别为单播、组播和广播,下面将一一为大家介绍。
同样的我们都需要在工程文件中添加network
- QT += core gui network
进行UDP通信需要用到的头文件
- #include <QUdpSocket>
这里我们把UDP通信分为两个部分写,一个是发送端,另一个是接收端,而发送端中又分为单播、组播和广播三种形式,下面我们先来看看写发送端的代码程序的步骤:
发送端Udpsend的代码:
1、单播
(1)创建套接字
- QUdpSocket mSocket;
mSocket = new QUdpSocket();
(2)发送数据到指定的地址和端口号
- mSocket->writeDatagram(ui->textEdit->toPlainText().toUtf8(),QHostAddress("192.168.137.1"),6677);
参数:ui->textEdit->toPlainText().toUtf8 要发送的消息
QHostAddress("192.168.137.1") 接收端的ip地址
6677 端口号,要和接收端的一致
2、组播,组播和单播的步骤是一样的,只有ip地址处有区别
- 组播ip地址范围:224.0.0.0-239.255.255.255
- 例子:mSocket->writeDatagram(ui->textEdit->toPlainText().toUtf8(),QHostAddress("224.0.0.100"),);
3、广播,广播也只有ip地址和单播有区别
- 广播地址ip:QHostAddress::Broadcast
例子:mSocket->writeDatagram(ui->textEdit->toPlainText().toUtf8(),QHostAddress::Broadcast,6677);
好了,单播、组播和广播的区别应该都了解了,那么我们就来看发送端(udpsend.cpp)的具体代码:
- #include "udpsend.h"
- #include "ui_udpsend.h"
- UdpSend:: UdpSend(QWidget *parent) :
- QMainWindow(parent),
- ui(new Ui:: UdpSend)
- {
- ui->setupUi(this);
- //初始化创建QUdpSocket对象
- mSocket = new QUdpSocket();
- }
- UdpSend::~ UdpSend()
- {
- delete ui;
- }
- void UdpSend::on_sendBt_clicked()
- {
- //单播
- // qint64 len = mSocket->writeDatagram(ui->textEdit->toPlainText().toUtf8(),QHostAddress("192.168.137.1"),6677);
- //组播ip地址范围:224.0.0.0-239.255.255.255
- //qint64 len = mSocket->writeDatagram(ui->textEdit->toPlainText().toUtf8(),QHostAddress("224.0.0.100"),6677);
- //广播
- qint64 len = mSocket->writeDatagram(ui->textEdit->toPlainText().toUtf8(),QHostAddress::Broadcast,);
- }
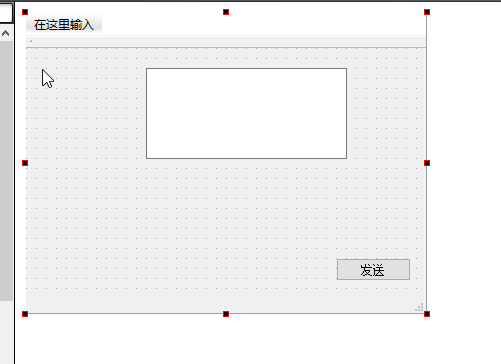
发送端的界面文件我做的很简单,我只做了发送消息框:

看完发送端的代码,我们继续来看接收端的代码(Udprecv)
接收端不管是单播、或者组播还是广播代码都是一样的,下面是写接收端代码的步骤:
1、创建套接字
- QUdpSocket mSocket;
- mSocket = new QUdpSocket();
2、绑定地址和端口号
- mSocket->bind(QHostAddress::AnyIPv4,);
- 参数:AnyIPv4 IPv4
- 端口号,要和发送端的一致
3、等待数据的到来,利用readyRread()
- connect(mSocket,SIGNAL(readyRead()),this,SLOT(read_data()));
4、读数据
- readDatagram(char * data, qint64 maxSize, QHostAddress * address = , quint16 * port = )
- 参数:
- data:数据
- maxSize:数据的大小
- address:QHostAddress类型的地址
- port:端口号
- 例子:
- void UdpRecv::read_data()
- {
- QByteArray array;
- QHostAddress address;
- quint16 port;
- array.resize(mSocket->bytesAvailable());//根据可读数据来设置空间大小
- mSocket->readDatagram(array.data(),array.size(),&address,&port); //读取数据
- ui->listWidget->addItem(array);//显示数据
- //发送反馈数据
- }
如果是组播的话还涉及到加入组播和退出组播
- 加入到组播组 joinMulticastGroup
- 例子:mSocket->joinMulticastGroup(QHostAddress("224.0.0.100"));
- 退出组播组 leaveMulticastGroup
- 例子: mSocket->leaveMulticastGroup(QHostAddress("224.0.0.100"));
来看看接收端(Udprecv.cpp)具体实现的代码
- #include "udprecv.h"
- #include "ui_udprecv.h"
- UdpRecv::UdpRecv(QWidget *parent) :
- QMainWindow(parent),
- ui(new Ui::UdpRecv)
- {
- ui->setupUi(this);
- //创建对象 初始化
- mSocket = new QUdpSocket();
- //绑定
- mSocket->bind(QHostAddress::AnyIPv4,);
- //关联读数据信号readyread
- connect(mSocket,SIGNAL(readyRead()),this,SLOT(read_data()));
- }
- UdpRecv::~UdpRecv()
- {
- delete ui;
- }
- void UdpRecv::read_data()
- {
- QByteArray array;
- QHostAddress address;
- quint16 port;
- array.resize(mSocket->bytesAvailable());//根据可读数据来设置空间大小
- mSocket->readDatagram(array.data(),array.size(),&address,&port); //读取数据
- ui->listWidget->addItem(array);//显示数据
- //发送反馈数据
- }
- void UdpRecv::on_checkBox_clicked(bool checked)
- {
- if(checked)
- {
- //加入组播
- mSocket->joinMulticastGroup(QHostAddress("224.0.0.100"));
- }
- else
- {
- //退出组播
- mSocket->leaveMulticastGroup(QHostAddress("224.0.0.100"));
- }
- }
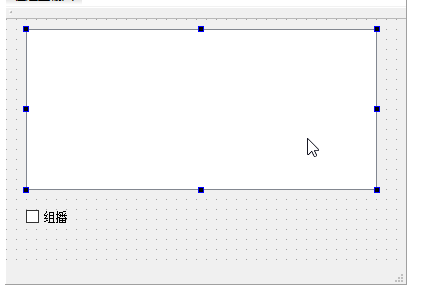
接收端的界面文件我只加了显示接收到的信息和选择是否加入组播的选择按钮

这是发送端和接收分开来写的,此外我也实现了一下发送端和接收端写到同一个文件中
头文件qudpapp.h中的代码
- #ifndef QUDPAPP_H
- #define QUDPAPP_H
- #include <QWidget>
- #include <QUdpSocket>
- namespace Ui {
- class QUdpApp;
- }
- class QUdpApp : public QWidget
- {
- Q_OBJECT
- public:
- explicit QUdpApp(QWidget *parent = );
- ~QUdpApp();
- private slots:
- void on_sendSigRb_clicked(); //单播旋转轴
- void on_sendMulRb_clicked(); //组播选择
- void on_sendBroadRb_clicked(); //广播选择
- void on_sendBt_clicked(); //发送按钮
- //===========================================
- void on_recvCb_clicked(bool checked); //选择接收
- void on_recvJoinMulBt_clicked(); //加入组播
- void on_recvLeaveMulBt_clicked(); //退出组播
- void on_sendMesEdit_cursorPositionChanged();//检测消息框是否有数据
- void read_data();
- private:
- Ui::QUdpApp *ui;
- QUdpSocket *mSocket;
- QHostAddress sendaddrees;
- QString sendPort;
- };
- #endif // QUDPAPP_H
源文件qudpapp.cpp中的代码
- #include "qudpapp.h"
- #include "ui_qudpapp.h"
- #include <QMessageBox>
- QUdpApp::QUdpApp(QWidget *parent) :
- QWidget(parent),
- ui(new Ui::QUdpApp)
- {
- ui->setupUi(this);
- mSocket = new QUdpSocket();//创建套接字
- ui->sendBt->setEnabled(false);
- }
- QUdpApp::~QUdpApp()
- {
- delete ui;
- }
- //==========================发送端====================
- //单播选择
- void QUdpApp::on_sendSigRb_clicked()
- {
- if(ui->sendPortEdit->text().isEmpty() || ui->sendSigAddrEdit->text().isEmpty())
- {
- QMessageBox::warning(this,"提示","请输入单播ip和端口号");
- //ui->sendSigRb->setChecked(false);
- return;
- }
- sendaddrees.setAddress( ui->sendSigAddrEdit->text());
- sendPort = ui->sendPortEdit->text();
- }
- //组播选择
- void QUdpApp::on_sendMulRb_clicked()
- {
- if(ui->sendPortEdit->text().isEmpty() || ui->sendMulAddrEdit->text().isEmpty())
- {
- QMessageBox::warning(this,"提示","请输入组播ip和端口号");
- //ui->sendSigRb->setChecked(false);
- return;
- }
- sendaddrees.setAddress( ui->sendMulAddrEdit->text());
- sendPort = ui->sendPortEdit->text();
- }
- //广播选择
- void QUdpApp::on_sendBroadRb_clicked()
- {
- if(ui->sendPortEdit->text().isEmpty() || ui->sendBroadAddrEdit->text().isEmpty())
- {
- QMessageBox::warning(this,"提示","请输入广播ip和端口号");
- //ui->sendSigRb->setChecked(false);
- return;
- }
- sendaddrees.setAddress( ui->sendBroadAddrEdit->text());
- sendPort = ui->sendPortEdit->text();
- }
- //发送按钮
- void QUdpApp::on_sendBt_clicked()
- {
- mSocket->writeDatagram(ui->sendMesEdit->toPlainText().toUtf8(),sendaddrees,sendPort.toInt());
- }
- //检测发送消息对话框中是否有消息
- void QUdpApp::on_sendMesEdit_cursorPositionChanged()
- {
- if(ui->sendMesEdit->toPlainText().isEmpty())
- {
- ui->sendBt->setEnabled(false);
- }
- else
- {
- ui->sendBt->setEnabled(true);
- }
- }
- //==========================发送端====================
- //==========================接收端=====================
- //选择接收
- void QUdpApp::on_recvCb_clicked(bool checked)
- {
- if(ui->recvPortEdit->text().isEmpty())
- {
- QMessageBox::warning(this,"提示","请输入端口号");
- ui->recvCb->setChecked(false);
- return;
- }
- if(checked)
- {
- mSocket->bind(QHostAddress::AnyIPv4,ui->recvPortEdit->text().toInt());
- connect(mSocket,SIGNAL(readyRead()),this,SLOT(read_data()));
- ui->recvPortEdit->setEnabled(false);
- }
- else
- {
- mSocket->close();
- ui->recvPortEdit->setEnabled(true);
- }
- }
- //加入组播
- void QUdpApp::on_recvJoinMulBt_clicked()
- {
- if(ui->recvMulAddrEdit->text().isEmpty())
- {
- QMessageBox::warning(this,"提示","请输入组播ip");
- return;
- }
- if(mSocket->joinMulticastGroup(QHostAddress(ui->recvMulAddrEdit->text()))) //加入组播
- {
- ui->recvMulAddr->addItem(ui->recvMulAddrEdit->text());
- }
- else
- {
- QMessageBox::warning(this,"提示","加入组播失败,请修改ip后继续加入");
- //return;
- }
- }
- //退出组播
- void QUdpApp::on_recvLeaveMulBt_clicked()
- {
- mSocket->leaveMulticastGroup(QHostAddress(ui->recvMulAddr->currentIndex()));//退出组播地址列表当前的组播
- ui->recvMulAddr->removeItem(ui->recvMulAddr->currentIndex()); //删除组播地址列表中当前的组播地址
- }
- void QUdpApp::read_data()
- {
- QByteArray array;
- array.resize(mSocket->bytesAvailable()); //将接收数据的array设置成为要接收数据的大小
- QHostAddress recvaddress;
- quint16 port;
- mSocket->readDatagram(array.data(),array.size(),&recvaddress,&port); //读取数据
- ui->recvList->addItem(array);
- }
- //==========================接收端=====================
界面文件qudpapp.ui
- <?xml version="1.0" encoding="UTF-8"?>
- <ui version="4.0">
- <class>QUdpApp</class>
- <widget class="QWidget" name="QUdpApp">
- <property name="geometry">
- <rect>
- <x></x>
- <y></y>
- <width></width>
- <height></height>
- </rect>
- </property>
- <property name="sizePolicy">
- <sizepolicy hsizetype="Preferred" vsizetype="Expanding">
- <horstretch></horstretch>
- <verstretch></verstretch>
- </sizepolicy>
- </property>
- <property name="windowTitle">
- <string>QUdpApp</string>
- </property>
- <widget class="QWidget" name="layoutWidget">
- <property name="geometry">
- <rect>
- <x></x>
- <y></y>
- <width></width>
- <height></height>
- </rect>
- </property>
- <layout class="QVBoxLayout" name="verticalLayout_6">
- <item>
- <layout class="QHBoxLayout" name="horizontalLayout_9">
- <item>
- <widget class="QGroupBox" name="groupBox">
- <property name="sizePolicy">
- <sizepolicy hsizetype="Preferred" vsizetype="Preferred">
- <horstretch></horstretch>
- <verstretch></verstretch>
- </sizepolicy>
- </property>
- <property name="title">
- <string>发送端</string>
- </property>
- <layout class="QVBoxLayout" name="verticalLayout_3">
- <property name="spacing">
- <number></number>
- </property>
- <property name="leftMargin">
- <number></number>
- </property>
- <property name="topMargin">
- <number></number>
- </property>
- <property name="rightMargin">
- <number></number>
- </property>
- <property name="bottomMargin">
- <number></number>
- </property>
- <item>
- <layout class="QVBoxLayout" name="verticalLayout_2">
- <item>
- <layout class="QHBoxLayout" name="horizontalLayout">
- <property name="spacing">
- <number></number>
- </property>
- <item>
- <widget class="QLabel" name="label">
- <property name="text">
- <string>端 口 号</string>
- </property>
- </widget>
- </item>
- <item>
- <widget class="QLineEdit" name="sendPortEdit">
- <property name="sizePolicy">
- <sizepolicy hsizetype="Preferred" vsizetype="Preferred">
- <horstretch></horstretch>
- <verstretch></verstretch>
- </sizepolicy>
- </property>
- <property name="placeholderText">
- <string>请输入端口号</string>
- </property>
- </widget>
- </item>
- </layout>
- </item>
- <item>
- <layout class="QHBoxLayout" name="horizontalLayout_2">
- <property name="spacing">
- <number></number>
- </property>
- <item>
- <widget class="QRadioButton" name="sendSigRb">
- <property name="text">
- <string>单播</string>
- </property>
- </widget>
- </item>
- <item>
- <widget class="QLineEdit" name="sendSigAddrEdit">
- <property name="sizePolicy">
- <sizepolicy hsizetype="Preferred" vsizetype="Preferred">
- <horstretch></horstretch>
- <verstretch></verstretch>
- </sizepolicy>
- </property>
- <property name="placeholderText">
- <string>请输入接收方地址</string>
- </property>
- </widget>
- </item>
- </layout>
- </item>
- <item>
- <layout class="QHBoxLayout" name="horizontalLayout_3">
- <property name="spacing">
- <number></number>
- </property>
- <item>
- <widget class="QRadioButton" name="sendMulRb">
- <property name="text">
- <string>组播</string>
- </property>
- </widget>
- </item>
- <item>
- <widget class="QLineEdit" name="sendMulAddrEdit">
- <property name="sizePolicy">
- <sizepolicy hsizetype="Preferred" vsizetype="Preferred">
- <horstretch></horstretch>
- <verstretch></verstretch>
- </sizepolicy>
- </property>
- <property name="placeholderText">
- <string>请输入组播地址</string>
- </property>
- </widget>
- </item>
- </layout>
- </item>
- <item>
- <layout class="QHBoxLayout" name="horizontalLayout_4">
- <property name="spacing">
- <number></number>
- </property>
- <item>
- <widget class="QRadioButton" name="sendBroadRb">
- <property name="text">
- <string>广播</string>
- </property>
- </widget>
- </item>
- <item>
- <widget class="QLineEdit" name="sendBroadAddrEdit">
- <property name="sizePolicy">
- <sizepolicy hsizetype="Preferred" vsizetype="Preferred">
- <horstretch></horstretch>
- <verstretch></verstretch>
- </sizepolicy>
- </property>
- <property name="placeholderText">
- <string>请输入广播地址</string>
- </property>
- </widget>
- </item>
- </layout>
- </item>
- </layout>
- </item>
- </layout>
- </widget>
- </item>
- <item>
- <widget class="QGroupBox" name="groupBox_2">
- <property name="sizePolicy">
- <sizepolicy hsizetype="Preferred" vsizetype="Preferred">
- <horstretch></horstretch>
- <verstretch></verstretch>
- </sizepolicy>
- </property>
- <property name="title">
- <string>接收端</string>
- </property>
- <layout class="QVBoxLayout" name="verticalLayout_4">
- <item>
- <layout class="QVBoxLayout" name="verticalLayout">
- <item>
- <layout class="QHBoxLayout" name="horizontalLayout_7">
- <item>
- <widget class="QCheckBox" name="recvCb">
- <property name="text">
- <string>接收</string>
- </property>
- </widget>
- </item>
- <item>
- <widget class="QLineEdit" name="recvPortEdit">
- <property name="placeholderText">
- <string>请输入端口号</string>
- </property>
- </widget>
- </item>
- </layout>
- </item>
- <item>
- <layout class="QHBoxLayout" name="horizontalLayout_5">
- <property name="spacing">
- <number></number>
- </property>
- <item>
- <widget class="QLineEdit" name="recvMulAddrEdit">
- <property name="placeholderText">
- <string>输入要加入的组播地址</string>
- </property>
- </widget>
- </item>
- <item>
- <widget class="QPushButton" name="recvJoinMulBt">
- <property name="maximumSize">
- <size>
- <width></width>
- <height></height>
- </size>
- </property>
- <property name="text">
- <string>加入</string>
- </property>
- </widget>
- </item>
- </layout>
- </item>
- <item>
- <layout class="QHBoxLayout" name="horizontalLayout_6">
- <item>
- <widget class="QComboBox" name="recvMulAddr"/>
- </item>
- <item>
- <widget class="QPushButton" name="recvLeaveMulBt">
- <property name="maximumSize">
- <size>
- <width></width>
- <height></height>
- </size>
- </property>
- <property name="text">
- <string>退出</string>
- </property>
- </widget>
- </item>
- </layout>
- </item>
- </layout>
- </item>
- </layout>
- </widget>
- </item>
- </layout>
- </item>
- <item>
- <layout class="QVBoxLayout" name="verticalLayout_5">
- <item>
- <widget class="QListWidget" name="recvList"/>
- </item>
- <item>
- <widget class="QTextEdit" name="sendMesEdit">
- <property name="maximumSize">
- <size>
- <width></width>
- <height></height>
- </size>
- </property>
- </widget>
- </item>
- </layout>
- </item>
- <item>
- <layout class="QHBoxLayout" name="horizontalLayout_8">
- <item>
- <widget class="QPushButton" name="clearRecvListBt">
- <property name="text">
- <string>清除接收区</string>
- </property>
- </widget>
- </item>
- <item>
- <widget class="QPushButton" name="clearsendEditBt">
- <property name="text">
- <string>清除发送区</string>
- </property>
- </widget>
- </item>
- <item>
- <spacer name="horizontalSpacer_2">
- <property name="orientation">
- <enum>Qt::Horizontal</enum>
- </property>
- <property name="sizeHint" stdset="">
- <size>
- <width></width>
- <height></height>
- </size>
- </property>
- </spacer>
- </item>
- <item>
- <widget class="QPushButton" name="sendBt">
- <property name="text">
- <string>发送</string>
- </property>
- </widget>
- </item>
- </layout>
- </item>
- </layout>
- </widget>
- </widget>
- <layoutdefault spacing="" margin=""/>
- <resources/>
- <connections>
- <connection>
- <sender>clearRecvListBt</sender>
- <signal>clicked()</signal>
- <receiver>recvList</receiver>
- <slot>clear()</slot>
- <hints>
- <hint type="sourcelabel">
- <x></x>
- <y></y>
- </hint>
- <hint type="destinationlabel">
- <x></x>
- <y></y>
- </hint>
- </hints>
- </connection>
- <connection>
- <sender>clearsendEditBt</sender>
- <signal>clicked()</signal>
- <receiver>sendMesEdit</receiver>
- <slot>clear()</slot>
- <hints>
- <hint type="sourcelabel">
- <x></x>
- <y></y>
- </hint>
- <hint type="destinationlabel">
- <x></x>
- <y></y>
- </hint>
- </hints>
- </connection>
- </connections>
- </ui>
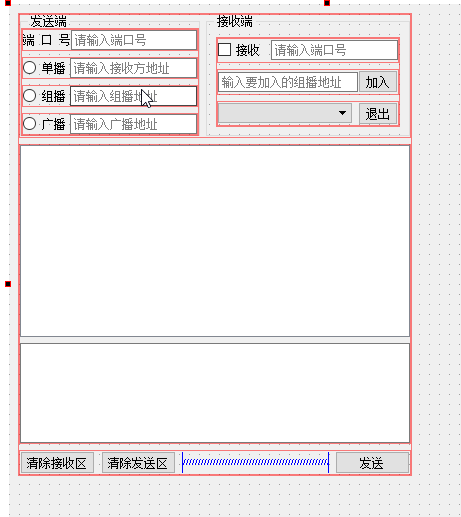
界面文件图示

QT之UDP通信的更多相关文章
- Qt下实现简单的UDP通信
本人呢还是小实习生一枚,刚一脚踏进社会大母亲的怀抱,不想找工作的时候碰到的全是培训机构... 不过还是幸运的进了一家...咳咳,国企?!好吧,其实是国企下面的一个分出来的小公司(正在起步中,算是创业公 ...
- qt在windows下的udp通信(最简单)
qt编程:windows下的udp通信 本文博客链接:http://blog.csdn.net/jdh99,作者:jdh,转载请注明. 环境: 主机:win7 开发环境:qt 功能: 用udp进行收发 ...
- QT下UDP套接字通信——QUdpSocket 简单使用
QT下UDP套接字通信--QUdpSocket QUdpSocket类提供一个UDP套接字. UDP(用户数据报协议)是一种轻量级.不可靠.面向数据报.无连接的协议.它可以在可靠性不重要的情况下使用. ...
- 界面编程之QT的Socket通信20180730
/*******************************************************************************************/ 一.linu ...
- 使用 Qt 获取 UDP 数据并显示成图片
一个项目,要接收 UDP 数据包,解析并获取其中的数据,主要根据解析出来的行号和序号将数据拼接起来,然后将拼接起来的数据(最重要的数据是 R.G.B 三个通道的像素值)显示在窗口中.考虑到每秒钟要接收 ...
- 【转】Qt Socket简单通信
最近要用到Qt的Socket部分,网上关于这部分的资料都比较复杂,我在这总结一下,把Socket的主要部分提取出来,实现TCP和UDP的简单通信. 1.UDP通信 UDP没有特定的server端和cl ...
- 套接字、UDP通信、TCP通信、TCP/IP协议簇
一.套接字(socket) 1.英语单词socket:n.插座:穴:v.插入插座 2.套接字就是源IP地址和目的IP地址.源端口号和目的端口号的组合,是通过传输层进行通信的.IP指定电脑,端口指定某一 ...
- 高性能 TCP & UDP 通信框架 HP-Socket v3.5.3
HP-Socket 是一套通用的高性能 TCP/UDP 通信框架,包含服务端组件.客户端组件和 Agent 组件,广泛适用于各种不同应用场景的 TCP/UDP 通信系统,提供 C/C++.C#.Del ...
- 高性能 TCP & UDP 通信框架 HP-Socket v3.5.2
HP-Socket 是一套通用的高性能 TCP/UDP 通信框架,包含服务端组件.客户端组件和 Agent 组件,广泛适用于各种不同应用场景的 TCP/UDP 通信系统,提供 C/C++.C#.Del ...
随机推荐
- VC++6.0在win8.1系统下运行失败的解决办法
在win8.1系统下安装了VC++6,.0编译软件之后,发现打不开.出现下面的错误: 解决办法: 安装文件目录:Microsoft Visual Studio--common--MSDev98--Bi ...
- 基于.NET CORE微服务框架 -浅析如何使用surging
1.前言 surging受到大家这么强烈的关注,我感到非常意外,比如有同僚在公司的分享会上分享surging, 还有在博客拿其它的RPC框架,微服务做对比等等,这些举动都让我感觉压力很大,毕竟作为个人 ...
- chromium源码阅读--进程间通信(IPC)
第一篇就有提到Chromium是目前默认是采用多进程架构,当然,chromium有singe-process的版本. 多进程与多线程的区别,确实有很多可以讲的,我的另一篇博客也讲了一些,这里是从浏览器 ...
- JS深层继承
我们在书写JS的时候常常被一种现象困扰 let jsonA = { a1: { b1:1; }, }; let jsonB = jsonA; jsonB.a1.b1 = 2; console.log( ...
- C语言程序内存布局
C语言程序内存布局 如有转载,请注明出处:http://blog.csdn.net/embedded_sky/article/details/44457453 作者:super_bert@csdn 一 ...
- 0_Simple__matrixMul + 0_Simple__matrixMul_nvrtc
矩阵乘法,使用一维线程块和共享内存.并且在静态代码和运行时编译两种条件下使用. ▶ 源代码:静态使用 #include <stdio.h> #include <assert.h> ...
- Node.js 回调函数
Node.js 回调函数 Node.js 异步编程的直接体现就是回调. 异步编程依托于回调来实现,但不能说使用了回调后程序就异步化了. 回调函数在完成任务后就会被调用,Node 使用了大量的回调函数, ...
- 利用canvas 导出图片
1.使用canvas绘制图片,并将图片导出. 在本地直接访问静态网页时,无法使用toDataURL(),需要将网页发布后,canvas才能使用toDataURL获取画布上的内容.因为canvas不允许 ...
- mac中利用brew实现多版本php共存以及任意切换
1.安装brew 参考链接:https://brew.sh/index_zh-cn.html 2.安装php56 brew install homebrew/php/php56 3.配置php56 因 ...
- [转载] 使用 Twitter Storm 处理实时的大数据
转载自http://www.ibm.com/developerworks/cn/opensource/os-twitterstorm/ 流式处理大数据简介 Storm 是一个开源的.大数据处理系统,与 ...
