GDI+ Tutorial for Beginners
原文 GDI+ Tutorial for Beginners
GDI+ is next evolution of GDI. Using GDI objects in earlier versions of Visual Studio was a pain. In Visual Studio .NET, Microsoft has taken care of most of the GDI problems and have made it easy to use.
GDI+ resides in System.Drawing.dll assembly. All GDI+ classes are reside in theSystem.Drawing, System.Text, System.Printing, System.Internal , System.Imaging,System.Drawing2D and System.Design namespaces.
The first class we must discuss is the Graphics class. After the Graphics class, I will discuss other useful GDI+ classes and structures such as Pen, Brush, and Rectangle. The final part of this tutorial are some examples in C#.
The Graphics Class
The Graphics class encapsulates GDI+ drawing surfaces. Before drawing any object (for example circle, or rectangle) we have to create a surface using Graphics class. Generally we use Paint event of a Form to get the reference of the graphics. Another way is to override OnPaint method.
Here is how you get a reference of the Graphics object:
private void form1_Paint(object sender, PaintEventArgs e)
{
Graphics g = e.Graphics;
}
OR:
protected override void OnPaint(PaintEventArgs e)
{
Graphics g = e.Graphics;
}
Once you have the Graphics reference, you can call any of this class's members to draw various objects. Here are some of Graphics class's methods:
| DrawArc | Draws an arc from the specified ellipse. |
| DrawBezier | Draws a cubic bezier curve. |
| DrawBeziers | Draws a series of cubic Bezier curves. |
| DrawClosedCurve | Draws a closed curve defined by an array of points. |
| DrawCurve | Draws a curve defined by an array of points. |
| DrawEllipse | Draws an ellipse. |
| DrawImage | Draws an image. |
| DrawLine | Draws a line. |
| DrawPath | Draws the lines and curves defined by a GraphicsPath. |
| DrawPie | Draws the outline of a pie section. |
| DrawPolygon | Draws the outline of a polygon. |
| DrawRectangle | Draws the outline of a rectangle. |
| DrawString | Draws a string. |
| FillEllipse | Fills the interior of an ellipse defined by a bounding rectangle. |
| FillPath | Fills the interior of a path. |
| FillPie | Fills the interior of a pie section. |
| FillPolygon | Fills the interior of a polygon defined by an array of points. |
| FillRectangle | Fills the interior of a rectangle with a Brush. |
| FillRectangles | Fills the interiors of a series of rectangles with a Brush. |
| FillRegion | Fills the interior of a Region. |
In .NET, GDI+ functionality resides in the System.Drawing.dll. Before you start using GDI+ classes, you must add reference to the System.Drawing.dll and import System.Drawing namespace. If you are using Visual Studio .NET for your development, you can add reference to the GDI+ library using following:
Creating this project is simple. Create a Windows application and add reference to the System.Drawing.dll using Project->Add Reference menu item. See Figure 1.
Figure 1. Adding reference to System.Drawing.dll
After that add these two lines.
using System.Drawing;
using System.Drawing.Drawing2D;
Note: If you create a Windows application using VS.NET, you only need write only one line.
using System.Drawing.Drawing2D;
After that add a Form_Paint event handler using the Properties Window. See Figure 2.
Figure 2. Adding Form_Paint event handler.
Note: You can also add Form paint event handler manually described above.
Graphics Objects
After creating a Graphics object, you can use it draw lines, fill shapes, draw text and so on. The major objects are:
| Brush | Used to fill enclosed surfaces with patterns,colors, or bitmaps. |
| Pen | Used to draw lines and polygons, including rectangles, arcs, and pies |
| Font | Used to describe the font to be used to render text |
| Color | Used to describe the color used to render a particular object. In GDI+ color can be alpha blended |
The Pen Class
A pen draws a line of specified width and style. You always use Pen constructor to create a pen. The constructor initializes a new instance of the Pen class. You can initialize it with a color or brush.
Initializes a new instance of the Pen class with the specified color.
public Pen(Color);
Initializes a new instance of the Pen class with the specified Brush.
public Pen(Brush);
Initializes a new instance of the Pen class with the specified Brush and width.
public Pen(Brush, float);
Initializes a new instance of the Pen class with the specified Color and Width.
public Pen(Color, float);
Here is one example:
Pen pn = new Pen( Color.Blue ); or Pen pn = new Pen( Color.Blue, 100 );
Some of its most commonly used properties are:
| Alignment | Gets or sets the alignment for objects drawn with this Pen. |
| Brush | Gets or sets the Brush that determines attributes of this Pen. |
| Color | Gets or sets the color of this Pen. |
| Width | Gets or sets the width of this Pen. |
The Color Structure
A Color structure represents an ARGB color. Here are ARGB properties of it:
| A | Gets the alpha component value for this Color. |
| B | Gets the blue component value for this Color. |
| G | Gets the green component value for this Color. |
| R | Gets the red component value for this Color. |
You can call the Color members. Each color name (say Blue) is a member of the Color structure. Here is how to use a Color structure:
Pen pn = new Pen( Color.Blue );
The Font Class
The Font class defines a particular format for text such as font type, size, and style attributes. You use font constructor to create a font.
Initializes a new instance of the Font class with the specified attributes.
public Font(string, float);
Initializes a new instance of the Font class from the specified existing Font and FontStyle.
public Font(Font, FontStyle);
Where FontStyle is an enumeration and here are its members:
| Member Name | Description |
| Bold | Bold text. |
| Italic | Italic text. |
| Regular | Normal text. |
| Strikeout | Text with a line through the middle. |
| Underline | Underlined text. |
Here is one example:
Graphics g ;
Font font = new Font("Times New Roman", 26);
Some of its most commonly used properties are:
| Bold | Gets a value indicating whether this Font is bold. |
| FontFamily | Gets the FontFamily of this Font. |
| Height | Gets the height of this Font. |
| Italic | Gets a value indicating whether this Font is Italic. |
| Name | Gets the face name of this Font. |
| Size | Gets the size of this Font. |
| SizeInPoints | Gets the size, in points, of this Font. |
| Strikeout | Gets a value indicating whether this Font is strikeout (has a line through it). |
| Style | Gets style information for this Font. |
| Underline | Gets a value indicating whether this Font is underlined. |
| Unit | Gets the unit of measure for this Font. |
The Brush Class
The Brush class is an abstract base class and cannot be instantiated. We always use its derived classes to instantiate a brush object, such as SolidBrush, TextureBrush, RectangleGradientBrush, and LinearGradientBrush.
Here is one example:
LinearGradientBrush lBrush = new LinearGradientBrush(rect, Color.Red, Color.Yellow,LinearGradientMode.BackwardDiagonal);
OR
Brush brsh = new SolidBrush(Color.Red), 40, 40, 140, 140);
The SolidBrush class defines a brush made up of a single color. Brushes are used to fill graphics shapes such as rectangles, ellipses, pies, polygons, and paths.
The TextureBrush encapsulates a Brush that uses an fills the interior of a shape with an image.
The LinearGradiantBrush encapsulates both two-color gradients and custom multi-color gradients.
The Rectangle Structure
public Rectangle(Point, Size); or public Rectangle(int, int, int, int);
The Rectangle structure is used to draw a rectangle on WinForms. Besides its constructor, the Rectangle structure has following members:
| Bottom | Gets the y-coordinate of the lower-right corner of the rectangular region defined by thisRectangle. |
| Height | Gets or sets the width of the rectangular region defined by this Rectangle. |
| IsEmpty | Tests whether this Rectangle has a Width or a Height of 0. |
| Left | Gets the x-coordinate of the upper-left corner of the rectangular region defined by thisRectangle. |
| Location | Gets or sets the coordinates of the upper-left corner of the rectangular region represented by this Rectangle. |
| Right | Gets the x-coordinate of the lower-right corner of the rectangular region defined by thisRectangle. |
| Size | Gets or sets the size of this Rectangle. |
| Top | Gets the y-coordinate of the upper-left corner of the rectangular region defined by thisRectangle. |
| Width | Gets or sets the width of the rectangular region defined by this Rectangle. |
| X | Gets or sets the x-coordinate of the upper-left corner of the rectangular region defined by this Rectangle. |
| Y | Gets or sets the y-coordinate of the upper-left corner of the rectangular region defined by this Rectangle. |
Its constructor initializes a new instance of the Rectangle class. Here is the definition:
public Rectangle(Point, Size); or public Rectangle(int, int, int, int);
The Point Structure
This structure is similar to the POINT structure in C++. It represents an ordered pair of x and y coordinates that define a point in a two-dimensional plane. The member x represents the x coordinates and y represents the y coordinates of the plane.
Here is how to instantiate a point structure:
Point pt1 = new Point( 30, 30);
Point pt2 = new Point( 110, 100);
Some sample Examples:
Drawing a rectangle
You can override OnPaint event of your form to draw an rectangle. The LinearGradientBrush encapsulates a brush and linear gradient.
protected override void OnPaint(PaintEventArgs pe)
{
Graphics g = pe.Graphics ;
Rectangle rect = new Rectangle(50, 30, 100, 100);
LinearGradientBrush lBrush = new LinearGradientBrush(rect, Color.Red, Color.Yellow,LinearGradientMode.BackwardDiagonal);
g.FillRectangle(lBrush, rect);
}
The output of the above code looks like Figure 3.
Figure 3. Drawing a rectangle.
Drawing an Arc
DrawArc function draws an arc. This function takes four arguments.
First is the Pen. You create a pen by using the Pen class. The Pen constructor takes at least one argument, the color or the brush of the pen. Second argument width of the pen or brush is optional.
Pen pn = new Pen( Color.Blue ); or Pen pn = new Pen( Color.Blue, 100 );
The second argument is a rectangle. You can create a rectangle by using Rectangle structure. The Rectangle constructor takes four int type arguments and they are left and right corners of the rectangle.
Rectangle rect = new Rectangle(50, 50, 200, 100);
protected override void OnPaint(PaintEventArgs pe)
{
Graphics g = pe.Graphics ;
Pen pn = new Pen( Color.Blue );
Rectangle rect = new Rectangle(50, 50, 200, 100);
g.DrawArc( pn, rect, 12, 84 );
}
The output looks like this:
Drawing a Line
DrawLine function of the Graphics class draws a line. It takes three parameters, a pen, and two Point class parameters, starting and ending points. Point class constructor takes x, y arguments.
protected override void OnPaint(PaintEventArgs pe)
{
Graphics g = pe.Graphics ;
Pen pn = new Pen( Color.Blue );
// Rectangle rect = new Rectangle(50, 50, 200, 100);
Point pt1 = new Point( 30, 30);
Point pt2 = new Point( 110, 100);
g.DrawLine( pn, pt1, pt2 );
}
The output looks like this:
Drawing an Ellipse
An ellipse( or a circle) can be drawn by using DrawEllipse method. This method takes only two parameters, Pen and rectangle.
protected override void OnPaint(PaintEventArgs pe)
{
Graphics g = pe.Graphics ;
Pen pn = new Pen( Color.Blue, 100 );
Rectangle rect = new Rectangle(50, 50, 200, 100);
g.DrawEllipse( pn, rect );
}
The output looks like this:
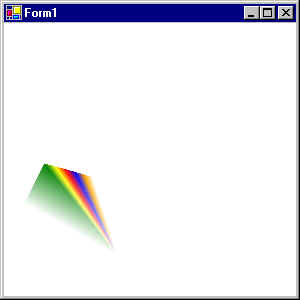
The FillPath
Drawing bazier curves is little more complex than other objects.
protected override void OnPaint(PaintEventArgs pe)
{
Graphics g = pe.Graphics;
g.FillRectangle(new SolidBrush(Color.White), ClientRectangle);
GraphicsPath path = new GraphicsPath(new Point[] {
new Point(40, 140), new Point(275, 200),
new Point(105, 225), new Point(190, 300),
new Point(50, 350), new Point(20, 180), },
new byte[] {
(byte)PathPointType.Start,
(byte)PathPointType.Bezier,
(byte)PathPointType.Bezier,
(byte)PathPointType.Bezier,
(byte)PathPointType.Line,
(byte)PathPointType.Line,
});
PathGradientBrush pgb = new PathGradientBrush(path);
pgb.SurroundColors = new Color[] { Color.Green,Color.Yellow,Color.Red, Color.Blue,
Color.Orange, Color.White, };
g.FillPath(pgb, path);
}
The output looks like this:
Drawing Text and Strings
You can override OnPaint event of your form to draw an rectangle. The LinearGradientBrush encapsulates a brush and linear gradient.
protected override void OnPaint(PaintEventArgs pe)
{
Font fnt = new Font("Verdana", 16);
Graphics g = pe.Graphics;
g.DrawString("GDI+ World", fnt, new SolidBrush(Color.Red), 14,10);
}
The output looks like this:
GDI+ Tutorial for Beginners的更多相关文章
- Writing buffer overflow exploits - a tutorial for beginners
Buffer overflows in user input dependent buffers have become one of the biggest security hazards on ...
- 最简单的视音频播放示例2:GDI播放YUV, RGB
前一篇文章对“Simplest Media Play”工程作了概括性介绍.后续几篇文章打算详细介绍每个子工程中的几种技术.在记录Direct3D,OpenGL这两种相对复杂的技术之前,打算先记录一种和 ...
- Python Machine Learning: Scikit-Learn Tutorial
这是一篇翻译的博客,原文链接在这里.这是我看的为数不多的介绍scikit-learn简介而全面的文章,特别适合入门.我这里把这篇文章翻译一下,英语好的同学可以直接看原文. 大部分喜欢用Python来学 ...
- IOS 开发教程
http://www.raywenderlich.com/category/ios http://www.raywenderlich.com/50310/storyboards-tutorial-in ...
- Cheatsheet: 2016 05.01 ~ 05.31
Other Awesome Go - A curated list of awesome Go frameworks, libraries and software Visual Studio Cod ...
- 用Phaser实现Flappy Bird 游戏
How to Make a Flappy Bird in HTML5 With Phaser - Part 1 Flappy Bird is a nice little game with easy ...
- Cheatsheet: 2015 07.01 ~ 07.31
Java JBoss Drools Tutorial for Beginners Other A Simple File System RebornDB: the Next Generation Di ...
- Linux Autotools
/********************************************************************** * Linux Autotools * 说明: * 我们 ...
- OFBIZ文章
0. OFBIZ Tutorials 1. A Tour of OFBiz 2. Entities and Services - Data Models and Business Logic in O ...
随机推荐
- UINavigationController具体解释(二)
@UINavigationBar-----(是一个View)基本介绍 1.导航栏,和导航控制器一样,是一个容器用来显示提供的其它对象的内容 2.导航栏显示的内容,通过设置UINavigationIte ...
- Android Testing(1) 浅尝Android测试的奥秘
------- 源自梦想.永远是你IT事业的好友.只是勇敢地说出我学到! ---------- 仅供学习和交流使用,翻译不好勿喷,请只摘除不合适的地方 Testing The Android fram ...
- as3声谱效果,有在线演示地址,能够播放本地音乐
来源:潮汕IT男 简单的as3声谱效果,能够播放本地音乐. tag=as3" style="word-wrap:break-word; margin:0px; padding:0p ...
- VMware-Workstation安装在ubuntu15.04(内核3.19)
安装的最新版的linux15.04 安装VMware-Workstation11,运行gui程序的时候出现,VMware Kernel Module Update的提示窗口, 说是要更新vmnet-d ...
- Visual Studio 2012中编写C程序
换了win7系统后,突然发现VC++6.0不兼容了,我听说有的同学的行,反正我是不行. 那就用VS2012呗.... 我们来看看怎么用: 打开文件->新建->项目,新建一个项目 选择win ...
- SGU 183. Painting the balls( dp )
dp..dp(i, j)表示画两个点为i-j, i的最优答案. dp(i, j) = min{ dp(i-j, k) } + cost[i] (1≤k≤M-j) 令f(i, j) = min{dp(i ...
- hdu1284经典钱币兑换问题
钱币兑换问题. 题目 http://acm.hdu.edu.cn/showproblem.php?pid=1284 完全背包. 这种是求背包问题最多的组合方案 参考了一些资料 http://blo ...
- C# 继承细节
假定没有为类定义任何显式的构造函数,这样编译器就会为所有的类提供默认的构造函数,在后台会进行许多操作,编译器可以很好地解决层次结构中的所有问题,每个类中的每个字段都会初始化为默认值.但在添加了一个我们 ...
- X-UA-Compatible是什么
X-UA-Compatible是神马? X-UA-Compatible是IE8的一个专有<meta>属性,它告诉IE8采用何种IE版本去渲染网页,在html的<head>标签中 ...
- itextsharp生成pdf后的直接打印问题
原文 itextsharp生成pdf后的直接打印问题 小弟这两天用itextsharp生成pdf文档,生成的pdf可以直接保存在指定路径的文件夹下,可是user不想保存,想要点一下button,就可以 ...