Java系列--第五篇 基于Maven的SSME之Token及Parameterized单元测试
本来在第四篇要说完的,但是写着写着,我觉得内容有点多起来了,所以就另开这篇,在这里专门讲述Token的定义,JSP自定义标签以及如何用Parameterized的来做单元测试。
1,新建包com.vanceinfo.javaserial.handlerinterceptors,新加类TokenHandler,这个类就是Token的Helper类了,包含三个方法:
generateGUID当进入页面加载时,产生一个GUID,分别存入Session和Constant里,说明一下,Constant是用于页面的hidden值保存用的。。。。,顺便打个预防针的是sesseion里面存的是map对象,使用的key叫SPRINGMVC.TOKEN,map里面的一条对象以"springMVC_token.GUID:GUID"形式保存。而客户端的hidden框的name使用的是小写的springMVC_token
getInputToken获取客户端hidden里面的guid值。
validToken这个方法用于验证客户端Hidden里的guid里值,与服务端Session里面对应的值是否一致,完全相同而返回true,否则返回false, 并且先会remove掉session里面的对应的这条token值。
源码如下:
package com.vanceinfo.javaserial.handlerinterceptors;

import java.math.BigInteger;

import java.util.HashMap;

import java.util.Map;

import java.util.Random;

import javax.servlet.http.HttpServletRequest;

import javax.servlet.http.HttpSession;

import org.apache.log4j.Logger;

import org.springframework.ui.ModelMap;

import com.vanceinfo.javaserial.constants.Constant;

public class TokenHandler {

    private static Logger LOGGER = Logger.getLogger(TokenHandler.class);

    static Map<String, String> springmvc_token = new HashMap<String, String>();

    /**

     * generate the unique token, and store into both server, client side.

     *

     * @param session

     * @return

     */

    @SuppressWarnings("unchecked")

    public synchronized static String generateGUID(HttpSession session, ModelMap map) {

        String token = "";

        try {

            Object obj = session.getAttribute("SPRINGMVC.TOKEN");

            if (obj != null) {

                springmvc_token = (Map<String, String>) session.getAttribute("SPRINGMVC.TOKEN");

            }

            token = new BigInteger(165, new Random()).toString(36).toUpperCase();

            springmvc_token.put(Constant.DEFAULT_TOKEN_NAME + "." + token, token);

            session.setAttribute("SPRINGMVC.TOKEN", springmvc_token);

            Constant.TOKEN_VALUE = token;

        } catch (IllegalStateException e) {

            LOGGER.error("generateGUID() mothod find bug,by token session...");

        }

        return token;

    }

    /**

     * validate the form token value and session token value.

     *

     * @param request

     * @return true if both token value are the same,otherwise false

     */

    @SuppressWarnings("unchecked")

    public static boolean validToken(HttpServletRequest request) {

        String inputToken = getInputToken(request);

        if (inputToken == null) {

            LOGGER.warn("token is not valid!inputToken is NULL");

            return false;

        }

        HttpSession session = request.getSession();

        Map<String, String> tokenMap = (Map<String, String>) session.getAttribute("SPRINGMVC.TOKEN");

        if (tokenMap == null || tokenMap.size() < 1) {

            LOGGER.warn("token is not valid!sessionToken is NULL");

            return false;

        }

        String sessionToken = tokenMap.get(Constant.DEFAULT_TOKEN_NAME + "." + inputToken);

        if (!inputToken.equals(sessionToken)) {

            LOGGER.warn("token is not valid!inputToken='" + inputToken + "',sessionToken = '" + sessionToken + "'");

            return false;

        }

        tokenMap.remove(Constant.DEFAULT_TOKEN_NAME + "." + inputToken);

        session.setAttribute("SPRINGMVC.TOKEN", tokenMap);

        return true;

    }

    /**

     * Get the token value from the form. assume it store in the hidden field

     *

     * @param request

     * @return

     */

    @SuppressWarnings("unchecked")

    public static String getInputToken(HttpServletRequest request) {

        Map<String, String[]> params = request.getParameterMap();

        if (!params.containsKey(Constant.DEFAULT_TOKEN_NAME)) {

            LOGGER.warn("Could not find token name in params.");

            return null;

        }

        String[] tokens = (String[]) (String[]) params.get(Constant.DEFAULT_TOKEN_NAME);

        if ((tokens == null) || (tokens.length < 1)) {

            LOGGER.warn("Got a null or empty token name.");

            return null;

        }

        return tokens[0];

    }

}
TokenHandler.java
通过上面的描述,聪明你可以很自然的猜到Constant.java里面会有两个常量值
    public static String DEFAULT_TOKEN_NAME = "springMVC_token";

    public static String TOKEN_VALUE;
Interceptor里面其实编写代码起来要容易的多,实现HandlerInterceptor接口,其实主要是在preHandler和postHandler就好了。
/* (non-Javadoc)

     * @see org.springframework.web.servlet.HandlerInterceptor#postHandle(javax.servlet.http.HttpServletRequest, javax.servlet.http.HttpServletResponse, java.lang.Object, org.springframework.web.servlet.ModelAndView)

     */

    public void postHandle(HttpServletRequest request, HttpServletResponse response,

            Object handler, ModelAndView modelAndView) throws Exception {

        if ("get".equalsIgnoreCase(request.getMethod())) {

            TokenHandler.generateGUID(request.getSession(), modelAndView.getModelMap());

        }

    }

    /* (non-Javadoc)

     * @see org.springframework.web.servlet.HandlerInterceptor#preHandle(javax.servlet.http.HttpServletRequest, javax.servlet.http.HttpServletResponse, java.lang.Object)

     */

    public boolean preHandle(HttpServletRequest request, HttpServletResponse response,

            Object handler) throws Exception {

        if ("get".equalsIgnoreCase(request.getMethod())) {

            return true;

        } else {

            if (!TokenHandler.validToken(request)) {

                response.sendRedirect("index.do");

                return false;

            }

            return true;

        }

    }
preHandler_PostHandler
以上代码是接合我的一些情况,如果二次请求,我是跳转至index.do这个方法的。
2, 将刚写的这个interceptor注册至spring-mvc.xml里面。
<mvc:interceptors>

        <!-- use Token to void multi post when user press F5 or Ctrol+F5 -->

        <mvc:interceptor>

            <mvc:mapping path="/**/*.do" />

            <bean

                class="com.vanceinfo.javaserial.handlerinterceptors.TokenHandlerInterceptor" />

        </mvc:interceptor>

</mvc:interceptors>
mvc:interceptors
3, 接下来就是要写tag了。4步实现自定义tag:
a,先定义一个BaseTag,让其继承于TagSupport,这是最简单的实现方式
package com.vanceinfo.javaserial.tags;

import javax.servlet.jsp.tagext.TagSupport;

public class BaseTag extends TagSupport {

    private static final long serialVersionUID = -4886769810825854364L;

    protected String name;

    protected String type;

    protected String id;

    protected String onclick;

    protected String onfocus;

    protected String onblur;

    protected String onchange;

    protected String cssStyle;

    protected String cssClass;

    protected String size;

    public void generateAttribute(StringBuilder sb) {

        if (id != null) {

            sb.append(" id='").append(id).append("'");

        }

        if (onclick != null) {

            sb.append(" onclick='").append(onclick).append("'");

        }

        if (onfocus != null) {

            sb.append(" onfocus='").append(onfocus).append("'");

        }

        if (onblur != null) {

            sb.append(" onblur='").append(onblur).append("'");

        }

        if (onchange != null) {

            sb.append(" onchange='").append(onchange).append("'");

        }

        if (cssStyle != null) {

            sb.append(" style='").append(cssStyle).append("'");

        }

        if (cssClass != null) {

            sb.append(" class='").append(cssClass).append("'");

        }

        if (size != null) {

            sb.append(" size='").append(size).append("'");

        }

    }

    /**

     * @return the name

     */

    public String getName() {

        return name;

    }

    /**

     * @param name the name to set

     */

    public void setName(String name) {

        this.name = name;

    }

    /**

     * @return the type

     */

    public String getType() {

        return type;

    }

    /**

     * @param type the type to set

     */

    public void setType(String type) {

        this.type = type;

    }

    /**

     * @return the id

     */

    public String getId() {

        return id;

    }

    /**

     * @param id the id to set

     */

    public void setId(String id) {

        this.id = id;

    }

    /**

     * @return the onclick

     */

    public String getOnclick() {

        return onclick;

    }

    /**

     * @param onclick the onclick to set

     */

    public void setOnclick(String onclick) {

        this.onclick = onclick;

    }

    /**

     * @return the onfocus

     */

    public String getOnfocus() {

        return onfocus;

    }

    /**

     * @param onfocus the onfocus to set

     */

    public void setOnfocus(String onfocus) {

        this.onfocus = onfocus;

    }

    /**

     * @return the onblur

     */

    public String getOnblur() {

        return onblur;

    }

    /**

     * @param onblur the onblur to set

     */

    public void setOnblur(String onblur) {

        this.onblur = onblur;

    }

    /**

     * @return the onchange

     */

    public String getOnchange() {

        return onchange;

    }

    /**

     * @param onchange the onchange to set

     */

    public void setOnchange(String onchange) {

        this.onchange = onchange;

    }

    /**

     * @return the cssStyle

     */

    public String getCssStyle() {

        return cssStyle;

    }

    /**

     * @param cssStyle the cssStyle to set

     */

    public void setCssStyle(String cssStyle) {

        this.cssStyle = cssStyle;

    }

    /**

     * @return the cssClass

     */

    public String getCssClass() {

        return cssClass;

    }

    /**

     * @param cssClass the cssClass to set

     */

    public void setCssClass(String cssClass) {

        this.cssClass = cssClass;

    }

    /**

     * @return the size

     */

    public String getSize() {

        return size;

    }

    /**

     * @param size the size to set

     */

    public void setSize(String size) {

        this.size = size;

    }

}
BaseTag
自定义的TokenTag 继承于BaseTag
package com.vanceinfo.javaserial.tags;

import java.io.IOException;

import javax.servlet.jsp.JspException;

import com.vanceinfo.javaserial.constants.Constant;

public class TokenTag extends BaseTag {

    private static final long serialVersionUID = 1495609370076247263L;

    /* (non-Javadoc)

     * @see javax.servlet.jsp.tagext.TagSupport#doStartTag()

     */

    @Override

    public int doStartTag() throws JspException {

        StringBuilder sb = new StringBuilder();

        sb.append("<input type='text' name='").append(

                Constant.DEFAULT_TOKEN_NAME).append("'").append(" value='").append(Constant.TOKEN_VALUE).append("'");

        sb.append(" /> ");

        try {

            pageContext.getOut().print(sb.toString());

        } catch (IOException e) {

            e.printStackTrace();

        }

        return EVAL_BODY_INCLUDE;

    }

}
TokenTag
b,接着就去WEB-INF下面创建标签库描述文件,注意这个文件只能放在这个文件夹下,当然为了区分,你可以在其下自建一个文件夹,至于放其它地方会出错的原因还不明。
<?xml version="1.0" encoding="UTF-8"?>

<taglib version="2.0" xmlns="http://java.sun.com/xml/ns/j2ee"

 xmlns:xsi="http://www.w3.org/2001/XMLSchema-instance"

 xsi:schemaLocation="http://java.sun.com/xml/ns/j2ee web-jsptaglibrary_2_0.xsd">

<tlib-version>1.0</tlib-version>

<jsp-version>2.0</jsp-version>

<short-name>token</short-name>

<uri>/mytaglib</uri>

<tag>

    <name>token</name>

    <tag-class>com.vanceinfo.javaserial.tags.TokenTag</tag-class>

    <body-content>empty</body-content>

    <attribute>

        <name>user</name>

        <required>false</required>

        <rtexprvalue>true</rtexprvalue>

    </attribute>

 </tag>

</taglib>
/tlds/Token.tld
至于c、d两步,我在第四篇中已经讲述,故不在重复,不清楚的可以返回上篇查阅一下。
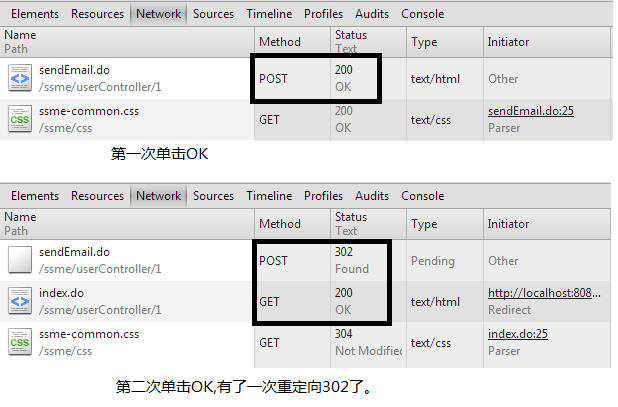
以上就是关于自定义类Struts2的Token的完整过程,Struts2是经历了很多人的检验的,我们的自造的,为了表示出我们的信心和诚意,自然对我们的Interceptor进行单元测试喽。当然,从浏览器现象来看个现象也是好的,所谓有图有真相有说服力
4,关于单元测试,我们利用Parameterized参数化集中测试,没弄这种单元测试之前,我也很悚这种模式,不过一来二去之后,对其还是持拥抱态度的。其实,单元测试针对的是单元,看你对单元的单位是如何定义的,一般来讲一个方法就是一个单元来测最合适。因为我是这样子认同的,所以,对于每一个方法,我们需要创建一个JUnit4的Test Case.并且勾选setUpBeforeClass,tearDownAfterClass,setUp,tearDown,这4个方法一般用于记一些描述性步骤等内容,下面是TokenHandlerInterceptorTest_postHandleTest里的一个示例。
    /**

     * @throws java.lang.Exception

     */

    @BeforeClass

    public static void setUpBeforeClass() throws Exception {

        LOGGER.debug("Starting test class : " + TokenHandlerInterceptorTest_postHandleTest.class.getName());

    }

    /**

     * @throws java.lang.Exception

     */

    @AfterClass

    public static void tearDownAfterClass() throws Exception {

        LOGGER.debug("Ending test class : " + TokenHandlerInterceptorTest_postHandleTest.class.getName());

    }

    /**

     * @throws java.lang.Exception

     */

    @Before

    public void setUp() throws Exception {

        LOGGER.debug("Starting test: " + testName);

    }

    /**

     * @throws java.lang.Exception

     */

    @After

    public void tearDown() throws Exception {

        LOGGER.debug("Ending test: " + testName);

    }
JUnit Test Case 四大金刚前后执行方法
还有一个约定成俗的定义一个变量,用于对每次执行一时输出你的test case名字出来。
private String testName;
除了这个约定以外,如果你的测试方法的入参也请列在private列表里面,作为变量,也就是参数。最后,测试方法的返回值也请以参数的形式定义。这一次,我举TokenHandlerInterceptor_preHandleTest作为例子,因为他是有返回值的。
    private String testName;

    private HttpServletRequest httpRequest;

    private HttpServletResponse httpResponse;

    private boolean returnBoolean;
入参和出参列表
然后,你还要定义一个带所有参数的构造函数出来。例如:
    public TokenHandlerInterceptor_preHandleTest(String testName, HttpServletRequest httpRequest,

            HttpServletResponse httpResponse, Boolean returnBoolean) {

        this.testName = testName;

        this.httpRequest = httpRequest;

        this.httpResponse = httpResponse;

        this.returnBoolean = returnBoolean;

    }
带全部入出参数的构造函数
最后,准备测试数据,写在testData()函数里面,一定要以这个命名,返回Collection<Object[]>,并且打上@org.junit.runners.Parameterized.Parameters标签,
准备完这些之后中,在class前面也一定不要忘了打上@RunWith(Parameterized.class)标签。
一个完整的TokenHandlerInterceptor_preHandleTest如下:
package com.vanceinfo.javaserial.handlerinterceptors;

import static org.junit.Assert.*;

import java.util.Arrays;

import java.util.Collection;

import java.util.HashMap;

import java.util.Map;

import javax.servlet.http.HttpServletRequest;

import javax.servlet.http.HttpServletResponse;

import org.apache.log4j.Logger;

import org.junit.After;

import org.junit.AfterClass;

import org.junit.Before;

import org.junit.BeforeClass;

import org.junit.Test;

import org.junit.runner.RunWith;

import org.junit.runners.Parameterized;

import org.junit.runners.Parameterized.Parameters;

import org.springframework.mock.web.MockHttpServletRequest;

import org.springframework.mock.web.MockHttpServletResponse;

import org.springframework.mock.web.MockHttpSession;

@RunWith(Parameterized.class)

public class TokenHandlerInterceptor_preHandleTest {

    private static final Logger LOGGER = Logger.getLogger(TokenHandlerInterceptor_preHandleTest.class);

    private String testName;

    private HttpServletRequest httpRequest;

    private HttpServletResponse httpResponse;

    private boolean returnBoolean;

    public TokenHandlerInterceptor_preHandleTest(String testName, HttpServletRequest httpRequest,

            HttpServletResponse httpResponse, Boolean returnBoolean) {

        this.testName = testName;

        this.httpRequest = httpRequest;

        this.httpResponse = httpResponse;

        this.returnBoolean = returnBoolean;

    }

    @Parameters

    public static Collection<Object[]> testData() throws Exception {

        // *******************

        // test case 1

        // *******************

        String testNameTC1 = "Get Method";

        MockHttpServletRequest httpRequest1 = new MockHttpServletRequest("get", "http://testRequestUrl");

        httpRequest1.addParameter("htid", "1001");

        MockHttpServletResponse httpResponse1 = new MockHttpServletResponse();

        // *******************

        // test case 2

        // *******************

        String testNameTC2 = "Post Method unvalid: no param(client) token";

        MockHttpServletRequest httpRequest2 = new MockHttpServletRequest("post", "http://testRequestUrl");

        httpRequest2.addParameter("htid", "1001");

        MockHttpServletResponse httpResponse2 = new MockHttpServletResponse();

        // *******************

        // test case 3

        // *******************

        String testNameTC3 = "Post Method unvalid: has param(client) token but is null";

        MockHttpServletRequest httpRequest3 = new MockHttpServletRequest("post", "http://testRequestUrl");

        httpRequest3.addParameter("htid", "1001");

        httpRequest3.addParameter("springMVC_token", new String[] {});

        MockHttpServletResponse httpResponse3 = new MockHttpServletResponse();

        // *******************

        // test case 4

        // *******************

        String testNameTC4 = "Post Method unvalid: has param(client) token but no session token";

        MockHttpServletRequest httpRequest4 = new MockHttpServletRequest("post", "http://testRequestUrl");

        httpRequest4.addParameter("htid", "1001");

        httpRequest4.addParameter("springMVC_token", new String[] { "abcdef" });

        MockHttpServletResponse httpResponse4 = new MockHttpServletResponse();

        // *******************

        // test case 5

        // *******************

        String testNameTC5 = "Post Method unvalid: has param(client) token and session token,but not the same value";

        MockHttpServletRequest httpRequest5 = new MockHttpServletRequest("post", "http://testRequestUrl");

        httpRequest5.addParameter("htid", "1001");

        httpRequest5.addParameter("springMVC_token", new String[] { "abcdef" });

        MockHttpSession session5 = new MockHttpSession();

        Map<String, String> tokenMap5 = new HashMap<String, String>();

        tokenMap5.put("springMVC_token.abcdef", "abcdefg");

        session5.putValue("SPRINGMVC.TOKEN", tokenMap5);

        httpRequest5.setSession(session5);

        MockHttpServletResponse httpResponse5 = new MockHttpServletResponse();

        // *******************

        // test case 6

        // *******************

        String testNameTC6 = "Post Method valid";

        MockHttpServletRequest httpRequest6 = new MockHttpServletRequest("post", "http://testRequestUrl");

        httpRequest6.addParameter("htid", "1001");

        httpRequest6.addParameter("springMVC_token", new String[] { "abcdef" });

        MockHttpSession session6 = new MockHttpSession();

        Map<String, String> tokenMap6 = new HashMap<String, String>();

        tokenMap6.put("springMVC_token.abcdef", "abcdef");

        session6.putValue("SPRINGMVC.TOKEN", tokenMap6);

        httpRequest6.setSession(session6);

        MockHttpServletResponse httpResponse6 = new MockHttpServletResponse();

        return Arrays

                .asList(new Object[][] { { testNameTC1, httpRequest1, httpResponse1, true },

                        { testNameTC2, httpRequest2, httpResponse2, false },

                        { testNameTC3, httpRequest3, httpResponse3, false },

                        { testNameTC4, httpRequest4, httpResponse4, false },

                        { testNameTC5, httpRequest5, httpResponse5, false },

                        { testNameTC6, httpRequest6, httpResponse6, true } });

    }

    /**

     * @throws java.lang.Exception

     */

    @BeforeClass

    public static void setUpBeforeClass() throws Exception {

        LOGGER.debug("Starting test class : " + TokenHandlerInterceptor_preHandleTest.class.getName());

    }

    /**

     * @throws java.lang.Exception

     */

    @AfterClass

    public static void tearDownAfterClass() throws Exception {

        LOGGER.debug("Ending test class : " + TokenHandlerInterceptor_preHandleTest.class.getName());

    }

    /**

     * @throws java.lang.Exception

     */

    @Before

    public void setUp() throws Exception {

        LOGGER.debug("Starting test: " + testName);

    }

    /**

     * @throws java.lang.Exception

     */

    @After

    public void tearDown() throws Exception {

        LOGGER.debug("Ending test: " + testName);

    }

    /**

     * Test method for

     * {@link com.expedia.lux.drr.handlerinterceptors.TokenHandlerInterceptor#preHandle(javax.servlet.http.HttpServletRequest, javax.servlet.http.HttpServletResponse, java.lang.Object)}

     * .

     *

     * @throws Exception

     */

    @Test

    public void testPreHandle() {

        TokenHandlerInterceptor pre = new TokenHandlerInterceptor();

        try {

            boolean actual = pre.preHandle(httpRequest, httpResponse, new Object());

            assertEquals(this.returnBoolean, actual);

        } catch (Exception e) {

            fail("Should not throw exception!");

        }

    }

}
TokenHandlerInterceptor_preHandleTest
注意我在上面设计了6个case. 大部分期望的是返回false,也就是负case的测试。而assert 的时候,只需写一次就可以了。
这就是参数化单元测试的好处了。耗时就耗在准备数据上面。
希望把自定义标签的制作说明白了。
Java系列--第五篇 基于Maven的SSME之Token及Parameterized单元测试的更多相关文章
- Java系列--第八篇 基于Maven的SSME之定时邮件发送
关于ssme这个我的小示例项目,想做到麻雀虽小,五脏俱全,看到很多一些web都有定时发送邮件的功能,想我ssme也加入一下这种功能,经查询相关文档,发现spring本身自带了一个调度器quartz,下 ...
- Java系列--第四篇 基于Maven的SSME之发送邮件
在系列第一篇中,使用的是mybatis得到了一个小小的项目,而该项目的用户对象是有邮件地址的,如果按照邮件地址给对方去一封邮件会不会更能体现针对性呢,所以,我在这篇准备加入发送邮件的功能,利用的就是s ...
- Java系列--第六篇 基于Maven的SSME之多国语言实现
如果你的网站足够强大,以致冲出了国门,走向了国际的话,你就需要考虑做多国语言了,不过,未雨绸缪,向来是我辈程序人员的优秀品质,谁知道那天,我们的网站被国外大公司看中收购,从而飞上枝头变凤凰.不扯这么多 ...
- Java系列--第七篇 基于Maven的Android开发实战项目
本篇是基于<Android应用案例开发大全,吴亚峰等著>的项目开发实例源码,其中有些图片,我做了一些修改,用于个人学习,请勿用于商业. 1, 日程管理专家 mvn archetype:ge ...
- Java系列--第三篇 基于Maven的Android开发CAIO
学习要打好基础,这里用一个项目来学习一下Android的组件,参考网址为这个但不限于这个.有些东西的学习,理解三遍理论还不如一遍操作,所谓理论来自实践,实践是检验真理的唯一标准.所以,虽然看懂了那篇文 ...
- 前端工程师技能之photoshop巧用系列第五篇——雪碧图
× 目录 [1]定义 [2]应用场景 [3]合并[4]实现[5]维护 前面的话 前面已经介绍过,描述性图片最终要合并为雪碧图.本文是photoshop巧用系列第五篇——雪碧图 定义 css雪碧图(sp ...
- Java系列--第二篇 基于Maven的Android开发HelloAndroidWorld
曾经写过一篇Android环境配置的随笔,个人感觉特繁琐,既然有Maven,何不尝试用用Maven呢,经网上搜索这篇文章但不限于这些,而做了一个基于Maven的Android版的Hello Andro ...
- java selenium (三) 环境搭建 基于Maven
现在Java的大部分项目都是基于Maven, 在Maven项目中使用Selenium2. 非常简单. 首先你需要配置好Maven的环境 可以参考本博客的Maven教程系列,Maven入门教程(一) ...
- 【Windows编程】系列第五篇:GDI图形绘制
上两篇我们学习了文本字符输出以及Unicode编写程序,知道如何用常见Win32输出文本字符串,这一篇我们来学习Windows编程中另一个非常重要的部分GDI图形绘图.Windows的GDI函数包含数 ...
随机推荐
- WPC文件修改还原pin进度
原文地址:http://wenku.baidu.com/link?url=KZRR6VtW_Yn59iEbrWYz15jOH6hSVgjyow8nvwHfQr3eQgvCcc9IgYCT-fWwVWf ...
- Install and use Karma
1:安装karma y@y:~$ npm install --global karma 2:安装karma插件 y@y:~$ npm install --global karma-jasmine ka ...
- Entity Framework with MySQL 学习笔记一(查询)
参考 : http://msdn.microsoft.com/en-us/data/jj574232.aspx EF 查询基本上有3中 默认是 Lazy Loading 特色是只有在需要数据的时候EF ...
- ExpandableList列表的简单应用
package com.test;//Download by http://ww.codefans.netimport java.util.ArrayList;import java.util.Has ...
- MD中bitmap源代码分析--数据结构
本篇分析bitmap的数据结构的设计,并基于此分析bitmap的工作机制. 为了后面更清楚的理解,先有个总体印象,给出整体的结构图: 在下面的描述中涉及到的内容可以对照到上图中相应部分,便于理解. 首 ...
- UVa400.Unix ls
题目链接:http://uva.onlinejudge.org/index.php?option=com_onlinejudge&Itemid=8&page=show_problem& ...
- Java组合与继承生成的类中构造函数的执行顺序
[程序实例] import java.util.*; class Meal{ Meal() { System.out.println("Meal Constructor"); } ...
- 【C#基础】 读取json某个键值
/// <summary> /// 用JSObject的方法获取json指定第一层某个键的值 /// </summary> /// <param name="j ...
- 一个C++基于boost简单实现的线程池
xl_blocking_queue.h ? 1 2 3 4 5 6 7 8 9 10 11 12 13 14 15 16 17 18 19 20 21 22 23 24 25 26 27 28 29 ...
- rpm包安装
RPM全称是“RedHatPackageManager”是由RedHat公司发发展起来的,本质是将软件源码包经过编译并且打包成rpm的格式,rpm文件包含的有二进制文件,配置文件,库文件等,同时RPM ...