Angular 学习笔记 (动态组件 & Material Overlay & Dialog 分析)
更新 : 2020-02-13
关于 position 的细节
1. withFlexibleDimensions(true)
默认是 true
overlay 在决定 position 时, 它会依据我们给的先后 position
顺序去看,如果其中一个可以完全显示就马上用那个。
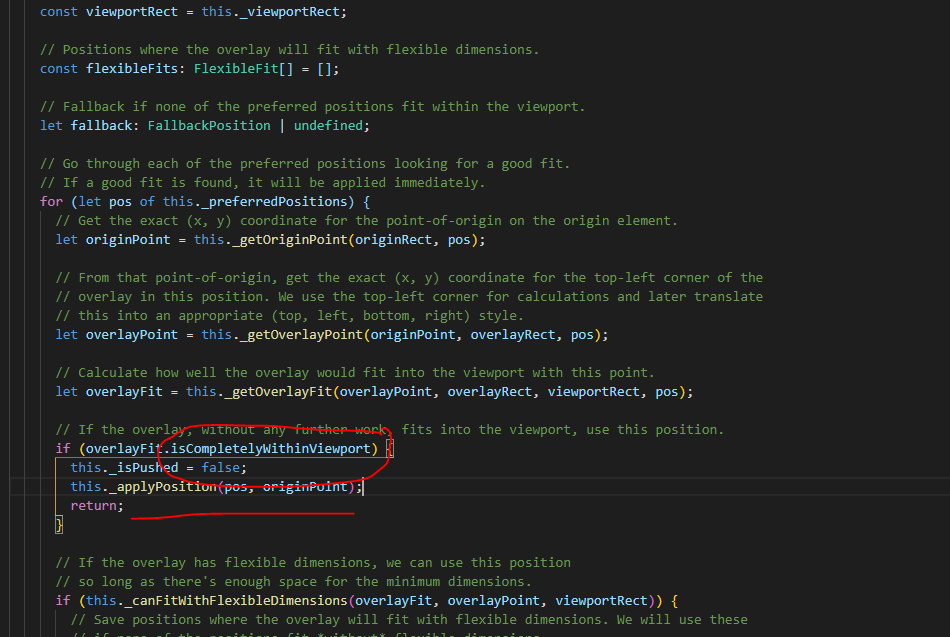
如果全部都不能完整显示,那么就要试试看调位置, 然后比分数
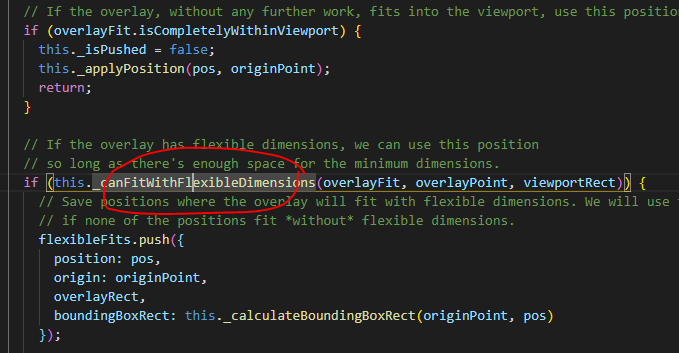
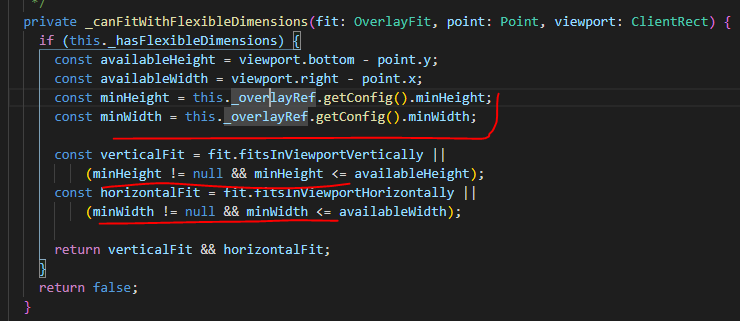
然后是这样
最后比分数
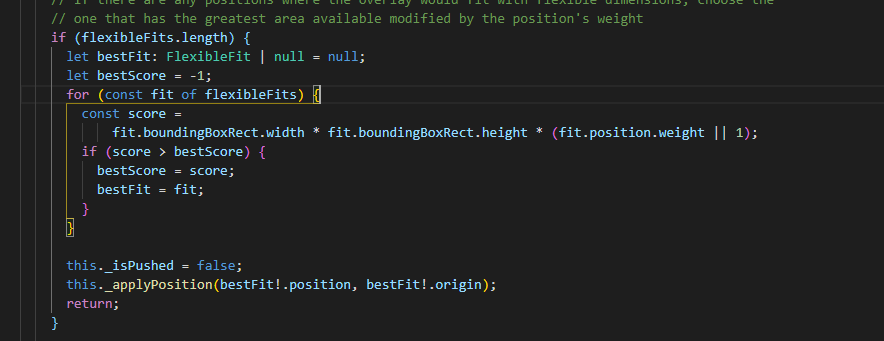
所以这个是配合 minHeight, minWidth 来使用的.
还有一个设置也要留意
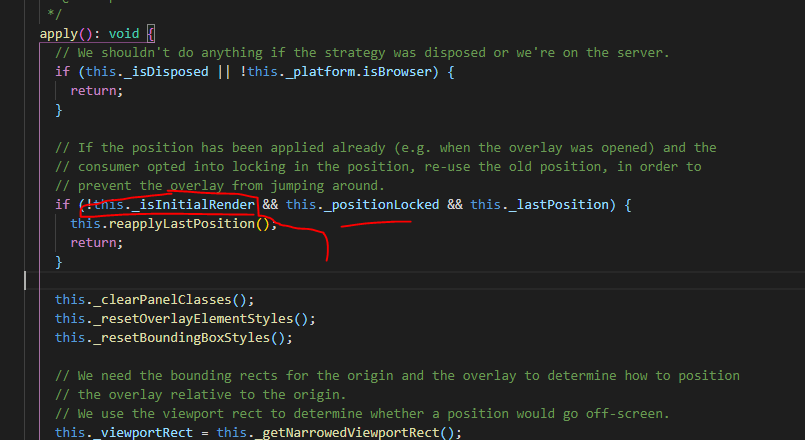
window resize 之所以可以绕过 lock 是通过 _isInitialRender 实现的
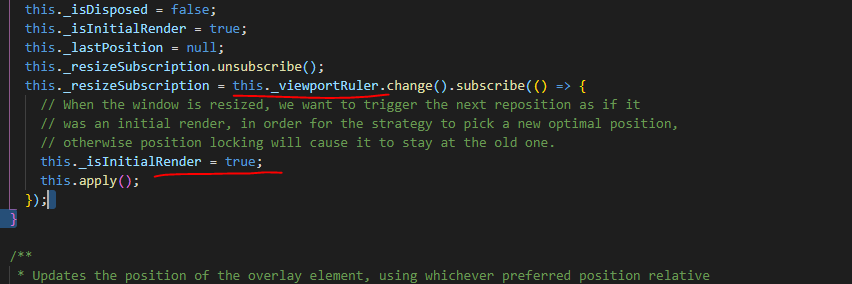
另外还有一种就是我们手动调用 updatePosition.
如果我们的内容是动态的,或者是 ajax 比较慢加载回来的话, 那么一般上我们都需要使用这个 reposition 来 update 一下.
总结 :
3 种情况下我们会需要 update position
1. onscroll, (lock/nolock)
2. on resize, (no lock)
3. on content change (lock/nolock)
遇到的问题是 1,3 只可以用同一个config, 比如你 lock 那么 2 个都得 lock, 如果 nolock 2个都得 nolock
因为目前 material 并没有给多得接口用, 除非我们调用 private 的 _isInitialRender
更新: 2019-11-24
dialog vs router link
refer : https://stackoverflow.com/questions/51821766/angular-material-dialog-not-closing-after-navigation
今天发现一些场景可能导致 dialog 不会关闭. 比如当子组件打开一个 dialog 后
某一个操作把父组件给销毁了.这个时候 dialog content 会一起销毁掉,
因为 content 是 under 这个逻辑树中 (当然如果你是放到 appRef 里头就另外说)
content 销毁了,但是 overlay 留在 body 丫.
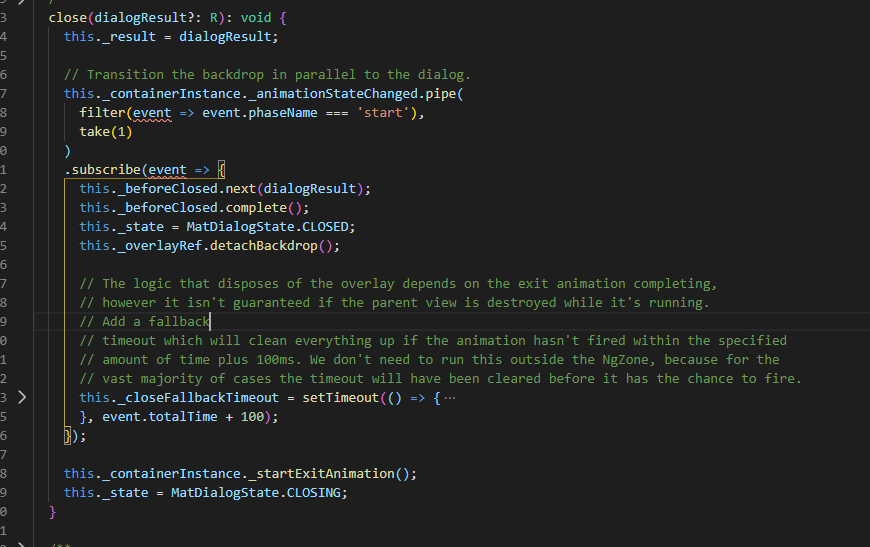
material team 有考虑到这种情况所以做了一个 fallback 机制, 但是这个并不能解决上面的问题,因为无论如何 dialog 要求至少要启动 animation start
如果是 router link 切换的话,渲染会在同一个 detech change 下完成,所以 animation start 是不会被触发的。
目前 dialog 没有提供 displose 的方法,所以基本上不无法做到的,除非你去监听 router event 之类的。
那我觉得比较合理的处理方式是。如果组件负责打开 dialog or overlay
那么当这个组件 onDestroy 的时候,必须要确保它负责的 overlay 一定要 displose. 为此 dialog 应该要公开这个接口让我们使用的.
更新 : 2019-11-14
小总结一下 angular 动态组件 -> portal -> overlay -> dialog
constructor(

  private componentFactoryResolver: ComponentFactoryResolver,

) { }
制作出组件工厂, 把动态组件丢进去就可以了
const componentFactory = this.componentFactoryResolver.resolveComponentFactory(DynamicComponent);
然后就可以创建组件实例了,这个时候需要基于一个注入器
通过 Injector.create 创建出一个新的 injector 并且继承 parent injector, ng 的 injector 有分层的概念 ngModule 的 provider 通常会放到 root injector 里头, lazy load module 则像下面那样创建出第 2 层级的 injector
const componentFactory = this.componentFactoryResolver.resolveComponentFactory(DynamicComponent);

const injector = Injector.create({

  providers: [{ provide: 'extraProvider', useValue: 'dada' }],

  parent: this.injector

});

const componentRef = componentFactory.create(this.injector);
这个时候组件就已经被实例化了,但是还没有发生 detech change, OnInit 也还没跑.
这个时候组件是独立的,我们知道 angular 把所有东西看成 VIew
组件就是组件 view, 模板就是 embedded view
然后所有 view 都必须放到 logical view tree 里头. 这样 change detech 才能遍历执行
所以现在组件创建好以后,我们需要给它一个家.
可以是 ViewContainerRef 或 ApplicationRef
像这样
this.applicationRef.attachView(componentRef.hostView);

this.container.insert(componentRef.hostView, 0);
2 者最大的区别是在 detech change 上, 如果你放到 app 里头, 那么组件是在最上层, 一旦 app.tick 触发. 此组件就会触发 doCheck
如果你是放到 container 里头,那么要看这个 container 在 logical tree 里面的第几层. app.tick 时就不一定触发 doCheck 了,要看 detech change 有没有流到这一层里头 (OnPush 的情况下)
此外, applicationRef.attachVIew 和 container 还有一个不同是, appRef attach 并不会把 dom append 出去
它只是把组件放进去 logical view tree 而且,并没有 append to dom.
view container 则会做这个事情.
那我们得自己搞, 比如...
document.body.appendChild((componentRef.hostView as EmbeddedViewRef<any>).rootNodes[0] as HTMLElement);
当然绝大部分情况下,我们应该使用 view container 因为这个是官方教我们正确插入 dom 的方式.
上面这个通常是用在 dialog 那种要 append to body 最外层的情况. 由于那里已经脱离的 angular 的 scope 所以我们得自己弄.
不管是 container.insert 还是 appRef.attachView 调用后,组件就会被 detech change OnInit 了.
组件 append 出去或需要一个 detech change 的 cycle 才会渲染哦. viewContainer 并不会替我们渲染组件. 它只是单纯的 append 而已.
注意 :
动态组件的 detech change 是比较难懂的. 我是在发现问题,看了源码之后,找特定关键字才找到了相关的文章
https://netbasal.com/things-worth-knowing-about-dynamic-components-in-angular-166ce136b3eb

意思是 componentRef.hostview.detechChange 只会让 component DoCheck 而已.
因为 componentRef.hostView 并不是 componentRef.instance.changeDetectorRef
componentRef.hostView 是一个 RootView 而不是 LView
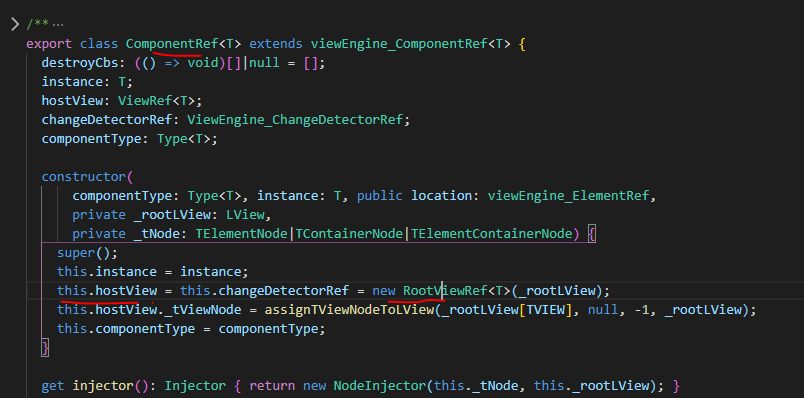
RootView 重写了 detech change
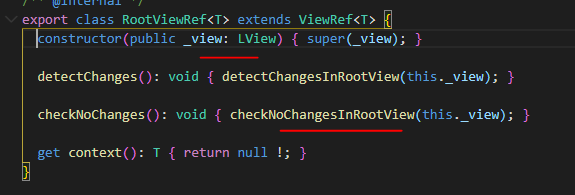
LView 的 detechChanges 是这样的

所以你会发现 hostView['_lView'] === instance.changeDetectorRef['_IView']
但是 detechChange 却不一样. 至于为什么这样设计我也不清楚. 总之只有动态 create 出来的 component 才会有这个 RootViewRef
那么问题来了, 外部如何让内部 detech change 呢 ?
第一种方法就是传 rxjs 流进去咯. 里面监听然后 mark for check.
第二种是通过 componentRef.injector 获取到内部的 changeDetectorRef, 然后调用 markForCheck
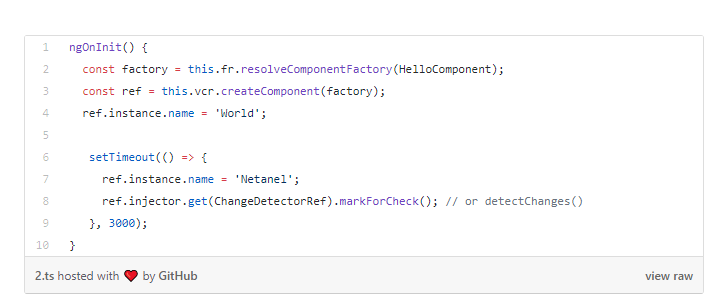
此外别无它法, componentRef.detechChange 由于是上层,它只能让 component DoCheck 而已. 记住了。
所以,记住这几个点.
1. componentFactory.create
这个时候组件只是被实例化, 没有 detech change, 没有 OnInit 没有 DoCheck.此时它也没有在 logical tree 里头
2. ComponentRef.hostView 是 RootViewRef 而不是平常我们看到的 LView
RootViewRef 重写了 changesDetech 方法,所以当我们调用 hostView.changesDetech 的时候,我们的组件并没有渲染, 因为它执行的是 component 的上一层, 这只会让 component 执行 DoCheck 而已.
3. appRef.attachView(componentRef.hostView)
插入到 logical tree 顶端. 每一次 app.tick 就会被执行 hostView.detechChange. <-- 记住它只是让 component DoCheck 而不是 render.
appRef.attach 不会 append dom, 我们需要自己写代码去 append dom.
4.container.insert
插入到 container 这一层级的 logical tree, app.tick 如果有流到这一次就会被 detech change. <-- 还是一样它只能让 component DoCheck 而不是 render.
会 append dom 到 container 的位置.
5. 唯一能让 component detech change render 的方式是传一个 rxjs 流进去, 或者通过 componentRef.injector 获取到内部的 ViewRef (也就是 ChangeDetectorRef)
好说完 component,现在说说 template
template 是通过 <ng-template> 制作出来的。
const context = {};

const viewRef = this.templateRef.createEmbeddedView(context);
和 component 相同的,这个时候 viewRef 还没有被 detech change. 也没有在 logical tree 里头.
我们可以通过 appRef.attachView 或者 container.insert 让它插入到 logical tree 里头.
这里主要说说它和 component 不同的地方.
首先它没有 RootView 这个概念, 我们获取到的就是 ViewRef.
另外 template 和 component 一个很大的区别在于它的通讯值.
template 本身就被定义在某个 component 当中, 然后又被丢到另一个可能千里之外的 component.container 里头.
<ng-template #template let-age="age" >

  {{ value }} and {{ age }}

</ng-template>
value 来自定义 template 的 component, age 来自使用 template 的 component.
那它的 detech change 是这样工作的。
当定义它的 component 发生 detech change 时, value 就被更新了, 使用它的组件并不会因此触发 detech change 之类的, age 也不会从新去拿.
就只是更新了 value 然后渲染出效果而已. 如果你在期中偷偷的修改了 age,ng 是不会发现的, 因为它不会去 get age.
反过来如果是使用 template 的组件做了 detech change, 定义它的组件也不会发生 detech change, 但是呢 value 却会去 getter 一下 (这里和 age 的表现不相同).
上面说了 component 和 template 的基本用法和 detech change 的更新机制.
现在说说 cdk 的 portal
cdk 提我们封装了上面这些动态创建 component 和 template 的方法. 其实也没有什么好封装的啦,不就那几行...
但是还是得要搞清楚它是怎样用起来的。
我们通常会用到是
ComponentPortal

4个都很合理,我们上一段都有用到这些. 至于为什么可以替换 componentFactory 呢, 这个不是很清楚,不是都一样的吗.. ?
另一个可能会用到得是
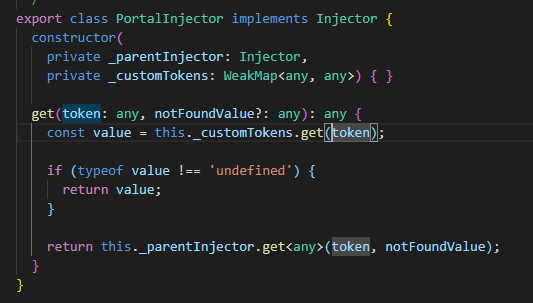
mat dialog 传递 data 和 dialogRef 就是用这种简单方式做的. 它不像上一段使用 Injector.create 然后提供 provider
它只是用一个 weakmap 来实现而已.
然后是 TemplatePortal

都是动态创建需要的东西.
TemplatePortal 和 ComponentPortal 都继承了 Portal 类
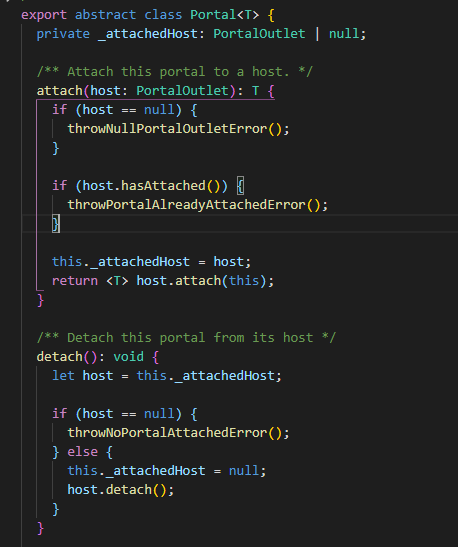
没什么特别的,只是有 attach 和 detech 的方法而已。然后主要, 这 2 个方法其实内部是调用了 outlet.attach 和 detech
也就是说逻辑根本没有写在这里,这 2 个方法只是一个委托方法而已,除了让初学者乱没有看出其它意义.
再来一个 DomPortal

很简单,就是放了一个 dom 在里面...
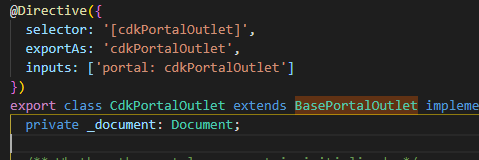
最后是 PortalOutlet, outlet 的职责是 container 用来 append dom 的,
这个是最常用到的,可以简单理解它就是 container
另一个是专门给 append body 用的,类似上段我们说的 appRef 然后自己 append body
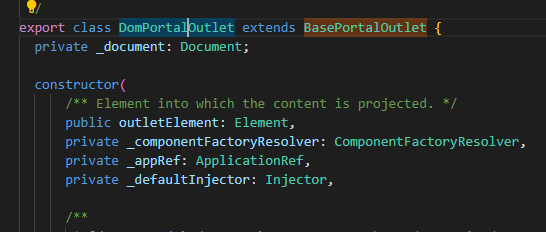
整个 portal 看下来没有什么奇特的地方,就真的只是封装而已.
我觉得最需要懂得逻辑在这里, portal.attach
cdk outlet 和 dom outlet 区别就在于此
先看看 ckd outlet attach template

关键在 viewContainerRef, 这个 container 说的是 outlet 这个指令依赖注入得 container (outlet 这个位置)
再看看 ckd outlet attach component
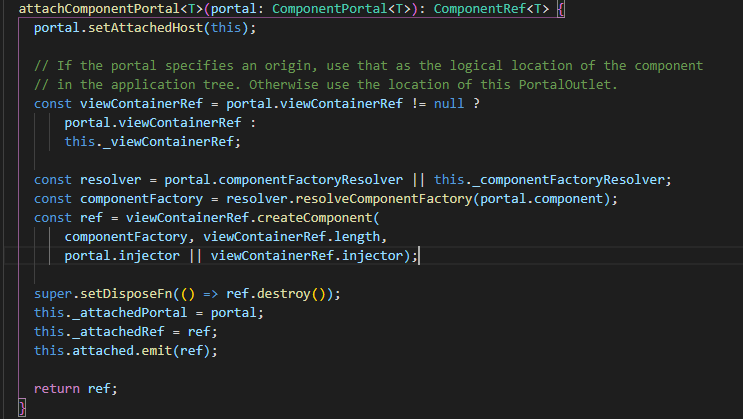
关键也在 container, 如果 portal 本身有 container, 就用,不然就用 outlet 的.
这里和刚才 template 不同,template 没有判断 portal 是否有 container
这样的设计我是觉得挺奇怪的,我把 portal 交给了 outlet 结果, portal 被 attach 在原本的 container 里, 这里关 outlet 什么是呢 ?
然后 outlet 被 destroy 时也 destroy 掉 portal ?
我们把疑点留着,等下一起讨论. 继续往下走.
这是 dom outlet 的 attach template
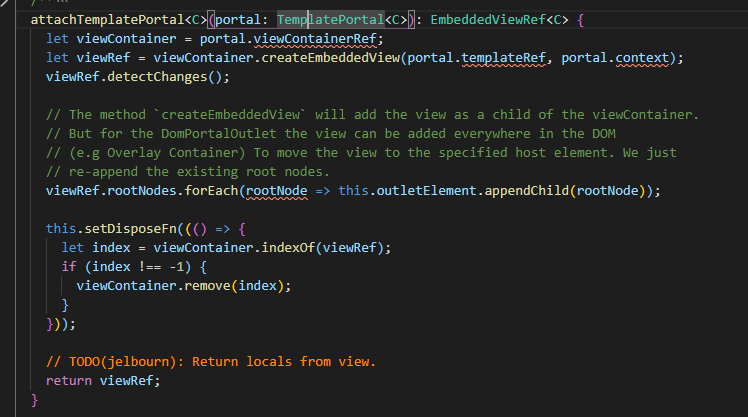
dom outlet 不是指令,它是 new 出来的,所以它本身不会有 view container ref, 所以 portal 理应要有 view container ref
这里没有任何判断就直接使用了 portal.viewContainerRef ... 挺勇敢的嘛...
此外这里还有一个 cut and paste 的动作. 当 portal 内容 attach 到 container 后, 这里做了一个 dom 操作就是把内容 cut and paste 到 outlet element 里头.
这应该是和 cdk outlet 最大的不同点.
最后是 dom outlet 的 attach component
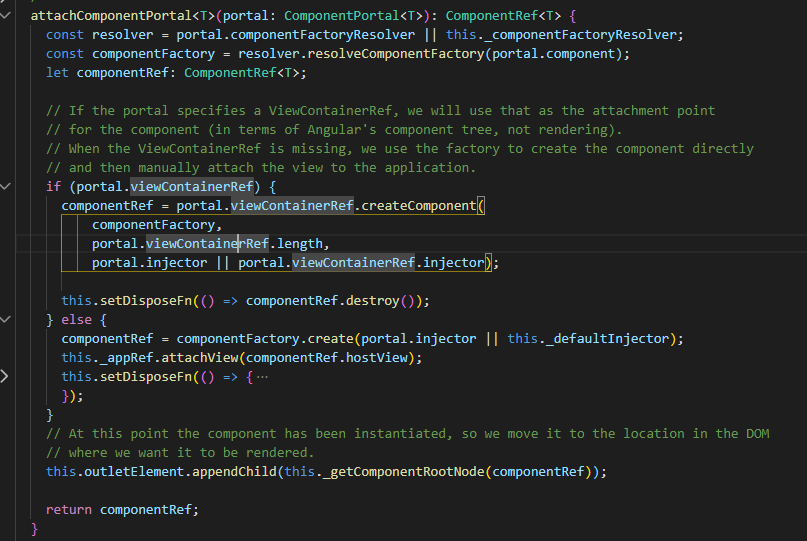
这里有做 viewcontainer 判断, 和 template 的处理手法不同.
如果 portal 没有 viewcontainer 那么就放到 appRef 里头. 最后依然会 cut and paste.
解析完了。总结一下我觉得不太容易理解的几个点.
1. outlet 决定位置
cdk outlet attach template, dom outlet attach component/template 都可以确保最终的内容渲染在 outlet 位置上.
但是 cdk outlet attach component 却不是这样..
这个确定是一个 bug, https://github.com/angular/components/issues/17650 -> https://github.com/angular/components/pull/17731
所以 cdk outlet 的会确保最终内容出现在 outlet 里
2. cdk outlet append component 时,有可能把 component 系在 appRef 上, 但是 append template 时却不会这样.
反而强制要求 portal 一定要有 container (我的想到的一个解是, template 定义在 component 里,所以它肯定是有 container 的)
在我的理解中. template 和 component 应该保持行为一致. 让使用者决定要用哪一种. 可以简单的替换.
可能 cdk 很灵活时因为 mat 需要这么灵活. 但对我来说这些不一致会导致维护起来比较麻烦.
所以我的做法通常是 portal 不需要带 container 逻辑.
更新: 2019-11-08
记入一下 overlay 的使用
material 有 8 个组件用到了 overlay
autocomplete
datepicker
select
menu
bottom sheet
dialog
snackbar
tooltip
在真实项目中,还有很多组件是没有的. 比如
小 form
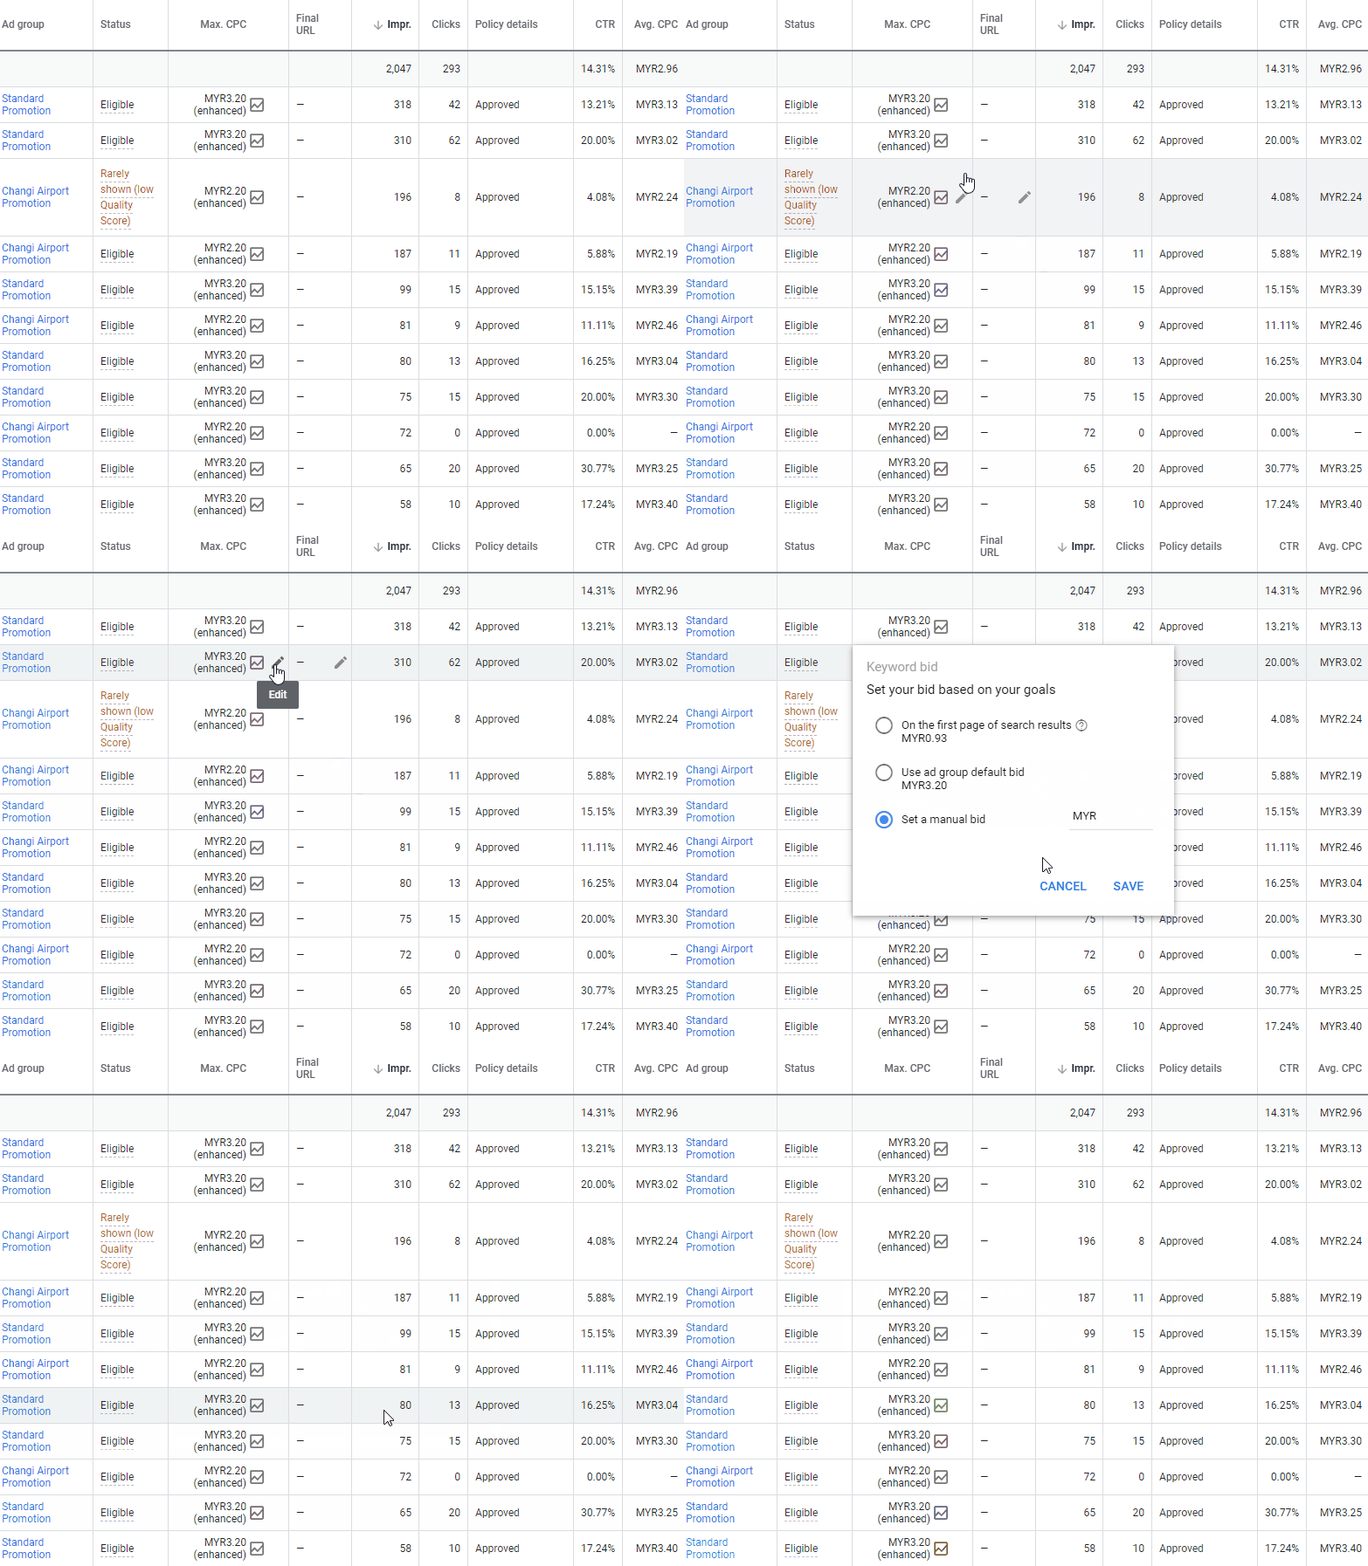
比如大 message tip
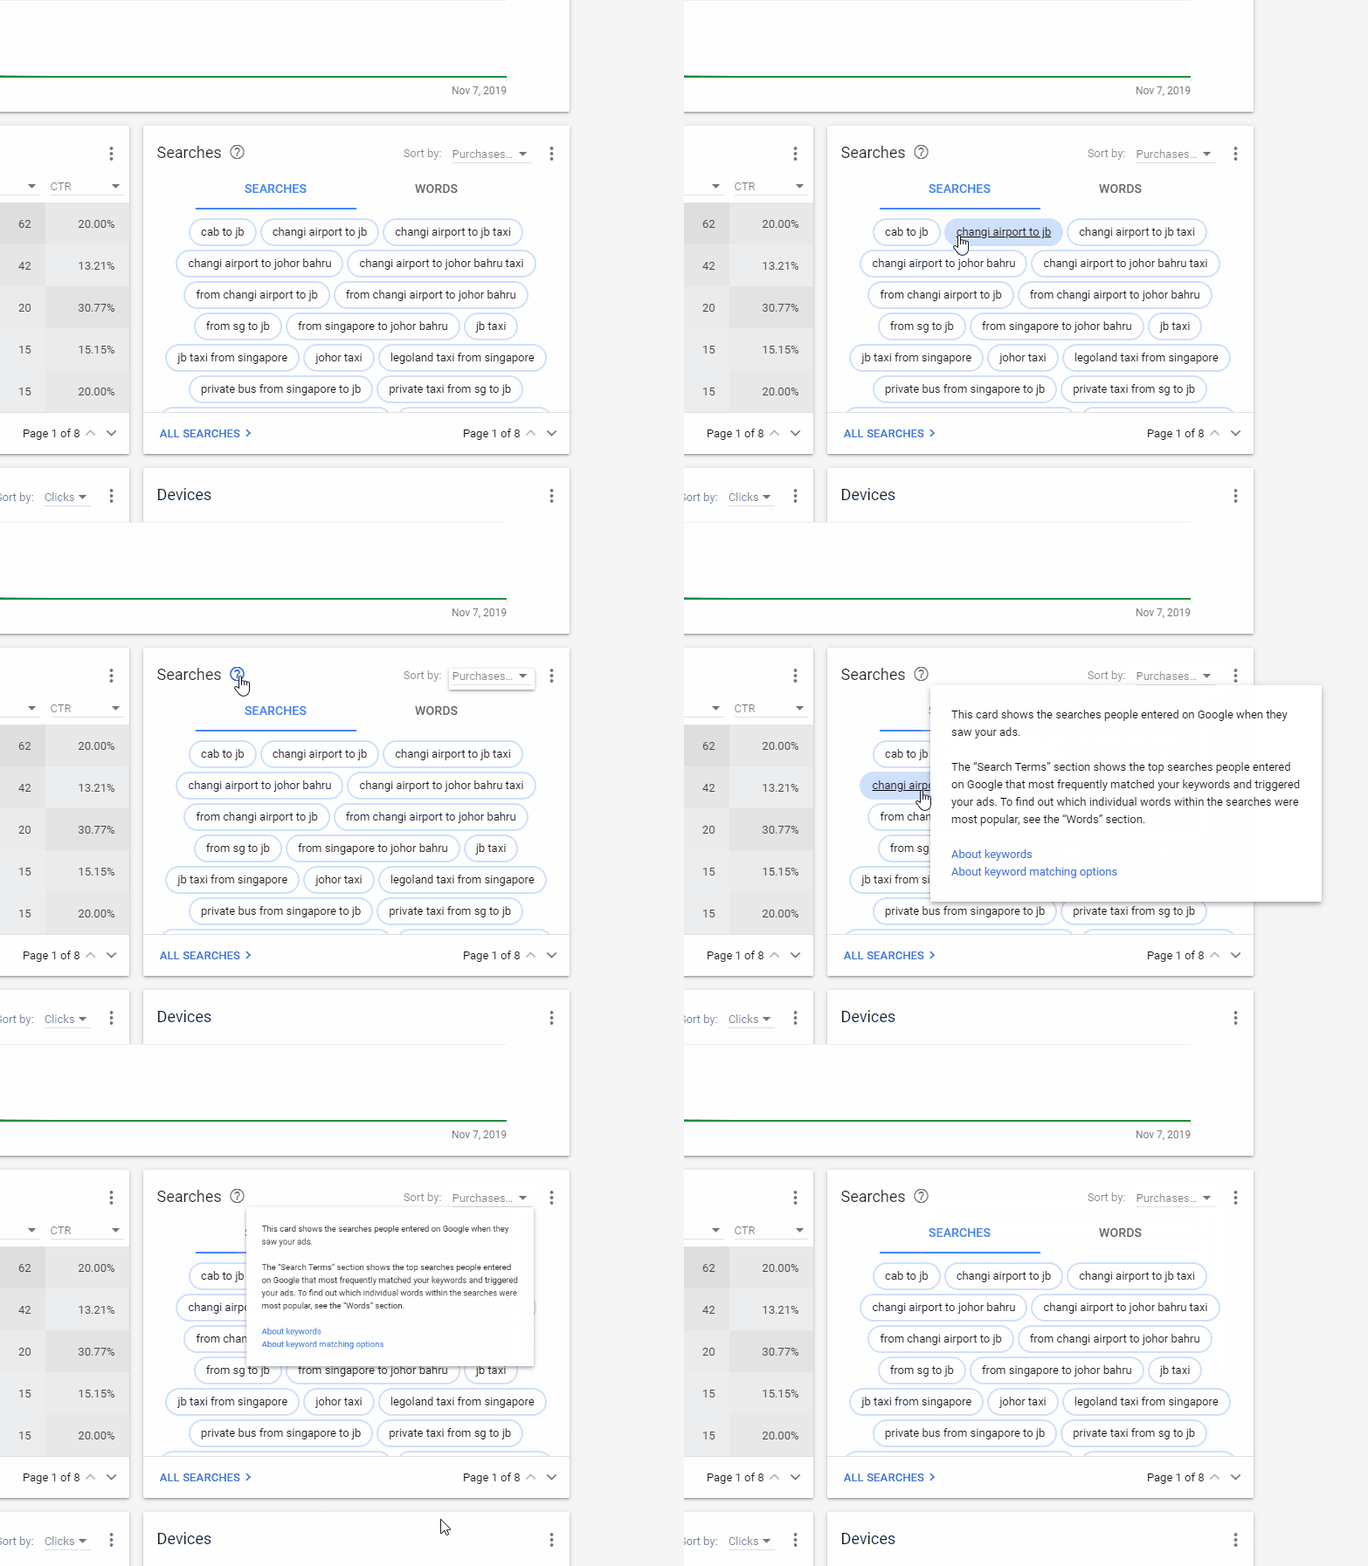
这些都得我们自己去实现. 所以就需要用到 overlay 了.
先说说它的过程
当我们调用 overlay.create 的时候, overlay 会在 body 层创建一个 div
然后依据我们的 width height 在放一个 div 在里面 (其实好像有 3 - 4 层 div)
如果我们要 backdrop 也可以通过 overlay 设置.
有了 backdrop 我们就可以监听点击事件然后关掉 overlay 了.
这里有一个小体验. 很久以前,我是用 body click + stop bubble 来实现这种 modal close 的. 后来发现大家都用 overlay + 透明 backdrop 来做
省去了不少麻烦. stop bubble 在多层次的情况下不太好处理, 但是这个做法也有它的局限. 比如只能 body scroll 因为 backdrop 在最上层, 会把其它 div 挡住, 如果我们依赖其它 div 来做 scroll
那么就 scroll 不了的. 所以多用 body scroll 还是比较正确的姿势.
我还发现一个小秘密,就是 material tooltip 没有使用 backdrop 但是缺可以点击 body 关闭. 它也是通过监听 body click 实现的,因为 tooltip 内只可以是字, 所以不会有点击事件也就不需要顾虑 bubble 的问题. 很巧妙的在设计上躲过了实现的难题.
做小 modal 要搞懂 position strategy
const positionStrategy = this.overlay.position()

  .flexibleConnectedTo(origin)

  .withTransformOriginOn('.transformOrigin')

  .withFlexibleDimensions(false)

  .withViewportMargin(8)

  .withPush(false)

  .withLockedPosition(true)

  .withPositions([

    { originX: 'start', originY: 'top', overlayX: 'start', overlayY: 'top' },

    { originX: 'start', originY: 'top', overlayX: 'start', overlayY: 'bottom' },

    { originX: 'end', originY: 'top', overlayX: 'end', overlayY: 'top' },

    { originX: 'end', originY: 'top', overlayX: 'end', overlayY: 'bottom' }

  ]);

const overlayRef = this.overlay.create({

    positionStrategy,

    scrollStrategy: this.overlay.scrollStrategies.reposition(),

    hasBackdrop: true,

});
scroll strategy 用的是 reposition, 这个很好里理解, 就是当 scroll 的时候我们的 modal 需要始终维持对的位置.
来说说 position strategy, 和 big modal 不同, small modal 需要一个位置, 通常是在我们点击按钮的附近.
可以叫它 origin element, 我们要呈现的内容 (content) 必须和 origin element 做一个定位.
flexibleConnectedTo(origin element) 就 content connect to origin 的意思
withPositions 提供一个位置匹配, origin 9 个点, content 9 个点, 所以总共可以摆出 81 一个位置.
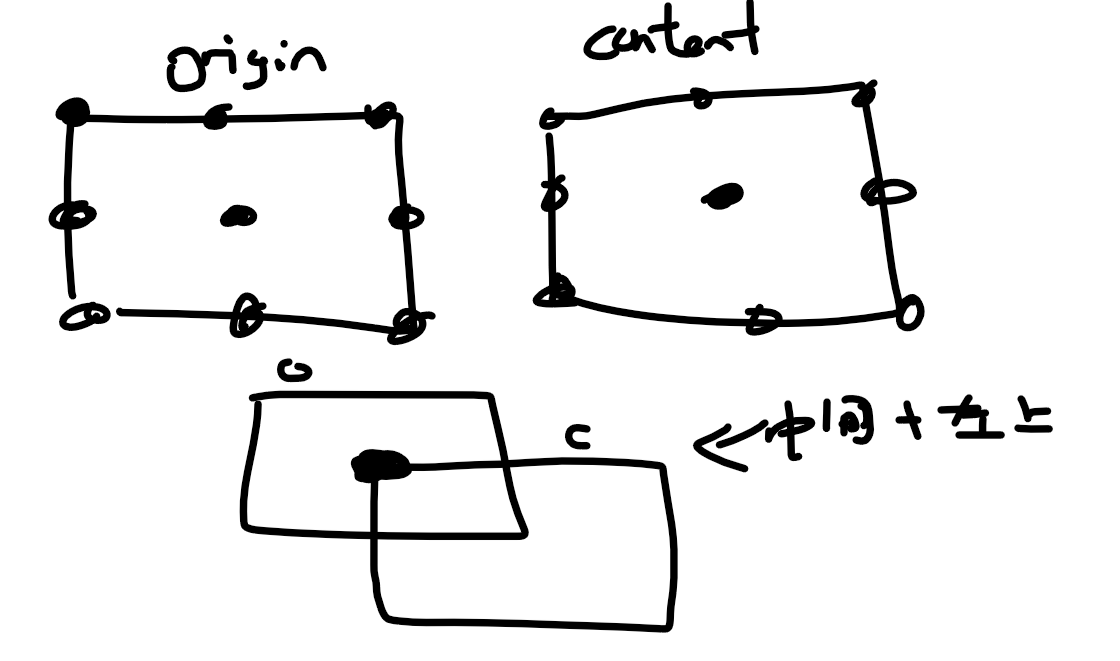
我们提供一个 array 写上各种匹配方式, 要有顺序之分哦,overlay 会先后判断可见范围,找出一个可见度最高的作为展现, 比如 drop down 在屏幕上方,显示位置是下,在屏幕下方显示位置是上,这种体验.
withTransformOriginOn(content element selector string) 主要是给我们做 animation scale 用的,由于 content 出现的位置是不固定的
所以 animation 展示的位置也是不固定的,overlay 会通过我们传入的 selector 找到 element 然后把 transform origin 设置进去.
withFlexibleDimensions 这个我到现在都没有搞懂是啥, default 是 true, 但是我发现它的效果怪怪的,所以就不用了. 跳
withViewportMargin 我们不希望我们的 content 和 viewport 黏在一起, 就可以放这个 margin 给它.
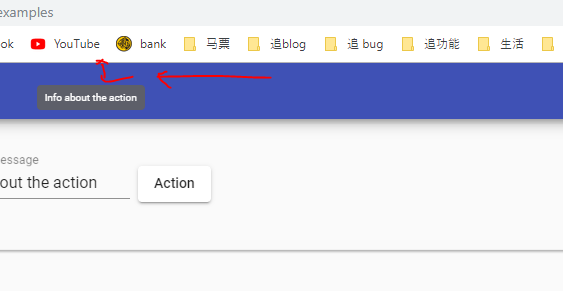
红色区域就是那个 margin
withPush 默认是 true, 有了这个, 用户不管 scroll 上下左右, 我们的 content 就会一直保持在可见区, 会跟着 scroll 走.
withScrollableContainers(element) 这个是用于当我们有多层 scroll bar 时用到的,默认情况下, overlay 是通过 scrollDispatcher 去监听 body scroll 的.
但是如果我们的 origin 在一个 div scroll 里, 只监听 body scroll 是无法做出正确体验的,所以我们要让 overlay 知道这个事情.
做法是这样的, 我们得把我们能 scroll 的 element 都注册进去 scrollDispatcher (可以自己调用 register 或者用 cdkScrollable 指令)
当 scrollDispatcher 有了所有的 scrollable div, 当我们调用 withScrollableContainers,它会拿我们传入的 element 去 match (element 的 parent 如果有在 scrollable list 中就去监听这个 scrollable 的滚动事件)
这样当 scroll 的时候, 我们的 content 就会正确的被 reposition 了.
withLockedPosition 当我们 scroll 的时候, overlay 会替我们 reposition 但是有时候这种跳来跳去不一定是好的体验,这个时候我们可以使用 lock, content 显示时会用最佳位置,然后就一直保持这个位置,不管用户 resize or scroll.
到这个环境, overlay 算是做出来了. 下一个是做 content 的 animation
通常 overlay append content 我们都希望有同一种 animation 体验,所以一般上会封装 animation
它的具体做法是做一个 container 组件, overlay 每次 append 都是这个 container 组件,然后这个组件在 append 我们的动态组件.
const containerInjector = new PortalInjector(this.vcr.injector, new WeakMap());

const containerPortal = new ComponentPortal(ContainerComponent, this.vcr, containerInjector);

const container = overlayRef.attach(containerPortal).instance;
overlay 内部有一个 dom portal outlet (这个和我们经常用的 cdk portal outlet 指令不是同一个哦),我们调用 overlay.attach(我们的 portal)
overlay 会调用 DomPortalOutlet.attachComponent.
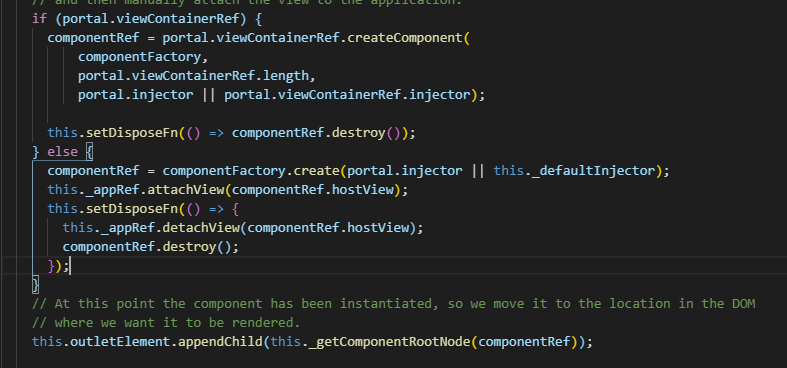
这里的关键是我们传入的 portal 是否有 viewContainerRef 它会决定之后的 detech change 时机和 injection.
如果有 viewcontainer 那么会把 portal 先创建到 view container 然后通过 outletElement (body 的 div) appendchild (cut and paste) 出去.
如果没有会直接创建 component 然后放入 appRef.views 里面. 然后依然 append to body
大部分情况下我们 portal 应该要有 view container ref.
下一个动作就是 container append 动态组件了.
<ng-template cdkPortalOutlet></ng-template>
我们可以在 container.html 使用 cdkPortalOutlet
@ViewChild(CdkPortalOutlet, { static: true }) portalOutlet: CdkPortalOutlet;
通过 viewchild + static 获取到这个指令. (看到 static true 的用途了吧...嘻嘻)
static 的特色是,在 component construtor 运行完后就可以获取到这个属性值了, 不需要等到 after view init.
container.animationStateChanged.pipe(filter(e => e.toState === 'enter' && e.phaseName === 'done'), take(1)).subscribe(e => {

  container.autoFocus();

});

const contentInjector = new PortalInjector(this.vcr.injector, new WeakMap([[MODAL_DATA, 'data']]));

const contentPortal = new ComponentPortal(AbcComponent, null, contentInjector); // 这里 view container ref 是 null

container.attachComponentPortal(contentPortal);
注意那个 animationStateChanged. overlay dispose 是很突兀的,所以我们几乎不可能直接调用。
正确的做法是通过控制我们 container 的 animation 来完成关闭, 比如先 fade out container,然后监听 container fade out done 才调用 overlay dispose.
上面这个例子是做了一个 autofocus, 看的出来 container 内部封装了 cdk focus trap 功能.
另一个要留意的是, container.attachComponent
刚才我们说 container 内有一个 cdk portal outlet, 拿我们只需要开一个接口接受动态组件,然后就可以 attach 出去了。
cdk portal outlet vs dom portal outlet
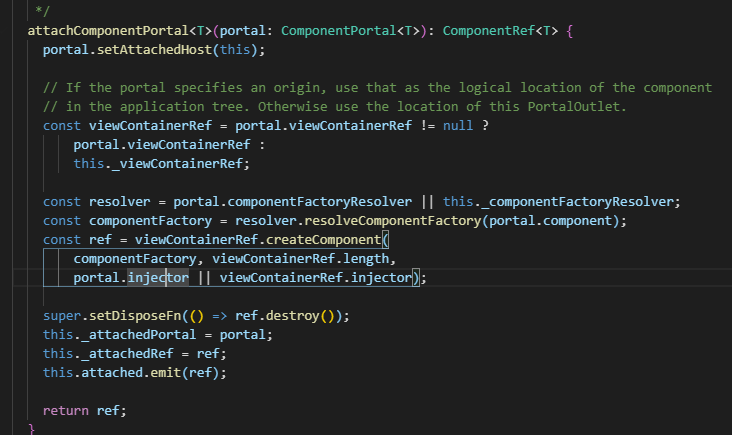
cdk portal outlet 处理 view container ref 的方式有点不同, cdk poral outlet 本身有自己的 view container ref (刚才 dom outlet 是用 appRef)
如果 portal 自带 view container ref, 那么会直接把 portal 插入到其中, 所以内容不会被 append 到 cdk portal outlet 的位置哦. (这有点怪,注释说了只是逻辑树会插入到 portal 的 view container, 但是渲染应该是在 portal outlet 的位置才对呀. 但是没有..)
提了一个 issue 希望能问个明白
https://github.com/angular/components/issues/17650
如果没有, 就会使用 cdk portal outlet 的 viewcontainer 了. 这通常会是我们想要的结果.
在学习 overlay 和 portal 的时候,一直没有弄明白 viewContainerRef 在其中扮演的角色
这里说一下来龙去脉
当我们创建一个 overlay 时,同时创建了一个 portal outlet

当我们要 append 内容时,内部其实时调用了 DomPortalOutlet 的 attachComponentPortal 方法

这时候会依据 portal <-- 传入的component portal,不是 portal outlet 哦,不要搞混了.
时候有 viewContainerRef 决定如何创建 component.
如果有就调用 viewContainerRef create component 方法, 这时会 insert component to container 渲染. 然后再通过 dom 操作 cut and paste 去 portal outlet (body)。
如果没有的话就直接通过 component factory create component 然后把 view 放入到全局 appRef 里面. 这时候组件并没有 append to dom 任何地方.
然后 cut and paste to portal outlet.
当 app.tick 时,所有的 appRef.views 就会 detech change.
2 者有什么区别呢 ?

在 portal 的文档里并没有解释太多... 只是说什么逻辑树和 view 树的不同而已.
反而是 dialog 的文档里解释了

从源码上看确实如此.
在使用了 viewContainerRef 之后, detech change 的时机是依据 viewContainerRef 的
而放入 appRef 的情况, detech change 的时机是 app.tick 每一次都触发.

appRef.attachView 将 view 放入了一个 array 中.
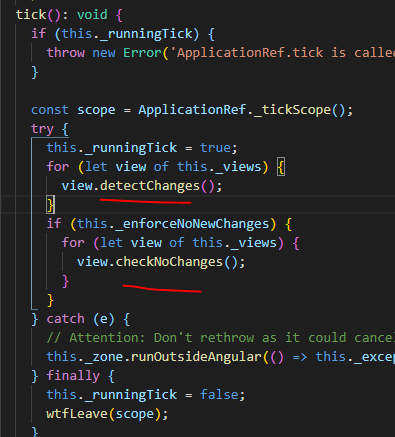
在 tick 的时候调用 detech change.
至于 injector 其实蛮困惑的,因为 attachComponentPortal injector 是基于 component portal 的 injector,跟 viewContainerRef 没有啥关系丫. 那为什么 dialog 文档说有关系呢

看了源码就会发现了,dialog 创建 portal 使用的 injector 是 userInjector || rootInjector, 而所谓的 userInjector 就是 viewContainerRef.injector.
这样就真相大白了咯。
Angular 学习笔记 (动态组件 & Material Overlay & Dialog 分析)的更多相关文章
- Angular 学习笔记 ( timezone + moment + material date-picker + date pipe + asp.net core )
参考 : https://stackoverflow.com/questions/29979609/time-conversion-with-timezoneinfo-for-past-years h ...
- Angular学习笔记之组件之间的交互
1.@Input:可设置属性 当它通过属性绑定的形式被绑定时,值会“流入”这个属性. 在子组件中使用,例如:@Input()name:string 父组件定义宾亮,并在父组件的模板中绑定,例如: 子组 ...
- angular学习笔记 父子组件传值
一.如何将父组件的值传到子组件? 在子组件里面引入Input,然后用@Input 变量1 接收 接着在父组件中的,子组件标签上添加[msg]="msg",中括号里的名字要与子组件中 ...
- Flutter学习笔记(41)--自定义Dialog实现版本更新弹窗
如需转载,请注明出处:Flutter学习笔记(41)--自定义Dialog实现版本更新弹窗 功能点: 1.更新弹窗UI 2.强更与非强更且别控制 3.屏蔽物理返回键(因为强更的时候点击返回键,弹窗会消 ...
- angular学习笔记(三十一)-$location(2)
之前已经介绍了$location服务的基本用法:angular学习笔记(三十一)-$location(1). 这篇是上一篇的进阶,介绍$location的配置,兼容各版本浏览器,等. *注意,这里介绍 ...
- angular学习笔记(三十一)-$location(1)
本篇介绍angular中的$location服务的基本用法,下一篇介绍它的复杂的用法. $location服务的主要作用是用于获取当前url以及改变当前的url,并且存入历史记录. 一. 获取url的 ...
- angular学习笔记(三十)-指令(10)-require和controller
本篇介绍指令的最后两个属性,require和controller 当一个指令需要和父元素指令进行通信的时候,它们就会用到这两个属性,什么意思还是要看栗子: html: <outer‐direct ...
- angular学习笔记(三十)-指令(7)-compile和link(2)
继续上一篇:angular学习笔记(三十)-指令(7)-compile和link(1) 上一篇讲了compile函数的基本概念,接下来详细讲解compile和link的执行顺序. 看一段三个指令嵌套的 ...
- angular学习笔记(三十)-指令(7)-compile和link(1)
这篇主要讲解指令中的compile,以及它和link的微妙的关系. link函数在之前已经讲过了,而compile函数,它和link函数是不能共存的,如果定义了compile属性又定义link属性,那 ...
随机推荐
- 微信小程序-收货地址左滑删除
我参照了其中的部分代码,如:bindtouchstart,bindtouchmove,bindtouchend事件多数组中偏移值的更改, 在结合微信 movable-area 和 movable-vi ...
- C3线性化
https://zh.wikipedia.org/wiki/C3线性化 在计算机科学中,C3算法主要用于确定多重继承时,子类应该继承哪一个父类的方法,即方法解析顺序(Method Resolution ...
- Python3基础 输出逐行递增的小星星
Python : 3.7.3 OS : Ubuntu 18.04.2 LTS IDE : pycharm-community-2019.1.3 ...
- 有些lambda表达式就可以体现出编程中「Context(上下文)」环境
编程中什么是「Context(上下文)」? 每一段程序都有很多外部变量.只有像Add这种简单的函数才是没有外部变量的.一旦你的一段程序有了外部变量,这段程序就不完整,不能独立运行.你为了使他们运行 ...
- 多线程查询数据,将结果存入到redis中,最后批量从redis中取数据批量插入数据库中【我】
多线程查询数据,将结果存入到redis中,最后批量从redis中取数据批量插入数据库中 package com.xxx.xx.reve.service; import java.util.ArrayL ...
- Linux系统调优——Memory内存(二)
(1).查看Memory(内存)运行状态相关工具 1)free命令查看内存使用情况 [root@youxi1 ~]# free -m //-m选项,以MB为单位显示 total used free s ...
- Django中的QuerySet查询优化之prefetch_related
转载的,做个笔记,原文链接 在数据库有外键的时候,使用 select_related() 和 prefetch_related() 可以很好的减少数据库请求的次数,从而提高性能.本文通过一个简单的例子 ...
- Python基于socket模块实现UDP通信功能示例
Python基于socket模块实现UDP通信功能示例 本文实例讲述了Python基于socket模块实现UDP通信功能.分享给大家供大家参考,具体如下: 一 代码 1.接收端 import ...
- HTML布局排版5 测试某段html页面1
除了div,常见的还有用table布局,这里直接用前面博文的页头页尾,如下面的页面的部分,是个简单的table.该页面样式,如果拖动浏览器,可以看到table和文本框总是居中,但是文本框下方那两个按钮 ...
- Centos7.0操作系统加固常见方法
1. 账号和口令 1.1 禁用或删除无用账号 减少系统无用账号,降低安全风险. 操作步骤 使用命令 userdel <用户名> 删除不必要的账号. 使用命令 passwd -l <用 ...
