Expect Command And How To Automate Shell Scripts Like Magic
In the previous post, we talked about writing practical shell scripts and we saw how it is easy to write a shell script. Today we are going to talk about a tool that does magic to our shell scripts, that tool is the Expect command or Expect scripting language.
Expect command or expect scripting language is a language that talks with your interactive programs or scripts that require user interaction.
Expect scripting language works by expecting input, then the Expect script will send the response without any user interaction.
You can say that this tool is your robot which will automate your scripts.
If Expect command if not installed on your system, you can install it using the following command:
$ apt-get install expect
Or on Red Hat based systems like CentOS:
$ yum install expect
Table of Contents [hide]
Expect Command
Before we talk about expect command, Let’s see some of the expect command which used for interaction:
spawn Starting a script or a program.
expect Waiting for program output.
send Sending a reply to your program.
interact Allowing you in interact with your program.
- The spawn command is used to start a script or a program like the shell, FTP, Telnet, SSH, SCP, and so on.
- The send command is used to send a reply to a script or a program.
- The Expect command waits for input.
- The interact command allows you to define a predefined user interaction.
We are going to type a shell script that asks some questions and we will make an Expect script that will answer those questions.
First, the shell script will look like this:
|
|
#!/bin/bash
echo "Hello, who are you?"
read $REPLY
echo "Can I ask you some questions?"
read $REPLY
echo "What is your favorite topic?"
read $REPLY
|
Now we will write the Expect scripts that will answer this automatically:
|
|
#!/usr/bin/expect -f
set timeout -1
spawn ./questions
expect "Hello, who are you?\r"
send -- "Im Adam\r"
expect "Can I ask you some questions?\r"
send -- "Sure\r"
expect "What is your favorite topic?\r"
send -- "Technology\r"
expect eof
|
The first line defines the expect command path which is #!/usr/bin/expect .
On the second line of code, we disable the timeout. Then start our script using spawn command.
We can use spawn to run any program we want or any other interactive script.
The remaining lines are the Expect script that interacts with our shell script.
The last line if the end of file which means the end of the interaction.
Now Showtime, let’s run our answer bot and make sure you make it executable.
$ chmod +x ./answerbot
$./answerbot
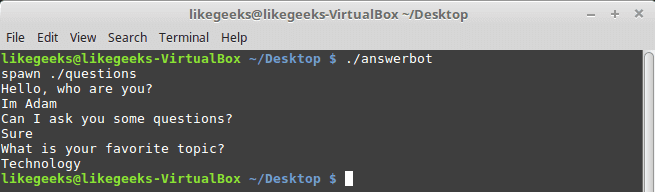
Cool!! All questions are answered as we expect.
If you get errors about the location of Expect command you can get the location using the which command:
$ which expect
We did not interact with our script at all, the Expect program do the job for us.
The above method can be applied to any interactive script or program.Although the above Expect script is very easy to write, maybe the Expect script little tricky for some people, well you have it.
Using autoexpect
To build an expect script automatically, you can the use autoexpect command.
autoexpect works like expect, but it builds the automation script for you. The script you want to automate is passed to autoexpect as a parameter and you answer the questions and your answers are saved in a file.
$ autoexpect ./questions
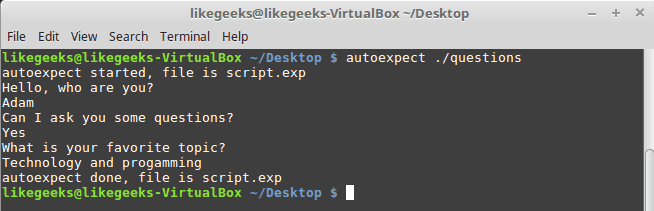
A file is generated called script.exp contains the same code as we did above with some additions that we will leave it for now.

If you run the auto generated file script.exp, you will see the same answers as expected:
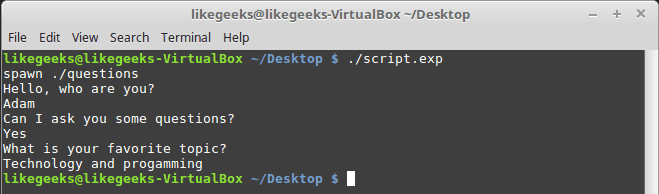
Awesome!! That super easy.
There are many commands that produce changeable output, like the case of FTP programs, the expect script may fail or stuck. To solve this problem, you can use wildcards for the changeable data to make your script more flexible.
Working with Variables
The set command is used to define variables in Expect scripts like this:
set MYVAR 5
To access the variable, precede it with $ like this $VAR1
To define command line arguments in Expect scripts, we use the following syntax:
set MYVAR [lindex $argv 0]
Here we define a variable MYVAR which equals the first passed argument.
You can get the first and the second arguments and store them in variables like this:
|
|
set my_name [lindex $argv 0]
set my_favorite [lindex $argv 1]
|
Let’s add variables to our script:
|
|
#!/usr/bin/expect -f
set my_name [lindex $argv 0]
set my_favorite [lindex $argv 1]
set timeout -1
spawn ./questions
expect "Hello, who are you?\r"
send -- "Im $my_name\r"
expect "Can I ask you some questions?\r"
send -- "Sure\r"
expect "What is your favorite topic?\r"
send -- "$my_favorite\r"
expect eof
|
Now try to run the Expect script with some parameters to see the output:
$ ./answerbot SomeName Programming

Awesome!! Now our automated Expect script is more dynamic.
Conditional Tests
You can write conditional tests using braces like this:
|
|
expect {
"something" { send -- "send this\r" }
"*another" { send -- "send another\r" }
}
|
We are going to change our script to return different conditions, and we will change our Expect script to handle those conditions.
We are going to emulate different expects with the following script:
|
|
#!/bin/bash
let number=$RANDOM
if [ $number -gt 25000 ]; then
echo "What is your favorite topic?"
else
echo "What is your favorite movie?"
fi
read $REPLY
|
A random number is generated every time you run the script and based on that number, we put a condition to return different expects.
Let’s make out Expect script that will deal with that.
|
|
#!/usr/bin/expect -f
set timeout -1
spawn ./questions
expect {
"*topic?" { send -- "Programming\r" }
"*movie?" { send -- "Star wars\r" }
}
expect eof
|
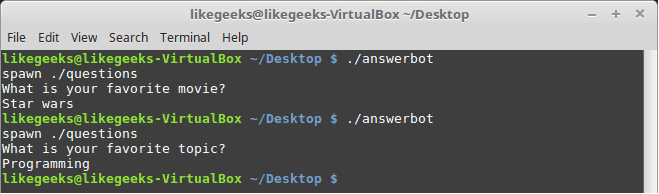
Very clear. If the script hits the topic output, the Expect script will send programming and if the script hits movie output the expect script will send star wars. Isn’t cool?
If else Conditions
You can use if/else clauses in expect scripts like this:
|
|
#!/usr/bin/expect -f
set NUM 1
if { $NUM < 5 } {
puts "\Smaller than 5\n"
} elseif { $NUM > 5 } {
puts "\Bigger than 5\n"
} else {
puts "\Equals 5\n"
}
|

Note: The opening brace must be on the same line.
While Loops
While loops in expect language must use braces to contain the expression like this:
|
|
#!/usr/bin/expect -f
set NUM 0
while { $NUM <= 5 } {
puts "\nNumber is $NUM"
set NUM [ expr $NUM + 1 ]
}
puts ""
|

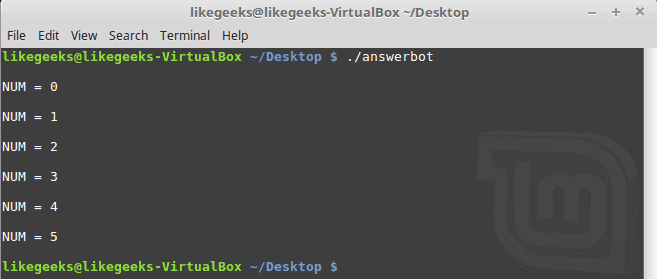
For Loops
To make a for loop in expect, three fields must be specified, like the following format:
|
|
#!/usr/bin/expect -f
for {set NUM 0} {$NUM <= 5} {incr NUM} {
puts "\nNUM = $NUM"
}
puts ""
|
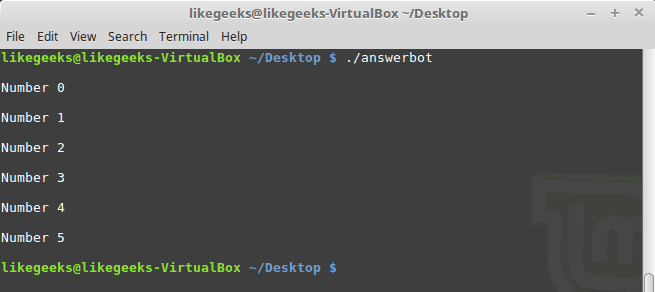
User-defined Functions
You can define a function using proc like this:
|
|
proc myfunc { TOTAL } {
set TOTAL [expr $TOTAL + 1]
return "$TOTAL"
}
|
And you can use them after that.
|
|
#!/usr/bin/expect -f
proc myfunc { TOTAL } {
set TOTAL [expr $TOTAL + 1]
return "$TOTAL"
}
set NUM 0
while {$NUM <= 5} {
puts "\nNumber $NUM"
set NUM [myfunc $NUM]
}
puts ""
|
Interact Command
Sometimes your Expect script contains some sensitive information that you don’t want to share with other users who use your Expect scripts, like passwords or any other data, so you want your script to take this password from you and continuing automation normally.
The interact command reverts the control back to the keyboard.
When this command is executed, Expect will start reading from the keyboard.
This shell script will ask about the password as shown:
|
|
#!/bin/bash
echo "Hello, who are you?"
read $REPLY
echo "What is you password?"
read $REPLY
echo "What is your favorite topic?"
read $REPLY
|
Now we will write the Expect script that will prompt for the password:
|
|
#!/usr/bin/expect -f
set timeout -1
spawn ./questions
expect "Hello, who are you?\r"
send -- "Hi Im Adam\r"
expect "*password?\r"
interact ++ return
send "\r"
expect "*topic?\r"
send -- "Technology\r"
expect eof
|

After you type your password type ++ and the control will return back from the keyboard to the script.
Expect language is ported to many languages like C#, Java, Perl, Python, Ruby and Shell with almost the same concepts and syntax due to its simplicity and importance.
Expect scripting language is used in quality assurance, network measurements such as echo response time, automate file transfers, updates, and many other uses.
I hope you now supercharged with some of the most important aspects of Expect command, autoexpect command and how to use it to automate your tasks in a smarter way.
Thank you.
示例:
#!/bin/bash

passwd=*********

ips=`cat /tmp/ip.list|awk '{print $1}'`

for host  in $ips

do

   expect <<!

  spawn rsync -av   list.txt002  root@$host:/tmp

   expect {

   "Are you sure you want to continue connecting (yes/no)? " { send "yes\r"; exp_continue}

   "password:" { send "$passwd\r"; exp_continue}

    }

!

done
Expect Command And How To Automate Shell Scripts Like Magic的更多相关文章
- 鸟哥的 Linux 私房菜Shell Scripts篇(一)
参考: http://linux.vbird.org/linux_basic/0340bashshell-scripts.php#script_be http://www.runoob.com/lin ...
- 第十三章、学习 Shell Scripts
什么是 Shell scripts shell script (程序化脚本) :shell script 是针对 shell 所写的『脚本!』 shell script 是利用 shell 的功能所写 ...
- source command not found in sh shell解决办法
在Ubuntu系统中执行脚本的时候突然出现错误"source command not found in sh shell" 这个其实在Ubuntu 当中 执行脚本默认的使用的是da ...
- React native采坑路 Running 1 of 1 custom shell scripts
1. Running 1 of 1 custom shell scripts 卡住的问题. 分析: 四个文件没有下载完成. boost_1_63_0.tar.gz folly-2016.09.26.0 ...
- 鸟哥的Linux私房菜——第十六章:学习Shell Scripts
视频链接:http://www.bilibili.com/video/av10565321/ 1. 什么是 Shell Script (shell写的脚本)1.1 干嘛学习 shell s ...
- 鸟哥的Linux私房菜-第10/11/12/13章(vim程序编辑器、学习bash、正则表达式与文件格式化处理、学习Shell Scripts)
第10章 vim程序编辑器 可以将vim看做vi的进阶版本,vim可以用颜色或底线等方式来显示出一些特殊的信息. 为何要学习vim?因为: a. 所有的 Unix Like 系统都会内建 vi 文书编 ...
- linux source命令与sh shell scripts的区别
source FileName 作用:在当前bash环境下读取并执行FileName中的命令. 注:该命令通常用命令“.”来替代. 如:source .bash_rc 与 . .bash_rc 是等效 ...
- 鸟哥的linux私房菜——第十二章学习(Shell Scripts)
第十二章 Shell Scripts 1.0).什么是shell scripts? script 是"脚本.剧本"的意思.整句话是说, shell script 是针对 shel ...
- 第十三章、学习 Shell Scripts 简单的 shell script 练习
简单的 shell script 练习 简单范例 对谈式脚本:变量内容由使用者决定 [root@www scripts]# vi sh02.sh #!/bin/bash # Program: # Us ...
随机推荐
- jQuery浮窗图片到页面中间的代码兼容移动端
jQuery浮窗图片到页面中间的代码兼容移动端 <!doctype html> <html> <head> <meta charset="utf-8 ...
- 单片机成长之路(51基础篇) - 023 N76e003 系统时钟切换到外部时钟
N76e003切换到外部时钟的资料很少(因为N76e003的片子是不支持无源晶振的,有源晶振的成本又很高,所以网上很少有对N76e003的介绍).有图有真相: 代码如下: main.c #includ ...
- Kafka学习笔记之Kafka背景及架构介绍
0x00 概述 本文介绍了Kafka的创建背景,设计目标,使用消息系统的优势以及目前流行的消息系统对比.并介绍了Kafka的架构,Producer消息路由,Consumer Group以及由其实现的不 ...
- FileChannel(API详解)
1.两种获取通道的方法FileChannel.open()的方式 FileChannel channell = FileChannel.open(Paths.get("a.txt" ...
- VS2019无法安装Android SDK 28的问题
在一台新电脑上安装VS2019,新建Xamarin.Android项目,反复提示要安装Android SDK Build Tools 28.0.3,在弹出的窗口里点击接受协议,却无法安装SDK. 直接 ...
- 14、VUE服务器渲染
1.HTML的渲染方式 1.1. 浏览器本地渲染 这种方式不会被搜索引擎获取内容,所以不利于网站的推广. 因为浏览器本地渲染是页面js通过发送ajax请求获取后台的json数据,然后生成页面内容. 爬 ...
- 02 .NET CORE 2.2 使用OCELOT -- 路由
继续学习.NET CORE 2.2 使用OCELOT https://www.jianshu.com/p/05ccf87a3091 https://www.jianshu.com/p/585396dc ...
- 使用Alipay代码源,构建自己的Docker镜像
1. alipay 镜像仓库 地址 (自行换成自己的阿里镜像云DockerHub地址) https://cr.console.aliyun.com/repository/ 2.alipay 代码云 地 ...
- 基于tensorflow训练模型的显存不足解决办法
import tensorflow as tfimport osos.environ["CUDA_VISIBLE_DEVICES"] = '0' #指定第一块GPU可用config ...
- kkpager 实现ajax分页查询
前台分页数据,适合数据少量的时候,因为分页的数据是从后台获取的,大数据的话不建议使用 现看前台代码: @{ Layout = null; } <!DOCTYPE html> <htm ...