linux 系统扩容 VMware Centos---VMware ESXi
用到的命令
df fdisk pvcreate pvdisplay vgdisplay vgextend lvdisplay lvextend resize2fs
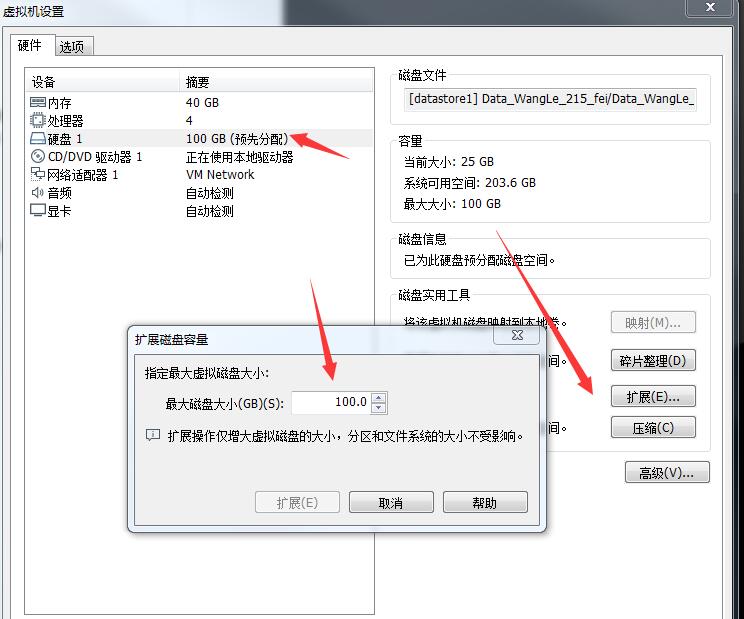
01) 使用了一段时间虚拟机后发现磁盘不够用了,需要扩容。在客户端操作扩容出现磁盘已成功扩展。
您必须从客户机操作系统内部对磁盘重新进行分区和扩展文件系统。 然后进centos7系统进行操作
02) 使用 df -h 查看磁盘空间大小
### 挂载跟目录节点的 /dev/mapper/centos-root 只有23容量

[root@localhost ~]# df -h

Filesystem               Size  Used Avail Use% Mounted on

/dev/mapper/centos-root   23G   23G   20K 100% /

devtmpfs                  20G     0   20G   0% /dev

tmpfs                     20G  4.0K   20G   1% /dev/shm

tmpfs                     20G  8.5M   20G   1% /run

tmpfs                     20G     0   20G   0% /sys/fs/cgroup

/dev/sda1                497M  120M  378M  25% /boot

[root@localhost ~]#
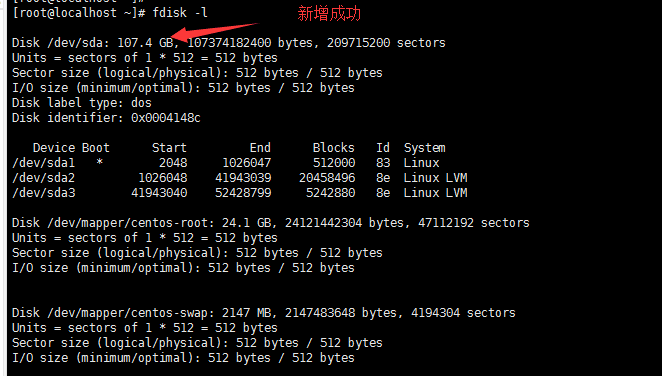
03) 使用 fdisk -l 命令查看磁盘信息
 ### 第一行 Disk /dev/sda: 107.4 GB 与实际 df -好现实内容不符,说明增加磁盘成功

 [root@localhost ~]# fdisk -l

 Disk /dev/sda: 107.4 GB,  bytes,  sectors  ---与上面(df -h)不符,说明新增成功

 Units = sectors of  *  =  bytes

 Sector size (logical/physical):  bytes /  bytes

 I/O size (minimum/optimal):  bytes /  bytes

 Disk label type: dos

 Disk identifier: 0x0004148c

    Device Boot      Start         End      Blocks   Id  System

 /dev/sda1   *                        Linux

 /dev/sda2                    8e  Linux LVM

 /dev/sda3                    8e  Linux LVM

 Disk /dev/mapper/centos-root: 24.1 GB,  bytes,  sectors

 Units = sectors of  *  =  bytes

 Sector size (logical/physical):  bytes /  bytes

 I/O size (minimum/optimal):  bytes /  bytes

 Disk /dev/mapper/centos-swap:  MB,  bytes,  sectors

 Units = sectors of  *  =  bytes

 Sector size (logical/physical):  bytes /  bytes

 I/O size (minimum/optimal):  bytes /  bytes

 [root@localhost ~]#
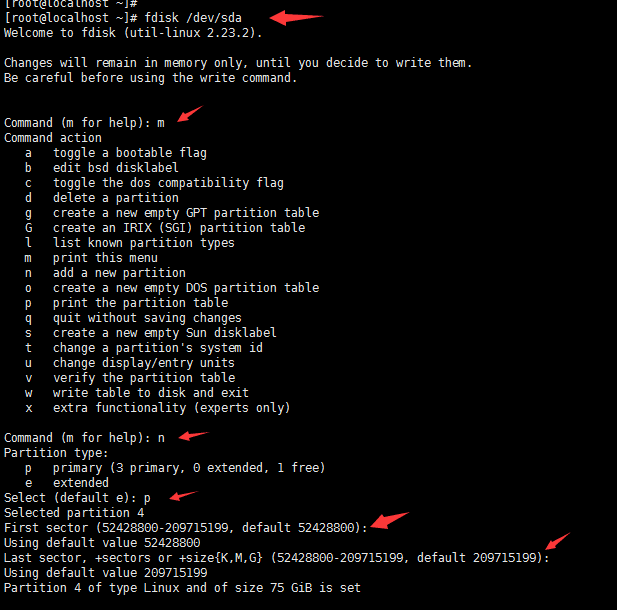
04) 使用 fdisk /dev/sda 创建新的分区
 ### 注意:不同操作系统的磁盘命名方式不同,有些是/dev/vda。

 ### 具体使用方式参考第三步中fdisk -l首行显示Disk。

 ### 如笔者在该系统中首行显示为Disk /dev/sda: 107.4 GB,  bytes ,故使用命令fdisk /dev/sda)

 [root@localhost ~]# fdisk /dev/sda

 Welcome to fdisk (util-linux 2.23.).

 Changes will remain in memory only, until you decide to write them.

 Be careful before using the write command.

 Command (m for help): m   ---------#帮助命令

 Command action

    a   toggle a bootable flag

    b   edit bsd disklabel

    c   toggle the dos compatibility flag

    d   delete a partition

    g   create a new empty GPT partition table

    G   create an IRIX (SGI) partition table

    l   list known partition types

    m   print this menu

    n   add a new partition

    o   create a new empty DOS partition table

    p   print the partition table

    q   quit without saving changes

    s   create a new empty Sun disklabel

    t   change a partition's system id

    u   change display/entry units

    v   verify the partition table

    w   write table to disk and exit

    x   extra functionality (experts only)

 Command (m for help): n  -----------#创建新分区

 Partition type:

    p   primary ( primary,  extended,  free)

    e   extended

 Select (default e): p      -------#选择主分区

 Selected partition

 First sector (-, default ):   ---#回车使用默认

 Using default value

 Last sector, +sectors or +size{K,M,G} (-, default ): ---#回车使用默认

 Using default value

 Partition  of type Linux and of size  GiB is set

 Command (m for help): t   --------------#修改分区类型

 Partition number (-, default ):   ----------#回车使用默认值

 Hex code (type L to list all codes): 8e    -----#说明: 8e 是lvm磁盘类型

 Changed type of partition 'Linux' to 'Linux LVM'

 Command (m for help): p  ------#打印分区表

 Disk /dev/sda: 107.4 GB,  bytes,  sectors

 Units = sectors of  *  =  bytes

 Sector size (logical/physical):  bytes /  bytes

 I/O size (minimum/optimal):  bytes /  bytes

 Disk label type: dos

 Disk identifier: 0x0004148c

    Device Boot      Start         End      Blocks   Id  System

 /dev/sda1   *                        Linux

 /dev/sda2                    8e  Linux LVM

 /dev/sda3                    8e  Linux LVM

 /dev/sda4                  8e  Linux LVM

 Command (m for help): w   -------#保存退出

 The partition table has been altered!

 Calling ioctl() to re-read partition table.

 WARNING: Re-reading the partition table failed with error : Device or resource busy.

 The kernel still uses the old table. The new table will be used at

 the next reboot or after you run partprobe() or kpartx()  ---#这里提示重启系统

 Syncing disks

05) 重启系统
[root@localhost ~]# reboot
06) 查看磁盘情况
 ### 核对刚才所做的分区操作是否保存成功

 [root@localhost ~]# fdisk -l

 Disk /dev/sda: 107.4 GB,  bytes,  sectors

 Units = sectors of  *  =  bytes

 Sector size (logical/physical):  bytes /  bytes

 I/O size (minimum/optimal):  bytes /  bytes

 Disk label type: dos

 Disk identifier: 0x0004148c

    Device Boot      Start         End      Blocks   Id  System

 /dev/sda1   *                        Linux

 /dev/sda2                    8e  Linux LVM

 /dev/sda3                    8e  Linux LVM

 /dev/sda4                  8e  Linux LVM   ----#这里多出一块,说明保存成功

 Disk /dev/mapper/centos-root: 24.1 GB,  bytes,  sectors

 Units = sectors of  *  =  bytes

 Sector size (logical/physical):  bytes /  bytes

 I/O size (minimum/optimal):  bytes /  bytes

 Disk /dev/mapper/centos-swap:  MB,  bytes,  sectors

 Units = sectors of  *  =  bytes

 Sector size (logical/physical):  bytes /  bytes

 I/O size (minimum/optimal):  bytes /  bytes

 [root@localhost ~]#
07) 查看当前分区类型( 这里的类型会影响最后一步调整文件系统大小命令 xfs_growfs 还是 resize2fs )
[root@localhost ~]# df -T /dev/sda1

Filesystem     Type 1K-blocks   Used Available Use% Mounted on

/dev/sda1      xfs            % /boot

[root@localhost ~]#
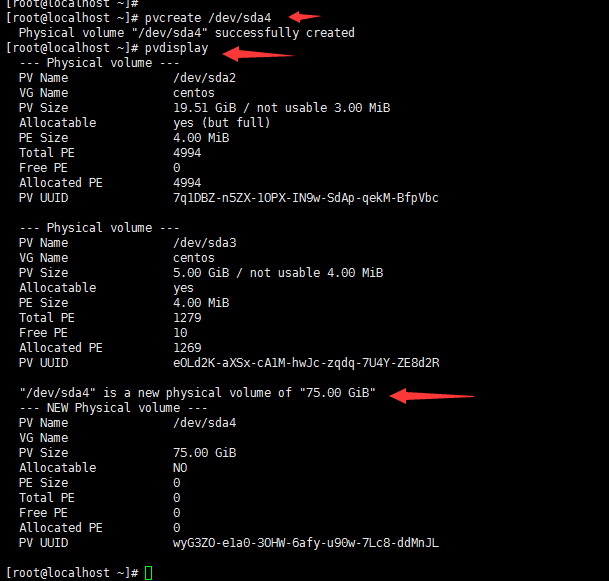
08) 使用 pvcreate /dev/sda4 创建物理卷
 ###  /dev/sda4  这里的4是上面刚才新增的分区

 [root@localhost ~]# pvcreate /dev/sda4

   Physical volume "/dev/sda4" successfully created

 [root@localhost ~]#

09) 使用pvdisplay 查看新建的物理卷大小
 [root@localhost ~]# pvdisplay

   --- Physical volume ---

   PV Name               /dev/sda2

   VG Name               centos

   PV Size               19.51 GiB / not usable 3.00 MiB

   Allocatable           yes (but full)

   PE Size               4.00 MiB

   Total PE

   Free PE

   Allocated PE

   PV UUID               7q1DBZ-n5ZX-1OPX-IN9w-SdAp-qekM-BfpVbc

   --- Physical volume ---

   PV Name               /dev/sda3

   VG Name               centos

   PV Size               5.00 GiB / not usable 4.00 MiB

   Allocatable           yes

   PE Size               4.00 MiB

   Total PE

   Free PE

   Allocated PE

   PV UUID               eOLd2K-aXSx-cA1M-hwJc-zqdq-7U4Y-ZE8d2R

   "/dev/sda4" is a new physical volume of "75.00 GiB"  ----------#可以看到新增的75G

   --- NEW Physical volume ---

   PV Name               /dev/sda4

   VG Name

   PV Size               75.00 GiB

   Allocatable           NO

   PE Size

   Total PE

   Free PE                                   --------#现在这里看到的是0,在 lvextend 的时候还要重新查看

   Allocated PE

   PV UUID               wyG3ZO-e1a0-3OHW-6afy-u90w-7Lc8-ddMnJL

 [root@localhost ~]#
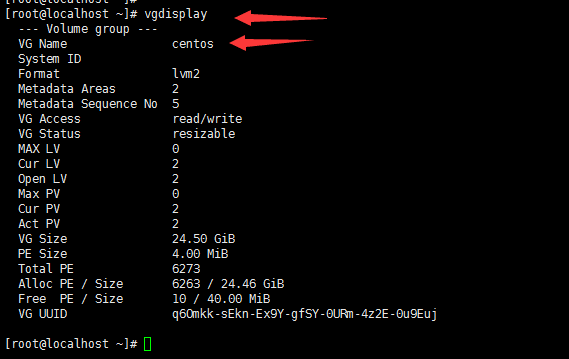
10) 使用 vgdisplay 查看 vg 状态
 [root@localhost ~]# vgdisplay

   --- Volume group ---

   VG Name               centos    --------------#这个名字在下面会用到

   System ID

   Format                lvm2

   Metadata Areas

   Metadata Sequence No

   VG Access             read/write

   VG Status             resizable

   MAX LV

   Cur LV

   Open LV

   Max PV

   Cur PV

   Act PV

   VG Size               24.50 GiB

   PE Size               4.00 MiB

   Total PE

   Alloc PE / Size        / 24.46 GiB

   Free  PE / Size        / 40.00 MiB

   VG UUID               q6Omkk-sEkn-Ex9Y-gfSY-0URm-4z2E-0u9Euj

 [root@localhost ~]#
11) 使用 vgextend centos /dev/sda4 将添加新的物理卷加载到 centos 卷组
 ### centos 是我的服务器vg名称,可以通过vgdisplay查看vg状态得到名称

 ### /dev/sda4 是我刚刚新增的物理卷

 [root@localhost ~]# vgextend centos /dev/sda4

   Volume group "centos" successfully extended

 [root@localhost ~]#

 ###---------- 注意这里可以由于系统空间不足出现报错 ------------

 ###---------- 手动去删除些没有用的文件 ------------

 ### 报错内容

 ### [root@localhost ~]# vgextend centos /dev/sda4

 ###  Couldn't create temporary archive name.

 ###  Volume group "centos" metadata archive failed.

 ###  Internal error: Attempt to unlock unlocked VG #orphans.

 ### [root@localhost ~]#

 ###

 [root@localhost ~]# vgextend centos /dev/sda4

   Couldn't create temporary archive name.

   Volume group "centos" metadata archive failed.

   Internal error: Attempt to unlock unlocked VG #orphans.

 [root@localhost ~]#

12) 使用 lvdisplay 查看 lv 状态
 [root@localhost ~]# lvdisplay

   --- Logical volume ---

   LV Path                /dev/centos/swap

   LV Name                swap

   VG Name                centos

   LV UUID                d39rhF-bGNs-fWPE-ItwX-FNQe-QJ4h-taAm94

   LV Write Access        read/write

   LV Creation host, time localhost, -- :: -

   LV Status              available

   # open

   LV Size                2.00 GiB

   Current LE

   Segments

   Allocation             inherit

   Read ahead sectors     auto

   - currently set to

   Block device           :

   --- Logical volume ---

   LV Path                /dev/centos/root

   LV Name                root

   VG Name                centos

   LV UUID                rvepaR-xSYs-hPOy-vPWA-Oiuh-A0Je-j29Gk1

   LV Write Access        read/write

   LV Creation host, time localhost, -- :: -

   LV Status              available

   # open

   LV Size                22.46 GiB

   Current LE

   Segments

   Allocation             inherit

   Read ahead sectors     auto

   - currently set to

   Block device           :

 [root@localhost ~]#
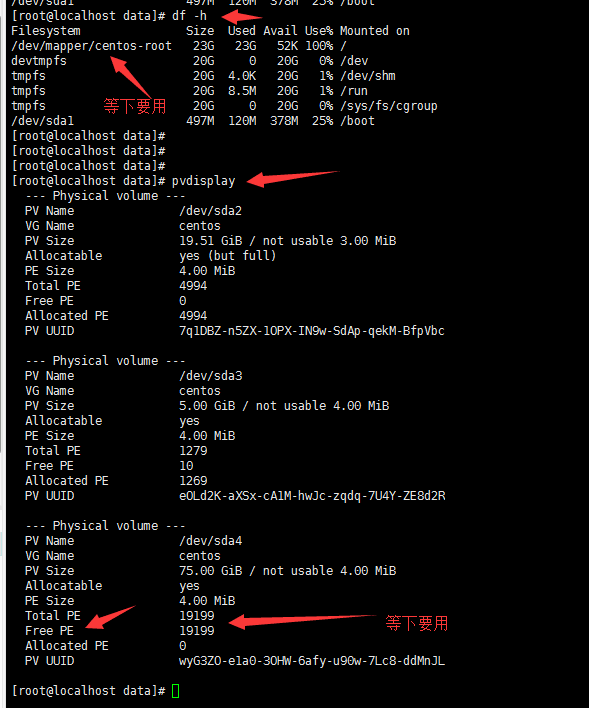
13) 使用 lvextend 增加容量
 ## 使用 df -h 可以看到 /dev/mapper/centos-root 的名字

  ## 使用 pvdisplay 再次查看 free 的PE数量

  [root@localhost data]# df -h

 Filesystem               Size  Used Avail Use% Mounted on

 /dev/mapper/centos-root   23G   23G   52K % /     -------# /dev/mapper/centos-root 这个名字要用

 devtmpfs                  20G        20G   % /dev

 tmpfs                     20G  .0K   20G   % /dev/shm

 tmpfs                     20G  8.5M   20G   % /run

 tmpfs                     20G        20G   % /sys/fs/cgroup

 /dev/sda1                497M  120M  378M  % /boot

 [root@localhost data]#

 [root@localhost data]# pvdisplay

   --- Physical volume ---

   PV Name               /dev/sda2

   VG Name               centos

   PV Size               19.51 GiB / not usable 3.00 MiB

   Allocatable           yes (but full)

   PE Size               4.00 MiB

   Total PE

   Free PE

   Allocated PE

   PV UUID               7q1DBZ-n5ZX-1OPX-IN9w-SdAp-qekM-BfpVbc

   --- Physical volume ---

   PV Name               /dev/sda3

   VG Name               centos

   PV Size               5.00 GiB / not usable 4.00 MiB

   Allocatable           yes

   PE Size               4.00 MiB

   Total PE

   Free PE

   Allocated PE

   PV UUID               eOLd2K-aXSx-cA1M-hwJc-zqdq-7U4Y-ZE8d2R

   --- Physical volume ---

   PV Name               /dev/sda4

   VG Name               centos

   PV Size               75.00 GiB / not usable 4.00 MiB

   Allocatable           yes

   PE Size               4.00 MiB

   Total PE

   Free PE                        --------#这个大小要用

   Allocated PE

   PV UUID               wyG3ZO-e1a0-3OHW-6afy-u90w-7Lc8-ddMnJL

 [root@localhost data]#

 ###---------- 注意这里可以由于系统空间不足出现报错 ------------

 ###---------- 手动去删除些没有用的文件 ------------

 ### 报错内容

 ### [root@localhost ~]# lvextend -l + /dev/mapper/centos-root

 ###  Couldn't create temporary archive name.

 ###  Volume group "centos" metadata archive failed.

 ### [root@localhost ~]#

 ###

 [root@localhost ~]# lvextend -l + /dev/mapper/centos-root

 Size of logical volume centos/root changed from 22.46 GiB ( extents) to 97.46 GiB ( extents).

   Logical volume root successfully resized

 [root@localhost ~]#

14-01) 查看当前分区类型(在下一步会用到)
 ### 我的是 xfs 类型(centos7系统)

 [root@localhost ~]# df -T /dev/sda1

 Filesystem     Type 1K-blocks   Used Available Use% Mounted on

 /dev/sda1      xfs            % /boot

 [root@localhost ~]#

 ###-----------或者使用

 [root@localhost ~]# cat /etc/fstab | grep centos-root

 /dev/mapper/centos-root /                       xfs     defaults

 [root@localhost ~]#
14-02) 使用 xfs_growfs (centos7)重新调整文件系统大小
 ### centos7中用 xfs_growfs

 [root@localhost ~]# xfs_growfs /dev/mapper/centos-root

 meta-data=/dev/mapper/centos-root isize=    agcount=, agsize= blks

          =                       sectsz=   attr=, projid32bit=

          =                       crc=        finobt=

 data     =                       bsize=   blocks=, imaxpct=

          =                       sunit=      swidth= blks

 naming   =version               bsize=   ascii-ci= ftype=

 log      =internal               bsize=   blocks=, version=

          =                       sectsz=   sunit= blks, lazy-count=

 realtime =none                   extsz=   blocks=, rtextents=

 data blocks changed from  to

 [root@localhost ~]#

 ### centos6中用 resize2fs

 [root@localhost ~]# resize2fs /dev/mapper/centos-root

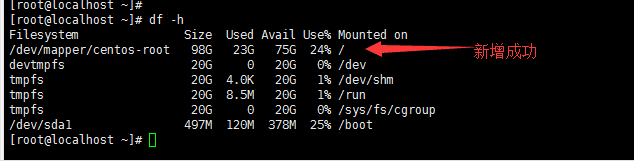
15) 最后一步检查磁盘空间,确认是否新增成功
 root@localhost ~]# df -h

 Filesystem               Size  Used Avail Use% Mounted on

 /dev/mapper/centos-root   98G   23G   75G  % /               ----#新增成功

 devtmpfs                  20G        20G   % /dev

 tmpfs                     20G  .0K   20G   % /dev/shm

 tmpfs                     20G  8.5M   20G   % /run

 tmpfs                     20G        20G   % /sys/fs/cgroup

 /dev/sda1                497M  120M  378M  % /boot

 [root@localhost ~]#
其他参考文章:
linux 系统扩容 VMware Centos---VMware ESXi的更多相关文章
- 虚拟机VMware安装及Linux系统基础配置(CentOS 7)
PS: 我是 VMware 14 安装 CentOS 7 来配置Linux虚拟机,想要安装 Ubuntu 18.04 的可以自行其他搜或者参考博客:https://blog.csdn.net/gith ...
- 在vmware fusion上安装linux系统然后再安装vmware tools出现问题
/usr/lib/vmware-tools] In which directory do you want to install the documentation files? [/usr/shar ...
- [linux]vmware中linux虚拟机扩容 标签: vmware虚拟机linux 2016-09-05 08:03 315人阅读 评
扩容原因 现阶段,虚拟机的标配都是1G内存和20G硬盘,大部分时候是够用的,但是也会出现虚拟机里面东西放多了硬盘不够用的情况,这种情况下,除了清理垃圾,另外就只能给虚拟机扩容了.因为window扩容相 ...
- Linux系统扩容根目录磁盘空间的操作方法
问题描述 系统的服务无法正常运行,查看磁盘空间,发现根目录已经满了 解决过程 1.添加磁盘空间 2.使用fdisk -l命令查看磁盘信息 3.新建磁盘分区 4.使用fdisk /dev/sda3, 创 ...
- Linux系统扩容根目录磁盘空间
作者:非法小恋 一.使用背景 Linux根目录磁盘空间不够用了,当修改了虚拟机模版增加磁盘大小或者插入了一块新硬盘,但是发现系统里的大小还是没改变. 产生的原因是没有给磁盘格式化,没有增加分区. 二. ...
- 如何为ubuntu等Linux系统扩容(LVM)
第一步:磁盘分区 fdisk /dev/sdb root@ubuntu:/home/ubuntu# fdisk /dev/sdb Welcome to fdisk (util-linux 2.27.1 ...
- Linux系统中(CentOS 7)的用户和权限管理
目录 用户和组 用户信息文件 用户密码信息 相关命令 用户管理 组管理 密码管理 权限管理 文件的详细信息 文件权限 相关命令 用户和组 用户信息文件 /etc/passwd (1 2 3 4 5 6 ...
- VMWare上Linux系统下载安装教程
原文链接:http://www.studyshare.cn/blog-front//software/details/1162/0 一.下载 linux镜像文件下载,此处只提供CentOS 6.8版本 ...
- 在4K屏下以超过VMWare默认的最高分辨率运行Linux系统
前言 4K 屏,有其优点也有其弊端.优点就是分辨率高,字体和图标看起来如丝一般顺滑:缺点就是字体和图标小,费眼睛.解决这个缺点的方法也很简单粗暴,就是将系统的显示比例放大.在高分屏不很普及的时候,无论 ...
随机推荐
- mysql lower()函数
mysql> select " DFREF"; +--------+ | DFREF | +--------+ | DFREF | +--------+ row in set ...
- 大名鼎鼎的RPC和MQ到底有啥区别和联系
RPC(Remote Procedure Call)远程过程调用,主要解决远程通信间的问题,不需要了解底层网络的通信机制. RPC框架 知名度较高的有Thrift(FB的).dubbo(阿里的). R ...
- SSH框架整合1
======================web.xml======================= <?xml version="1.0" encoding=" ...
- edusoho上传视频弹出abort之解决方案
错误描述:edusoho上传如avi.mp4等容量大的图片(如100m以上或500m等)弹出abort提示框 原因:是因为web服务器apache默认上传文件有限制导致的 解决办法如下: (1)首先修 ...
- rust结构体
//Rust 并不允许只将某个字段标记为可变 struct User { email: String, name:String, age:i32, sex:String, active:bool, } ...
- session机制,浏览器禁用cookie后,怎么使用session
sessionid是存储在cookie中的,解决方案如下: Session URL重写,保证在客户端禁用或不支持COOKIE时,仍然可以使用Session session机制.session机制是一种 ...
- 【LeetCode算法-27】Remove Element
LeetCode第27题 Given an array nums and a value val, remove all instances of that value in-place and re ...
- PAT 甲级 1075 PAT Judge (25分)(较简单,注意细节)
1075 PAT Judge (25分) The ranklist of PAT is generated from the status list, which shows the scores ...
- 通过自定义EasyNVR的Logo、标题、版权等相关信息构建属于自己的摄像机网页视频直播服务
随着互联网基础设施建设的发展,4G/5G/NB-IoT各种网络技术.物联网技术的大规模商用,视频随时随地可看.可控.可回溯的诉求越来越多,互联网思维.架构和技术引入进传统监控行业里,成为新形势下全终端 ...
- 利用Entity Framework修改指定字段中的值
利用Entity Framework修改指定字段中的值一般我们编辑某些模型的时候会用到类似这样的代码: [HttpPost] public ActionResult Edit(Article mode ...