Struts2学习第四天——拦截器及文件上传
1、概述
Struts2的很多核心功能都是由拦截器完成的。
拦截器很好的实现了AOP的编程思想,在动作的执行之前和结果的返回之后,做拦截处理。
2、struts2的默认拦截器栈
3、自定义拦截器
Struts2提供的拦截器有很多,有些并不是默认的,如果需要只能手动打开。当然,也可以自定义拦截器。
1、定义
创建一个类,继承AbstractInterceptor或者实现Interceptor。
 public class TimerInterceptor extends AbstractInterceptor {

     public void init(){

         System.out.println("TimerInterceptor初始化");

     }

     /**

      * struts会在请求Action之前和Action之后调用

      */

     @Override

     public String intercept(ActionInvocation invocation) throws Exception {

         //请求Action之前的代码

         long start=System.currentTimeMillis();//返回毫秒数

         String ret=invocation.invoke();//invoke()执行Action组件

         long end=System.currentTimeMillis();

         System.out.println("用时"+(end-start)+"毫秒"+ret);

         //返回结果字符串

         return ret;

     }
2、声明
在struts.xml配置文件中声明该拦截器。
     <interceptors>

             <interceptor name="CurrentTime" class="com.house.interceptor.TimerInterceptor"/>

             </interceptor>

     </interceptors>
3、使用
在动作中使用。
注意:使用了自定义的拦截器,默认的拦截器将不再起作用。如果需要使用它们,必须手动声明。
 <action name="*HouserUserAction" class="com.house.action.HouserUserAction" method="{1}">

      <interceptor-ref name="CurrentTime"></interceptor-ref>

     <result name="register_success">/page/login.jsp</result>

  </action>
4、拦截器栈
默认的拦截器是以拦截器栈的形式存在的。如果使用了非默认的拦截器(包括自定义的拦截器和框架提供的其它拦截器),需要将默认的拦截器栈手动声明才可以继续使用。拦截器的拦截顺序,遵守其在拦截器栈中的声明顺序。
拦截器的继承体系
自定义拦截器栈及引入
<!-- 自定义拦截器 -->

        <interceptors>

            <interceptor name="CurrentTime" class="com.house.interceptor.TimerInterceptor"/>

            <interceptor name="Permission"  class="com.house.interceptor.PermissionInterceptor">

                <param name="excludeMethods">login,reg</param><!--拦截时过滤这两个页面 -->

            </interceptor>

        <!-- 拦截器栈 -->

            <interceptor-stack name="myStack">

                <interceptor-ref name="defaultStack"></interceptor-ref>

                <interceptor-ref name="CurrentTime"></interceptor-ref>

                <!-- <interceptor-ref name="Permission"/> -->

            </interceptor-stack>

        </interceptors>
   <!-- 引入拦截器栈 -->

        <default-interceptor-ref name="myStack"></default-interceptor-ref>
文件上传
struts2为文件上传下载提供了更好的实现机制,在这里我分别就单文件上传和多文件上传的源代码进行一下讲解,这里需要导入文件下载上传的两个jar文件,一个是commons-fileupload-1.2.2.jar,另一个是commons-io-2.0.1.jar
struts2单文件上传:
<!--在进行文件上传时,表单提交方式一定要是post的方式,因为文件上传时二进制文件可能会很大,还有就是enctype属性,这个属性一定要写成multipart/form-data,

  不然就会以二进制文本上传到服务器端-->

  <form action="fileUpload.action" method="post" enctype="multipart/form-data">


        username: <input type="text" name="username"><br>

        file: <input type="file" name="file"><br>

        <input type="submit" value="submit">

    </form>
FileUploadAction
public class FileUploadAction extends ActionSupport

{

    private String username;

   //注意,file并不是指前端jsp上传过来的文件本身,而是文件上传过来存放在临时文件夹下面的文件

    private File file;

    //提交过来的file的名字

    private String fileFileName;

    //提交过来的file的MIME类型

    private String fileContentType;

    public String getUsername()

    {

        return username;

    }

    public void setUsername(String username)

    {

        this.username = username;

    }

    public File getFile()

    {

        return file;

    }

    public void setFile(File file)

    {

        this.file = file;

    }

    public String getFileFileName()

    {

        return fileFileName;

    }

    public void setFileFileName(String fileFileName)

    {

        this.fileFileName = fileFileName;

    }

    public String getFileContentType()

    {

        return fileContentType;

    }

    public void setFileContentType(String fileContentType)

    {

        this.fileContentType = fileContentType;

    }

    @Override

    public String execute() throws Exception

    {

        String root = ServletActionContext.getServletContext().getRealPath("/upload");

        InputStream is = new FileInputStream(file);

        OutputStream os = new FileOutputStream(new File(root, fileFileName));

        System.out.println("fileFileName: " + fileFileName);

    // 因为file是存放在临时文件夹的文件,我们可以将其文件名和文件路径打印出来,看和之前的fileFileName是否相同

        System.out.println("file: " + file.getName());

        System.out.println("file: " + file.getPath());

        byte[] buffer = new byte[500];

        int length = 0;

        while(-1 != (length = is.read(buffer, 0, buffer.length)))

        {

            os.write(buffer);

        }

        os.close();

        is.close();

        return SUCCESS;

    }

}
这里的file并不是真正指代jsp上传过来的文件,当文件上传过来时,struts2首先会寻找struts.multipart.saveDir(这个是在default.properties里面有)这个name所指定的存放位置,我们可以新建一个struts.properties属性文件来指定这个临时文件存放位置,如果没有指定,那么文件会存放在tomcat的apache-tomcat-7.0.29\work\Catalina\localhost\目录下,然后我们可以指定文件上传后的存放位置,通过输出流将其写到流里面就行了,这时我们就可以在文件夹里看到我们上传的文件了。
在实际开发中,经常需要限制上传文件的大小和类型。这是因为如果客户端上传的文件过大会影响服务器性能,消耗服务器存储空间。
要实现限制上传文件的大小有两种常用方法。第一种是在<strutr>节点下添加struts.multiparty.maxSize常量,代码如下
<constant name="struts.multiparty.maxSize" value="50000000"/>
它是一个全局配置,可以实现对所有<action>文件上传大小的限制,value的单位是字节。默认值是2MB,如果大于2M一定要修改该值。
第二种方法是在<action>中配置拦截器,它可以限制单个<action>的文件上传大小。
<interceptor-refname="fileUpload">
<paramname="allowedTypes">
image/png,image/gif,image/jpeg
</param>
</interceptor-ref>
上面配置的是上传文件类型的限制,其实共有两个参数
maximumSize(可选)-这个拦截器允许的上传到action中的文件最大长度(以byte为单位).注意这个参数和在webwork.properties中定义的属性没有关系。
allowedTypes(可选)-以逗号分割的contentType类型列表(例如text/html),这些列表是这个拦截器允许的可以传到action中的contentType.如果没有指定就是允许任何上传类型.
多文件上传
public class UploadAction extends ActionSupport {

    /**

    private String title;

    private File upload;//和上传输入的域名称必须一致,类型必须是file

    //注意,file并不是指前端jsp上传过来的文件本身,而是文件上传过来存放在临时文件夹下面的文件

    private String uploadFilename;//用于接收输入域上传的文件名

    //注意:文件名称和文件类型的名称前缀必须相同

    private String uploadContentType;//上传文件的MIME类型

    public String getTitle() {

        return title;

    }

    public void setTitle(String title) {

        this.title = title;

    }

    public File getUpload() {

        return upload;

    }

    public void setUpload(File upload) {

        this.upload = upload;

    }

    public String getUploadFilename() {

        return uploadFilename;

    }

    public void setUploadFilename(String uploadFilename) {

        this.uploadFilename = uploadFilename;

    }

    public String getUploadContentType() {

        return uploadContentType;

    }

    public void setUploadContentType(String uploadContentType) {

        this.uploadContentType = uploadContentType;

    }

*/

    private File[] upload;//多文件上传对应数组

    private String[] uploadFilename;//多文件对应的名字

    private String[] uploadContentType;

    public File[] getUpload() {

        return upload;

    }

    public void setUpload(File[] upload) {

        this.upload = upload;

    }

    public String[] getUploadFilename() {

        return uploadFilename;

    }

    public void setUploadFilename(String[] uploadFilename) {

        this.uploadFilename = uploadFilename;

    }

    public String[] getUploadContentType() {

        return uploadContentType;

    }

    public void setUploadContentType(String[] uploadContentType) {

        this.uploadContentType = uploadContentType;

    }

    @Override

    public String execute() throws Exception{

        FileInputStream fis=null;

        FileOutputStream fos=null;

         //获取需要上传文件的文件路径

        String basePath= ServletActionContext.getServletContext().getRealPath("/upload");//服务器upload下

        //判断文件是否上传,如果上传的话将会创建该目录

        if(upload!=null&&upload.length>0){

            for(int i=0;i<upload.length;i++){

                File file=upload[i];

                fis=new FileInputStream(file);

                String fileName=basePath+"/upload"+uploadFilename[i];

                fos=new FileOutputStream(fileName);

                int c=0;

                while((c=fis.read())!=-1){

                    fos.write(c);

                }

                fis.close();

                fos.close();

            }

        }

        return "upload";

    }

        //第二种文件上传的方法

        //FileUtils.copyFile(upload,new File(uploadFile+"\\"+uploadFileName));

        //FileUtils.copyFile(upload,new File(uploadFile,uploadFileName));

        //第三种方法

//      BufferedReader bReader=new BufferedReader(new InputStreamReader(new FileInputStream(upload)));

//      BufferedWriter bWriter=new BufferedWriter(new OutputStreamWriter(new FileOutputStream(uploadFile+"\\"+uploadFileName)));

//      try{

//          char[] str=new char[1024];

//          int i=0;

//          while((i=bReader.read(str))>0){

//              bWriter.write(str,0,i);

//          }

//      }catch(Exception e){

//          e.printStackTrace();

//      }finally{

//          bReader.close();

//          bWriter.close();

//          uploadFile.delete();

//      }
文件下载
定义一个Action类,FileDownload.java
package com.struts2.filedownload;

import java.io.InputStream;

import org.apache.struts2.ServletActionContext;

import com.opensymphony.xwork2.ActionSupport;

//文件下载

public class FileDownload extends ActionSupport{

    private int number ;

    private String fileName;

    public int getNumber() {

        return number;

    }

    public void setNumber(int number) {

        this.number = number;

    }

    public String getFileName() {

        return fileName;

    }

    public void setFileName(String fileName) {

        this.fileName = fileName;

    }

    //返回一个输入流,作为一个客户端来说是一个输入流,但对于服务器端是一个 输出流

    public InputStream getDownloadFile() throws Exception

    {

        if(1 == number)

        {

           this.fileName = "Dream.jpg" ;

           //获取资源路径

           return ServletActionContext.getServletContext().getResourceAsStream("upload/Dream.jpg") ;

        }

        else if(2 == number)

        {

            this.fileName = "jd2chm源码生成chm格式文档.rar" ;

            //解解乱码

            this.fileName = new String(this.fileName.getBytes("GBK"),"ISO-8859-1");

            return ServletActionContext.getServletContext().getResourceAsStream("upload/jd2chm源码生成chm格式文档.rar") ;

        }

        else

           return null ;

    }

    @Override

    public String execute() throws Exception {

        return SUCCESS;

    }

}
在struts.xml文件中配置相关信息
<struts>

   <package name="struts2" extends="struts-default">

       <action name="FileDownload" class="com.struts2.filedownload.FileDownload">

           <result name="success" type="stream">

               <param name="contentType">text/plain</param>

               <param name="contentDisposition">attachment;fileName="${fileName}"</param>

               <param name="inputName">downloadFile</param>

               <param name="bufferSize">1024</param>

           </result>

       </action>

   </package>

</struts>
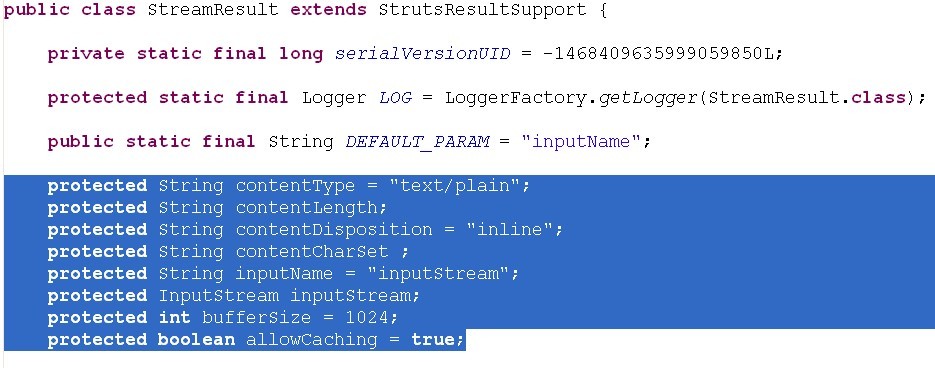
1.结果类型必须要写成 type="stream" ,与之对应的处理类是 org.apache.struts2.dispatcher.StreamResult
2.涉及到的参数:

3.
1) <param name="contentDisposition">attachment;fileName="${fileName}"</param>
contentDisposition默认是 inline(内联的), 比如说下载的文件是文本类型的,就直接在网页上打开,不能直接打开的才会打开下载框自己选择
2) attachment :下载时会打开下载框
3) fileName="${fileName}" :在这定义的名字是一个动态的,该名字是显示在下载框上的文件名字
4.<param name="inputName">downloadFile</param>,这个downloadFile名字要和FileDownload.java类中的getDownloadFile()方法名去掉get 一致
三)用于显示下载的链接界面 filedownload.jsp
<%@ page language="java" import="java.util.*" pageEncoding="UTF-8"%>

<%

String path = request.getContextPath();

String basePath = request.getScheme()+"://"+request.getServerName()+":"+request.getServerPort()+path+"/";

%>

<!DOCTYPE HTML PUBLIC "-//W3C//DTD HTML 4.01 Transitional//EN">

<html>

  <head>

    <base href="<%=basePath%>">

    <title>My JSP 'filedownload.jsp' starting page</title>

    <meta http-equiv="pragma" content="no-cache">

    <meta http-equiv="cache-control" content="no-cache">

    <meta http-equiv="expires" content="0">

    <meta http-equiv="keywords" content="keyword1,keyword2,keyword3">

    <meta http-equiv="description" content="This is my page">

    <!--

    <link rel="stylesheet" type="text/css" href="styles.css">

    -->

  </head>

  <body>

    <h2>文件下载内容:</h2><br/>

    Dream.jpg:<a href="FileDownload.action?number=1">点击下载</a><br/>

    jd2chm源码生成chm格式文档.rar:<a href="FileDownload.action?number=2">点击下载2</a>

  </body>

</html>
Struts2学习第四天——拦截器及文件上传的更多相关文章
- 深入分析JavaWeb Item47 -- Struts2拦截器与文件上传下载
一.struts2中的拦截器(框架功能核心) 1.过滤器VS拦截器 过滤器VS拦截器功能是一回事. 过滤器是Servlet规范中的技术,能够对请求和响应进行过滤. 拦截器是Struts2框架中的技术. ...
- 利用Struts2拦截器完成文件上传功能
Struts2的图片上传以及页面展示图片 在上次的CRUD基础上加上图片上传功能 (https://www.cnblogs.com/liuwenwu9527/p/11108611.html) 文件上传 ...
- Spring MVC—拦截器,文件上传,中文乱码处理,Rest风格,异常处理机制
拦截器 文件上传 -中文乱码解决 rest风格 异常处理机制 拦截器 Spring MVC可以使用拦截器对请求进行拦截处理,用户可以自定义拦截器来实现特定的功能,自定义的拦截器必须实现HandlerI ...
- 【Struts2学习笔记(9)】单文件上传和多文件上传
(1)单文件上传 第一步:在WEB-INF/lib下增加commons-fileupload-1.2.1.jar.commons-io-1.3.2.jar. 这两个文件能够从http://common ...
- salesforce 零基础学习(四十二)简单文件上传下载
项目中,常常需要用到文件的上传和下载,上传和下载功能实际上是对Document对象进行insert和查询操作.本篇演示简单的文件上传和下载,理论上文件上传后应该将ID作为操作表的字段存储,这里只演示文 ...
- springMVC学习记录3-拦截器和文件上传
拦截器和文件上传算是springmvc中比较高级一点的内容了吧,让我们一起看一下. 下面先说说拦截器.拦截器和过滤器有点像,都可以在请求被处理之前和请求被处理之到做一些额外的操作. 1. 实现Hand ...
- Spring MVC 学习总结(五)——校验与文件上传
Spring MVC不仅是在架构上改变了项目,使代码变得可复用.可维护与可扩展,其实在功能上也加强了不少. 验证与文件上传是许多项目中不可缺少的一部分.在项目中验证非常重要,首先是安全性考虑,如防止注 ...
- Android(java)学习笔记214:开源框架的文件上传(只能使用Post)
1.文件上传给服务器,服务器端必然要写代码进行支持,如下: 我们新建一个FileUpload.jsp的动态网页,同时我们上传文件只能使用post方式(不可能将上传数据拼凑在url路径下),上传数据Ap ...
- Javaweb学习笔记——(二十二)——————文件上传、下载、Javamail
文件上传概述 1.文件上传的作用 例如网络硬盘,就是用来上传下载文件的. 在网络浏览器中,时常需要上传照片 2.文件上传对页面的要求 上 ...
随机推荐
- 微信小程序 实现三级联动-省市区
github项目地址 https://github.com/z1511676208/chooseAddr 序:项目中需要用到三级联动,自己试着写了下,也查了一些资料,现在把这个记录一下,里面地区数 ...
- Spring整体了解
1.spring原理 内部最核心的就是IOC了,动态注入,让一个对象的创建不用new了,可以自动的生产,这其实就是利用java里的反射,反射其实就是在运行时动态的去创建.调用对象,Spring就是 ...
- 关于java字节码框架ASM的学习
一.什么是ASM ASM是一个java字节码操纵框架,它能被用来动态生成类或者增强既有类的功能.ASM 可以直接产生二进制 class 文件,也可以在类被加载入 Java 虚拟机之前动态改变类行为 ...
- WOW
WOW http://bbs.ngacn.cc/read.php?tid=4992959 http://ngasave.us/popcn/?t=gems 地精科技:国服最流行 http://bbs ...
- sqlite--一秒20万数据
参考博文:https://blog.csdn.net/weixin_35261786/article/details/78222602 #include <iostream> #inclu ...
- JavaScript 的基础学习(一)
JavaScript概述 JavaScript的历史 1992年Nombas开发出C-minus-minus(C--)的嵌入式脚本语言(最初绑定在CEnvi软件中).后将其改名ScriptEase.( ...
- python中的异常处理常用方法
异常处理 什么是异常? 异常就是与正常情况不同,程序在执行过程中出现错误,导致无法执行完毕.异常其实就是代码执行过程中出错. 常见的一些异常 AttributeError 试图访问一个对象没有的属性, ...
- 443. String Compression
原题: 443. String Compression 解题: 看到题目就想到用map计数,然后将计数的位数计算处理,这里的解法并不满足题目的额外O(1)的要求,并且只是返回了结果array的长度,并 ...
- test case VS test scenario
---恢复内容开始--- 1. test case: how to test --如何测试 test scenario: what to be tested --测试什么 2. test scen ...
- Spring使用fastjson处理json数据
1.搭建SpringMVC+spring环境 2.配置web.xml以及springmvc-config.xml,web.xml同Spring使用jackson处理json数据一样,Springmvc ...


