Lab 6-3
In this lab, we’ll analyze the malware found in the file Lab06-03.exe.
Questions and Short Answers
Compare the calls in main to Lab 6-2’s main method. What is the new function called from main?
A: The functions at 0x401000 and 0x401040 are the same as those in Lab 6-2. At 0x401271 is printf. The 0x401130 function is new to this lab.
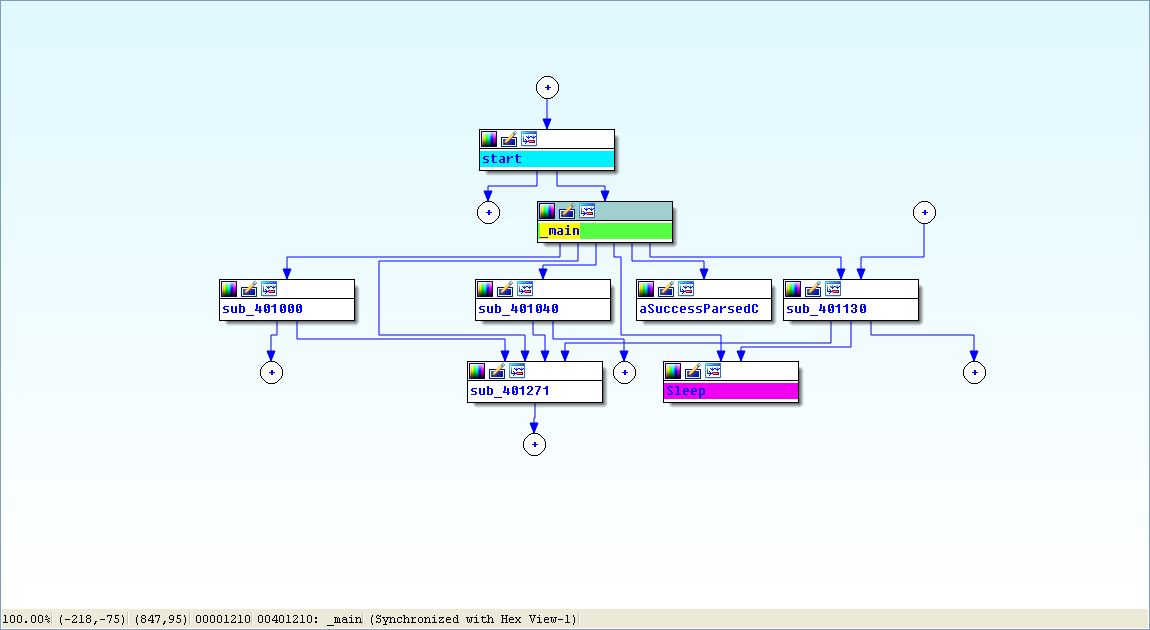
View -> Graphs -> Flow chart :
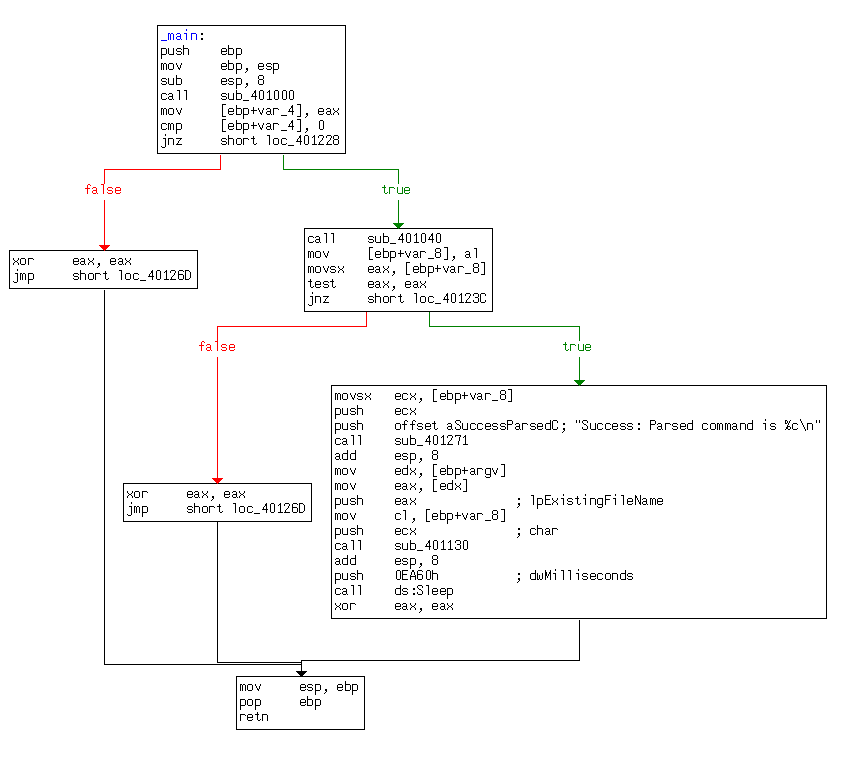
What parameters does this new function take?
A: The new function takes two parameters. The first is the command character parsed from the HTML comment, and the second is the program name argv[0], the standard main parameter.
What major code construct does this function contain?
A: The new function contains a switch statement with a jump table.
What can this function do?
A: The new function can print error messages, delete a file, create a directory, set a registry value, copy a file, or sleep for 100 seconds.
Are there any host-based indicators for this malware?
A: The registry key Software\Microsoft\Windows\CurrentVersion\Run\Malware
and the file location C:\Temp\cc.exe can both be host-based indicators.What is the purpose of this malware?
A: The program first checks for an active Internet connection. If no Internet connection is found, the program terminates. Otherwise, the program will attempt to download a web page containing an embedded HTML comment beginning with
<!--. The first character of the comment is parsed and used in a switch statement to determine which action to take on the local system, including whether to delete a file, create a directory, set a registry run key, copy a file, or sleep for 100 seconds.
Detailed Analysis
We begin by performing basic static analysis on the binary and find several new strings of interest, as shown in Listing 6-6L.

Listing 6-6L: Interesting new strings contained in Lab 6-3
These error messages suggest that the program may be able to modify the registry. Software\Microsoft\Windows\CurrentVersion\Run is a common auto-run location in the registry. C:\Temp\cc.exe is a directory and filename that may be useful as a host-based indicator.
Looking at the imports, we see several new Windows API functions not found in Lab 6-2, as shown in Listing 6-7L.
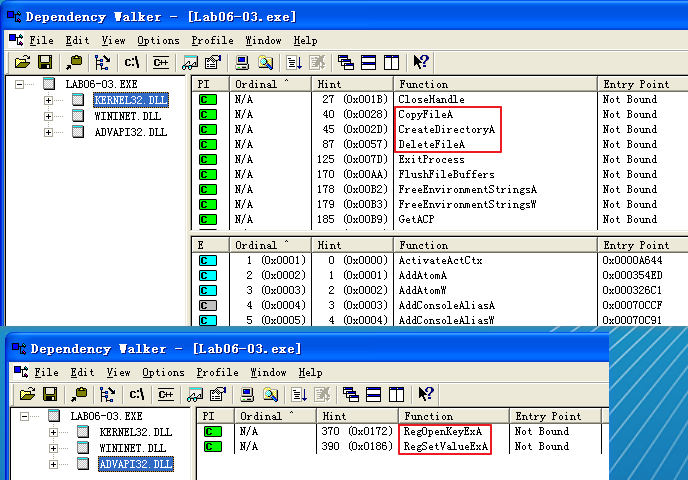
Listing 6-7L: Interesting new import functions contained in Lab 6-3
The first three imports are self-explanatory. The RegOpenKeyExA function is typically used with RegSetValueExA to insert information into the registry, usually when the malware sets itself or another program to start on system boot for the sake of persistence. (We discuss the Windows registry in depth in Chapter 7.)
Next, we perform dynamic analysis, but find that it isn’t very fruitful (not surprising based on what we discovered in Lab 6-2). We could connect the malware directly to the Internet or use INetSim to serve web pages to the malware, but we wouldn’t know what to put in the HTML comment. Therefore, we need to perform more in-depth analysis by looking at the disassembly.
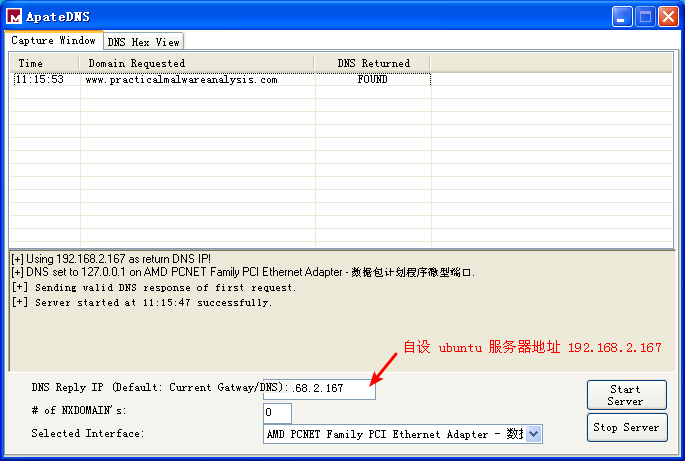
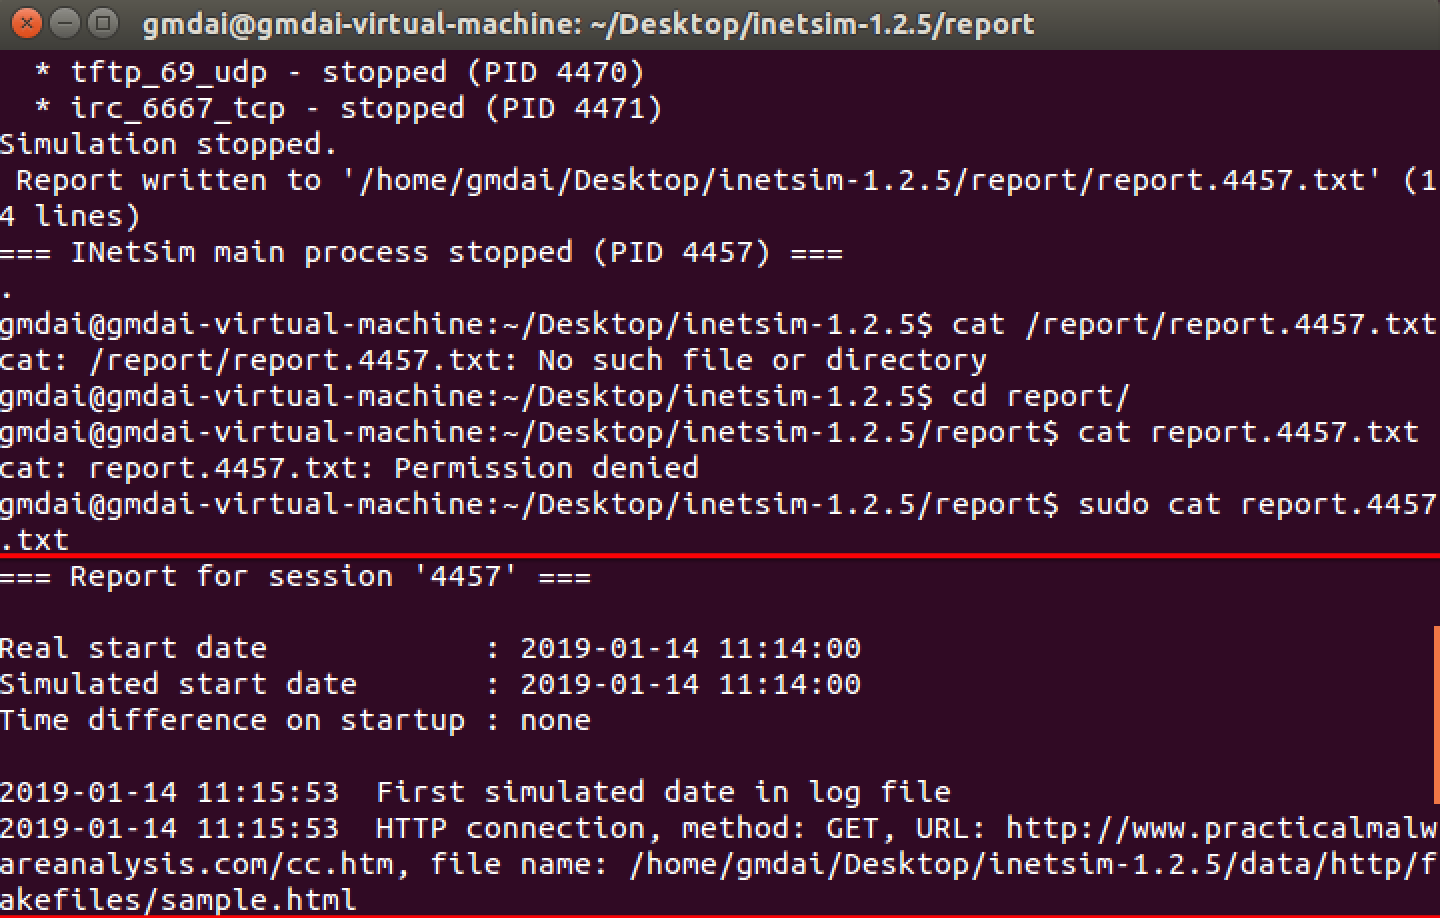
ApateDNS 点击 Stop Server,服务器 Ubuntu 端快捷键 control + c 结束服务。会产生日志文件,查看日志文件内容如下:
Finally, we load the executable into IDA Pro. The main method looks nearly identical to the one from Lab 6-2, except there is an extra call to 0x401130. The calls to 0x401000 (check Internet connection) and 0x401040 (download web page and parse HTML comment) are identical to those in Lab 6-2.
Next, we examine the parameters passed to 0x401130. It looks like argv and var_8 are pushed onto the stack before the call. In this case, argv is Argv[0], a reference to a string containing the current program’s name, Lab06-03.exe. Examining the disassembly, we see that var_8 is set to AL at 0x40122D. Remember that EAX is the return value from the previous function call, and that AL is contained within EAX. In this case, the previous function call is 0x401040 (download web page and parse HTML comment). Therefore, var_8 is passed to 0x401130 containing the command character parsed from the HTML comment.
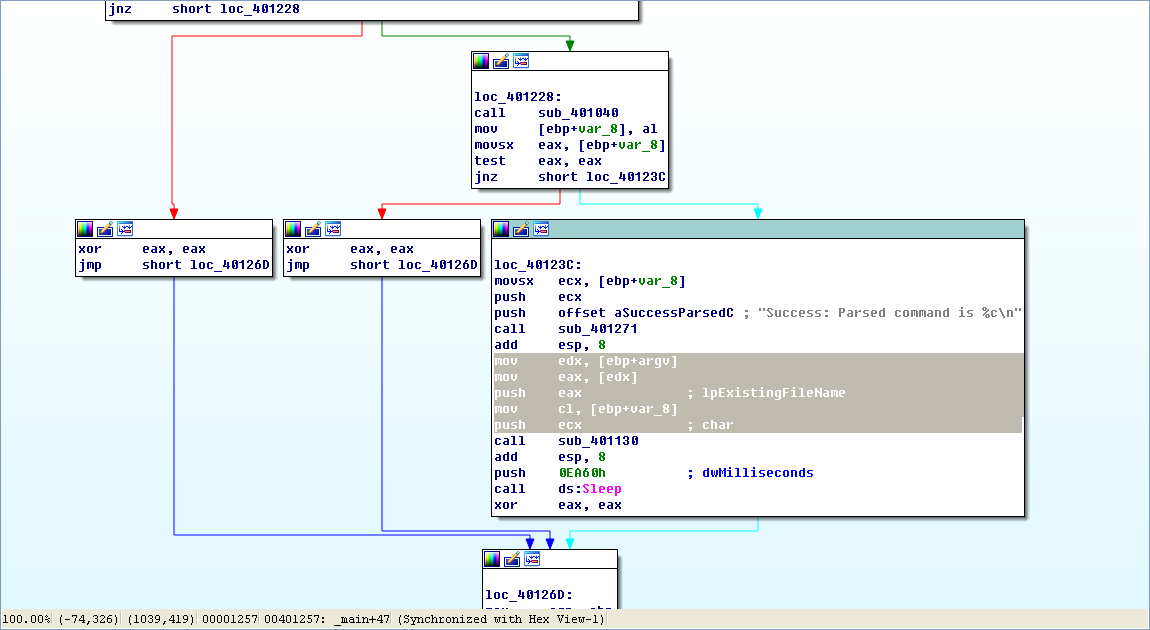
Now that we know what is passed to the function at 0x401130, we can analyze it. Listing 6-8L is from the start of the function.
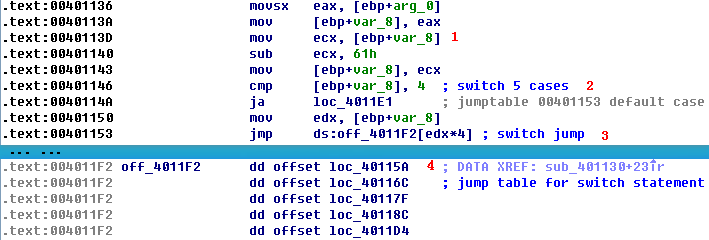
Listing 6-8L: Analyzing the function at 0x401130
arg_0 is an automatic label from IDA Pro that lists the last parameter pushed before the call; therefore, arg_0 is the parsed command character retrieved from the Internet. The parsed command character is moved into var_8 and eventually loaded into ECX at \({\color{red} 1}\). The next instruction subtracts 0x61 (the letter a in ASCII) from ECX. Therefore, once this instruction executes, ECX will equal 0 when arg_0 is equal to a.
Next, a comparison to the number 4 at \({\color{red} 2}\) checks to see if the command character (arg_0) is a, b, c, d, or e. Any other result will force the ja instruction to leave this section of code. Otherwise, we see the parsed command character used as an index into the jump table at \({\color{red} 3}\).
The EDX is multiplied by 4 at \({\color{red} 3 }\) because the jump table is a set of memory addresses referencing the different possible paths, and each memory address is 4 bytes in size. The jump table at \({\color{red} 4}\) has five entries, as expected. A jump table like this is often used by a compiler when generating assembly for a switch statement, as described in Chapter 6.
Graphical View of Command Character Switch
Now let’s look at the graphical view of this function, as shown in Figure 6-3L. We see six possible paths through the code, including five cases and the default. The “jump above 4” instruction takes us down the default path; otherwise, the jump table causes an execution path of the a through e branches. When you see a graph like the one in the figure (a single box going to many different boxes), you should suspect a switch statement. You can confirm that suspicion by looking at the code logic and jump table.
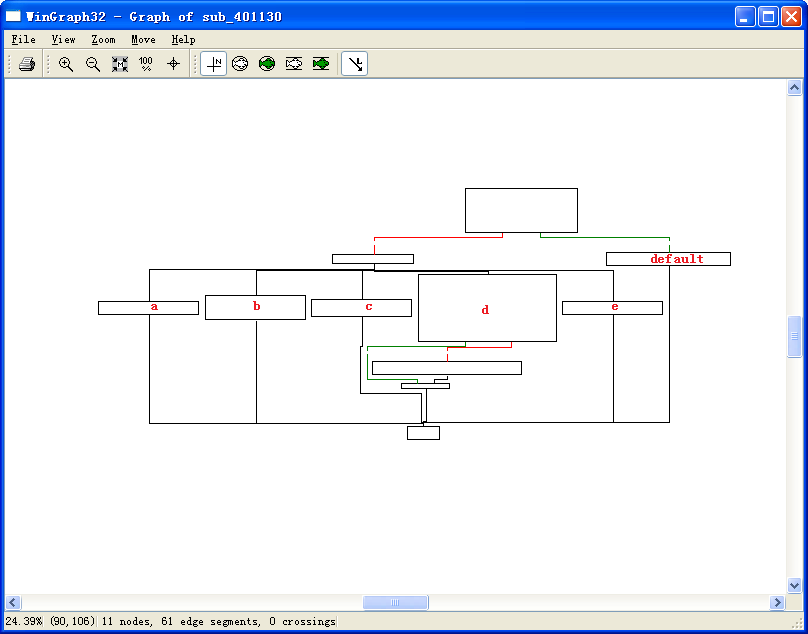
Figure 6-3L: The switch statement from function 0x401130 shown in graphical mode, labeled with the switch options
Switch Options
Next, we will examine each of the switch options (a through e) individually.
- The a option calls CreateDirectory with the parameter C:\\Temp, to create the path if it doesn’t already exist.
- The b option calls CopyFile, which takes two parameters: a source and a destination file. The destination is C:\\Temp\\cc.exe. The source is a parameter passed to this function, which, based on our earlier analysis, we know to be the program name (Argv[0]). Therefore, this option would copy Lab06-03.exe to C:\Temp\cc.exe.
- The c option calls DeleteFile with the parameter C:\\Temp\\cc.exe, which deletes that file if it exists.
- The d option sets a value in the Windows registry for persistence. Specifically, it sets Software\Microsoft\Windows\CurrentVersion\Run\Malware to C:\Temp\cc.exe, which makes the malware start at system boot (if it is first copied to the Temp location).
- The e option sleeps for 100 seconds.
- Finally, the default option prints “Error 3.2: Not a valid command provided.”
Having analyzed this function fully, we can combine it with our analysis from Lab 6-2 to gain a strong understanding of how the overall program operates.
We now know that the program checks for an active Internet connection using the if construct. If there is no valid Internet connection, the program terminates. Otherwise, the program attempts to download a web page that contains an embedded HTML comment starting with <!--. The next character is parsed from this comment and used in a switch statement to determine which action to take on the local system: delete a file, create a directory, set a registry run key, copy a file, or sleep for 100 seconds.
Preference
Lab 6-3的更多相关文章
- MIT 6.828 JOS学习笔记18. Lab 3.2 Part B: Page Faults, Breakpoints Exceptions, and System Calls
现在你的操作系统内核已经具备一定的异常处理能力了,在这部分实验中,我们将会进一步完善它,使它能够处理不同类型的中断/异常. Handling Page Fault 缺页中断是一个非常重要的中断,因为我 ...
- MIT 6.828 JOS学习笔记17. Lab 3.1 Part A User Environments
Introduction 在这个实验中,我们将实现操作系统的一些基本功能,来实现用户环境下的进程的正常运行.你将会加强JOS内核的功能,为它增添一些重要的数据结构,用来记录用户进程环境的一些信息:创建 ...
- MIT 6.828 JOS学习笔记16. Lab 2.2
Part 3 Kernel Address Space JOS把32位线性地址虚拟空间划分成两个部分.其中用户环境(进程运行环境)通常占据低地址的那部分,叫用户地址空间.而操作系统内核总是占据高地址的 ...
- MIT 6.828 JOS学习笔记15. Lab 2.1
Lab 2: Memory Management lab2中多出来的几个文件: inc/memlayout.h kern/pmap.c kern/pmap.h kern/kclock.h kern/k ...
- MIT 6.828 JOS学习笔记10. Lab 1 Part 3: The kernel
Lab 1 Part 3: The kernel 现在我们将开始具体讨论一下JOS内核了.就像boot loader一样,内核开始的时候也是一些汇编语句,用于设置一些东西,来保证C语言的程序能够正确的 ...
- MIT 6.828 JOS学习笔记7. Lab 1 Part 2.2: The Boot Loader
Lab 1 Part 2 The Boot Loader Loading the Kernel 我们现在可以进一步的讨论一下boot loader中的C语言的部分,即boot/main.c.但是在我们 ...
- python opencv 利用Lab空间把春天的场景改为秋天
前一段时间实现了Reinhard颜色迁移算法,感觉挺有意思的,然后在代码上随意做了一些更改,有了一些发现,把Lab通道的a通道值改为127左右,可以将绿色改为黄色,而对其他颜色的改动非常小,因此可以将 ...
- Acadia Lab 228 + Lab 222
又是一对串烧实验,布好线后非常方便就可以一起完成. 连线方案一模一样: Lab 228 数码管骰子 核心代码如下: def loop() : global cnt global btn_read,se ...
- Acadia Lab 203 + Lab 231
在做完 Lab 6 之后,惊觉选做实验缺口很大,于是遍历了一遍夏任务,找到了一条最省力的路线. 做完 Lab 6 的连线不用拆,可以接下来做以下两个实验: Lab 203 网络时钟 核心代码如下: v ...
- GJM : 【技术干货】给The Lab Renderer for Unity中地形添加阴影
感谢您的阅读.喜欢的.有用的就请大哥大嫂们高抬贵手"推荐一下"吧!你的精神支持是博主强大的写作动力以及转载收藏动力.欢迎转载! 版权声明:本文原创发表于 [请点击连接前往] ,未经 ...
随机推荐
- 安装配置Spark集群
首先准备3台电脑或虚拟机,分别是Master,Worker1,Worker2,安装操作系统(本文中使用CentOS7). 1.配置集群,以下步骤在Master机器上执行 1.1.关闭防火墙:syste ...
- spark streaming集成flume
1. 安装flume flume安装,解压后修改flume_env.sh配置文件,指定java_home即可. cp hdfs jar包到flume lib目录下(否则无法抽取数据到hdfs上): $ ...
- Python------excel读、写、拷贝
#-----------------------读excel-----------------#1 打开方式 索引.名字#2 获取行数据 sheet.row_values(0):获取某行第n到m列(n ...
- git常用命令--tag
/// 查看标签 // 打印所有标签 git tag // 打印符合检索条件的标签 git tag -l 1.*.* // 查看对应标签状态 git checkout 1.0.0 /// 创建标签(本 ...
- Linux服务器可以进百度,但是进阿里云或者别的一些网站提示‘错误代码:NS_ERROR_NET_INADEQUATE_SECURITY’的问题
昨天遇到一个头疼的事情,在阿里云买了一台服务器: 然后环境各种都装了,因为本人是小白,所以一般都装MATE界面: 一开始环境没配好,访问百度可以进去,进万网但是进不去,先也没急着搞这个事情,第一天晚上 ...
- js 判断浏览器型号
<html><head> <meta http-equiv="Content-Type" content="text/html;charse ...
- Monte Carlo simulated annealing
蒙特·卡罗分子模拟计算 使用蒙特·卡罗方法进行分子模拟计算是按照以下步骤进行的: 1. 使用随机数发生器产生一个随机的分子构型. 2. 对此分子构型的其中粒子坐标做无规则的改变,产生一个新的分子构型. ...
- Vue引入elementUI组件全过程
参考:https://www.cnblogs.com/fubinbin/p/9938528.html 在vue脚手架安装完成之后,页面正常跳出vue刚安装完的界面 我们开始引入elementui 1. ...
- 正则表达式(re模块)
s='hello world' print(s.find('llo')) #找到llo ret=s.replace('ll','xx') #用xx代替ll print(ret) print(s.spl ...
- 细说flask数据库迁移
什么情况下要用数据库迁移? 在开发过程中,需要修改数据库模型,而且还要在修改之后更新数据库.最直接的方式就是删除旧表,但这样会丢失数据. 更好的解决办法是使用数据库迁移框架,它可以追踪数据库模式的变化 ...
