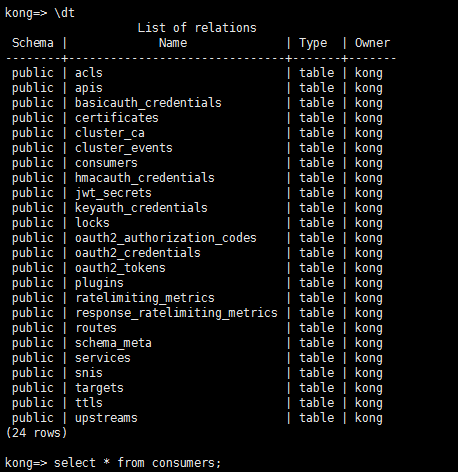
Kong安装教程(v1.0.2)
使用的软件
- Unbuntu 虚拟机(有自己的服务器更好)
- PostgreSQL
- kong
- kong-dashboard
- docker
- spring boot
安装 PostgreSQL
kong 需要使用到数据库,目前支持PostgreSQL和Cassandran ,我选择大象数据库,安装过程省略,可以参考这篇文章。
Ubuntu PostgreSQL安装和配置
安装完后建一个kong的用户、密码为kong、建一个kong 数据库:
sudo -u postgres psql 进入,提示符变成: postgres=#
postgres=# create user kong with password 'kong';

CREATE ROLE

postgres=# CREATE DATABASE kong OWNER kong;

CREATE DATABASE

postgres=#
至此,PostgreSQL已经安装和配置好了。
安装kong
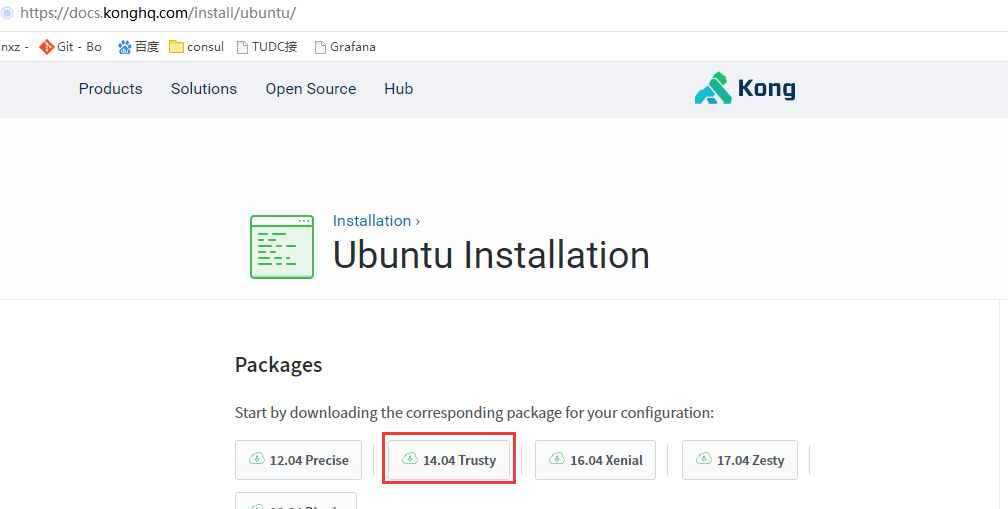
下载kong的源文件,下载地址:https://getkong.org/install/ubuntu/
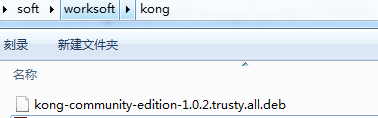
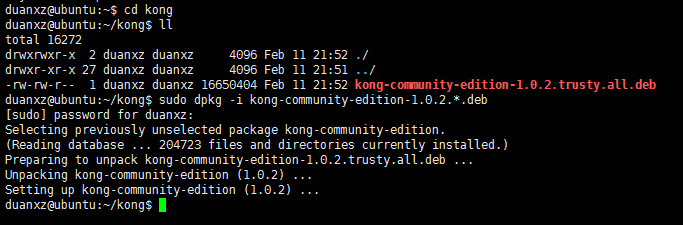
下载完成之后会有这样一个文件kong-community-edition-0.11.0.*.deb,cd到这个文件的目录:
$ sudo apt-get update

$ sudo apt-get install openssl libpcre3 procps perl

$ sudo dpkg -i kong-community-edition-1.0.2.*.deb
查看kong的版本:
kong version

配置kong
配置文档在这里:
https://getkong.org/docs/0.9.x/configuration/
复制配置文件:
$ cp /etc/kong/kong.conf.default /etc/kong/kong.conf
配置文件(Kong将使用默认设置进行操作。启动时,Kong会查找可能包含配置文件的几个默认位置):
cat /etc/kong/kong.conf
cat /etc/kong.conf
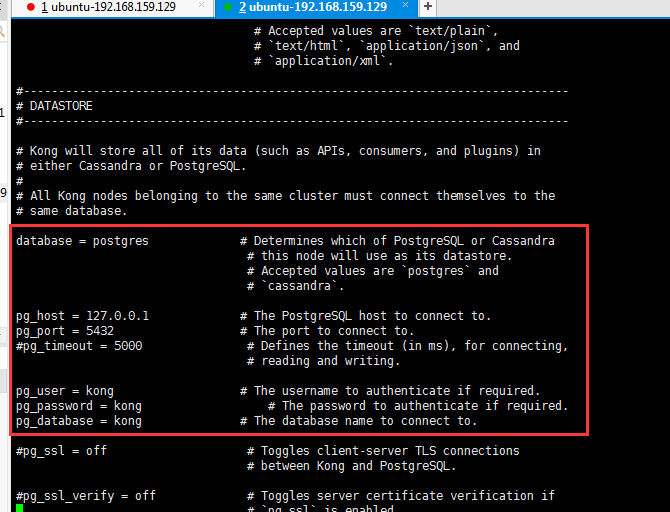
打开配置文件,里面可以修改很多配置,修改数据库连接,用户名、密码
pg_host = 127.0.0.1 # The PostgreSQL host to connect to.

pg_port =  # The port to connect to.

pg_user = kong # The username to authenticate if required.

pg_password = kong # The password to authenticate if required.

pg_database = kong
数据库配置(上面已经有了)
kong连数据库,需要我们在pg上建立密码为kong的kong用户,数据库名也为kong
su - postgres//进入数据库

-bash-4.2$ psql

postgres=# CREATE USER kong WITH PASSWORD 'kong'; CREATE DATABASE kong OWNER kong;//建立数据库以及用户
修改kong配置
进入/usr/local/share/lua/5.1/kong/templates目录,修改kong_defaults.lua里的pg_password=kong,保存
初始化数据库,执行以下整合命令:
$ kong migrations up -c /etc/kong/kong.conf.default
出错:
Error: /usr/local/share/lua/5.1/kong/cmd/start.lua:28: [postgres error] could not retrieve current migrations: [postgres error] 致命错误: 用户 "kong" Ident 认证失败
解决方法:
vi /var/lib/pgsql/9.6/data/pg_hba.conf
修改
把这个配置文件中的认证 METHOD的ident修改为trust,可以实现用账户和密码来访问数据库,
即解决psql: 致命错误: 用户 "postgres" Ident 认证失败 这个问题)
第五步:重启postgresql服务器使设置生效
#service postgresql-9.6 restart
再重试上面的migrations指令。
好像高版本是使用:
kong migrations bootstrap
执行好后,数据库会生成很多表,这些是默认但kong数据表,后续可以自定义插件,重新migrations,会生成自定义表
启动kong :
kong start -c /etc/kong/kong.conf --vv
默认情况下,KONG监听的端口为:
· 8000:此端口是KONG用来监听来自客户端传入的HTTP请求,并将此请求转发到上有服务器;(kong根据配置的规则转发到真实的后台服务地址。)
· 8443:此端口是KONG用来监听来自客户端传入的HTTPS请求的。它跟8000端口的功能类似,转发HTTPS请求的。可以通过修改配置文件来禁止它;
· 8001:Admin API,通过此端口,管理者可以对KONG的监听服务进行配置,插件设置、API的增删改查、以及负载均衡等一系列的配置都是通过8001端口进行管理;
· 8444:通过此端口,管理者可以对HTTPS请求进行监控;
最后、浏览器访问IP:8000,如果出现{"message":"no API found with those values"}
注意点:如果有防火墙的话,最好先关掉防火墙。
kong的日志
[root@localhost logs]# pwd

/usr/local/kong/logs

[root@localhost logs]# ll

总用量

-rw-r--r--.  root root  2月   : access.log

-rw-r--r--.  root root  2月   : admin_access.log

-rw-r--r--.  root root  2月   : error.log

[root@localhost logs]# tail -50f error.log
示例:
打开浏览器访问:localhost:8001,浏览器显示了一大串关于kong的json字符串,则启动成功。
curl -i http://localhost:8001/
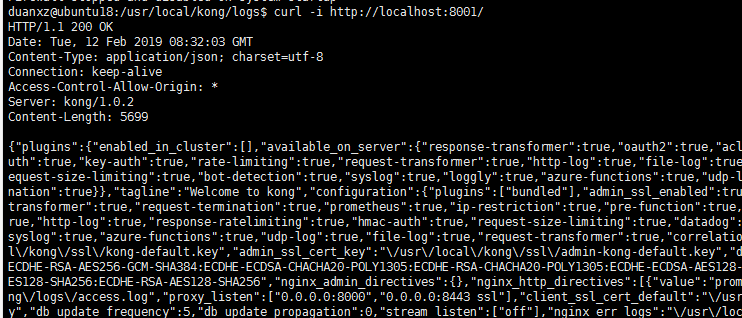
管理端口用rest api对api进行操作,文档地址:https://getkong.org/docs/0.8.x/admin-api
接口接入kong测试
下面的所有admin api操作,如果成功会写入postgreSQL中,下面是按照官方的demo操作的,所有操作都是成功的。数据落地到数据库的,查询见《Ubuntu PostgreSQL安装和配置》的第七章节。
示例1:服务转发
1. Add your Service using the Admin API
Issue the following cURL request to add your first Service (pointing to the baidu) to Kong:
curl -i -X POST \

  --url http://localhost:8001/services/ \

  --data 'name=baidu-service' \

  --data 'url=http://www.baidu.com'
You should receive a response similar to:
HTTP/1.1  Created

Date: Wed,  Feb  :: GMT

Content-Type: application/json; charset=utf-

Connection: keep-alive

Access-Control-Allow-Origin: *

Server: kong/1.0.

Content-Length:

{

    "host": "www.baidu.com",

    "created_at": ,

    "connect_timeout": ,

    "id": "be1ea866-c4b4-46ac-9c92-ff821fb317ab",

    "protocol": "http",

    "name": "baidu-service",

    "read_timeout": ,

    "port": ,

    "path": null,

    "updated_at": ,

    "retries": ,

    "write_timeout":

}
2. Add a Route for the Service
curl -i -X POST \

  --url http://localhost:8001/services/baidu-service/routes \

  --data 'hosts[]=baidu.com'
The answer should be similar to:
HTTP/1.1  Created

Date: Wed,  Feb  :: GMT

Content-Type: application/json; charset=utf-

Connection: keep-alive

Access-Control-Allow-Origin: *

Server: kong/1.0.

Content-Length:

{

    "created_at": ,

    "methods": null,

    "id": "d813af89-13fe-4d94-945f-d5bbf4c56a28",

    "service": {

        "id": "be1ea866-c4b4-46ac-9c92-ff821fb317ab"

    },

    "name": null,

    "hosts": ["baidu.com"],

    "updated_at": ,

    "preserve_host": false,

    "regex_priority": ,

    "paths": null,

    "sources": null,

    "destinations": null,

    "snis": null,

    "protocols": ["http",

    "https"],

    "strip_path": true

}
Kong is now aware of your Service and ready to proxy requests.
3. Forward your requests through Kong
Issue the following cURL request to verify that Kong is properly forwarding requests to your Service. Note that by default Kong handles proxy requests on port :8000:
curl -i -X GET \

  --url http://localhost:8000/ \

  --header 'Host: baidu.com'
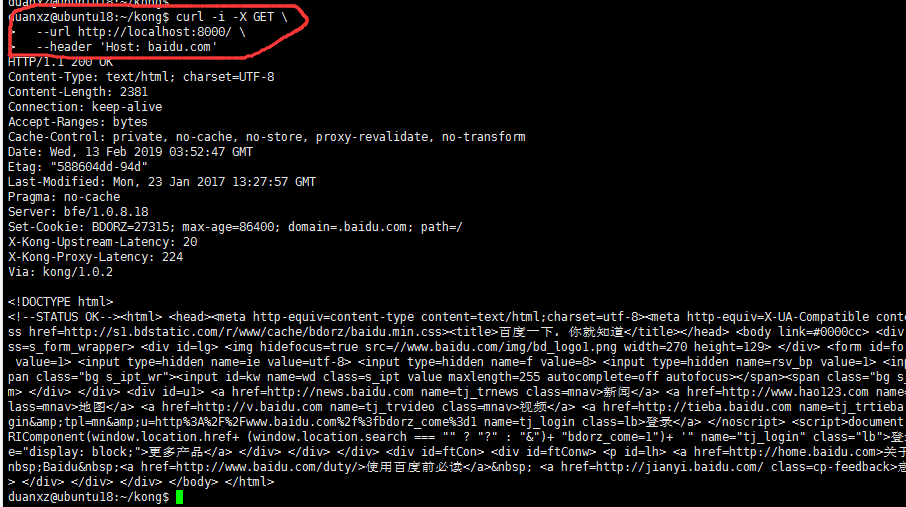
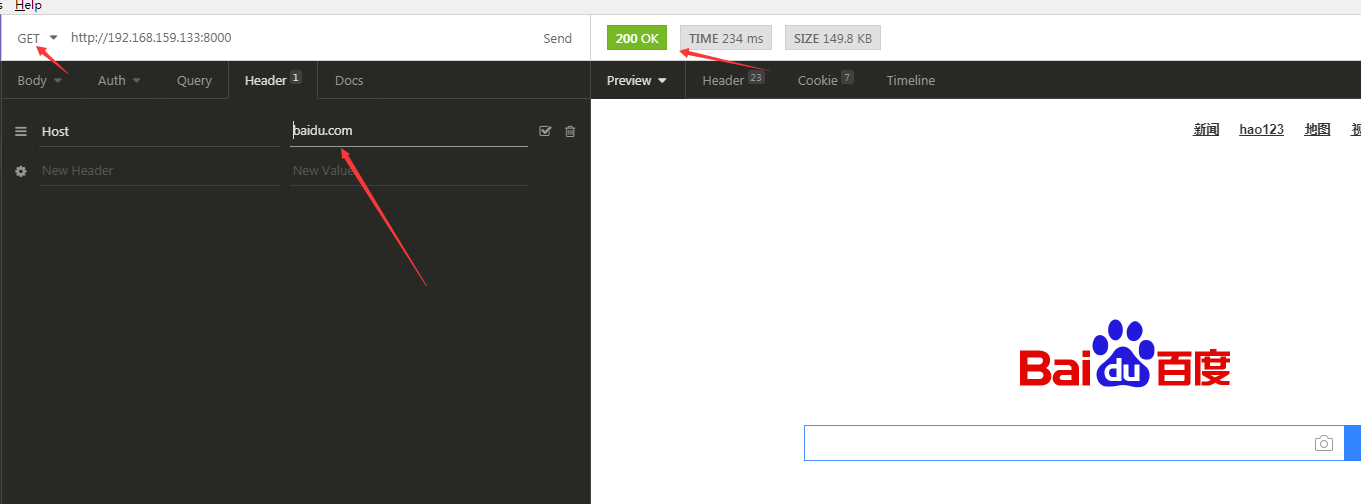
A successful response means Kong is now forwarding requests made to http://localhost:8000 to the url we configured in step #1, and is forwarding the response back to us. Kong knows to do this through the header defined in the above cURL request:
kong完美的实现了接口转发~
注意注册时,'hosts', 'uris' or 'methods'三个参数至少有一个必须指定。
示例2:Enabling Plugins
1. Configure the key-auth plugin
To configure the key-auth plugin for the Service you configured in Kong, issue the following cURL request:
curl -i -X POST \

  --url http://localhost:8001/services/example-service/plugins/ \

  --data 'name=key-auth'
Note: This plugin also accepts a config.key_names parameter, which defaults to ['apikey']. It is a list of headers and parameters names (both are supported) that are supposed to contain the apikey during a request.
2. Verify that the plugin is properly configured
Issue the following cURL request to verify that the key-auth plugin was properly configured on the Service:
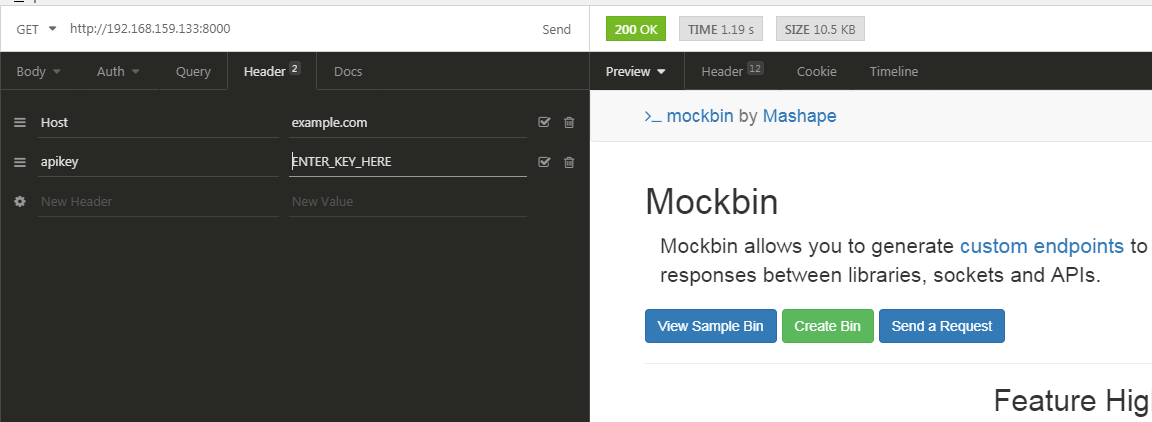
curl -i -X GET \

  --url http://localhost:8000/ \

  --header 'Host: example.com'
Since you did not specify the required apikey header or parameter, the response should be 401 Unauthorized:
duanxz@ubuntu18:~/kong$ curl -i -X GET \

>   --url http://localhost:8000/ \

>   --header 'Host: example.com'

HTTP/1.1  Unauthorized

Date: Wed,  Feb  :: GMT

Content-Type: application/json; charset=utf-

Connection: keep-alive

WWW-Authenticate: Key realm="kong"

Content-Length:

Server: kong/1.0.

{"message":"No API key found in request"}
配置好了 key-auth plugin。
示例3:Consumer
配置好了 key-auth plugin后,lets learn how to add consumers to your Service so we can continue proxying requests through Kong。
1. Create a Consumer through the RESTful API
Lets create a user named Jason by issuing the following request:
curl -i -X POST \

  --url http://localhost:8001/consumers/ \

  --data "username=Jason"
You should see a response similar to the one below:
HTTP/1.1  Created

Content-Type: application/json

Connection: keep-alive

{

"custom_id": null,

"created_at": ,

"username": "Jason",

"id": "f23dfd0f-6a43-444d-b628-6137cbdb1e6e"

}
Congratulations! You’ve just added your first consumer to Kong.
Note: Kong also accepts a custom_id parameter when creating consumers to associate a consumer with your existing user database.
2. Provision key credentials for your Consumer
Now, we can create a key for our recently created consumer Jason by issuing the following request:
curl -i -X POST \

  --url http://localhost:8001/consumers/Jason/key-auth/ \

  --data 'key=ENTER_KEY_HERE'
返回:
HTTP/1.1  Created

Date: Wed,  Feb  :: GMT

Content-Type: application/json; charset=utf-

Connection: keep-alive

Access-Control-Allow-Origin: *

Server: kong/1.0.

Content-Length:

{

    "key": "ENTER_KEY_HERE",

    "created_at": ,

    "consumer": {

        "id": "f23dfd0f-6a43-444d-b628-6137cbdb1e6e"

    },

    "id": "6d6c4792-f295-4f2a-9941-9357d17240d1"

}
3. Verify that your Consumer credentials are valid
We can now issue the following request to verify that the credentials of our Jason Consumer is valid:
curl -i -X GET \

  --url http://localhost:8000 \

  --header "Host: example.com" \

  --header "apikey: ENTER_KEY_HERE"
Next Steps
Now that we’ve covered the basics of adding Services, Routes, Consumers and enabling Plugins, feel free to read more on Kong in one of the following documents:
Questions? Issues? Contact us on one of the Community Channels for help!
遇到的问题
如果本机可以访问8000端口,远程机器无法通过ip:8000访问kong,估计是防火墙的问题
CentOS7使用firewalld打开关闭防火墙与端口

、firewalld的基本使用

启动: systemctl start firewalld

关闭: systemctl stop firewalld

查看状态: systemctl status firewalld

开机禁用  : systemctl disable firewalld

开机启用  : systemctl enable firewalld
ERROR: module ‘socket’ not found:No LuaRocks module found for socket
启动的时候:
# ./bin/kong start -c ./kong.conf

...

ERROR: ./kong/globalpatches.lua:63: module 'socket' not found:No LuaRocks module found for socket

...
这是因为编译kong之后,重新编译了luarocks,并且将luarocks安装在了其它位置。重新编译kong之后解决。
ERROR: function to_regclass(unknown) does not exist (8)
创建数据库的时候:
# kong migrations up -c ./kong.conf

...

[postgres error] could not retrieve current migrations: [postgres error] ERROR: function to_regclass(unknown) does not exist (8)

...
这是因为PostgreSQL的版本太低了,to_regclass在PostgreSQL 9.4及以上的版本中才存在。
yum install https://download.postgresql.org/pub/repos/yum/9.6/redhat/rhel-7-x86_64/pgdg-centos96-9.6-3.noarch.rpm

yum install postgresql96

yum install postgresql96-server
nginx: [emerg] unknown directive “real_ip_header” in /usr/local/kong/nginx-kong.conf:73
nginx: [emerg] unknown directive "real_ip_header" in /usr/local/kong/nginx-kong.conf:73
这是因为编译的openresty的时候,没有指定--with-http_realip_module,重新编译安装:
./configure --with-pcre-jit --with-http_ssl_module --with-http_realip_module --with-http_stub_status_module --with-http_v2_module

make -j2

make install     //默认安装在/usr/local/bin/openresty

export PATH=/usr/local/openresty/bin:$PATH
Kong安装教程(v1.0.2)的更多相关文章
- 《Ruby语言入门教程v1.0》学习笔记-01
<Ruby语言入门教程v1.0> 编著:张开川 邮箱:kaichuan_zhang@126.com 想要学习ruby是因为公司的自动化测试使用到了ruby语言,但是公司关于ruby只给了一 ...
- [转]Tomcat9.0安装教程 Tomcat9.0环境变量配置教程
[转]Tomcat9.0安装教程 Tomcat9.0环境变量配置教程 [转]超详细MySQL安装及基本使用教程
- mysql8.0.20安装教程,mysql下载安装教程8.0.20
mysql8.0.20下载安装教程 mysql8.0.20安装教程 mysql安装包+mysql学习视频+mysql面试指南视频教程 下载地址: 链接:https://pan.baidu.com/s ...
- 安装istio v1.0 详细过程和步骤
创建 istio 目录 [root@centos-110 ~]# mkdir istio [root@centos-110 ~]# cd istio 方案一: # 去下面的地址下载压缩包 # ...
- 《Ruby语言入门教程v1.0》学习笔记-03
10.09 第七章 7.1 模块 Ruby标准包里的 Math 模块提供了许多方法,比如:求平方根 sqrt ,使用的时候要这么写:模块名.方法名(参数).如:Math.sqrt( a*5+b ) M ...
- 《Ruby语言入门教程v1.0》学习笔记-02
9.18 第四章 一切都是对象 这个章节的例子都举得很浅显易懂,而且作者的语言= =噗,委实生动有趣啊是~~ 4.1 两种思维方式 初期的编程思想是:以“如何做”为指导来编写代码.这时期的编程语言叫 ...
- CentOS 6.8安装Docker V1.0
rpm -Uvh http://dl.Fedoraproject.org/pub/epel/6/x86_64/epel-release-6-8.noarch.rpm yum -y install do ...
- MySQL8.0.20下载与安装详细图文教程,mysql安装教程
MySQL下载与安装(8.0.20版)教程 mysql安装包+mysql学习视频+mysql面试指南视频教程 下载地址: 链接:https://pan.baidu.com/s/1FmLFhGlajBQ ...
- Windows环境下Android Studio v1.0安装教程
Windows环境下Android Studio v1.0安装教程 准备工具 JDK安装包. 要求:JDK 7以及以上版本. Android Studio安装文件. Windows: exe(包含SD ...
随机推荐
- selenium java 文件上传、下载
1.webdriver对页面文件的下载 我们一般操作浏览器下载时会让我们选择下载的目录然后经过一系列操作后才进行文件下载操作,但是用webdriver不能按这样的方式操作.经过查询资料找到了如下的实现 ...
- matplotlib各图形绘制
2D图形 import numpy as np import pandas as pd from pandas import Series,DataFrame import matplotlib.py ...
- mybatis_generator合并xml mapper文件
一.问题 用的mybatis.generator 1.3.6版本,版本没啥大关系. 目前的xml输出有两个主要的问题: 1.xml追加而不是覆盖 这样就导致一个xml mapper文件每个node都重 ...
- Makefile 系统论述
该篇文章为转载,是对原作者系列文章的总汇加上标注. 支持原创,请移步陈浩大神博客: http://blog.csdn.net/haoel/article/details/2886 概述 什么是make ...
- linq查询数值为null的问题以及数据表的关联计算问题
说明:下面实例都是我进行项目开发时的真实部分代码,毫无保留 一.数据表的关联计算 //把当前年度的分差计算出来,建立两个关联的数据表 try { using(TransactionScope scop ...
- 架构之路:nginx与IIS服务器搭建集群实现负载均衡(二)
[前言] 在<架构之路:nginx与IIS服务器搭建集群实现负载均衡(一)>中小编简单的讲解了Nginx的原理!俗话说:光说不练假把式.接下来,小编就和大家一起来做个小Demo来体会一下N ...
- RAID的详细配置
一.RAID 1.RAID机制通过使用多硬盘并行工作的方式来提高硬盘的IO性能 2.RAID分为多种,称之为RAID level,RAID共有7级:RAID0~RAID6 3.常用的RAID级别有:R ...
- python操作redis集群
strictRedis对象方法用于连接redis 指定主机地址,port与服务器连接,默认db是0,redis默认数据库有16个,在配置文件中指定database 16 上代码 .对redis的单实例 ...
- [Leetcode 46]全排列 Permutations 递归
[题目] Given a collection of distinct integers, return all possible permutations. 数组的组合情况. Input: [1,2 ...
- bfs两种记录路径方法
#include<cstdio> #include<queue> using namespace std; struct sss { int x,y; }ans[][]; ][ ...