吴裕雄 python 神经网络——TensorFlow 花瓣分类与迁移学习(2)
import glob
import os.path
import numpy as np
import tensorflow as tf
from tensorflow.python.platform import gfile # 原始输入数据的目录,这个目录下有5个子目录,每个子目录底下保存这属于该
# 类别的所有图片。
INPUT_DATA = 'F:\\TensorFlowGoogle\\201806-github\\datasets\\flower_photos\\'
# 输出文件地址。我们将整理后的图片数据通过numpy的格式保存。
OUTPUT_FILE = 'F:\\shuju\\flower_processed_data.npy' # 测试数据和验证数据比例。
VALIDATION_PERCENTAGE = 10
TEST_PERCENTAGE = 10 # 读取数据并将数据分割成训练数据、验证数据和测试数据。
def create_image_lists(sess, testing_percentage, validation_percentage):
sub_dirs = [x[0] for x in os.walk(INPUT_DATA)]
is_root_dir = True
# 初始化各个数据集。
training_images = []
training_labels = []
testing_images = []
testing_labels = []
validation_images = []
validation_labels = []
current_label = 0 # 读取所有的子目录。
for sub_dir in sub_dirs:
if is_root_dir:
is_root_dir = False
continue
# 获取一个子目录中所有的图片文件。
extensions = ['jpg', 'jpeg', 'JPG', 'JPEG']
file_list = []
dir_name = os.path.basename(sub_dir)
for extension in extensions:
file_glob = os.path.join(INPUT_DATA, dir_name, '*.' + extension)
file_list.extend(glob.glob(file_glob))
if not file_list:
continue
print("processing:", dir_name)
i = 0
# 处理图片数据。
for file_name in file_list:
i += 1
# 读取并解析图片,将图片转化为299*299以方便inception-v3模型来处理。
image_raw_data = gfile.FastGFile(file_name, 'rb').read()
image = tf.image.decode_jpeg(image_raw_data)
if image.dtype != tf.float32:
image = tf.image.convert_image_dtype(image, dtype=tf.float32)
image = tf.image.resize_images(image, [299, 299])
image_value = sess.run(image)
# 随机划分数据聚。
chance = np.random.randint(100)
if chance < validation_percentage:
validation_images.append(image_value)
validation_labels.append(current_label)
elif chance < (testing_percentage + validation_percentage):
testing_images.append(image_value)
testing_labels.append(current_label)
else:
training_images.append(image_value)
training_labels.append(current_label)
if i % 200 == 0:
print(i, "images processed.")
current_label += 1
# 将训练数据随机打乱以获得更好的训练效果。
state = np.random.get_state()
np.random.shuffle(training_images)
np.random.set_state(state)
np.random.shuffle(training_labels) return np.asarray([training_images, training_labels,validation_images, validation_labels,testing_images, testing_labels]) with tf.Session() as sess:
processed_data = create_image_lists(sess, TEST_PERCENTAGE, VALIDATION_PERCENTAGE)
# 通过numpy格式保存处理后的数据。
np.save(OUTPUT_FILE, processed_data) import glob
import os.path
import numpy as np
import tensorflow as tf
from tensorflow.python.platform import gfile
import tensorflow.contrib.slim as slim # 加载通过TensorFlow-Slim定义好的inception_v3模型。
import tensorflow.contrib.slim.python.slim.nets.inception_v3 as inception_v3 # 处理好之后的数据文件。
INPUT_DATA = 'F:\\shuju\\flower_processed_data.npy'
# 保存训练好的模型的路径。
TRAIN_FILE = 'E:\\train_dir\\model'
# 谷歌提供的训练好的模型文件地址。因为GitHub无法保存大于100M的文件,所以
# 在运行时需要先自行从Google下载inception_v3.ckpt文件。
CKPT_FILE = 'E:\\inception_v3\\inception_v3.ckpt' # 定义训练中使用的参数。
LEARNING_RATE = 0.0001
STEPS = 300
BATCH = 32
N_CLASSES = 5 # 不需要从谷歌训练好的模型中加载的参数。
CHECKPOINT_EXCLUDE_SCOPES = 'InceptionV3/Logits,InceptionV3/AuxLogits'
# 需要训练的网络层参数明层,在fine-tuning的过程中就是最后的全联接层。
TRAINABLE_SCOPES='InceptionV3/Logits,InceptionV3/AuxLogit' def get_tuned_variables():
exclusions = [scope.strip() for scope in CHECKPOINT_EXCLUDE_SCOPES.split(',')]
variables_to_restore = []
# 枚举inception-v3模型中所有的参数,然后判断是否需要从加载列表中移除。
for var in slim.get_model_variables():
excluded = False
for exclusion in exclusions:
if var.op.name.startswith(exclusion):
excluded = True
break
if not excluded:
variables_to_restore.append(var)
return variables_to_restore def get_trainable_variables():
scopes = [scope.strip() for scope in TRAINABLE_SCOPES.split(',')]
variables_to_train = []
# 枚举所有需要训练的参数前缀,并通过这些前缀找到所有需要训练的参数。
for scope in scopes:
variables = tf.get_collection(tf.GraphKeys.TRAINABLE_VARIABLES, scope)
variables_to_train.extend(variables)
return variables_to_train def main():
# 加载预处理好的数据。
processed_data = np.load(INPUT_DATA)
training_images = processed_data[0]
n_training_example = len(training_images)
training_labels = processed_data[1] validation_images = processed_data[2]
validation_labels = processed_data[3] testing_images = processed_data[4]
testing_labels = processed_data[5]
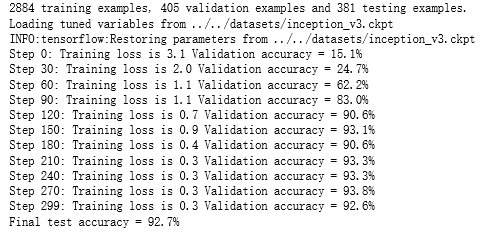
print("%d training examples, %d validation examples and %d testing examples." % (n_training_example, len(validation_labels), len(testing_labels))) # 定义inception-v3的输入,images为输入图片,labels为每一张图片对应的标签。
images = tf.placeholder(tf.float32, [None, 299, 299, 3], name='input_images')
labels = tf.placeholder(tf.int64, [None], name='labels') # 定义inception-v3模型。因为谷歌给出的只有模型参数取值,所以这里
# 需要在这个代码中定义inception-v3的模型结构。虽然理论上需要区分训练和
# 测试中使用到的模型,也就是说在测试时应该使用is_training=False,但是
# 因为预先训练好的inception-v3模型中使用的batch normalization参数与
# 新的数据会有出入,所以这里直接使用同一个模型来做测试。
with slim.arg_scope(inception_v3.inception_v3_arg_scope()):
logits, _ = inception_v3.inception_v3(images, num_classes=N_CLASSES, is_training=True) trainable_variables = get_trainable_variables()
# 定义损失函数和训练过程。
tf.losses.softmax_cross_entropy(tf.one_hot(labels, N_CLASSES), logits, weights=1.0)
total_loss = tf.losses.get_total_loss()
train_step = tf.train.RMSPropOptimizer(LEARNING_RATE).minimize(total_loss) # 计算正确率。
with tf.name_scope('evaluation'):
correct_prediction = tf.equal(tf.argmax(logits, 1), labels)
evaluation_step = tf.reduce_mean(tf.cast(correct_prediction, tf.float32)) # 定义加载Google训练好的Inception-v3模型的Saver。
load_fn = slim.assign_from_checkpoint_fn(
CKPT_FILE,
get_tuned_variables(),
ignore_missing_vars=True) # 定义保存新模型的Saver。
saver = tf.train.Saver() with tf.Session() as sess:
# 初始化没有加载进来的变量。
init = tf.global_variables_initializer()
sess.run(init) # 加载谷歌已经训练好的模型。
print('Loading tuned variables from %s' % CKPT_FILE)
load_fn(sess) start = 0
end = BATCH
for i in range(STEPS):
_, loss = sess.run([train_step, total_loss], feed_dict={
images: training_images[start:end],
labels: training_labels[start:end]}) if i % 30 == 0 or i + 1 == STEPS:
saver.save(sess, TRAIN_FILE, global_step=i)
validation_accuracy = sess.run(evaluation_step, feed_dict={images: validation_images, labels: validation_labels})
print('Step %d: Training loss is %.1f Validation accuracy = %.1f%%' % (i, loss, validation_accuracy * 100.0)) start = end
if start == n_training_example:
start = 0
end = start + BATCH
if end > n_training_example:
end = n_training_example
# 在最后的测试数据上测试正确率。
test_accuracy = sess.run(evaluation_step, feed_dict={
images: testing_images, labels: testing_labels})
print('Final test accuracy = %.1f%%' % (test_accuracy * 100)) if __name__ == '__main__':
main()

吴裕雄 python 神经网络——TensorFlow 花瓣分类与迁移学习(2)的更多相关文章
- 吴裕雄 python 神经网络——TensorFlow 花瓣分类与迁移学习(4)
# -*- coding: utf-8 -*- import glob import os.path import numpy as np import tensorflow as tf from t ...
- 吴裕雄 python 神经网络——TensorFlow 花瓣分类与迁移学习(3)
import glob import os.path import numpy as np import tensorflow as tf from tensorflow.python.platfor ...
- 吴裕雄 python 神经网络——TensorFlow 花瓣分类与迁移学习(1)
import glob import os.path import numpy as np import tensorflow as tf from tensorflow.python.platfor ...
- 吴裕雄 python 神经网络——TensorFlow 花瓣识别2
import glob import os.path import numpy as np import tensorflow as tf from tensorflow.python.platfor ...
- 吴裕雄 python 神经网络——TensorFlow训练神经网络:花瓣识别
import os import glob import os.path import numpy as np import tensorflow as tf from tensorflow.pyth ...
- 吴裕雄 python 神经网络——TensorFlow 循环神经网络处理MNIST手写数字数据集
#加载TF并导入数据集 import tensorflow as tf from tensorflow.contrib import rnn from tensorflow.examples.tuto ...
- 吴裕雄 python 神经网络TensorFlow实现LeNet模型处理手写数字识别MNIST数据集
import tensorflow as tf tf.reset_default_graph() # 配置神经网络的参数 INPUT_NODE = 784 OUTPUT_NODE = 10 IMAGE ...
- 吴裕雄 PYTHON 神经网络——TENSORFLOW 无监督学习处理MNIST手写数字数据集
# 导入模块 import numpy as np import tensorflow as tf import matplotlib.pyplot as plt # 加载数据 from tensor ...
- 吴裕雄 python 神经网络——TensorFlow 使用卷积神经网络训练和预测MNIST手写数据集
import tensorflow as tf import numpy as np from tensorflow.examples.tutorials.mnist import input_dat ...
随机推荐
- HDU 6740 kmp最小循环节
题意:给一个无线循环小数的前几位,给n,m 选择其中一种出现在前几位的循环节方式(a个数),循环节的长度b 使得n*a-m*b最大 样例: 2 1 12.1212 输出 6 选择2,2*1-1*1=1 ...
- vue基础api
vue比jq好处 1jq 频繁操作dom 增加了性能消耗 vue 模拟dom 从内存中拿 2jq 数据没有统一管理 vue 统一管理数据 3vue 组件开发可以提取出公共的html或js mv*好 ...
- X-Forwarded-For注入漏洞过程记录
一.题目地址 https://www.mozhe.cn/bug/detail/QWxmdFFhVURDay90L0wxdmJXSkl5Zz09bW96aGUmozhe 二.使用工具 FireFox浏览 ...
- 使用Idea构建springmvc框架,出现no bean named 'cacheManager' is defined 错误
由于IDEA的自动补全功能非常强大,当你配置 <mvc:annotation-driven/> 后编译器会帮你自动补全上面两个配置文件约束.这个时候如果你没注意的就会爆出一个很莫名奇妙的错 ...
- C#中如何将字符串或者字符串数组写入文本文件
using System; using System.Collections.Generic; using System.Linq; using System.Text; using System.T ...
- Flask 教程 第十五章:优化应用结构
本文翻译自The Flask Mega-Tutorial Part XV: A Better Application Structure 这是Flask Mega-Tutorial系列的第十五部分,我 ...
- jquery实现点击显示,再点击隐藏
//点击a标签,轮流显示和隐藏<div id="timo" style="background-color:red;height:50px;width:50px;& ...
- Lenet 神经网络-实现篇(1)
Lenet 神经网络结构为: ①输入为 32*32*1 的图片大小,为单通道的输入: ②进行卷积,卷积核大小为 5*5*1,个数为 6,步长为 1,非全零填充模式: ③将卷积结果通过非线性激活函数: ...
- github,gitlab的区别
链接:https://blog.csdn.net/Xiamen_XiaoHong/article/details/83655447 总而言之:gitlab最优
- SVN代码迁移到GITlab
==================================================================================================== ...