opencv 图像细化
图像细化多用于机器人视觉,OCR字符识别等领域,细化后的图像经过去毛刺就成为了我们常说的图像的骨架。
该图像细化代码依据论文: T. Y. ZHANG and C. Y. SUEN A Fast Parallel Algorithm for Thinning Digital Patterns
代码如下:
void ThinSubiteration1(Mat & pSrc, Mat & pDst) {

        int rows = pSrc.rows;

        int cols = pSrc.cols;

        pSrc.copyTo(pDst);

        for(int i = ; i < rows; i++) {

                for(int j = ; j < cols; j++) {

                        if(pSrc.at<float>(i, j) == 1.0f) {

                                /// get 8 neighbors

                                /// calculate C(p)

                                int neighbor0 = (int) pSrc.at<float>( i-, j-);

                                int neighbor1 = (int) pSrc.at<float>( i-, j);

                                int neighbor2 = (int) pSrc.at<float>( i-, j+);

                                int neighbor3 = (int) pSrc.at<float>( i, j+);

                                int neighbor4 = (int) pSrc.at<float>( i+, j+);

                                int neighbor5 = (int) pSrc.at<float>( i+, j);

                                int neighbor6 = (int) pSrc.at<float>( i+, j-);

                                int neighbor7 = (int) pSrc.at<float>( i, j-);

                                int C = int(~neighbor1 & ( neighbor2 | neighbor3)) +

                                                 int(~neighbor3 & ( neighbor4 | neighbor5)) +

                                                 int(~neighbor5 & ( neighbor6 | neighbor7)) +

                                                 int(~neighbor7 & ( neighbor0 | neighbor1));

                                if(C == ) {

                                        /// calculate N

                                        int N1 = int(neighbor0 | neighbor1) +

                                                         int(neighbor2 | neighbor3) +

                                                         int(neighbor4 | neighbor5) +

                                                         int(neighbor6 | neighbor7);

                                        int N2 = int(neighbor1 | neighbor2) +

                                                         int(neighbor3 | neighbor4) +

                                                         int(neighbor5 | neighbor6) +

                                                         int(neighbor7 | neighbor0);

                                        int N = min(N1,N2);

                                        if ((N == ) || (N == )) {

                                                /// calculate criteria 3

                                                int c3 = ( neighbor1 | neighbor2 | ~neighbor4) & neighbor3;

                                                if(c3 == ) {

                                                        pDst.at<float>( i, j) = 0.0f;

                                                }

                                        }

                                }

                        }

                }

        }

}

void ThinSubiteration2(Mat & pSrc, Mat & pDst) {

        int rows = pSrc.rows;

        int cols = pSrc.cols;

        pSrc.copyTo( pDst);

        for(int i = ; i < rows; i++) {

                for(int j = ; j < cols; j++) {

                        if (pSrc.at<float>( i, j) == 1.0f) {

                                /// get 8 neighbors

                                /// calculate C(p)

                            int neighbor0 = (int) pSrc.at<float>( i-, j-);

                            int neighbor1 = (int) pSrc.at<float>( i-, j);

                            int neighbor2 = (int) pSrc.at<float>( i-, j+);

                            int neighbor3 = (int) pSrc.at<float>( i, j+);

                            int neighbor4 = (int) pSrc.at<float>( i+, j+);

                            int neighbor5 = (int) pSrc.at<float>( i+, j);

                            int neighbor6 = (int) pSrc.at<float>( i+, j-);

                            int neighbor7 = (int) pSrc.at<float>( i, j-);

                                int C = int(~neighbor1 & ( neighbor2 | neighbor3)) +

                                        int(~neighbor3 & ( neighbor4 | neighbor5)) +

                                        int(~neighbor5 & ( neighbor6 | neighbor7)) +

                                        int(~neighbor7 & ( neighbor0 | neighbor1));

                                if(C == ) {

                                        /// calculate N

                                        int N1 = int(neighbor0 | neighbor1) +

                                                int(neighbor2 | neighbor3) +

                                                int(neighbor4 | neighbor5) +

                                                int(neighbor6 | neighbor7);

                                        int N2 = int(neighbor1 | neighbor2) +

                                                int(neighbor3 | neighbor4) +

                                                int(neighbor5 | neighbor6) +

                                                int(neighbor7 | neighbor0);

                                        int N = min(N1,N2);

                                        if((N == ) || (N == )) {

                                                int E = (neighbor5 | neighbor6 | ~neighbor0) & neighbor7;

                                                if(E == ) {

                                                        pDst.at<float>(i, j) = 0.0f;

                                                }

                                        }

                                }

                        }

                }

        }

}
int main(int argc, char* argv[])

{

    Mat src = imread("D://thinning.png", );

    Mat inputarray = src(Rect(, , src.cols - , src.rows - ));

    threshold(inputarray, inputarray, , , CV_THRESH_BINARY);

    Mat outputarray(inputarray.rows,inputarray.cols,CV_32FC1);

    bool bDone = false;

    int rows = inputarray.rows;

    int cols = inputarray.cols;

    inputarray.convertTo(inputarray, CV_32FC1);

    inputarray.copyTo(outputarray);

    //outputarray.convertTo(outputarray, CV_32FC1);

    /// pad source

    Mat p_enlarged_src = Mat(rows + , cols + , CV_32FC1);

    for (int i = ; i < (rows + ); i++) {

        p_enlarged_src.at<float>(i, ) = 0.0f;

        p_enlarged_src.at<float>(i, cols + ) = 0.0f;

    }

    for (int j = ; j < (cols + ); j++) {

        p_enlarged_src.at<float>(, j) = 0.0f;

        p_enlarged_src.at<float>(rows + , j) = 0.0f;

    }

    for (int i = ; i < rows; i++) {

        for (int j = ; j < cols; j++) {

            if (inputarray.at<float>(i, j) >= 20.0f) {

                p_enlarged_src.at<float>(i + , j + ) = 1.0f;

            }

            else

                p_enlarged_src.at<float>(i + , j + ) = 0.0f;

        }

    }

    /// start to thin

    Mat p_thinMat1 = Mat::zeros(rows + , cols + , CV_32FC1);

    Mat p_thinMat2 = Mat::zeros(rows + , cols + , CV_32FC1);

    Mat p_cmp = Mat::zeros(rows + , cols + , CV_8UC1);

    while (bDone != true) {

        /// sub-iteration 1

        ThinSubiteration1(p_enlarged_src, p_thinMat1);

        /// sub-iteration 2

        //ThinSubiteration2(p_thinMat1, p_thinMat2);

        /// compare

        compare(p_enlarged_src, p_thinMat1, p_cmp, CV_CMP_EQ);

        /// check

        int num_non_zero = countNonZero(p_cmp);

        if (num_non_zero == (rows + ) * (cols + )) {

            bDone = true;

        }

        /// copy

        p_thinMat1.copyTo(p_enlarged_src);

    }

    // copy result

    for (int i = ; i < rows; i++) {

        for (int j = ; j < cols; j++) {

            outputarray.at<float>(i, j) = p_enlarged_src.at<float>(i + , j + );

        }

    }

    imshow("src", inputarray);

    imshow("dst", p_enlarged_src);

    waitKey();

    return ;

}
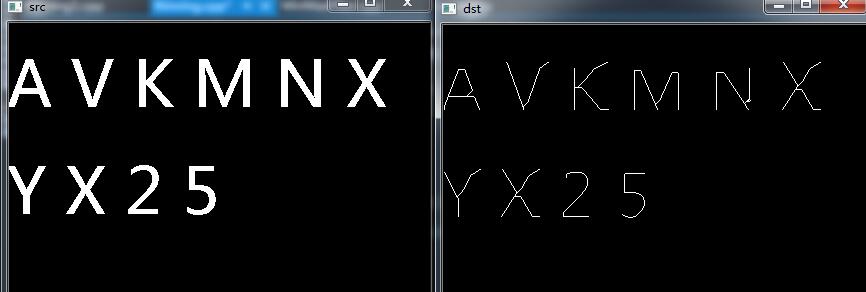
附上效果图:
未完待续。。。。
opencv 图像细化的更多相关文章
- OpenCV图像细化的一个例子
转自:http://blog.csdn.net/zfdxx369/article/details/9091953?utm_source=tuicool 本文是zhang的一篇经典图像细化论文,效果很好 ...
- 【opencv】图像细化
[原文:http://blog.csdn.net/qianchenglenger/article/details/19332011] 在我们进行图像处理的时候,有可能需要对图像进行细化,提取出图像的骨 ...
- SSE图像算法优化系列三十二:Zhang\Guo图像细化算法的C语言以及SIMD指令优化
二值图像的细化算法也有很多种,比较有名的比如Hilditch细化.Rosenfeld细化.基于索引表的细化.还有Opencv自带的THINNING_ZHANGSUEN.THINNING_GUOHALL ...
- OpenCV图像金字塔:高斯金字塔、拉普拉斯金字塔与图片尺寸缩放
这篇已经写得很好,真心给作者点个赞.题目都是直接转过来的,直接去看吧. Reference Link : http://blog.csdn.net/poem_qianmo/article/detail ...
- 【OpenCV新手教程之十三】OpenCV图像金字塔:高斯金字塔、拉普拉斯金字塔与图片尺寸缩放
本系列文章由@浅墨_毛星云 出品,转载请注明出处. 文章链接:http://blog.csdn.net/poem_qianmo/article/details/26157633 作者:毛星云(浅墨) ...
- Opencv 图像叠加 添加水印
Opencv 图像叠加 添加水印 C++: void Mat::copyTo(OutputArray m) const C++: void Mat::copyTo(OutputArray m, Inp ...
- opencv图像读取-imread
前言 图像的读取和保存一定要注意imread函数的各个参数及其意义,尽量不要使用默认参数,否则就像数据格式出现错误(here)一样,很难查找错误原因的: re: 1.opencv图像的读取与保存; 完
- 学习 opencv---(12)OpenCV 图像金字塔:高斯金字塔,拉普拉斯金字塔与图片尺寸缩放
在这篇文章里,我们一起学习下 图像金字塔 的一些基本概念,如何使用OpenCV函数pyrUp和pyrDown 对图像进行向上和向下采样,以及了解专门用于缩放图像尺寸的resize函数的用法.此博文一共 ...
- [OpenCV Qt教程] 在Qt图形界面中显示OpenCV图像的OpenGL Widget(第二部分)
本文译自:http://www.robot-home.it/blog/en/software/tutorial-opencv-qt-opengl-widget-per-visualizzare-imm ...
随机推荐
- oracle中hint 详解
Hint概述 基于代价的优化器是很聪明的,在绝大多数情况下它会选择正确的优化器,减轻了DBA的负担.但有时它也聪明反被聪明误,选择了很差的执行计划,使某个语句的执行变得奇慢无比. 此时就需要DBA进行 ...
- python图像特征提取
这里使用的是python 3.5 .opencv_python-3.4.0+contrib,特征提取的代码如下: import cv2 img = cv2.imread("feature.j ...
- 浅谈Java/Android下的注解
什么是注解 java.lang.annotation,接口 Annotation,在JDK5.0及以后版本引入. 注解是代码里的特殊标记,这些标记可以在编译.类加载.运行时被读取,并执行相应的处理.通 ...
- 每天一个Linux常用命令 命令
指令名称 : chmod 使用权限 : 所有使用者 使用方式 :chmod 777 /root 第一个7指文件所属用户,第二个7指文件所属用户的用户组,第三个7指其他用户 说明 : Linux/Uni ...
- Qt:代码里存在中文时带来的问题
一.报错: 常量中有换行符 方法1: 把文本文件转化为unicode或者utf-8, 同是还要带上QString::fromLocal8Bit() 还有其他方法,感觉不靠谱 二.显示异常:乱码 QSt ...
- koa2 的处理请求体koa-bodyparser koa-router 的中间件的学习
1.官网 https://www.npmjs.com/package/koa-router https://www.npmjs.com/package/koa-bodyparser 2. demo / ...
- Delphi DBgrid 动态点击事件
错误的写法: DBGrid1CellClick(DBGrid1.Columns[ DBGrid1.DataSource.DataSet.RecNo ]); //执行点击事件 正确的写法: DBGrid ...
- python3 投票
import urllib.request # cd C:\Python36-32\Scripts # pip install BeautifulSoup from bs4 import Beauti ...
- PHP ftp_delete() 函数
定义和用法 ftp_delete() 函数删除 FTP 服务器上的一个文件. 如果成功,该函数返回 TRUE.如果失败,则返回 FALSE 和一个警告. 语法 ftp_delete(ftp_conne ...
- Http请求工具类 httputil
package com.snowfigure.kits.net; import java.io.BufferedReader; import java.io.IOException; import j ...