Centos7 搭建lnmp环境 (centos7+nginx+MySQL5.7.9+PHP7)
阿里云一台服务器出现问题!
我估计是一键安装包环境的原因,所以打算重新搭建下环境!
首先,当然是先做好快照!安全第一!
对系统盘做更换系统操作,装上纯净版的centos。
装好后,进入系统
一、挂载数据盘
df -h

只有系统盘了,挂载上原来的数据盘
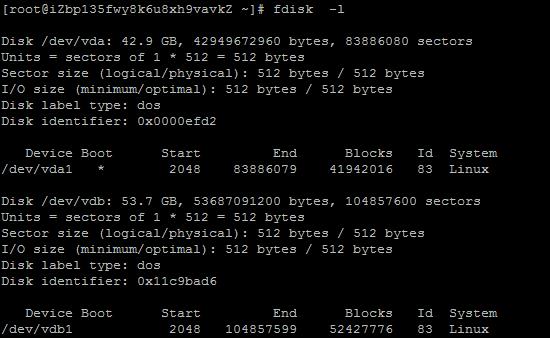
fdisk -l

看到数据盘了/dev/vdb1
挂载上这个数据盘,
mkdir /data0

mount /dev/vdb1 /data0

然后写入分区:
echo '/dev/vdb1 /data0 ext4 defaults 0 0' >> /etc/fstab
不写入分区表,重启后又要挂载的。
怎么知道分区类型是ext4,用这个命令:
df -hT
好的成功了!
二、安装nginx
首先更新系统软件
# yum update
安装nginx
1.安装nginx源
# yum localinstall http://nginx.org/packages/centos/7/noarch/RPMS/nginx-release-centos-7-0.el7.ngx.noarch.rpm
2.安装nginx
# yum install nginx
3.启动nginx
# service nginx start
Redirecting to /bin/systemctl start nginx.service
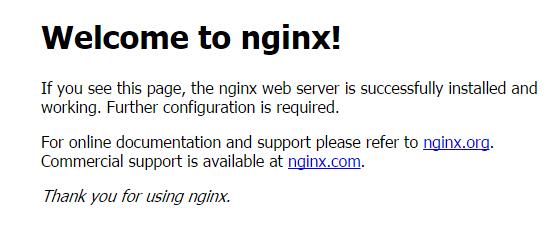
4.访问http://你的ip/
如果成功安装会出来nginx默认的欢迎界面

三、安装MySQL5.7.*
1.安装mysql源
# yum localinstall http://dev.mysql.com/get/mysql57-community-release-el7-7.noarch.rpm
2.安装mysql
# yum install mysql-community-server
3.安装mysql的开发包,以后会有用
# yum install mysql-community-devel
4.启动mysql
# service mysqld start
Redirecting to /bin/systemctl start mysqld.service
5.查看mysql启动状态
# service mysqld status
出现pid
证明启动成功
6.获取mysql默认生成的密码
# grep 'temporary password' /var/log/mysqld.log

选中的就是密码。
7.换成自己的密码
# mysql -uroot -p
Enter password:输入上页的密码,进入mysql
8. 更换密码
|
1
|
mysql> ALTER USER 'root'@'localhost' IDENTIFIED BY 'MyNewPasdfs4!'; |
这个密码一定要足够复杂,不然会不让你改,提示密码不合法;
9.退出mysql并试用下新密码
mysql> quit;

mysql -uroot -p
确认密码正确
四、编译安装php7.0.0
1.下载php7源码包
# cd /root & wget -O php7.tar.gz http://cn2.php.net/get/php-7.0.1.tar.gz/from/this/mirror
2.解压源码包
# tar -xvf php7.tar.gz
3.进入目录
# cd php-7.0.1
4.安装php依赖包
# yum install libxml2 libxml2-devel openssl openssl-devel bzip2 bzip2-devel libcurl libcurl-devel libjpeg libjpeg-devel libpng libpng-devel freetype freetype-devel gmp gmp-devel libmcrypt libmcrypt-devel readline readline-devel libxslt libxslt-devel
5.编译配置,这里如果上一步的某些依赖包没有安装好,就会遇到很多configure error,我们一一解决,安装上相关软件开发包就可以

# ./configure \

--prefix=/usr/local/php \

--with-config-file-path=/etc \

--enable-fpm \

--with-fpm-user=nginx  \

--with-fpm-group=nginx \

--enable-inline-optimization \

--disable-debug \

--disable-rpath \

--enable-shared  \

--enable-soap \

--with-libxml-dir \

--with-xmlrpc \

--with-openssl \

--with-mcrypt \

--with-mhash \

--with-pcre-regex \

--with-sqlite3 \

--with-zlib \

--enable-bcmath \

--with-iconv \

--with-bz2 \

--enable-calendar \

--with-curl \

--with-cdb \

--enable-dom \

--enable-exif \

--enable-fileinfo \

--enable-filter \

--with-pcre-dir \

--enable-ftp \

--with-gd \

--with-openssl-dir \

--with-jpeg-dir \

--with-png-dir \

--with-zlib-dir  \

--with-freetype-dir \

--enable-gd-native-ttf \

--enable-gd-jis-conv \

--with-gettext \

--with-gmp \

--with-mhash \

--enable-json \

--enable-mbstring \

--enable-mbregex \

--enable-mbregex-backtrack \

--with-libmbfl \

--with-onig \

--enable-pdo \

--with-mysqli=mysqlnd \

--with-pdo-mysql=mysqlnd \

--with-zlib-dir \

--with-pdo-sqlite \

--with-readline \

--enable-session \

--enable-shmop \

--enable-simplexml \

--enable-sockets  \

--enable-sysvmsg \

--enable-sysvsem \

--enable-sysvshm \

--enable-wddx \

--with-libxml-dir \

--with-xsl \

--enable-zip \

--enable-mysqlnd-compression-support \

--with-pear \

--enable-opcache

configure error:
1.configure: error: xml2-config not found. Please check your libxml2 installation.
解决:
|
1
|
<span style="color: #ff0000"># yum install libxml2 libxml2-devel</span> |
2.configure: error: Cannot find OpenSSL's <evp.h>
解决:
|
1
|
<span style="color: #ff0000"># yum install openssl openssl-devel</span> |
3.configure: error: Please reinstall the BZip2 distribution
解决:
|
1
|
<span style="color: #ff0000"># yum install bzip2 bzip2-devel</span> |
4.configure: error: Please reinstall the libcurl distribution - easy.h should be in <curl-dir>/include/curl/
解决:
|
1
|
<span style="color: #ff0000"># yum install libcurl libcurl-devel</span> |
5.If configure fails try --with-webp-dir=<DIR> configure: error: jpeglib.h not found.
解决:
|
1
|
<span style="color: #ff0000"># yum install libjpeg libjpeg-devel</span> |
6.If configure fails try --with-webp-dir=<DIR>
checking for jpeg_read_header in -ljpeg... yes
configure: error: png.h not found.
解决:
|
1
|
<span style="color: #ff0000"># yum install libpng libpng-devel</span> |
7.If configure fails try --with-webp-dir=<DIR>
checking for jpeg_read_header in -ljpeg... yes
checking for png_write_image in -lpng... yes
If configure fails try --with-xpm-dir=<DIR>
configure: error: freetype-config not found.
解决:
|
1
|
<span style="color: #ff0000"># yum install freetype freetype-devel</span> |
8.configure: error: Unable to locate gmp.h
解决:
|
1
|
<span style="color: #ff0000"># yum install gmp gmp-devel</span> |
9.configure: error: mcrypt.h not found. Please reinstall libmcrypt.
解决:
# yum install libmcrypt libmcrypt-devel
10.configure: error: Please reinstall readline - I cannot find readline.h
解决:
|
1
|
<span style="color: #ff0000"># yum install readline readline-devel</span> |
11.configure: error: xslt-config not found. Please reinstall the libxslt >= 1.1.0 distribution
解决:
|
1
|
<span style="color: #ff0000"># yum install libxslt libxslt-devel</span> |
6.编译与安装
# make && make install
这里要make好久,要耐心一下
7.添加 PHP 命令到环境变量
# vim /etc/profile
在末尾加入
PATH=$PATH:/usr/local/php/bin
export PATH
要使改动立即生效执行
# source /etc/profile
查看环境变量
# echo $PATH
查看php版本
# php -v
8.配置php-fpm
# cp php.ini-production /etc/php.ini
# cp /usr/local/php/etc/php-fpm.conf.default /usr/local/php/etc/php-fpm.conf

# cp /usr/local/php/etc/php-fpm.d/www.conf.default /usr/local/php/etc/php-fpm.d/www.conf
# cp sapi/fpm/init.d.php-fpm /etc/init.d/php-fpm
# chmod +x /etc/init.d/php-fpm
9.启动php-fpm
# /etc/init.d/php-fpm start
五、配置nginx虚拟机,绑定域名
# vim /etc/nginx/conf.d/php7.aaa.com.conf
这里可以把php7.aaa.com.conf改成自己的域名
把下面的内容复制到php7.aaa.com.conf里
server{

    listen 80;

    server_name  php7.aaa.com;

    root /var/www/html/php7.aaa.com; # 该项要修改为你准备存放相关网页的路径

    location / {

        index  index.php index.html index.htm;

         #如果请求既不是一个文件,也不是一个目录,则执行一下重写规则

         if (!-e $request_filename)

         {

            #地址作为将参数rewrite到index.php上。

            rewrite ^/(.*)$ /index.php/$1;

            #若是子目录则使用下面这句,将subdir改成目录名称即可。

            #rewrite ^/subdir/(.*)$ /subdir/index.php/$1;

         }

    }

    #proxy the php scripts to php-fpm

    location ~ \.php {

            include fastcgi_params;

            ##pathinfo支持start

            #定义变量 $path_info ,用于存放pathinfo信息

            set $path_info "";

            #定义变量 $real_script_name,用于存放真实地址

            set $real_script_name $fastcgi_script_name;

            #如果地址与引号内的正则表达式匹配

            if ($fastcgi_script_name ~ "^(.+?\.php)(/.+)$") {

                    #将文件地址赋值给变量 $real_script_name

                    set $real_script_name $1;

                    #将文件地址后的参数赋值给变量 $path_info

                    set $path_info $2;

            }

            #配置fastcgi的一些参数

            fastcgi_param SCRIPT_FILENAME $document_root$real_script_name;

            fastcgi_param SCRIPT_NAME $real_script_name;

            fastcgi_param PATH_INFO $path_info;

            ###pathinfo支持end

        fastcgi_intercept_errors on;

        fastcgi_pass   127.0.0.1:9000;

    }

    location ^~ /data/runtime {

    return 404;

    }

    location ^~ /application {

    return 404;

    }

    location ^~ /simplewind {

    return 404;

    }

}
2.重启nginx
# service nginx reload
3.
# vim /var/www/html/php7.aaa.com/index.php
把下面的代码复制到这个文件 里
<?php
phpinfo();
4.查看访问http://php7.aaa.com
ok!收工!
Centos7 搭建lnmp环境 (centos7+nginx+MySQL5.7.9+PHP7)的更多相关文章
- CentOS7——搭建LNMP环境(WordPress案例)
CentOS7--搭建LNMP环境(WordPress案例) LNMP组成介绍 LNMP(Linux-Nginx-MySQL-PHP)网站架构是目前国际流行的Web框架,该框架包括:Linux操作系统 ...
- 小白简单快速搭建lnmp环境(centos7)
本来想着自己搭建lnmp,由于php包下载不下来因此这次本人使用的lnmp一键包搭建的环境(很遗憾还没有php7.3.5)很详细并且方便快捷网址https://lnmp.org/install.htm ...
- linux中Centos7搭建lnmp环境
1.安装yum yum update 2.安装nginx源: yum localinstall http://nginx.org/packages/centos/7/noarch/RPMS/nginx ...
- CentOS7搭建LNMP环境
以前写的过时了,重新发一篇新的. 安装PHP 下载官网:https://www.php.net/downloads.php 为了方便,我存了现成的 百度网盘:https://pan.baidu.com ...
- 搭建lnmp环境,nginx的配置文件/etc/nginx/nginx.conf
#user nobody; worker_processes 1; #error_log logs/error.log; #error_log logs/error.log notice; #erro ...
- Vmware搭建LNMP环境(Centos7+Nginx+Mysql+PHP7.1.8)
参考:1.Linux学习之CentOS(一)----在VMware虚拟机中安装CentOS 7(图文教程) 2.Centos7搭建LNMP环境 3.MySQL5.7修改默认root密码 4.CentO ...
- Docker之使用Docker-compose搭建LNMP环境
之前有随笔介绍使用Docker-compose搭建LNMP环境(centos6 php5.6) https://www.cnblogs.com/minseo/p/10146982.html 本文介绍D ...
- centos7 yum搭建lnmp环境及配置wordpress超详细教程
yum安装lnmp环境是最方便,最快捷的一种方法.源码编译安装需要花费大量的人类时间,当然源码编译可以个性化配置一些其它功能.目前来说,yum安装基本满足我们搭建web服务器的需求. 本文是我根据近期 ...
- 手动编译部署LNMP环境(CentOS7.5+Nginx-1.18.0+MySQL-5.7.30+PHP-7.4.14)
在平时运维工作中,经常需要用到LNMP应用框架.LNMP环境是指在Linux系统下,由Nginx + MySQL + PHP组成的网站服务器架构. 可参考前面的文章: 如何在CentOS 7上搭建LA ...
随机推荐
- Android学习之路(转载)
原文地址:http://stormzhang.github.io/android/2014/07/07/learn-android-from-rookie/ 硬件 电脑–推荐Mac 首先声明我不是果粉 ...
- Jenkins官方教程地址入口
https://jenkins.io/doc/book/ 其实Jenkins的核心在于插件,官方教程只能是基本简单的,所以要找教程最好对应插件来找.
- Linux/CentOS实现交换机-简单的交换机实现
个人理解: 1.交换机的核心在于Mac地址学习,使其能在全双工/半双工下进行转发工作. 2.对于专业的交换机来说,使用的是专业的网络芯片并自己实现里面的协议,比如说华为的,为什么能卖那么贵,贵在于网络 ...
- java一些常用并发工具示例
最近把<java并发编程实战>-Java Consurrency in Practice 重温了一遍,把书中提到的一些常用工具记录于此: 一.闭锁(门栓)- CountDownLatch ...
- Android的GridView控件点击图片变暗效果
@Override public void onCreate(Bundle savedInstanceState) { super.onCreate(savedInstanceState); setC ...
- 一个.net程序客户端更新方案
客户端程序一个很大的不便的地方就是程序集更新,本文这里简单的介绍一种通用的客户端更新方案.这个方案依赖程序集的动态加载,具体方案如下: 将程序集存储在一个文件数据库中,客户端所有程序集直接从文件数据库 ...
- Chrome中使用老的标题栏界面
Chrome 69中启用了新的UI界面,看着更加秀气了. 但新UI一个不好用的地方是标签栏太高了,留给windows标题栏的空白太小,导致拖动窗口位置非常不方便,如下是一个解决方法: 在地址栏输入: ...
- STM32的CRC32 实现代码 -- Ether
uint32_t reverse_32( uint32_t data ) { asm("rbit r0,r0"); return data; } ; uint32_t crc32_ ...
- 爬虫IP被禁的简单解决方法
爬虫以前听上去好厉害好神秘的样子,用好了可以成就像Google.百度这样的索索引擎,用不好可以凭借不恰当的高并发分分钟崩掉一个小型网站.写到这里想到12306每年扛住的并发请求量,觉得好牛逼. 爬虫和 ...
- W3wp.exe占用CPU及内存资源
问题背景 最近使用一款系统,但是经常出现卡顿或者用户账号登录不了系统.后来将问题定位在了服务器中的“w3wp.exe”这个进程.在我们的用户对系统进行查询.修改等操作后,该进程占用大量的CPU以及内存 ...
