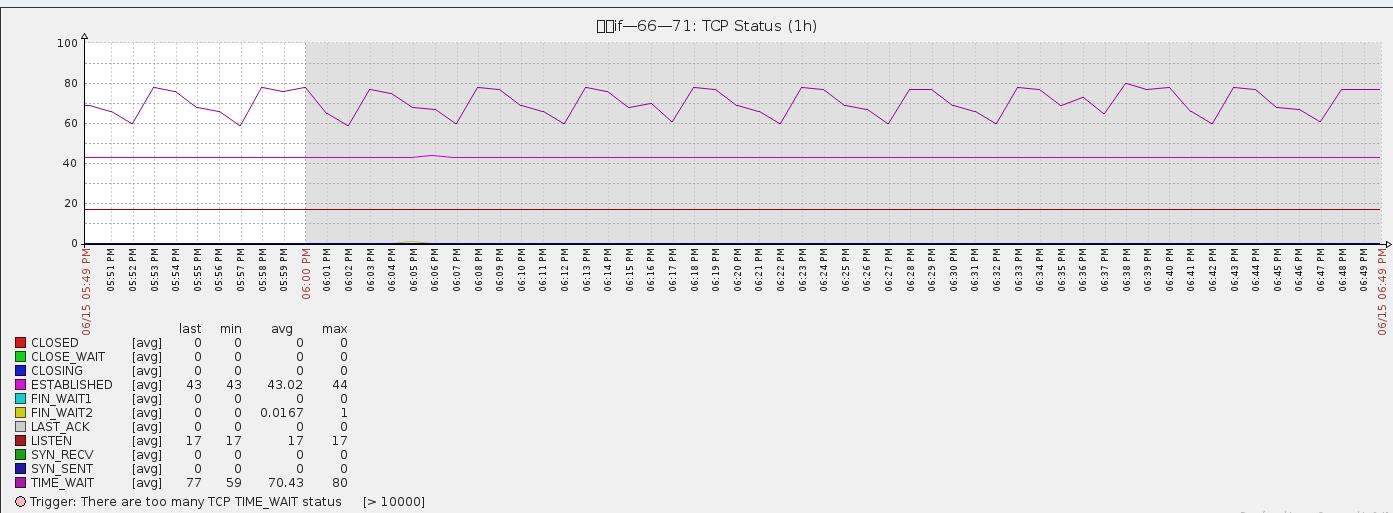
zabbix加入TCP连接数及状态的监控
一 监控原理:
[root@ nginx]# /bin/netstat -an|awk '/^tcp/{++S[$NF]}END{for(a in S) print a,S[a]}'

TIME_WAIT

FIN_WAIT2

ESTABLISHED

LISTEN
可以使用man netstat查看TCP的各种状态信息描述

ESTABLISHED       socket已经建立连接

CLOSED            socket没有被使用,无连接

CLOSING           服务器端和客户端都同时关闭连接

CLOSE_WAIT        等待关闭连接

TIME_WAIT         表示收到了对方的FIN报文,并发送出了ACK报文,等待2MSL后就可回到CLOSED状态

LAST_ACK          远端关闭,当前socket被动关闭后发送FIN报文,等待对方ACK报文

LISTEN            监听状态

SYN_RECV          接收到SYN报文

SYN_SENT          已经发送SYN报文

FIN_WAIT1         The socket is closed, and the connection is shutting down

FIN_WAIT2         Connection is closed, and the socket is waiting for a shutdown from the remote end.
二 监控脚本:
tcp_conn_status.sh,放在zabbix-agent的应用服务器上/usr/local/zabbix/bin/tcp_conn_status.sh
#!/bin/bash

#this script is used to get tcp and udp connetion status

#tcp status

metric=$

tmp_file=/tmp/tcp_status.txt

/bin/netstat -an|awk '/^tcp/{++S[$NF]}END{for(a in S) print a,S[a]}' > $tmp_file

case $metric in

   closed)

          output=$(awk '/CLOSED/{print $2}' $tmp_file)

          if [ "$output" == "" ];then

             echo

          else

             echo $output

          fi

        ;;

   listen)

          output=$(awk '/LISTEN/{print $2}' $tmp_file)

          if [ "$output" == "" ];then

             echo

          else

             echo $output

          fi

        ;;

   synrecv)

          output=$(awk '/SYN_RECV/{print $2}' $tmp_file)

          if [ "$output" == "" ];then

             echo

          else

             echo $output

          fi

        ;;

   synsent)

          output=$(awk '/SYN_SENT/{print $2}' $tmp_file)

          if [ "$output" == "" ];then

             echo

          else

             echo $output

          fi

        ;;

   established)

          output=$(awk '/ESTABLISHED/{print $2}' $tmp_file)

          if [ "$output" == "" ];then

             echo

          else

             echo $output

          fi

        ;;

   timewait)

          output=$(awk '/TIME_WAIT/{print $2}' $tmp_file)

          if [ "$output" == "" ];then

             echo

          else

             echo $output

          fi

        ;;

   closing)

          output=$(awk '/CLOSING/{print $2}' $tmp_file)

          if [ "$output" == "" ];then

             echo

          else

             echo $output

          fi

        ;;

   closewait)

          output=$(awk '/CLOSE_WAIT/{print $2}' $tmp_file)

          if [ "$output" == "" ];then

             echo

          else

             echo $output

          fi

        ;;

   lastack)

          output=$(awk '/LAST_ACK/{print $2}' $tmp_file)

          if [ "$output" == "" ];then

             echo

          else

             echo $output

          fi

         ;;

   finwait1)

          output=$(awk '/FIN_WAIT1/{print $2}' $tmp_file)

          if [ "$output" == "" ];then

             echo

          else

             echo $output

          fi

         ;;

   finwait2)

          output=$(awk '/FIN_WAIT2/{print $2}' $tmp_file)

          if [ "$output" == "" ];then

             echo

          else

             echo $output

          fi

         ;;

         *)

          echo -e "\e[033mUsage: sh  $0 [closed|closing|closewait|synrecv|synsent|finwait1|finwait2|listen|established|lastack|timewait]\e[0m"

esac
三 zabbix-agent配置
1、修改tcp_conn_status.sh文件权限:
chmod o+x /usr/local/zabbix/bin/tcp_conn_status.sh
2、在/usr/local/zabbix/etc目录下,创建文件tcp-status-params.conf
vi /usr/local/zabbix/etc/tcp-status-params.conf
3、在tcp-status-params.conf加入以下内容:
UserParameter=tcp.status[*],/usr/local/zabbix/bin/tcp_conn_status.sh $1
4、创建日志文件
# vi /tmp/tcp_status.txt

# chown zabbix:zabbix tcp_status.txt

# chmod  tcp_status.txt
5、在/usr/local/zabbix/etc/zabbix_agentd.conf加入以下配置:
UserParameter=tcp.status[*],/usr/local/zabbix/bin/tcp_conn_status.sh $
四 重启zabbix-agent服务
/etc/init.d/zabbix_agentd restart
五 添加监控模板
<?xml version="1.0" encoding="UTF-8"?>
<zabbix_export>
<version>2.0</version>
<date>--04T09::57Z</date>
<groups>
<group>
<name>Templates</name>
</group>
</groups>
<templates>
<template>
<template>Template TCP Connection Status</template>
<name>Template TCP Connection Status</name>
<groups>
<group>
<name>Templates</name>
</group>
</groups>
<applications>
<application>
<name>TCP Status</name>
</application>
</applications>
<items>
<item>
<name>CLOSED</name>
<type></type>
<snmp_community/>
<multiplier></multiplier>
<snmp_oid/>
<key>tcp.status[closed]</key>
<delay></delay>
<history></history>
<trends></trends>
<status></status>
<value_type></value_type>
<allowed_hosts/>
<units/>
<delta></delta>
<snmpv3_contextname/>
<snmpv3_securityname/>
<snmpv3_securitylevel></snmpv3_securitylevel>
<snmpv3_authprotocol></snmpv3_authprotocol>
<snmpv3_authpassphrase/>
<snmpv3_privprotocol></snmpv3_privprotocol>
<snmpv3_privpassphrase/>
<formula></formula>
<delay_flex/>
<params/>
<ipmi_sensor/>
<data_type></data_type>
<authtype></authtype>
<username/>
<password/>
<publickey/>
<privatekey/>
<port/>
<description/>
<inventory_link></inventory_link>
<applications>
<application>
<name>TCP Status</name>
</application>
</applications>
<valuemap/>
</item>
<item>
<name>CLOSE_WAIT</name>
<type></type>
<snmp_community/>
<multiplier></multiplier>
<snmp_oid/>
<key>tcp.status[closewait]</key>
<delay></delay>
<history></history>
<trends></trends>
<status></status>
<value_type></value_type>
<allowed_hosts/>
<units/>
<delta></delta>
<snmpv3_contextname/>
<snmpv3_securityname/>
<snmpv3_securitylevel></snmpv3_securitylevel>
<snmpv3_authprotocol></snmpv3_authprotocol>
<snmpv3_authpassphrase/>
<snmpv3_privprotocol></snmpv3_privprotocol>
<snmpv3_privpassphrase/>
<formula></formula>
<delay_flex/>
<params/>
<ipmi_sensor/>
<data_type></data_type>
<authtype></authtype>
<username/>
<password/>
<publickey/>
<privatekey/>
<port/>
<description/>
<inventory_link></inventory_link>
<applications>
<application>
<name>TCP Status</name>
</application>
</applications>
<valuemap/>
</item>
<item>
<name>CLOSING</name>
<type></type>
<snmp_community/>
<multiplier></multiplier>
<snmp_oid/>
<key>tcp.status[closing]</key>
<delay></delay>
<history></history>
<trends></trends>
<status></status>
<value_type></value_type>
<allowed_hosts/>
<units/>
<delta></delta>
<snmpv3_contextname/>
<snmpv3_securityname/>
<snmpv3_securitylevel></snmpv3_securitylevel>
<snmpv3_authprotocol></snmpv3_authprotocol>
<snmpv3_authpassphrase/>
<snmpv3_privprotocol></snmpv3_privprotocol>
<snmpv3_privpassphrase/>
<formula></formula>
<delay_flex/>
<params/>
<ipmi_sensor/>
<data_type></data_type>
<authtype></authtype>
<username/>
<password/>
<publickey/>
<privatekey/>
<port/>
<description/>
<inventory_link></inventory_link>
<applications>
<application>
<name>TCP Status</name>
</application>
</applications>
<valuemap/>
</item>
<item>
<name>ESTABLISHED</name>
<type></type>
<snmp_community/>
<multiplier></multiplier>
<snmp_oid/>
<key>tcp.status[established]</key>
<delay></delay>
<history></history>
<trends></trends>
<status></status>
<value_type></value_type>
<allowed_hosts/>
<units/>
<delta></delta>
<snmpv3_contextname/>
<snmpv3_securityname/>
<snmpv3_securitylevel></snmpv3_securitylevel>
<snmpv3_authprotocol></snmpv3_authprotocol>
<snmpv3_authpassphrase/>
<snmpv3_privprotocol></snmpv3_privprotocol>
<snmpv3_privpassphrase/>
<formula></formula>
<delay_flex/>
<params/>
<ipmi_sensor/>
<data_type></data_type>
<authtype></authtype>
<username/>
<password/>
<publickey/>
<privatekey/>
<port/>
<description/>
<inventory_link></inventory_link>
<applications>
<application>
<name>TCP Status</name>
</application>
</applications>
<valuemap/>
</item>
<item>
<name>FIN_WAIT1</name>
<type></type>
<snmp_community/>
<multiplier></multiplier>
<snmp_oid/>
<key>tcp.status[finwait1]</key>
<delay></delay>
<history></history>
<trends></trends>
<status></status>
<value_type></value_type>
<allowed_hosts/>
<units/>
<delta></delta>
<snmpv3_contextname/>
<snmpv3_securityname/>
<snmpv3_securitylevel></snmpv3_securitylevel>
<snmpv3_authprotocol></snmpv3_authprotocol>
<snmpv3_authpassphrase/>
<snmpv3_privprotocol></snmpv3_privprotocol>
<snmpv3_privpassphrase/>
<formula></formula>
<delay_flex/>
<params/>
<ipmi_sensor/>
<data_type></data_type>
<authtype></authtype>
<username/>
<password/>
<publickey/>
<privatekey/>
<port/>
<description/>
<inventory_link></inventory_link>
<applications>
<application>
<name>TCP Status</name>
</application>
</applications>
<valuemap/>
</item>
<item>
<name>FIN_WAIT2</name>
<type></type>
<snmp_community/>
<multiplier></multiplier>
<snmp_oid/>
<key>tcp.status[finwait2]</key>
<delay></delay>
<history></history>
<trends></trends>
<status></status>
<value_type></value_type>
<allowed_hosts/>
<units/>
<delta></delta>
<snmpv3_contextname/>
<snmpv3_securityname/>
<snmpv3_securitylevel></snmpv3_securitylevel>
<snmpv3_authprotocol></snmpv3_authprotocol>
<snmpv3_authpassphrase/>
<snmpv3_privprotocol></snmpv3_privprotocol>
<snmpv3_privpassphrase/>
<formula></formula>
<delay_flex/>
<params/>
<ipmi_sensor/>
<data_type></data_type>
<authtype></authtype>
<username/>
<password/>
<publickey/>
<privatekey/>
<port/>
<description/>
<inventory_link></inventory_link>
<applications>
<application>
<name>TCP Status</name>
</application>
</applications>
<valuemap/>
</item>
<item>
<name>LAST_ACK</name>
<type></type>
<snmp_community/>
<multiplier></multiplier>
<snmp_oid/>
<key>tcp.status[lastack]</key>
<delay></delay>
<history></history>
<trends></trends>
<status></status>
<value_type></value_type>
<allowed_hosts/>
<units/>
<delta></delta>
<snmpv3_contextname/>
<snmpv3_securityname/>
<snmpv3_securitylevel></snmpv3_securitylevel>
<snmpv3_authprotocol></snmpv3_authprotocol>
<snmpv3_authpassphrase/>
<snmpv3_privprotocol></snmpv3_privprotocol>
<snmpv3_privpassphrase/>
<formula></formula>
<delay_flex/>
<params/>
<ipmi_sensor/>
<data_type></data_type>
<authtype></authtype>
<username/>
<password/>
<publickey/>
<privatekey/>
<port/>
<description/>
<inventory_link></inventory_link>
<applications>
<application>
<name>TCP Status</name>
</application>
</applications>
<valuemap/>
</item>
<item>
<name>LISTEN</name>
<type></type>
<snmp_community/>
<multiplier></multiplier>
<snmp_oid/>
<key>tcp.status[listen]</key>
<delay></delay>
<history></history>
<trends></trends>
<status></status>
<value_type></value_type>
<allowed_hosts/>
<units/>
<delta></delta>
<snmpv3_contextname/>
<snmpv3_securityname/>
<snmpv3_securitylevel></snmpv3_securitylevel>
<snmpv3_authprotocol></snmpv3_authprotocol>
<snmpv3_authpassphrase/>
<snmpv3_privprotocol></snmpv3_privprotocol>
<snmpv3_privpassphrase/>
<formula></formula>
<delay_flex/>
<params/>
<ipmi_sensor/>
<data_type></data_type>
<authtype></authtype>
<username/>
<password/>
<publickey/>
<privatekey/>
<port/>
<description/>
<inventory_link></inventory_link>
<applications>
<application>
<name>TCP Status</name>
</application>
</applications>
<valuemap/>
</item>
<item>
<name>SYN_RECV</name>
<type></type>
<snmp_community/>
<multiplier></multiplier>
<snmp_oid/>
<key>tcp.status[synrecv]</key>
<delay></delay>
<history></history>
<trends></trends>
<status></status>
<value_type></value_type>
<allowed_hosts/>
<units/>
<delta></delta>
<snmpv3_contextname/>
<snmpv3_securityname/>
<snmpv3_securitylevel></snmpv3_securitylevel>
<snmpv3_authprotocol></snmpv3_authprotocol>
<snmpv3_authpassphrase/>
<snmpv3_privprotocol></snmpv3_privprotocol>
<snmpv3_privpassphrase/>
<formula></formula>
<delay_flex/>
<params/>
<ipmi_sensor/>
<data_type></data_type>
<authtype></authtype>
<username/>
<password/>
<publickey/>
<privatekey/>
<port/>
<description/>
<inventory_link></inventory_link>
<applications>
<application>
<name>TCP Status</name>
</application>
</applications>
<valuemap/>
</item>
<item>
<name>SYN_SENT</name>
<type></type>
<snmp_community/>
<multiplier></multiplier>
<snmp_oid/>
<key>tcp.status[synsent]</key>
<delay></delay>
<history></history>
<trends></trends>
<status></status>
<value_type></value_type>
<allowed_hosts/>
<units/>
<delta></delta>
<snmpv3_contextname/>
<snmpv3_securityname/>
<snmpv3_securitylevel></snmpv3_securitylevel>
<snmpv3_authprotocol></snmpv3_authprotocol>
<snmpv3_authpassphrase/>
<snmpv3_privprotocol></snmpv3_privprotocol>
<snmpv3_privpassphrase/>
<formula></formula>
<delay_flex/>
<params/>
<ipmi_sensor/>
<data_type></data_type>
<authtype></authtype>
<username/>
<password/>
<publickey/>
<privatekey/>
<port/>
<description/>
<inventory_link></inventory_link>
<applications>
<application>
<name>TCP Status</name>
</application>
</applications>
<valuemap/>
</item>
<item>
<name>TIME_WAIT</name>
<type></type>
<snmp_community/>
<multiplier></multiplier>
<snmp_oid/>
<key>tcp.status[timewait]</key>
<delay></delay>
<history></history>
<trends></trends>
<status></status>
<value_type></value_type>
<allowed_hosts/>
<units/>
<delta></delta>
<snmpv3_contextname/>
<snmpv3_securityname/>
<snmpv3_securitylevel></snmpv3_securitylevel>
<snmpv3_authprotocol></snmpv3_authprotocol>
<snmpv3_authpassphrase/>
<snmpv3_privprotocol></snmpv3_privprotocol>
<snmpv3_privpassphrase/>
<formula></formula>
<delay_flex/>
<params/>
<ipmi_sensor/>
<data_type></data_type>
<authtype></authtype>
<username/>
<password/>
<publickey/>
<privatekey/>
<port/>
<description/>
<inventory_link></inventory_link>
<applications>
<application>
<name>TCP Status</name>
</application>
</applications>
<valuemap/>
</item>
</items>
<discovery_rules/>
<macros/>
<templates/>
<screens/>
</template>
</templates>
<triggers>
<trigger>
<expression>{Template TCP Connection Status:tcp.status[timewait].last()}></expression>
<name>There are too many TCP TIME_WAIT status</name>
<url/>
<status></status>
<priority></priority>
<description/>
<type></type>
<dependencies/>
</trigger>
</triggers>
<graphs>
<graph>
<name>TCP Status</name>
<width></width>
<height></height>
<yaxismin>0.0000</yaxismin>
<yaxismax>100.0000</yaxismax>
<show_work_period></show_work_period>
<show_triggers></show_triggers>
<type></type>
<show_legend></show_legend>
<show_3d></show_3d>
<percent_left>0.0000</percent_left>
<percent_right>0.0000</percent_right>
<ymin_type_1></ymin_type_1>
<ymax_type_1></ymax_type_1>
<ymin_item_1></ymin_item_1>
<ymax_item_1></ymax_item_1>
<graph_items>
<graph_item>
<sortorder></sortorder>
<drawtype></drawtype>
<color>C80000</color>
<yaxisside></yaxisside>
<calc_fnc></calc_fnc>
<type></type>
<item>
<host>Template TCP Connection Status</host>
<key>tcp.status[closed]</key>
</item>
</graph_item>
<graph_item>
<sortorder></sortorder>
<drawtype></drawtype>
<color>00C800</color>
<yaxisside></yaxisside>
<calc_fnc></calc_fnc>
<type></type>
<item>
<host>Template TCP Connection Status</host>
<key>tcp.status[closewait]</key>
</item>
</graph_item>
<graph_item>
<sortorder></sortorder>
<drawtype></drawtype>
<color>0000C8</color>
<yaxisside></yaxisside>
<calc_fnc></calc_fnc>
<type></type>
<item>
<host>Template TCP Connection Status</host>
<key>tcp.status[closing]</key>
</item>
</graph_item>
<graph_item>
<sortorder></sortorder>
<drawtype></drawtype>
<color>C800C8</color>
<yaxisside></yaxisside>
<calc_fnc></calc_fnc>
<type></type>
<item>
<host>Template TCP Connection Status</host>
<key>tcp.status[established]</key>
</item>
</graph_item>
<graph_item>
<sortorder></sortorder>
<drawtype></drawtype>
<color>00C8C8</color>
<yaxisside></yaxisside>
<calc_fnc></calc_fnc>
<type></type>
<item>
<host>Template TCP Connection Status</host>
<key>tcp.status[finwait1]</key>
</item>
</graph_item>
<graph_item>
<sortorder></sortorder>
<drawtype></drawtype>
<color>C8C800</color>
<yaxisside></yaxisside>
<calc_fnc></calc_fnc>
<type></type>
<item>
<host>Template TCP Connection Status</host>
<key>tcp.status[finwait2]</key>
</item>
</graph_item>
<graph_item>
<sortorder></sortorder>
<drawtype></drawtype>
<color>C8C8C8</color>
<yaxisside></yaxisside>
<calc_fnc></calc_fnc>
<type></type>
<item>
<host>Template TCP Connection Status</host>
<key>tcp.status[lastack]</key>
</item>
</graph_item>
<graph_item>
<sortorder></sortorder>
<drawtype></drawtype>
<color></color>
<yaxisside></yaxisside>
<calc_fnc></calc_fnc>
<type></type>
<item>
<host>Template TCP Connection Status</host>
<key>tcp.status[listen]</key>
</item>
</graph_item>
<graph_item>
<sortorder></sortorder>
<drawtype></drawtype>
<color></color>
<yaxisside></yaxisside>
<calc_fnc></calc_fnc>
<type></type>
<item>
<host>Template TCP Connection Status</host>
<key>tcp.status[synrecv]</key>
</item>
</graph_item>
<graph_item>
<sortorder></sortorder>
<drawtype></drawtype>
<color></color>
<yaxisside></yaxisside>
<calc_fnc></calc_fnc>
<type></type>
<item>
<host>Template TCP Connection Status</host>
<key>tcp.status[synsent]</key>
</item>
</graph_item>
<graph_item>
<sortorder></sortorder>
<drawtype></drawtype>
<color></color>
<yaxisside></yaxisside>
<calc_fnc></calc_fnc>
<type></type>
<item>
<host>Template TCP Connection Status</host>
<key>tcp.status[timewait]</key>
</item>
</graph_item>
</graph_items>
</graph>
</graphs>
</zabbix_export>
zabbix加入TCP连接数及状态的监控的更多相关文章
- zabbix系列(七)zabbix3.0添加对tcp连接数及状态的监控
原理: netstat -an|awk '/^tcp/{++S[$NF]}END{for(a in S) print a,S[a]}' TIME_WAIT 79 ESTABLISHED 6 LISTE ...
- 使用ss命令对tcp连接数和状态的监控性能优化
之前对tcp的监控采用netstat命令,发现在服务器繁忙的时候效果不理想,这个命令占用大量的cpu有时候高达90%以上,可能会导致业务的不稳定,所以改用ss命令对脚本进行优化 对tcp连接数和状态的 ...
- zabbix3.0对tcp连接数和状态的监控优化
zabbix3.0对tcp连接数及状态的监控优化 之前对tcp的监控采用netstat命令,发现在服务器繁忙的时候效果不理想,这个命令占用大量的cpu有时候高达90%以上,可能会导致业务的不稳定,所以 ...
- zabbix3.0使用ss命令对tcp连接数和状态的监控性能优化
zabbix3.0对tcp连接数及状态的监控优化 之前对tcp的监控采用netstat命令,发现在服务器繁忙的时候效果不理想,这个命令占用大量的cpu有时候高达90%以上,可能会导致业务的不稳定,所以 ...
- Linux下查看tcp连接数及状态
netstat -n | awk ‘/^tcp/ {++S[$NF]} END {for(a in S) print a, S[a]}’ TIME_WAIT 8947FIN_WAIT1 15FIN_W ...
- zabbix 监控 tcp 连接数
一.zabbix-agent 服务器配置 1.编辑zabbix_agent配置文件,添加以下内容 vim /etc/zabbix/zabbix_agentd.conf ##添加此行 UserParam ...
- zabbix经常报警elasticsearch节点TCP连接数过高问题
单服务器最大tcp连接数及调优汇总 单机最大tcp连接数 网络编程 在tcp应用中,server事先在某个固定端口监听,client主动发起连接,经过三路握手后建立tcp连接.那么对单机,其最大并发t ...
- 服务器最大TCP连接数及调优汇总
启动线程数: 启动线程数=[任务执行时间/(任务执行时间-IO等待时间)]*CPU内核数 最佳启动线程数和CPU内核数量成正比,和IO阻塞时间成反比.如果任务都是CPU计算型任务,那么线程数最多不超过 ...
- 单服务器最大tcp连接数及调优汇总
启动线程数: 启动线程数=[任务执行时间/(任务执行时间-IO等待时间)]*CPU内核数 最佳启动线程数和CPU内核数量成正比,和IO阻塞时间成反比.如果任务都是CPU计算型任务,那么线程数最多不超过 ...
随机推荐
- Paxos算法细节详解(一)
Paxos分析 最近研究paxos算法,看了许多相关的文章,概念还是很模糊,觉得还是没有掌握paxos算法的精髓,所以花了3天时间分析了libpaxos3的所有代码,此代码可以从https://bit ...
- 卡片式ViewPager,一屏展示多个pager item,设置高度不一致的tabBar
ViewPager的基本用法不必多说,这都很简单,我们可以在ViewPager中加载一个ImageView,也可以加载一个Fragment,这都是目前非常常见的用法.那么我今天说的是ViewPager ...
- linux c 检测网络状态
转自:http://stackoverflow.com/questions/808560/how-to-detect-the-physical-connected-state-of-a-network ...
- js 实时数据显示
js代码 <script type="text/javascript" src="jquery.js"></script> <sc ...
- Self20171218_Assert断言使用
一.Assert用法: assertion(断言)在软件开发中是一种常用的调试方式,很多开发语言中都支持这种机制.在实现中,assertion就是在程序中的一条语句,它对一个boolean表达式进行 ...
- Global Pose Estimation with an Attention-based Recurrent Network
related work包含比较多,对SLAM和最近神经网络对于定位的工作介绍比较多.
- ITSM运营实施案例 - 汽车行业
M公司是在汽车行业知名TOP企业,在日常运营过程中有如下问题: ******************************************************************** ...
- 第三百八十七节,Django+Xadmin打造上线标准的在线教育平台—网站上传资源的配置与显示
第三百八十七节,Django+Xadmin打造上线标准的在线教育平台—网站上传资源的配置与显示 首先了解一下static静态文件与上传资源的区别,static静态文件里面一般防止的我们网站样式的文件, ...
- Maven项目模板
maven 使用 Archetype 概念为用户提供不同类型的项目模板,它是一个非常大的列表(614个数字). maven 使用下面的命令来帮助用户快速开始构建一个新的 Java 项目. mvn ar ...
- 让你的MyEclipse像Visual Studio 2008一样拥有强大功能智能感知功能
Windows→Preferences→Java→Editor→Content Assist 我们看到其中的AutoActivation Delay默认值为200(单位是毫秒)也就是说在打“.”之后停 ...