spring security采用基于简单加密 token 的方法实现的remember me功能
package com.petter.config;

import com.petter.handler.CustomAuthenticationProvider;

import com.petter.service.CustomUserDetailsService;

import org.springframework.context.annotation.Bean;

import org.springframework.context.annotation.Configuration;

import org.springframework.security.config.annotation.authentication.builders.AuthenticationManagerBuilder;

import org.springframework.security.config.annotation.web.builders.HttpSecurity;

import org.springframework.security.config.annotation.web.configuration.EnableWebSecurity;

import org.springframework.security.config.annotation.web.configuration.WebSecurityConfigurerAdapter;

import org.springframework.security.core.userdetails.UserDetailsService;

import org.springframework.security.web.authentication.SavedRequestAwareAuthenticationSuccessHandler;

import javax.annotation.Resource;

/**

 * 相当于spring-security.xml中的配置

 * @author hongxf

 * @since 2017-03-08 9:30

 */

@Configuration

@EnableWebSecurity

public class SecurityConfig extends WebSecurityConfigurerAdapter {

    @Resource

    private CustomAuthenticationProvider authenticationProvider;

    @Resource

    private CustomUserDetailsService userDetailsService;

    @Override

    protected void configure(AuthenticationManagerBuilder auth) throws Exception {

        auth.authenticationProvider(authenticationProvider);

    }

    /**

     * 配置权限要求

     * 采用注解方式,默认开启csrf

     * @param http

     * @throws Exception

     */

    @Override

    protected void configure(HttpSecurity http) throws Exception {

        http.authorizeRequests()

                .antMatchers("/admin/**").hasRole("ADMIN")

                .antMatchers("/dba/**").hasAnyRole("ADMIN", "DBA")

            .and()

                .formLogin().successHandler(savedRequestAwareAuthenticationSuccessHandler())

                .loginPage("/login") //指定自定义登录页

                .failureUrl("/login?error") //登录失败的跳转路径

                .loginProcessingUrl("/auth/login_check") //指定了登录的form表单提交的路径,需与表单的action值保存一致,默认是login

                .usernameParameter("user-name").passwordParameter("pwd")

            .and()

                .logout().logoutSuccessUrl("/login?logout")

            .and()

                .exceptionHandling().accessDeniedPage("/403")

            .and()

                .csrf()

            .and()

                .rememberMe().rememberMeParameter("remember-me") //其实默认就是remember-me,这里可以指定更换

                .tokenValiditySeconds(1209600)

                .key("hongxf");

    }

    //使用remember-me必须指定UserDetailsService

    @Override

    protected UserDetailsService userDetailsService() {

        return userDetailsService;

    }

    /**

     * 这里是登录成功以后的处理逻辑

     * 设置目标地址参数为targetUrl

     * /auth/login_check?targetUrl=/admin/update

     * 这个地址就会被解析跳转到/admin/update,否则就是默认页面

     *

     * 本示例中访问update页面时候会判断用户是手动登录还是remember-me登录的

     * 如果是remember-me登录的则会跳转到登录页面进行手动登录再跳转

     * @return

     */

    @Bean

    public SavedRequestAwareAuthenticationSuccessHandler savedRequestAwareAuthenticationSuccessHandler() {

        SavedRequestAwareAuthenticationSuccessHandler auth = new SavedRequestAwareAuthenticationSuccessHandler();

        auth.setTargetUrlParameter("targetUrl");

        return auth;

    }

}
这里需要指出几点:
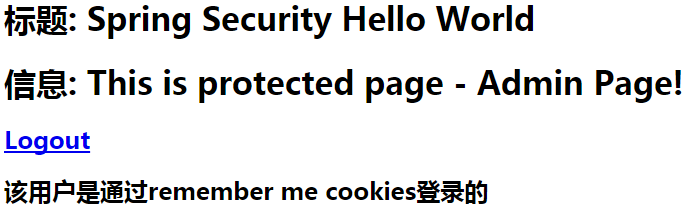
<div sec:authorize="isRememberMe()">

        <h2>该用户是通过remember me cookies登录的</h2>

    </div>

    <div sec:authorize="isFullyAuthenticated()">

        <h2>该用户是通过输入用户名和密码登录的</h2>

    </div>
用于展示
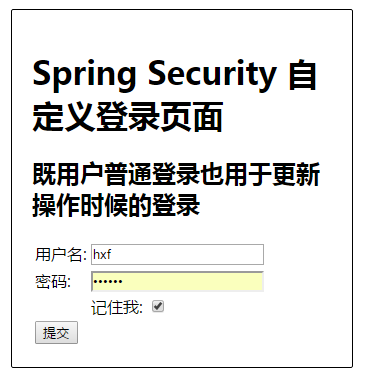
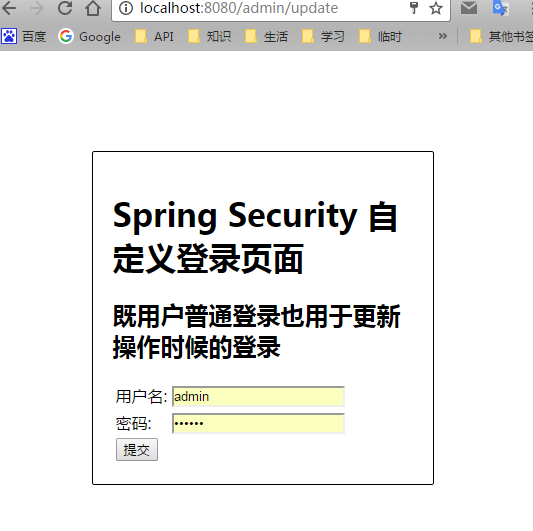
<form name='loginForm' th:action="@{/auth/login_check(targetUrl=${session.targetUrl})}" method='POST'>

            <table>

                <tr>

                    <td>用户名:</td>

                    <td><input type='text' name='user-name' /></td>

                </tr>

                <tr>

                    <td>密码:</td>

                    <td><input type='password' name='pwd' /></td>

                </tr>

                <!-- 如果是进行更新操作跳转过来的页面则不显示记住我 -->

                <div th:if="${loginUpdate} eq null">

                    <tr>

                        <td></td>

                        <td>记住我: <input type="checkbox" name="remember-me" /></td>

                    </tr>

                </div>

                <tr>

                    <td colspan='2'>

                        <input type="submit" value="提交" />

                    </td>

                </tr>

            </table>

        </form>
注意action的值,首先请求路径是/auth/login_check,与SecurityConfig配置的loginProcessingUrl保持一致
<!DOCTYPE html>

<html lang="en">

<head>

    <meta charset="UTF-8">

    <title>update</title>

</head>

<body>

    <h1>Title : 更新页面</h1>

    <h1>只有通过用户名和密码登录的用户才允许进入这个页面,remember me登录的用户不允许,防止被盗用cookie</h1>

    <h2>更新账号信息</h2>

</body>

</html>
五、修改HelloController类
package com.petter.web;

import org.springframework.security.authentication.AnonymousAuthenticationToken;

import org.springframework.security.authentication.BadCredentialsException;

import org.springframework.security.authentication.LockedException;

import org.springframework.security.authentication.RememberMeAuthenticationToken;

import org.springframework.security.core.Authentication;

import org.springframework.security.core.context.SecurityContextHolder;

import org.springframework.security.core.userdetails.UserDetails;

import org.springframework.stereotype.Controller;

import org.springframework.util.StringUtils;

import org.springframework.web.bind.annotation.RequestMapping;

import org.springframework.web.bind.annotation.RequestMethod;

import org.springframework.web.bind.annotation.RequestParam;

import org.springframework.web.servlet.ModelAndView;

import javax.servlet.http.HttpServletRequest;

import javax.servlet.http.HttpSession;

/**

 * @author hongxf

 * @since 2017-03-08 9:29

 */

@Controller

public class HelloController {

    @RequestMapping(value = { "/", "/welcome" }, method = RequestMethod.GET)

    public ModelAndView welcomePage() {

        ModelAndView model = new ModelAndView();

        model.addObject("title", "Spring Security Hello World");

        model.addObject("message", "This is welcome page!");

        model.setViewName("hello");

        return model;

    }

    @RequestMapping(value = "/admin", method = RequestMethod.GET)

    public ModelAndView adminPage() {

        ModelAndView model = new ModelAndView();

        model.addObject("title", "Spring Security Hello World");

        model.addObject("message", "This is protected page - Admin Page!");

        model.setViewName("admin");

        return model;

    }

    @RequestMapping(value = "/dba", method = RequestMethod.GET)

    public ModelAndView dbaPage() {

        ModelAndView model = new ModelAndView();

        model.addObject("title", "Spring Security Hello World");

        model.addObject("message", "This is protected page - Database Page!");

        model.setViewName("admin");

        return model;

    }

    /**

     * 登录页面只允许使用密码登录

     * 如果用户通过remember me的cookie登录则跳转到登录页面输入密码

     * 为了避免盗用remember me cookie 来更新信息

     */

    @RequestMapping(value = "/admin/update", method = RequestMethod.GET)

    public ModelAndView updatePage(HttpServletRequest request) {

        ModelAndView model = new ModelAndView();

        if (isRememberMeAuthenticated()) {

            //把targetUrl放入session中,登录页面使用${session.targetUrl}获取

            setRememberMeTargetUrlToSession(request);

            //跳转到登录页面

            model.addObject("loginUpdate", true);

            model.setViewName("login");

        } else {

            model.setViewName("update");

        }

        return model;

    }

    /**

     * 判断用户是不是通过remember me方式登录,参考

     * org.springframework.security.authentication.AuthenticationTrustResolverImpl

     */

    private boolean isRememberMeAuthenticated() {

        Authentication authentication = SecurityContextHolder.getContext().getAuthentication();

        return authentication != null && RememberMeAuthenticationToken.class.isAssignableFrom(authentication.getClass());

    }

    /**

     * 保存请求的页面targetUrl到session中

     */

    private void setRememberMeTargetUrlToSession(HttpServletRequest request){

        HttpSession session = request.getSession(false);

        if(session != null){

            session.setAttribute("targetUrl", request.getRequestURI());

        }

    }

    //获取session存储的SPRING_SECURITY_LAST_EXCEPTION的值,自定义错误信息

    @RequestMapping(value = "/login", method = RequestMethod.GET)

    public ModelAndView login(

            @RequestParam(value = "error", required = false) String error,

            @RequestParam(value = "logout", required = false) String logout,

            HttpServletRequest request) {

        ModelAndView model = new ModelAndView();

        if (error != null) {

            model.addObject("error", getErrorMessage(request, "SPRING_SECURITY_LAST_EXCEPTION"));

            //在update的登录页面上,判断targetUrl是否有值,没有则显示记住我,有则不显示

            String targetUrl = getRememberMeTargetUrlFromSession(request);

            System.out.println(targetUrl);

            if(StringUtils.hasText(targetUrl)){

                model.addObject("loginUpdate", true);

            }

        }

        if (logout != null) {

            model.addObject("msg", "你已经成功退出");

        }

        model.setViewName("login");

        return model;

    }

    /**

     * 从session中获取targetUrl

     */

    private String getRememberMeTargetUrlFromSession(HttpServletRequest request){

        String targetUrl = "";

        HttpSession session = request.getSession(false);

        if(session != null){

            targetUrl = session.getAttribute("targetUrl") == null ? "" :session.getAttribute("targetUrl").toString();

        }

        return targetUrl;

    }

    //自定义错误类型

    private String getErrorMessage(HttpServletRequest request, String key){

        Exception exception = (Exception) request.getSession().getAttribute(key);

        String error;

        if (exception instanceof BadCredentialsException) {

            error = "不正确的用户名或密码";

        }else if(exception instanceof LockedException) {

            error = exception.getMessage();

        }else{

            error = "不正确的用户名或密码";

        }

        return error;

    }

    @RequestMapping(value = "/403", method = RequestMethod.GET)

    public ModelAndView accessDenied() {

        ModelAndView model = new ModelAndView();

        //检查用户是否已经登录

        Authentication auth = SecurityContextHolder.getContext().getAuthentication();

        if (!(auth instanceof AnonymousAuthenticationToken)) {

            UserDetails userDetail = (UserDetails) auth.getPrincipal();

            model.addObject("username", userDetail.getUsername());

        }

        model.setViewName("403");

        return model;

    }

}
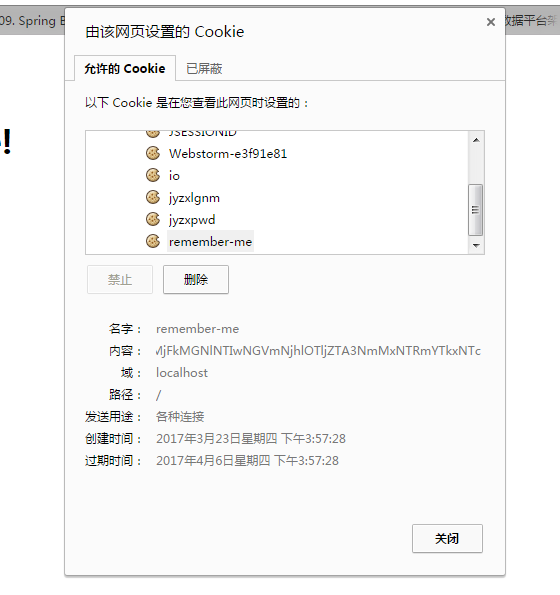
六、进行测试

可以查看此时的cookie中的值

spring security采用基于简单加密 token 的方法实现的remember me功能的更多相关文章
- spring security采用基于持久化 token 的方法实现的remember me功能
采用该方法相较于简单加密方式安全一些.具体的原理见 http://wiki.jikexueyuan.com/project/spring-security/remember-me.html 一.建立 ...
- 255.Spring Boot+Spring Security:使用md5加密
说明 (1)JDK版本:1.8 (2)Spring Boot 2.0.6 (3)Spring Security 5.0.9 (4)Spring Data JPA 2.0.11.RELEASE (5)h ...
- Spring security oauth2最简单入门环境搭建
关于OAuth2的一些简介,见我的上篇blog:http://wwwcomy.iteye.com/blog/2229889 PS:貌似内容太水直接被鹳狸猿干沉.. 友情提示 学习曲线:spring+s ...
- 关于 Spring Security OAuth2 中 Feign 调用 Token 问题
微服务体系中,避免不了服务之间链式调用,一般使用 Feign ,由于使用 Spring Security OAuth2 全局做了安全认证,简单的一种实现方式就是在服务提供方获得 Token 再次通过 ...
- spring security采用自定义登录页和退出功能
更新... 首先采用的是XML配置方式,请先查看 初识Spring security-添加security 在之前的示例中进行代码修改 项目结构如下: 一.修改spring-security.xml ...
- 使用Spring Security OAuth2进行简单的单点登录
1.概述 在本教程中,我们将讨论如何使用Spring Security OAuth和Spring Boot实现SSO - 单点登录. 我们将使用三个单独的应用程序: 授权服务器 - 这是中央身份验证机 ...
- spring security +MySQL + BCryptPasswordEncoder 单向加密验证 + 权限拦截 --- 心得
1.前言 前面学习了 security的登录与登出 , 但是用户信息 是 application 配置 或内存直接注入进去的 ,不具有实用性,实际上的使用还需要权限管理,有些 访问接口需要某些权限才可 ...
- Spring Security实现基于RBAC的权限表达式动态访问控制
昨天有个粉丝加了我,问我如何实现类似shiro的资源权限表达式的访问控制.我以前有一个小框架用的就是shiro,权限控制就用了资源权限表达式,所以这个东西对我不陌生,但是在Spring Securit ...
- Spring Security入门(2-3)Spring Security 的运行原理 4 - 自定义登录方法和页面
参考链接,多谢作者: http://blog.csdn.net/lee353086/article/details/52586916 http元素下的form-login元素是用来定义表单登录信息的. ...
随机推荐
- iOS开发之--storyboary下,为btn/lab/view等添加裁剪和阴影的方法
在开发过程中,很多时候我们都需要定制一个控件的属性,比如边框.阴影.圆角裁剪等,使用代码创建控件的时候,我们都知道,直接对layer图层进行各种属性的操作, self.button.layer.cor ...
- zoj3497(经典矩阵乘法)
原以为是用搜索做的题,想了好久都无法想到一个高效正确的解法. 后面发现竟然这就是矩阵的应用! 碉堡! 给定一个有向图,问从A点恰好走k步(允许重复经过边)到达B点的方案数mod p的值 ——选自ma ...
- Manacher模板,kmp,扩展kmp,最小表示法模板
*N]; //储存临时串 *N];//中间记录 int Manacher(char tmp[]) { int len=strlen(tmp); ; ;i<len;i++) { s[cnt++]= ...
- struts2的配置文件为什么可以使用${}符号?
转自:https://www.cnblogs.com/sharpest/p/6030265.html 一.#符号的用途一般有三种. “#”主要有三种用途: 1. 访问OGNL上下文和Action上下文 ...
- 170303、PHP微信公众平台开发接口 SDK完整版
<?php /* 方倍工作室 http://www.fangbei.org/ CopyRight 2015 All Rights Reserved */ define("TOKEN&q ...
- 《JAVA多线程编程核心技术》 笔记:第五章:定时器Timer
一.定时器Timer的使用 1.1 方法schedule(TimerTask task, Date time) 是否过期 执行说明 开始执行时间 time>当前时间(未过期) 在time到达时执 ...
- Python全栈day24-25(面向对象编程)
参考文档: http://www.cnblogs.com/linhaifeng/articles/6182264.html# 类:把一类事物的相同的特征和动作整合到一起就是类,类是抽象的概练 对象:就 ...
- HDU 5658 CA Loves Palindromic(回文树)
CA Loves Palindromic Time Limit: 2000/1000 MS (Java/Others) Memory Limit: 262144/262144 K (Java/O ...
- jquery刷新页面指定部位
做好好几次了,经常忘记格式,这次记下来 $("#baseInfo").load("/KnowledgeLib/Personalization/QuestionUpdate ...
- Spring使用JMS传递消息的两种方式
方式一:同步收发消息,使用JMS template 消费者阻塞等待消息的到来. 方式二:异步收发消息,使用message listener container 消费者提供一个listener,注册一个 ...