利用Azure虚拟机安装Dynamics 365 Customer Engagement之十一:SQL Server配置Always On后D365的配置更改
我是微软Dynamics 365 & Power Platform方面的工程师罗勇,也是2015年7月到2018年6月连续三年Dynamics CRM/Business Solutions方面的微软最有价值专家(Microsoft MVP),欢迎关注我的微信公众号 MSFTDynamics365erLuoYong ,回复367或者20190911可方便获取本文,同时可以在第一间得到我发布的最新博文信息,follow me!
本文主要参考官方文档 Set configuration and organization databases for SQL Server AlwaysOn failover 。
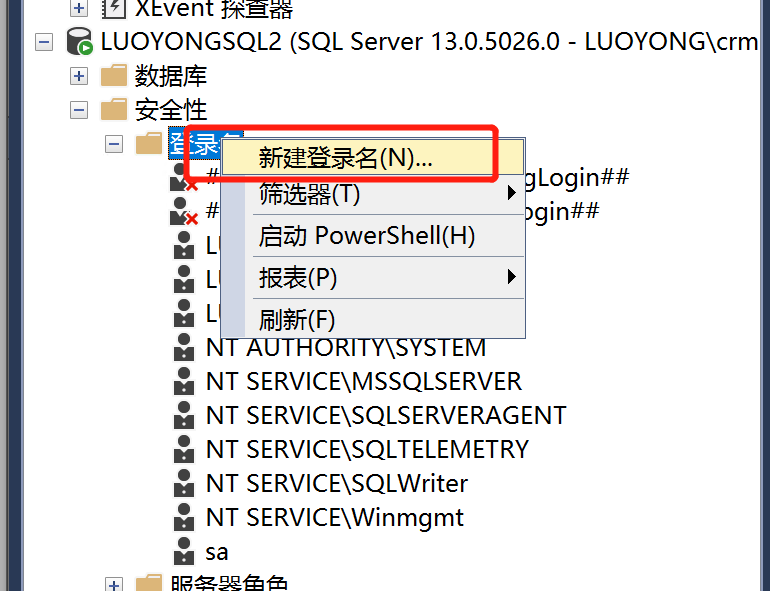
连接SQL Server副本数据库服务器(我这里是LuoYongSQL2),展开【安全性】>【登录名】,右击选择【新建登录名】

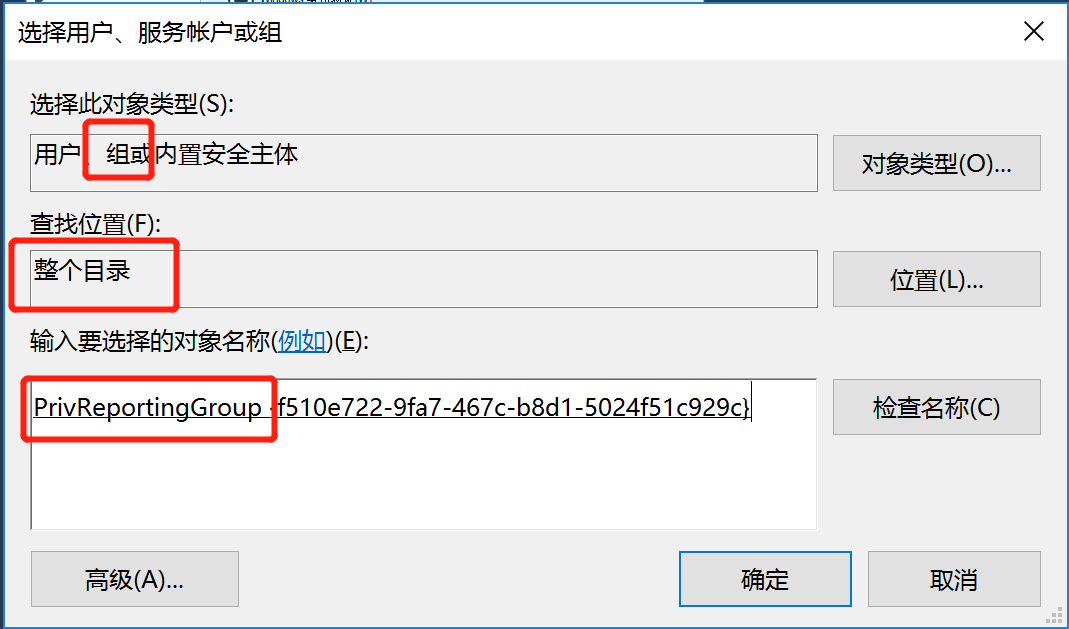
搜索luoyong\PrivReportingGroup,记得更改下对象类型和查找位置如下图,点击确定按钮添加。同样的操作为 ReportingGroup 和 SQLAccessGroup 执行一下。

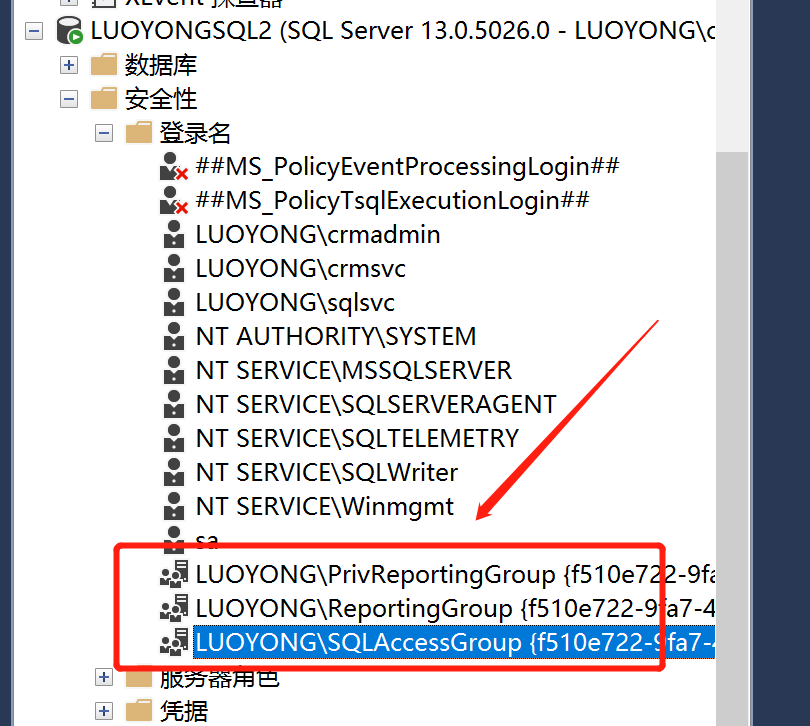
新添加的三个登录名如下:

然后就是每台Dynamics 365服务器需要更改注册表中的连接字符串,使用Regedit打开注册表,导航到HKEY_LOCAL_MACHINE\SOFTWARE\Microsoft\MSCRM\,双击名称为 configdb 的键,我这里原来的值是 Data Source=LuoYongSQL1;Initial Catalog=MSCRM_CONFIG;Integrated Security=SSPI
我修改为: Data Source=LuoYongSQLListener1.luoyong.me;Initial Catalog=MSCRM_CONFIG;Integrated Security=SSPI;multisubnetfailover=true
然后执行如下SQL:
USE MSCRM_CONFIG
Update Organization set ConnectionString = 'Provider=SQLOLEDB;Data Source=LuoYongSQLListener1.luoyong.me;Initial Catalog=Demo_MSCRM;Integrated Security=SSPI;MultiSubnetFailover=True' where DatabaseName = 'Demo_MSCRM'
重启CRM相关的服务和IIS,对SQL Server执行手工故障转移后进行测试。
利用Azure虚拟机安装Dynamics 365 Customer Engagement之十一:SQL Server配置Always On后D365的配置更改的更多相关文章
- 利用Azure虚拟机安装Dynamics 365 Customer Engagement之四:组织单位服务安装账号设置
我是微软Dynamics 365 & Power Platform方面的工程师罗勇,也是2015年7月到2018年6月连续三年Dynamics CRM/Business Solutions方面 ...
- 利用Azure虚拟机安装Dynamics 365 Customer Engagement之一:准备工作
我是微软Dynamics 365 & Power Platform方面的工程师罗勇,也是2015年7月到2018年6月连续三年Dynamics CRM/Business Solutions方面 ...
- 利用Azure虚拟机安装Dynamics 365 Customer Engagement之五:安装SQL Server
我是微软Dynamics 365 & Power Platform方面的工程师罗勇,也是2015年7月到2018年6月连续三年Dynamics CRM/Business Solutions方面 ...
- 利用Azure虚拟机安装Dynamics 365 Customer Engagement之二:创建域控虚拟机
我是微软Dynamics 365 & Power Platform方面的工程师罗勇,也是2015年7月到2018年6月连续三年Dynamics CRM/Business Solutions方面 ...
- 利用Azure虚拟机安装Dynamics 365 Customer Engagement之六:安装后端服务器
我是微软Dynamics 365 & Power Platform方面的工程师罗勇,也是2015年7月到2018年6月连续三年Dynamics CRM/Business Solutions方面 ...
- 利用Azure虚拟机安装Dynamics 365 Customer Engagement之七:安装前端服务器及部署管理器
我是微软Dynamics 365 & Power Platform方面的工程师罗勇,也是2015年7月到2018年6月连续三年Dynamics CRM/Business Solutions方面 ...
- 利用Azure虚拟机安装Dynamics 365 Customer Engagement之十:为SQL Server配置Always On
我是微软Dynamics 365 & Power Platform方面的工程师罗勇,也是2015年7月到2018年6月连续三年Dynamics CRM/Business Solutions方面 ...
- 利用Azure虚拟机安装Dynamics 365 Customer Engagement之十二:新增SQL Server可用性副本
我是微软Dynamics 365 & Power Platform方面的工程师罗勇,也是2015年7月到2018年6月连续三年Dynamics CRM/Business Solutions方面 ...
- 利用Azure虚拟机安装Dynamics 365 Customer Engagement之八:安装报表扩展及最新更新
我是微软Dynamics 365 & Power Platform方面的工程师罗勇,也是2015年7月到2018年6月连续三年Dynamics CRM/Business Solutions方面 ...
随机推荐
- CAD绘图效率低?教你4个CAD绘图技巧,绘图效率提升十倍
CAD绘图一直是一个谜一样的存在,说它简单吧,很多人都无法完全精通,说它难吧,很多人也都自学成才了. 如何学好CAD绘图是个难题,但是老话说的好,只要思想不滑坡,办法总比困难多,掌握以下这些CAD绘图 ...
- unittest---unittest封装方法
前面我们写了一个关于查询歌曲的接口测试,但是代码重复性比较大,进行一次简单的优化 封装方法 在编写自动化脚本的时候,都要求代码简介,上一篇unittest---unittest断言中代码重复性比较多, ...
- Retrofit-草稿
1.GSONFormat 2.动态代理 https://www.cnblogs.com/maohuidong/p/7992894.html retrofit的核心就是动态代理
- SpringBoot应用篇(二):SpringSecurity实现带验证码的登录认证 附代码
一.文章简介 本文简要介绍了spring security的基本原理和实现,并基于springboot整合了spring security实现了基于数据库管理的用户的登录和登出,登录过程实现了验证码的 ...
- GO基础之文件操作
一.文件操作的基本API func main() { //绝对路径 fileInfo , err := os.Stat("E:/a.txt") fileInfo , err = o ...
- Andriod安卓下开发UHF读写器
随着在Andriod设备上使用UHF读写器变得越来越广泛,友我科技独立研发了UHF读写器的android开发包,使用此开发包,工程师只需在工程中导入jar包,使用java语言就可以轻松的开发出Andr ...
- 3、netty第二个例子,使用netty建立客户端,与服务端通讯
第一个例子中,建立了http的服务器端,可以直接使用curl命令,或者浏览器直接访问. 在第二个例子中,建立一个netty的客户端来主动发送请求,模拟浏览器发送请求. 这里先启动服务端,再启动客户端, ...
- 通过U盘在物理机安装CentOS出现Timeout的问题
错误信息:centos dracut timeout..... 解决方案: 在进入install页面是,按e,启动编辑.要保证Label与U盘的卷标保持一致即可.
- Spring Boot与ActiveMQ整合
Spring Boot与ActiveMQ整合 1使用内嵌服务 (1)在pom.xml中引入ActiveMQ起步依赖 <dependency> <groupId>org.spri ...
- bat批处理执行python 的几种方式
第一种方式:@echo off C: cd C:\Users\administrator\Desktopstart python apidemo.py exit第二种方式: start cmd /K ...
