【zabbix告警监控】配置zabbix监控nginx服务
zabbix监控nginx,nginx需要添加--with-http_stub_status模块
使用zabbix监控nginx,首先nginx需要配置开启ngx_status。但是我这边nginx安装成功了并且也没有添加sub模块,需要重新编译添加该模块。配置如下:
# 在添加之前需要查看是否有sub的模块(--with-http_sub_module 这个模块),如果没有就需要重新编译

# 使用nginx -V可以查看

[root@VM_0_10_centos thy]# /usr/local/nginx/sbin/nginx -V

nginx version: nginx/1.16.1

built by gcc 4.8.5 20150623 (Red Hat 4.8.5-39) (GCC)

built with OpenSSL 1.0.2k-fips  26 Jan 2017

TLS SNI support enabled

configure arguments: --prefix=/usr/local/nginx --pid-path=/var/run/nginx/nginx.pid --lock-path=/var/lock/nginx.lock --er

ror-log-path=/var/log/nginx/error.log --http-log-path=/var/log/nginx/access.log --with-http_gzip_static_module --http-client-body-temp-path=/var/tmp/nginx/client --http-proxy-temp-path=/var/tmp/nginx/proxy --http-fastcgi-temp-path=/var/tmp/nginx/fastcgi --http-uwsgi-temp-path=/var/tmp/nginx/uwsgi --http-scgi-temp-path=/var/tmp/nginx/scgi --with-http_ssl_module

# 重新配置(需要在nginx的解压目录下执行)

./configure \

--prefix=/usr/local/nginx \

--pid-path=/var/run/nginx/nginx.pid \

--lock-path=/var/lock/nginx.lock \

--error-log-path=/var/log/nginx/error.log \

--http-log-path=/var/log/nginx/access.log \

--with-http_gzip_static_module \

--http-client-body-temp-path=/var/tmp/nginx/client \

--http-proxy-temp-path=/var/tmp/nginx/proxy \

--http-fastcgi-temp-path=/var/tmp/nginx/fastcgi \

--http-uwsgi-temp-path=/var/tmp/nginx/uwsgi \

--http-scgi-temp-path=/var/tmp/nginx/scgi \

--with-http_stub_status_module \

--with-http_ssl_module \

--with-http_realip_module

# 编译,注意不要make install,不然会覆盖之前的安装

[root@VM_0_10_centos nginx-1.16.1]# make

# 替换二进制文件(可以先备份好再操作)(如果没有这一步,就不会重新加载模块,使用-V查看的还会是之前的模块)

[root@VM_0_10_centos nginx-1.16.1]# cp /usr/local/src/nginx-1.16.1/objs/nginx /usr/local/nginx/sbin/

# 重启nginx(nginx停掉重启,pid文件会被删除,所以需要生成下pid文件再重启),再次-V查看就能看到刚刚添加的模块

[root@VM_0_10_centos nginx-1.16.1]# /usr/local/nginx/sbin/nginx -t

[root@VM_0_10_centos nginx-1.16.1]# /usr/local/nginx/sbin/nginx -c /usr/local/nginx/conf/nginx.conf

[root@VM_0_10_centos nginx-1.16.1]# /usr/local/nginx/sbin/nginx -s reload

# 查看

[root@VM_0_10_centos nginx-1.16.1]# nginx -V

nginx version: nginx/1.16.1

built by gcc 4.8.5 20150623 (Red Hat 4.8.5-39) (GCC)

built with OpenSSL 1.0.2k-fips  26 Jan 2017

TLS SNI support enabled

configure arguments: --prefix=/usr/local/nginx --pid-path=/var/run/nginx/nginx.pid --lock-path=/var/lock/nginx.lock --er

ror-log-path=/var/log/nginx/error.log --http-log-path=/var/log/nginx/access.log --with-http_gzip_static_module --http-client-body-temp-path=/var/tmp/nginx/client --http-proxy-temp-path=/var/tmp/nginx/proxy --http-fastcgi-temp-path=/var/tmp/nginx/fastcgi --http-uwsgi-temp-path=/var/tmp/nginx/uwsgi --http-scgi-temp-path=/var/tmp/nginx/scgi --with-http_stub_status_module --with-http_ssl_module --with-http_realip_module

# 我的nginx配置文件是采用的导入方式,也就是将配置文件分开,一个主配置文件里边调用多个服务的配置文件,这里以other.conf为列开启nginx的status

[root@VM_0_10_centos thy]# pwd

/usr/local/nginx/conf/thy

[root@VM_0_10_centos thy]# vim other.conf

server{

        listen 80;

        server_name ip地址或域名;

        location / {

                root html;

        index index.html index.htm index.php;

        }

        # 开启status

    location /nginx_status {

                stub_status on;

                access_log   off;

            allow 10.0.0.1;

        allow 10.0.0.2;

        deny all;

    }

   # 缓存php生成页面内容,8个16k

   # fastcgi_buffers 8 16k;

   # 缓存php生成的头部信息

   # fastcgi_buffers_size 32k;

   # 连接php的超时时间

   # fastcgi_connect_timeout 300;

   # 发送请求的超时时间

   # fastcgi_send_timeout 300;

   # 读取请求的超时时间

   # fastcgi_read_timeout 300;

      location ~ \.php$ {

          root           html;

          fastcgi_pass   127.0.0.1:9000;

          fastcgi_index  index.php;

          #fastcgi_param  SCRIPT_FILENAME  /scripts$fastcgi_script_name;

          fastcgi_param  SCRIPT_FILENAME  $document_root$fastcgi_script_name;

          include        fastcgi_params;

      }

}

# 重启nginx

[root@VM_0_10_centos thy]# /usr/local/nginx/sbin/nginx -s reload
使用浏览器访问或curl访问:
[root@VM_0_10_centos thy]# curl http://ip地址或域名:80/nginx_status

Active connections: 7

server accepts handled requests

 22 22 161

Reading: 0 Writing: 1 Waiting: 6

PS:上面如果设置了允许访问的ip,那么只能在允许访问的ip访问,一般是不会开放给所有人访问的。
禁止访问会出现如下图:

active connections – 活跃的连接数量(当前与http建立的连接数,包括等待的客户端连接)7
server accepts handled requests — 接受的客户端连接总数目22 , 处理的客户端连接总数目22, 客户端总的请求数目161
reading — 读取客户端的连接数.(当前,nginx读请求连接)
writing — 响应数据到客户端的数量
waiting — 开启 keep-alive 的情况下,这个值等于 active – (reading+writing), 意思就是 Nginx 已经处理完正在等候下一次请求指令的驻留连接.(目前有多少空闲客户端请求连接)
zabbix配置
上面配置好stub模块之后,现在配置zabbix监控nginx的服务。我们除了监控以上数据,还需要监控nginx进程状态,并且配置触发器!
1. zabbix客户端配置
# 在zabbix_agentd客户端编写监控脚本

[root@VM_0_10_centos thy]# cd /usr/local/share/zabbix/alertscripts/

[root@VM_0_10_centos alertscripts]# vi ngx_status.sh

#!/bin/bash

# DateTime: 2019-12-10

# AUTHOR: HeiDi

# Description: Zabbix monitors nginx performance and process status

# 开启stub_status服务的名称,也就ip或域名

HOST="ip或域名"

PORT=""

# Detects if the nginx process exists

function ping {

    /sbin/pidof nginx | wc -l

}

# check nginx property

# 这中方法也可以实现和下面相同的效果curl http://域名/nginx_status 2>/dev/null | grep Active | awk -F '[:]+' '{p

rint $2}'  这里的[:]+表示以1个或多个 :(空格或冒号)作为分隔符

# NR表示行,

function active {

    /usr/bin/curl "http://$HOST:$PORT/nginx_status/" 2>/dev/null| grep 'Active' | awk '{print $NF}'

}

function reading {

    /usr/bin/curl "http://$HOST:$PORT/nginx_status/" 2>/dev/null| grep 'Reading' | awk '{print $2}'

}

function writing {

    /usr/bin/curl "http://$HOST:$PORT/nginx_status/" 2>/dev/null| grep 'Writing' | awk '{print $4}'

}

function waiting {

    /usr/bin/curl "http://$HOST:$PORT/nginx_status/" 2>/dev/null| grep 'Waiting' | awk '{print $6}'

}

function accepts {

    /usr/bin/curl "http://$HOST:$PORT/nginx_status/" 2>/dev/null| awk NR==3 | awk '{print $1}'

}

function handled {

    /usr/bin/curl "http://$HOST:$PORT/nginx_status/" 2>/dev/null| awk NR==3 | awk '{print $2}'

}

function requests {

    /usr/bin/curl "http://$HOST:$PORT/nginx_status/" 2>/dev/null| awk NR==3 | awk '{print $3}'

}

# execute function

$1

# 赋予权限

[root@VM_0_10_centos alertscripts]# chmod +x ngx_status.sh

[root@VM_0_10_centos alertscripts]# chown zabbix.zabbix ngx_status.sh
本地服务器上测试:
[root@VM_0_10_centos alertscripts]# ./ngx_status.sh active

5

2. 配置zabbix.conf,定义监控脚本key:
# 开启该参数,默认为0(另外还需要将zabbix_agentd.conf需要加载zabbix_agentd.conf.d目录的行注释去掉)

[root@VM_0_10_centos alertscripts]# cat /usr/local/etc/zabbix_agentd.conf | grep UnsafeUserParameter

### Option: UnsafeUserParameters

UnsafeUserParameters=1
# 加载配置文件目录
Include=/usr/local/etc/zabbix_agentd.conf.d/
# 在/usr/local/etc/zabbix_agentd.conf.d目录下添加监控项配置文件键值 [root@VM_0_10_centos alertscripts]# cd /usr/local/etc/zabbix_agentd.conf.d/ # 这里为键值,nginx_status为agentd.conf.d目录下的文件对应,后面值为nginx_status.sh脚本路径 [root@VM_0_10_centos zabbix_agentd.conf.d]# vi nginx_status UserParameter=nginx_status[*],/usr/local/share/zabbix/alertscripts/ngx_status.sh $1 # 配置好之后重启zabbix_agentd [root@VM_0_10_centos zabbix_agentd.conf.d]# killall zabbix_agentd [root@VM_0_10_centos zabbix_agentd.conf.d]# zabbix_agentd [root@VM_0_10_centos zabbix_agentd.conf.d]# ss -tulpn | grep zabbix_agentd
3. zabbix_server服务端通过zabbix_get测试获取数据
# zabbix_get -s 监控主机 -k key名

[root@VM_0_10_centos zabbix_agentd.conf.d]# zabbix_get -s 被监控agentd主机ip -k nginx_status[active]

5
PS:服务端获取数据正确之后,在web页面进行配置
4. web页面配置监控nginx操作
1)添加主机,这里我已经添加了,就不在重复操作

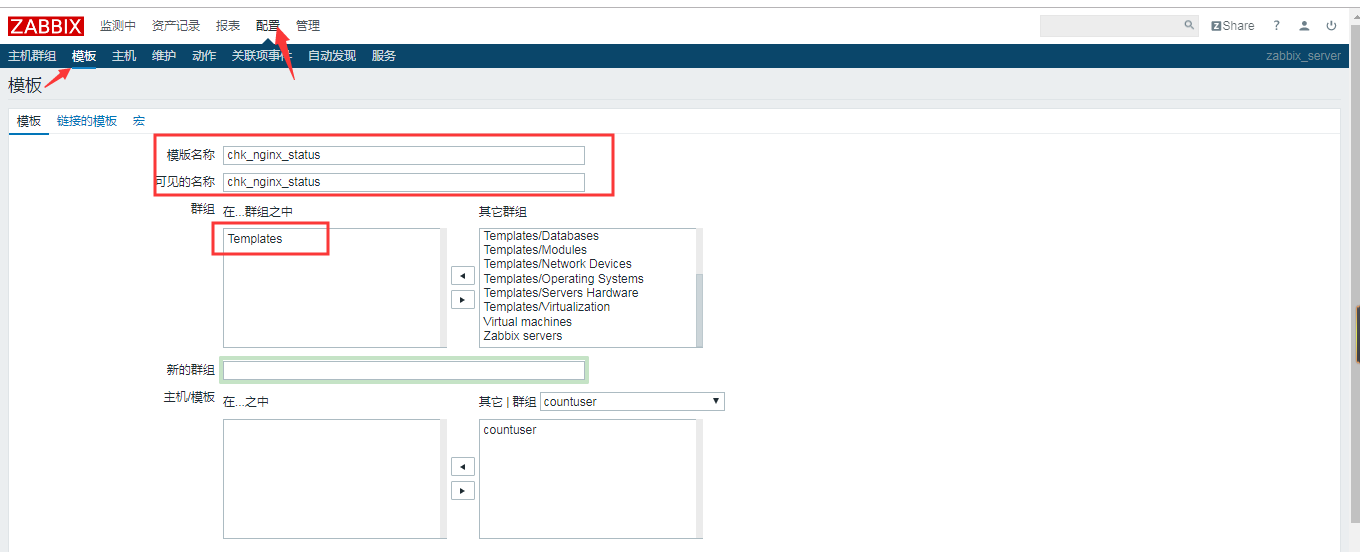
2)添加监控模板
配置==》模板 ==》创建模板

填写对应的信息,确认无误点击更新
3) 创建应用集

点击应用集==》创建应用集


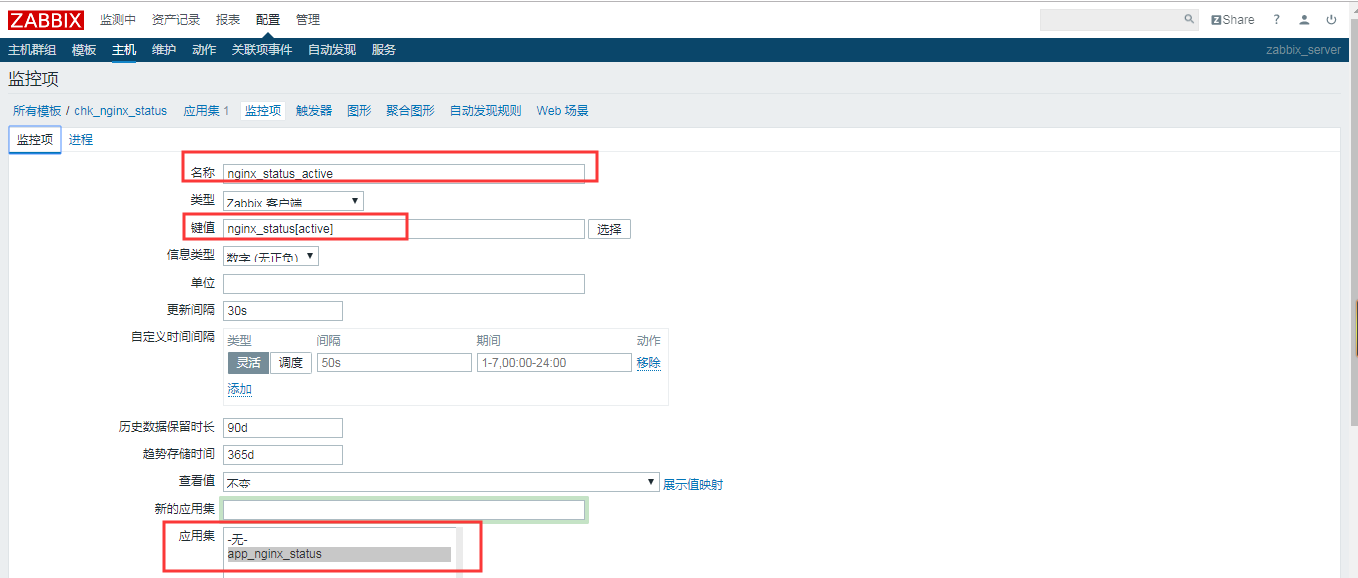
4)创建监控项
点击监控项进入==》创建监控项


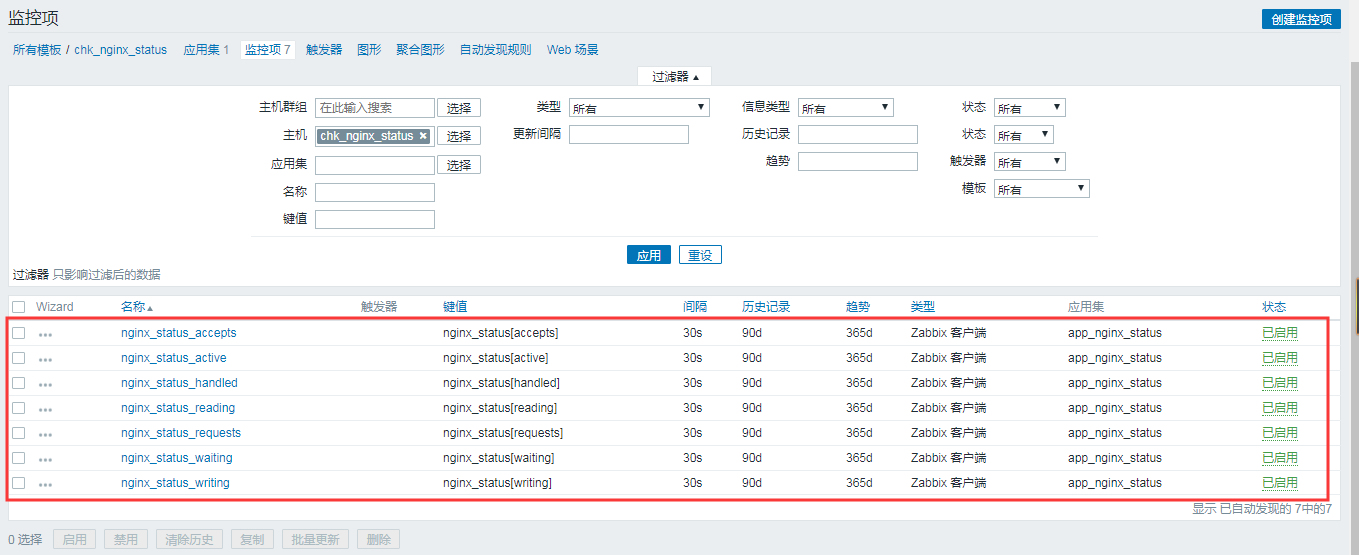
这里以active为例,其余一样创建即可,这里的键值要和我们创建的键值文件名称一致
创建后如下图:
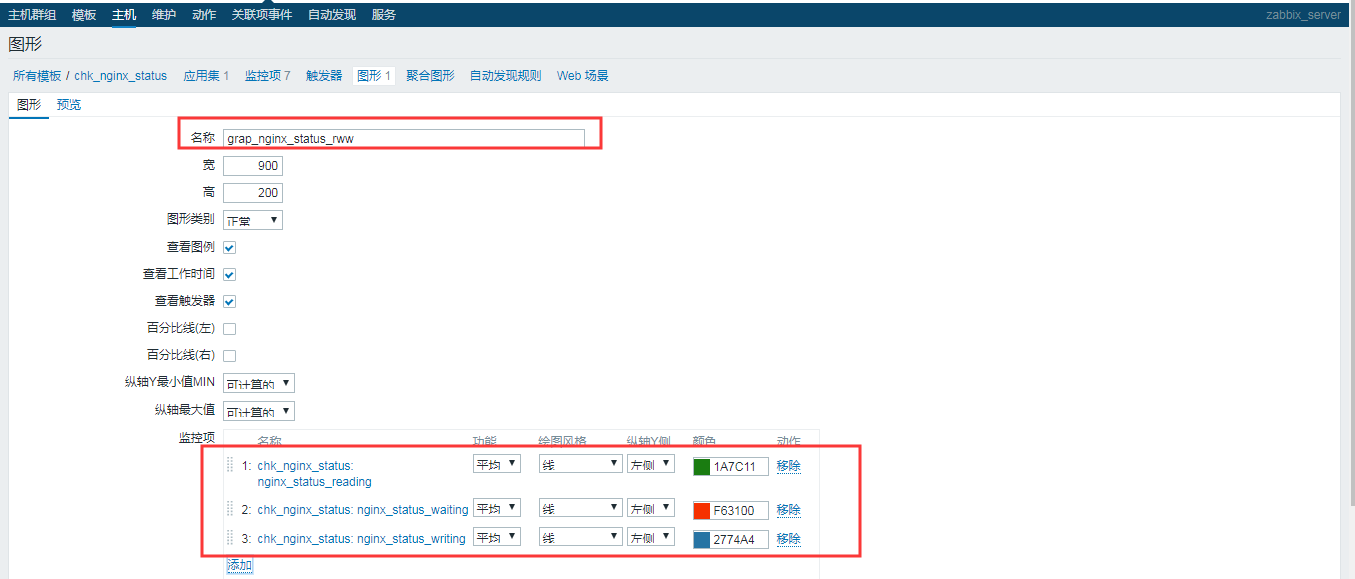
5)创建图形




6)将模板链接到被监控主机

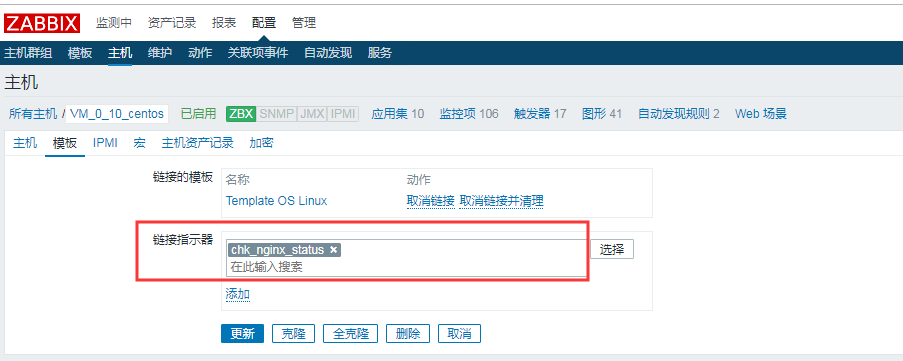
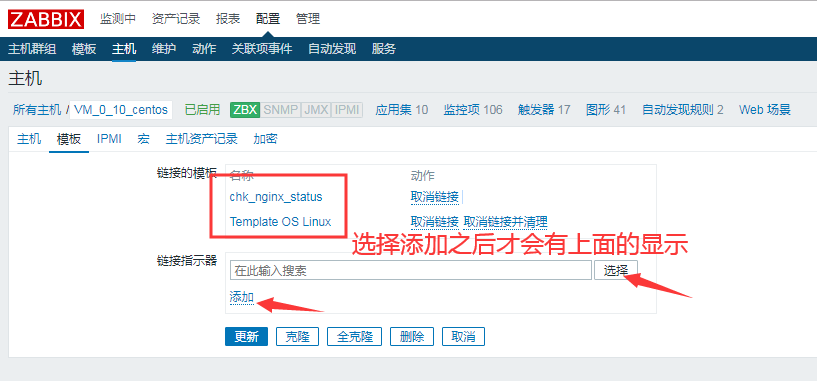
7)查看数据


8)创建聚合图形

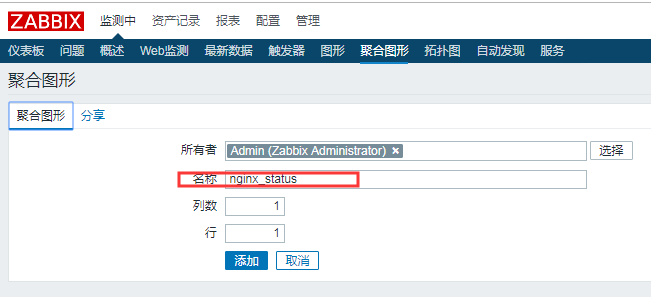
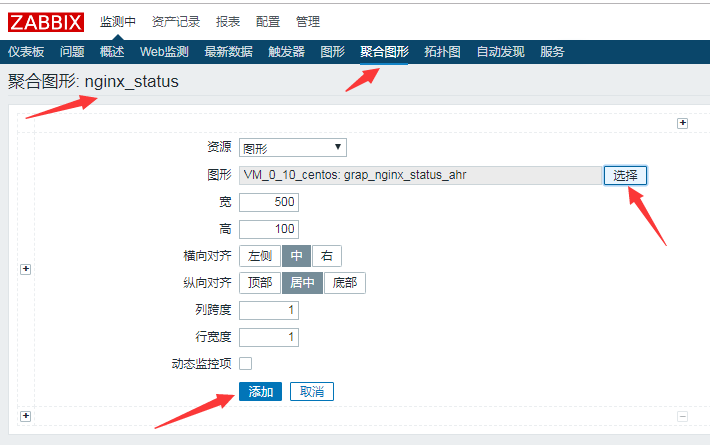
PS:其余的一样添加
最终结果为:

至此,nginx的监控就配置完成了
【zabbix告警监控】配置zabbix监控nginx服务的更多相关文章
- 【2】循序渐进学 Zabbix:安装配置 Zabbix Server 服务端
上一篇 [1]循序渐进学 Zabbix :初识与基础依赖环境搭建( LNMP ) 安装 Zabbix Server 上篇我们在 192.168.200.101 上面安装了 Zabbix 所依赖的 LN ...
- Zabbix 告警内容配置
#配置媒介告警类型 #----------------------------------------------------------------------------------------- ...
- Zabbix的SNMPTrap监控配置
SNMPTrap监控主要用于设备发生故障时的主动通知的监控.以下简单记录下Zabbix的SNMPTrap的配置方法. 一.SNMPTrap监控的处理流程说明 1.监控对象发送SNMPTrap信息到sn ...
- 【3】循序渐进学 Zabbix:配置 Zabbix Web
上一篇 [2]循序渐进学 Zabbix:安装配置 Zabbix Server 服务端 配置 Zabbix Web 访问 上一篇完成了 Zabbix Server 的安装,但是那对于我们而言只是一个服务 ...
- Spring系列之集成Druid连接池及监控配置
前言 前一篇文章我们熟悉了HikariCP连接池,也了解到它的性能很高,今天我们讲一下另一款比较受欢迎的连接池:Druid,这是阿里开源的一款数据库连接池,它官网上声称:为监控而生!他可以实现页面监控 ...
- 6_2.springboot2.x整合Druid和配置数据源监控
简介 Druid首先是一个数据库连接池.Druid是目前最好的数据库连接池,在功能.性能.扩展性方面,都超过其他数据库连接池,包括DBCP.C3P0.BoneCP.Proxool.JBoss Data ...
- zabbix监控配置与邮件告警
添加主机与主机组 进入web页面,在 配置-主机群组,创建主机群组 在 配置-主机,新建主机 在可见的名称中建议填写为类似 主机类型-主机名-IP或域名 的格式,如Web-Hyrule001-192. ...
- zabbix系列(四)Zabbix3.0.4添加对Nginx服务的监控
Zabbix3.0.4添加对Nginx服务的监控 通过Nginx的http_stub_status_module模块提供的状态信息来监控,所以在Agent端需要配置Nginx状态获取的脚本,和添加ke ...
- ZABBIX 3.0 配置监控NGINX性能【OK】
1.在agent端查看配置: nginx -V //查看编辑时是否加入状态监控模块:--with-http_stub_status_module --with-http_gzip_static_mod ...
随机推荐
- Apache用户认证、域名跳转、Apache访问日志
5月29日任务 课程内容: 11.18 Apache用户认证11.19/11.20 域名跳转11.21 Apache访问日志扩展 apache虚拟主机开启php的短标签 http://ask.apel ...
- Matlab交叉验证函数——crossvalind
Generate cross-validation indices 生成交叉验证索引 Syntax语法 Indices = crossvalind('Kfold', N, K) %K折交叉验证 ...
- 作为UIApplication单例对象的方法 openURL方法的变化
作为UIApplication单例对象的方法 openURL: 在iOS开发中经常用来实现在当前应用打开外部链接的需求比如跳转到其他应用,跳转应用隐私设置界面;还有相关API canOpenURL: ...
- 关于ios沙盒
沙盒下主要有四个文件夹:document,caches,tmp,library document 的路径 程序运行时生成的文件,这个文件不要存比较放大的文件,比如音频,视频类,因为这里的东西会被上传 ...
- luogu P5058 [ZJOI2004]嗅探器
题目描述 某军搞信息对抗实战演习,红军成功地侵入了蓝军的内部网络,蓝军共有两个信息中心,红军计划在某台中间服务器上安装一个嗅探器,从而能够侦听到两个信息中心互相交换的所有信息,但是蓝军的网络相当的庞大 ...
- 使用Cocoapods创建私有podspec
Cocoapods是非常好用的一个iOS依赖管理工具,使用它可以方便的管理和更新项目中所使用到的第三方库,以及将自己的项目中的公共组件交由它去管理.Cocoapods的介绍及优点本文就不在赘述,我开始 ...
- [TimLinux] Python 函数(2)
1. 作用 最大化的代码重用:建设复制.粘贴 最小化的代码冗余:减少重复代码 流程分解:将做一件事情分解为相应的步骤,不同步骤封装在不同的函数中. 2. 定义 def 函数名(可选的参数列表): 函数 ...
- 学习Java必看的Java书籍(高清中文最新版附下载链接)
今年下半年,我正式系统地学习Java(之前学习C++).最近把学习Java所用到的书籍整理了一下,分享出来,希望对正在学习或准备学习Java的人有一定的帮助. 关于Java的学习路线,和IDE工具In ...
- swagger的配置
// This method gets called by the runtime. Use this method to add services to the container. public ...
- 【数据结构05】红-黑树基础----二叉搜索树(Binary Search Tree)
目录 1.二分法引言 2.二叉搜索树定义 3.二叉搜索树的CRUD 4.二叉搜索树的两种极端情况 5.二叉搜索树总结 前言 在[算法04]树与二叉树中,已经介绍过了关于树的一些基本概念以及二叉树的前中 ...
