Spring Boot学习笔记:JavaMailSender发送邮件
项目中经常会有这样的需求,用户注册成功,需要给用户发送一封邮件。邮件需要有一定格式和样式。本次例子中用freemarker做样式,其他的模版引擎类似。
首先Spring Boot项目,项目结构如下

在pom.xml文件中添加依赖
- <dependency>
- <groupId>org.springframework.boot</groupId>
- <artifactId>spring-boot-starter-mail</artifactId>
- </dependency>
- <dependency>
- <groupId>org.springframework.boot</groupId>
- <artifactId>spring-boot-starter-freemarker</artifactId>
- </dependency>
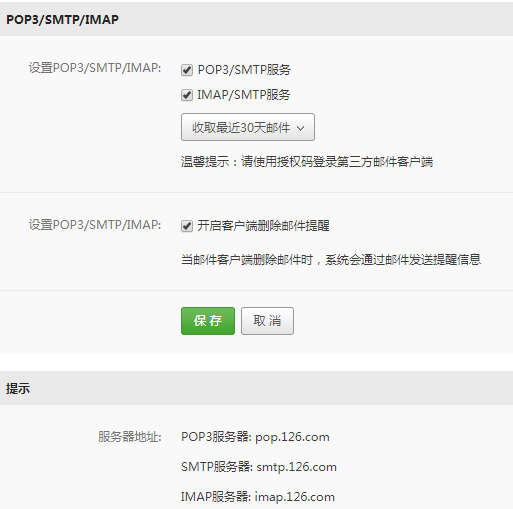
配置发件人信息,发件人邮箱需要开通POP3/SMTP服务,如下图(我是采用126邮箱):
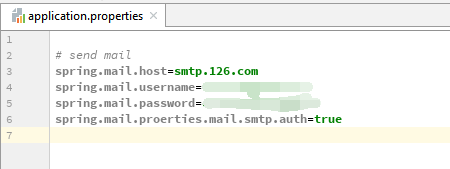
然后在application.properties中添加配置文件:
然后在service层中添加MailService类,代码如下
- import freemarker.core.ParseException;
- import freemarker.template.MalformedTemplateNameException;
- import freemarker.template.Template;
- import freemarker.template.TemplateException;
- import freemarker.template.TemplateNotFoundException;
- import org.slf4j.Logger;
- import org.slf4j.LoggerFactory;
- import org.springframework.beans.factory.annotation.Autowired;
- import org.springframework.beans.factory.annotation.Value;
- import org.springframework.mail.SimpleMailMessage;
- import org.springframework.mail.javamail.JavaMailSender;
- import org.springframework.mail.javamail.MimeMessageHelper;
- import org.springframework.stereotype.Service;
- import org.springframework.ui.freemarker.FreeMarkerTemplateUtils;
- import org.springframework.util.ResourceUtils;
- import org.springframework.web.servlet.view.freemarker.FreeMarkerConfig;
- import javax.mail.MessagingException;
- import javax.mail.internet.MimeMessage;
- import java.io.File;
- import java.io.IOException;
- import java.util.HashMap;
- import java.util.Map;
- @Service
- public class MailService {
- private final static Logger logger = LoggerFactory.getLogger(MailService.class);
- @Value("${spring.mail.username}")
- private String from;
- @Autowired
- private JavaMailSender mailSender;
- @Autowired
- private FreeMarkerConfig freeMarkerConfig;
- // send simple email
- public String sendSimple(String to, String title, String content) {
- SimpleMailMessage message = new SimpleMailMessage();
- message.setFrom(from);
- message.setTo(to);
- message.setSubject(title);
- message.setText(content);
- mailSender.send(message);
- logger.info("{} send email to {}", from, to);
- return "SUCESS";
- }
- // send template mail
- public String sendTemplateMail(String to, String title) {
- MimeMessage mimeMessage = mailSender.createMimeMessage();
- MimeMessageHelper helper;
- try {
- helper = new MimeMessageHelper(mimeMessage, true);
- helper.setFrom(from);
- helper.setTo(to);
- helper.setSubject(title);
- Map<String, Object> model = new HashMap<>();
- model.put("params", from);
- Template template = freeMarkerConfig.getConfiguration().getTemplate("message.ftl");
- String text = FreeMarkerTemplateUtils.processTemplateIntoString(template, model);
- helper.setText(text, true);
- mailSender.send(mimeMessage);
- } catch (MessagingException e) {
- e.printStackTrace();
- } catch (MalformedTemplateNameException e) {
- e.printStackTrace();
- } catch (ParseException e) {
- e.printStackTrace();
- } catch (TemplateNotFoundException e) {
- e.printStackTrace();
- } catch (IOException e) {
- e.printStackTrace();
- } catch (TemplateException e) {
- e.printStackTrace();
- }
- return "SUCEESS";
- }
- // send template mail with attachment
- public String sendAttactmentMail(String to, String title){
- MimeMessage mimeMessage = mailSender.createMimeMessage();
- MimeMessageHelper helper;
- try {
- helper = new MimeMessageHelper(mimeMessage, true);
- helper.setFrom(from);
- helper.setTo(to);
- helper.setSubject(title);
- // add template
- Map<String, Object> model = new HashMap<>();
- model.put("params", from);
- Template template = freeMarkerConfig.getConfiguration().getTemplate("message.ftl");
- String text = FreeMarkerTemplateUtils.processTemplateIntoString(template, model);
- helper.setText(text, true);
- // add attachment
- File file = ResourceUtils.getFile("classpath:static/flcl.jpg");
- helper.addAttachment(file.getName(), file);
- mailSender.send(mimeMessage);
- } catch (MessagingException e) {
- e.printStackTrace();
- } catch (MalformedTemplateNameException e) {
- e.printStackTrace();
- } catch (ParseException e) {
- e.printStackTrace();
- } catch (TemplateNotFoundException e) {
- e.printStackTrace();
- } catch (IOException e) {
- e.printStackTrace();
- } catch (TemplateException e) {
- e.printStackTrace();
- }
- return "SUCCESS";
- }
- }
这个service中写了三个方法,三个方法的作用分别对应于:发送简单邮件、发送模版邮件、发送带附件的模版邮件
核心方法是 mailSender.send(message) ,message对象根据发送的邮件类型不同而不同,主要有MimeMessage MimeMessageHelper
发送带附件的模板邮件方式是三者中最复杂,首先创建邮件对象MimeMessage ,然后通过MimeMessage对象创建MimeMessageHelper(此对象的作用:向MimeMessage对象中填充数据的助手),通过向MimeMessageHelper对象中添加一些属性,例如发件人、收件人、邮件主题、模版、附件。其中freemarker模板文件xxx.ftl放在resources文件夹下中template(通过FreemakrerConfig获取xxx.ftl的Template对象,然后转换为String),其中附件flcl.jpg放在resources文件夹中的static中(通过ResourceUtils获取文件对象File)。属性添加完成后,就可以发送了。
然后在controller或者其他service层中调用该方法就可以了。
补充:
message.ftl文件内容如下
- <!DOCTYPE html>
- <html lang="en">
- <head>
- <meta charset="UTF-8">
- <title>Hello</title>
- </head>
- <body>
- <h1>Send email</h1>
- <div>this email come from ${params}</div>
- </body>
- </html>
发送成功后,可在收件箱中收到邮件

Spring Boot学习笔记:JavaMailSender发送邮件的更多相关文章
- Spring Boot学习笔记2——基本使用之最佳实践[z]
前言 在上一篇文章Spring Boot 学习笔记1——初体验之3分钟启动你的Web应用已经对Spring Boot的基本体系与基本使用进行了学习,本文主要目的是更加进一步的来说明对于Spring B ...
- Spring Boot中使用JavaMailSender发送邮件
相信使用过Spring的众多开发者都知道Spring提供了非常好用的JavaMailSender接口实现邮件发送.在Spring Boot的Starter模块中也为此提供了自动化配置.下面通过实例看看 ...
- Spring Boot 学习笔记(六) 整合 RESTful 参数传递
Spring Boot 学习笔记 源码地址 Spring Boot 学习笔记(一) hello world Spring Boot 学习笔记(二) 整合 log4j2 Spring Boot 学习笔记 ...
- Spring Boot 学习笔记1——初体验之3分钟启动你的Web应用[z]
前言 早在去年就简单的使用了一下Spring Boot,当时就被其便捷的功能所震惊.但是那是也没有深入的研究,随着其在业界被应用的越来越广泛,因此决定好好地深入学习一下,将自己的学习心得在此记录,本文 ...
- Spring Boot 学习笔记1---初体验之3分钟启动你的Web应用
前言 早在去年就简单的使用了一下Spring Boot,当时就被其便捷的功能所震惊.但是那是也没有深入的研究,随着其在业界被应用的越来越广泛,因此决定好好地深入学习一下,将自己的学习心得在此记录,本文 ...
- Spring Boot 学习笔记--整合Thymeleaf
1.新建Spring Boot项目 添加spring-boot-starter-thymeleaf依赖 <dependency> <groupId>org.springfram ...
- 我的第一个spring boot程序(spring boot 学习笔记之二)
第一个spring boot程序 写在前面:鉴于spring注解以及springMVC的配置有大量细节和知识点,在学习理解之后,我们将直接进入spring boot的学习,在后续学习中用到注解及其他相 ...
- Java框架spring Boot学习笔记(六):Spring Boot事务管理
SpringBoot和Java框架spring 学习笔记(十九):事务管理(注解管理)所讲的类似,使用@Transactional注解便可以轻松实现事务管理.
- Spring Boot学习笔记---Spring Boot 基础及使用idea搭建项目
最近一段时间一直在学习Spring Boot,刚进的一家公司也正好有用到这个技术.虽然一直在学习,但是还没有好好的总结,今天周末先简单总结一下基础知识,等有时间再慢慢学习总结吧. Spring Boo ...
随机推荐
- selenium ide界面介绍
Selenium Ide是firefox浏览器的一个插件,可以进行web的录制和回放,完成简单的自动化测试,同时可以将录制的脚本导出多种语言的脚本. 下面是Selenium Ide的界面: Base ...
- Android Studio 插件-Android Styler 的使用 (转)
作用:把 xml文件 转为 style 截图保留 使用方法 使用方法:选中xml代码 按下 Ctrl+Shift+D 转自:http://blog.csdn.net/zxwd2015/article/ ...
- pyinstaller linux系统下打包python源文件
将python程序放在其他linux服务器中执行,通常linux服务器中默认安装python2.6,很多情况下需要升级为2.7 且要安装程序中需要的第三方模块,配置较为麻烦,所以通过在本地linux ...
- Redis集群架构【转载】
Redis 集群的 TCP 端口(Redis Cluster TCP ports) 每个 Redis 集群节点需要两个 TCP 连接打开.正常的 TCP 端口用来服务客户端,例如 6379,加 100 ...
- jenkin、SVN、archery集成openLDAP
jenkins: 1.下载.安装插件 LDAP .Matrix Authorization Strategy 2. 系统管理 —> 全局安全配置 点击 启用安全,并且选择 LDAP 认证,这里有 ...
- 使用phpStudy运行伊人集项目
1.首次运行时,需要把system/config/install.look.php以及system/config/database.php(后面这个文件可以先不删除,若是安装过程中数据库报错,再来删除 ...
- Genymotion 模拟器上网出现 net::ERR_NAME_NOT_RESOLVED
Genymotion 模拟器在公司网络安装的,然后启动能正常上网,把笔记本带回家,网络变化了,再使用模拟器 上网显示: (net::ERR_NAME_NOT_RESOLVED) 各种百度,最后用如下方 ...
- 官方教程:Apache Kylin和Superset集成,使用开源组件,完美打造OLAP系统
本文转自Apache Kylin公众号apachekylin. Superset 是一个数据探索和可视化平台,设计用来提供直观的,可视化的,交互式的分析体验. Superset 提供了两种分析数据源的 ...
- position的absolute与fixed,absolute与relative共同点与不同点
absolute与fixed 共同点: (1) 改变行内元素的呈现方式,display被置为block: (2) 让元素脱离普通流,不占据空间: (3) 默认会覆盖到非定位元素上 不同点: absol ...
- XP下1433端口打不开
问题:操作系统windows xp:数据库sql server 2000:安装后通过程序无法访问数据,原因是数据库的默认端口1433未打开. 原因:sql server 2000的bug,需要升级补丁 ...