数据持久化—真机上的Plist写入
其实写入不到真机里面主要是你写入时,当前那文件夹里你要写入的plist根本不存在
所以你怎么写都写不进去,所以你必须先创建你要写入的plist;
你用这样初始化程序就能自己创建:
- NSMutableArray *dictplist = [[NSMutableArray alloc] init];
- [dictplist insertObject:markName atIndex:0];
- [dictplist writeToFile:plistPath atomically:YES];
直接下面这种是不行的
- NSMutableArray *array = [[NSMutableArray alloc] initWithContentsOfFile:plistPath];
- [array insertObject:markName atIndex:0];
- [array writeToFile:plistPath atomically:YES];
下面是具体的实现方法
一般plist 的写入位置在
写入文件的位置:(Library文件夹)
- NSString *lib = [NSSearchPathForDirectoriesInDomains(NSLibraryDirectory, NSUserDomainMask, YES) lastObject];
- NSString *libPath = [lib stringByAppendingString:@"/Caches"];
- NSString* plistPath = [libPath stringByAppendingFormat:@"/bookmark.plist"];
- NSLog(@"%@",plistPath);
- if(![[NSFileManager defaultManager] fileExistsAtPath:plistPath]) {
- NSMutableArray *dictplist = [[NSMutableArray alloc] init];
- [dictplist insertObject:markName atIndex:0];
- [dictplist writeToFile:plistPath atomically:YES];
- NSLog(@"------1-----%@",dictplist);
- }
- else
- {
- NSMutableArray *array = [[NSMutableArray alloc] initWithContentsOfFile:plistPath];
- [array insertObject:markName atIndex:0];
- [array writeToFile:plistPath atomically:YES];
- NSLog(@"-------2----%@",array);
- }
写入文件的位置:( Document 文件夹)
- NSArray *paths = NSSearchPathForDirectoriesInDomains(NSDocumentDirectory, NSUserDomainMask, YES);
- //获取完整路径
- NSString *documentsDirectory = [paths objectAtIndex:0];
- NSString *plistPath = [documentsDirectory stringByAppendingPathComponent:@"test2.plist"];
- NSLog(@"%@",plistPath);
- if(![[NSFileManager defaultManager] fileExistsAtPath:plistPath]) {
- NSMutableArray *dictplist = [[NSMutableArray alloc] init];
- [dictplist insertObject:markName atIndex:0];
- [dictplist writeToFile:plistPath atomically:YES];
- NSLog(@"------1-----%@",dictplist);
- }
- else
- {
- NSMutableArray *array = [[NSMutableArray alloc] initWithContentsOfFile:plistPath];
- [array insertObject:markName atIndex:0];
- [array writeToFile:plistPath atomically:YES];
- NSLog(@"-------2----%@",array);
- }
下面的是参考 http://blog.csdn.net/smallsky_keke/article/details/7431277
这篇文章是自己通过实践获取,在网上查过很多资料,也走了不上的弯路,由于刚开始学子不久,只是把自己遇到的问题贡献给大家
一,创建文件
//获取路径对象
NSArray *paths =NSSearchPathForDirectoriesInDomains(NSDocumentDirectory,NSUserDomainMask,
YES);
//获取完整路径
NSString *documentsDirectory = [paths objectAtIndex:0];
NSString *plistPath = [documentsDirectory stringByAppendingPathComponent:@"test.plist"];
NSMutableDictionary *dictplist = [[NSMutableDictionaryalloc
] init];
//设置属性值
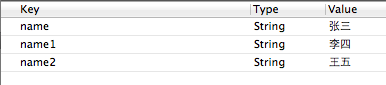
[dictplist
setObject:@"张三" forKey:@"name"];
[dictplist
setObject:@"李四"forKey:@"name1"];
[dictplist
setObject:@"王五"forKey:@"name2"];
//写入文件
[dictplist
writeToFile:plistPath atomically:YES];
这个是创建了一个简单的plist文件,创建后的图1为:
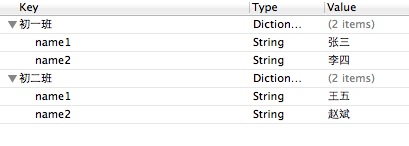
下面是创建了一种多键值的plist文件,代码和图如下:
//获取路径对象
NSArray *paths =NSSearchPathForDirectoriesInDomains(NSDocumentDirectory,NSUserDomainMask,
YES);
//获取完整路径
NSString *documentsDirectory = [paths objectAtIndex:0];
NSString *plistPath = [documentsDirectory stringByAppendingPathComponent:@"test.plist"];
NSMutableDictionary *dictplist = [[NSMutableDictionaryalloc
] init];
//定义第一个插件的属性
NSMutableDictionary *plugin1 = [[NSMutableDictionaryalloc]init];
[plugin1
setObject:@"张三"forKey:@"name1"];
[plugin1
setObject:@"李四"forKey:@"name2"];
//定义第二个插件的属性
NSMutableDictionary *plugin2 = [[NSMutableDictionaryalloc]init];
[plugin2
setObject:@"王五"forKey:@"name1"];
[plugin2
setObject:@"赵斌"forKey:@"name2"];
//设置属性值
[dictplist
setObject:plugin1 forKey:@"初一班"];
[dictplist
setObject:plugin2 forKey:@"初二班"];
//写入文件
[dictplist
writeToFile:plistPath atomically:YES];
图2:
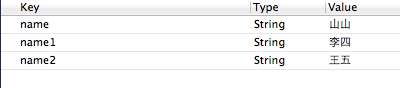
针对图1进行修改的程序,代码如下:
NSString *path = [[NSSearchPathForDirectoriesInDomains(NSDocumentDirectory,NSUserDomainMask,
YES) objectAtIndex:0]stringByAppendingPathComponent:@"test.plist"];
NSMutableDictionary *applist = [[[NSMutableDictionaryalloc]initWithContentsOfFile:path]mutableCopy];
NSString *name = [applist objectForKey:@"name"];
name =
@"山山";
[applist
setObject:name forKey:@"name"];
[applist
writeToFile:path atomically:YES];
执行后如下图:
针对图2进行修改的程序,代码如下:
[dictplist writeToFile:plistPath atomically:YES];
NSString *path = [[NSSearchPathForDirectoriesInDomains(NSDocumentDirectory,NSUserDomainMask,
YES)objectAtIndex:0]stringByAppendingPathComponent:@"test.plist"];
//根据路径获取test.plist的全部内容
NSMutableDictionary *infolist= [[[NSMutableDictionaryalloc]initWithContentsOfFile:path]mutableCopy];
//获取初一班的信息
NSMutableDictionary *info = [infolist objectForKey:@"初一班"];
NSString *name1 = [info objectForKey:@"name1"];
name1 =
@"山山";
[info
setValue:name1 forKey:@"name1"];
[infolist
setValue:info forKey:@"初一班"];
[infolist
writeToFile:path atomically:YES];
图如下:

以上两个修改信息的地方,必须要加入红色标记的方法,才能在表里进行增改操作。
以上是个人的学习心得,请大家多多指教。
数据持久化—真机上的Plist写入的更多相关文章
- iOS数据持久化-OC
沙盒详解 1.IOS沙盒机制 IOS应用程序只能在为该改程序创建的文件系统中读取文件,不可以去其它地方访问,此区域被成为沙盒,所以所有的非代码文件都要保存在此,例如图像,图标,声音,映像,属性列表,文 ...
- 数据持久化-Plist文件写入
数据持久化,常见4种:归档,plist文件,sqlite,coreData.今天复习的是plist文件读写. // // ViewController.m // Test_Plist // // Cr ...
- iOS - OC 数据持久化
1.Sandbox 沙箱 iOS 为每个应用提供了独立的文件空间,一个应用只能直接访问为本应用分配的文件目录,不可以访问其他目录,每个应用自己独立的访问空间被称为该应用的沙盒.也就是说,一个应用与文件 ...
- iOS - Swift 数据持久化
1.Sandbox 沙箱 iOS 为每个应用提供了独立的文件空间,一个应用只能直接访问为本应用分配的文件目录,不可以访问其他目录,每个应用自己独立的访问空间被称为该应用的沙盒.也就是说,一个应用与文件 ...
- iOS中 数据持久化 UI高级_17
数据持久化的本质就是把数据由内写到本地(硬盘中),在iOS指将数据写到沙盒文件夹下: 沙盒机制:指的就是采用沙盒文件夹的形式管理应用程序的本地文件,而且沙盒文件夹的名字是随机分配的,采用十六进制方法命 ...
- iOS -数据持久化方式-以真实项目讲解
前面已经讲解了SQLite,FMDB以及CoreData的基本操作和代码讲解(CoreData也在不断学习中,上篇博客也会不断更新中).本篇我们将讲述在实际开发中,所使用的iOS数据持久化的方式以及怎 ...
- iOS之数据持久化方案
概论 所谓的持久化,就是将数据保存到硬盘中,使得在应用程序或机器重启后可以继续访问之前保存的数据.在iOS开发中,有很多数据持久化的方案,接下来我将尝试着介绍一下5种方案: plist文件(属性列表) ...
- Docker数据持久化与容器迁移
上节讲到当容器运行期间产生的数据是不会在写镜像里面的,重新用此镜像启动新的容器就会初始化镜像,会加一个全新的读写入层来保存数据.如果想做到数据持久化,Docker提供数据卷(Data volume)或 ...
- iOS的数据持久化
所谓的持久化,就是将数据保存到硬盘中,使得在应用程序或机器重启后可以继续访问之前保存的数据.在iOS开发中,有很多数据持久化的方案,接下来我将尝试着介绍一下5种方案: plist文件(属性列表) pr ...
随机推荐
- java小程序(课堂作业04)
请编写一个程序,使用上述算法加密或解密用户输入的英文字串要求设计思想.程序流程图.源代码.结果截图. 1,设计思想: 先输入索要加密的字符串由于此程序比较基础所以只考虑大写字母,然后用toCharAr ...
- 在Android中创建一个下拉菜单
添加四个控件 TToolbar Alignment: alTop TSpeedButton Alignment: alRight StyleLookUp: detailstoolbutton Marg ...
- Action<T> Delegate
来源:https://docs.microsoft.com/zh-cn/dotnet/api/system.action-1?view=netframework-4.7.2 Action<T&g ...
- mysql数据字典 如何生成?
用phpMyAdmin查看表结构,点击 打印预览. &lt;img src="https://pic3.zhimg.com/50/3205ff3bd3da067528f4c1 ...
- 【springmvc】之使用jQuery接收前端传入List对象
前端代码: <form id="person_add" method="post" action="user"> <tab ...
- 基于Kafka消息驱动最终一致事务(一)
基本可用软状态最终一致事务 本用例分两个数据库分别是用户库和交易库,不使用分布式事务,使用基于消息驱动实现基本可用软状态最终一致事务(BASE).现在说明下事务逻辑演化步骤,尊从CAP原则,即分布式系 ...
- 服务容错保护断路器Hystrix之一:入门示例介绍(springcloud引入Hystrix的两种方式)
限流知识<高可用服务设计之二:Rate limiting 限流与降级> 在微服务架构中,我们将系统拆分成了一个个的服务单元,各单元间通过服务注册与订阅的方式互相依赖.由于每个单元都在不同的 ...
- 用gradle打包可运行jar
参考了 http://www.cnblogs.com/yongtao/p/4104526.html gradle文件加入 apply plugin: 'application' mainClassNa ...
- IP地址基础
第一台计算机的名字 1946年2月14日,世界上第一台电脑ENIAC在美国宾夕法尼亚大学诞生,名叫ENIAC(爱尼阿克). 第一个网络的名字: arpanet 计算机网络定义: 物理位置不同.功能 ...
- 多级字典表单的Python实现
需求: 可依次选择进入各子菜单 可从任意一层往回退到上一层 可从任意一层退出程序 数据结构 menu = { '北京':{ '海淀':{ '五道口':{ 'soho':{}, '网易':{}, 'go ...