4、TensorFlow基础(二)常用API与变量作用域
1、图、操作和张量
TensorFlow 的计算表现为数据流图,所以 tf.Graph 类中包含一系列表示计算的操作对象(tf.Operation),以及在操作之间流动的数据 — 张量对象(tf.Tensor)。与图相关的 API 均位于tf.Graph 类中:
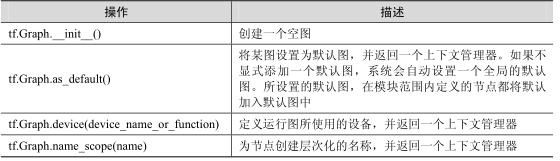
tf.Operation 类代表图中的一个节点,用于计算张量数据。该类型由节点构造器(如 tf.matmul()或者 Graph.create_op())产生。例如,c = tf.matmul(a, b)创建一个 Operation 类,其类型为 MatMul的操作类。与操作相关的 API 均位于 tf.Operation 类中,


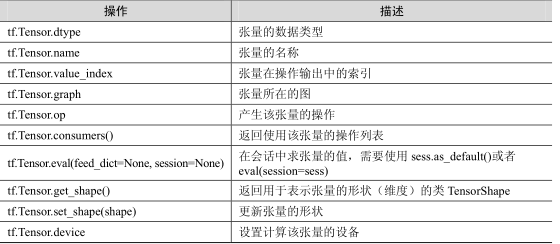
tf.Tensor 类是操作输出的符号句柄,它不包含操作输出的值,而是提供了一种在 tf.Session中计算这些值的方法。这样就可以在操作之间构建一个数据流连接,使 TensorFlow 能够执行一个表示大量多步计算的图形。与张量相关的 API 均位于 tf.Tensor 类中
2、可视化
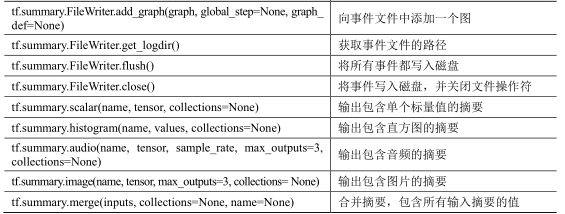
可视化时,需要在程序中给必要的节点添加摘要(summary),摘要会收集该节点的数据,并标记上第几步、时间戳等标识,写入事件文件(event file)中。tf.summary.FileWriter 类用于在目录中创建事件文件,并且向文件中添加摘要和事件,用来在 TensorBoard 中展示。

3、变量作用域
在 TensorFlow 中有两个作用域(scope),一个是 name_scope,另一个是 variable_scope。它们究竟有什么区别呢?简而言之,name_scope主要是给variable_name加前缀,也可以op_name加前缀;name_scope 是给 op_name 加前缀
变量名字由两部分组成:scope/变量name。
name 参数才是对象的唯一标识。
3.1、tf.name_scope()
Graph中保存着一个属性_name_stack(string类型),_name_stack的值保存着当前的name_scope的名字,在这个图中创建的对象Variable、Operation、Tensor的名字之前都加上了这个前缀。
#它的主要目的是为了更加方便地管理参数命名。
# 与 tf.Variable() 结合使用。简化了命名
|
1
2
3
|
with tf.name_scope('conv1') as scope: weights1 = tf.Variable([1.0, 2.0], name='weights') bias1 = tf.Variable([0.3], name='bias') |
# 下面是在另外一个命名空间来定义变量的
|
1
2
3
|
with tf.name_scope('conv2') as scope: weights2 = tf.Variable([4.0, 2.0], name='weights') bias2 = tf.Variable([0.33], name='bias') |
# 所以,实际上weights1 和 weights2 这两个引用名指向了不同的空间,不会冲突
|
1
2
3
4
5
|
print (weights1.name)print (weights2.name)输出:<br>conv1/weights:0conv2/weights:0 |
# 注意,这里的 with 和 python 中其他的 with 是不一样的
# 执行完 with 里边的语句之后,这个 conv1/ 和 conv2/ 空间还是在内存中的。这时候如果再次执行上面的代码
# 就会再生成其他命名空间(执行完上面的代码,接着执行这里的,上面的空间还在内存中)
|
1
2
3
4
5
6
7
8
9
10
11
12
|
with tf.name_scope('conv1') as scope: weights1 = tf.Variable([1.0, 2.0], name='weights') bias1 = tf.Variable([0.3], name='bias')with tf.name_scope('conv2') as scope: weights2 = tf.Variable([4.0, 2.0], name='weights') bias2 = tf.Variable([0.33], name='bias')print (weights1.name)print (weights2.name)输出: conv1_1/weights:0conv2_1/weights:0 |
注意,tf.Variable再次命名相同变量时(本来又要产生 conv1/weights:0 conv2/weights:0),结果这里产生了(conv1_1/weights:0 conv2_1/weights:0),所以这就是tf.Variable()的一个特性,遇到同名时,产生一个新的,并不共享。
3.2、 tf.variable_scope
Graph中维护一个collection,这个collection中的 键_VARSCOPE_KEY对应一个 [current_variable_scope_obj],保存着当前的variable_scope。使用 get_variable() 创建变量的时候,就从这个collection 取出 current_variable_scope_obj,通过这个 variable_scope创建变量。
tf.variable_scope() 主要结合 tf.get_variable() 来使用,实现变量共享。
如果tf.variable_scope函数使用参数reuse=None或者reuse=False创建上下文管理器,则tf.get_variable函数可以创建新的变量。但不可以创建已经存在的变量即为同名的变量。
如果tf.variable_scope函数使用参数reuse=True创建上下文管理器,则tf.get_variable函数可以使用已在当前空间定义的变量赋值来创建变量。但不可以使用不存在的变量来创建。
# 这里是正确的打开方式~~~可以看出,name 参数才是对象的唯一标识
|
1
2
3
|
with tf.variable_scope('v_scope') as scope1: Weights1 = tf.get_variable('Weights', shape=[2, 3]) bias1 = tf.get_variable('bias', shape=[3]) |
# 下面来共享上面已经定义好的变量
# note: 在下面的 scope 中的变量必须已经定义过了,才能设置 reuse=True,否则会报错
|
1
2
3
4
5
6
7
8
9
|
with tf.variable_scope('v_scope', reuse=True) as scope2: Weights2 = tf.get_variable('Weights') Weights3 = tf.get_variable('Weights', [2,3]) #shape如果不同会报错print (Weights2.name)print (Weights3.name)输出v_scope/Weights:0v_scope/Weights:0 |
# 可以看到这两个引用名称指向的是同一个内存对象
|
1
2
3
4
5
6
7
8
9
10
11
12
13
14
15
16
17
18
19
|
# 注意, bias1 的定义方式with tf.variable_scope('v_scope') as scope1: Weights1 = tf.get_variable('Weights', shape=[2, 3]) bias1 = tf.Variable([0.52], name='bias')# 下面来共享上面已经定义好的变量# note: 在下面的 scope 中的get_variable()变量必须已经定义过了,才能设置 reuse=True,否则会报错with tf.variable_scope('v_scope', reuse=True) as scope2: Weights2 = tf.get_variable('Weights') bias2 = tf.Variable([0.53], name='bias')print (Weights1.name)print (Weights2.name)print (bias1.name)print (bias2.name)输出:v_scope / Weights:0v_scope / Weights:0v_scope / bias:0v_scope_1 / bias:0 |
使用tf.get_variable发现之前有定义好的的该变量,则进行权值共享。
而bias1 = tf.Variable([0.52], name='bias')发现之前定义好的名字,则重新定一个新的,并没有共享权值。
tf.get_variable_scope() :获取当前scope
tf.get_variable_scope().reuse_variables() 共享变量
3.3、对比
简单来说name_scope是给Op_name加前缀的,variable_scope是给变量variable_name和Op_name加前缀的.作用域在使用Tensorboard对Graph对象进行可视化的时候很有帮助,作用域会把一些Op划分到较大的语句块当中.使用tensorboard可视化数据流图的时候,每个作用域都对自己的Op进行封装,从而获得更好的可视化效果.
- 如果在 tf.name_scope() 环境下分别使用 tf.get_variable() 和 tf.Variable(),两者的主要区别在于
- tf.get_variable() 创建的变量名不受 name_scope 的影响;
- tf.get_variable() 创建的变量,name 属性值不可以相同;tf.Variable() 创建变量时,name 属性值允许重复(底层实现时,会自动引入别名机制)
- 此外 tf.get_variable() 与 tf.Variable() 相比,多了一个 initilizer (初始化子)可选参数;
- tf.Variable() 对应地多了一个 initial_value 关键字参数,也即对于 tf.Variable 创建变量的方式,必须显式初始化;
name_scope
|
1
2
3
4
5
6
7
8
9
10
11
12
13
|
with tf.name_scope("ns") as ns: b = tf.Variable(1.0, name='b') w = tf.get_variable("w", shape=[2,10],dtype=tf.float32) a = tf.add(b, [3],name='a')print nsprint b.nameprint w.nameprint a.name<br>输出:ns /ns / b:0w:0ns / a:0 |
|
1
2
3
4
5
6
7
8
9
10
11
12
13
14
15
|
with tf.name_scope("ns") as ns: with tf.name_scope("ns1") as ns1: b1 = tf.Variable(0, name='b1') w1 = tf.get_variable("w1", shape=[10], dtype=tf.float32) a1 = tf.add(b1, [3], name='a1')print ns1print b1.nameprint w1.nameprint a1.name输出:ns/ns1/ns/ns1/b1:0w1:0ns/ns1/a1:0 |
|
1
2
3
4
5
6
7
8
9
10
11
12
13
14
15
16
17
|
with tf.name_scope("ns") as ns: with tf.variable_scope("vs1") as vs1: b2 = tf.Variable(0, name='b2') w2 = tf.get_variable("w2", shape=[2]) a2 = tf.add(b2, [3], name='a2')print vs1print vs1.nameprint b2.nameprint w2.nameprint a2.name输出:<tensorflow.python.ops.variable_scope.VariableScope object at 0x42fe790>vs1ns/vs1/b2:0vs1/w2:0ns/vs1/a2:0 |
|
1
2
3
4
5
6
7
8
9
10
11
12
13
14
15
|
with tf.name_scope("ns") as ns: with tf.name_scope(None) as n1: b3 = tf.Variable(2.0, name='b3') w3 = tf.get_variable("w3", shape=[2]) a3 = tf.add(b3, [3], name='a3')print n1print b3.nameprint w3.nameprint a3.name输出:b3:0w3:0a3:0 |
variable_scope
注意事项:
1. 在 variable_scope 里面的 variable_scope 会继承上面的 reuse 值,即上面一层开启了 reuse ,则下面的也跟着开启。但是不能人为的设置 reuse 为 false ,只有退出 variable_scope 才能让 reuse 变为 false:
2、当在某一 variable_scope 内使用别的 scope 的名字时,此时不再受这里的等级关系束缚,直接与使用的 scope 的名字一样:
|
1
2
3
4
5
6
7
8
9
10
11
12
13
14
15
16
|
with tf.variable_scope("vs") as vs: b = tf.Variable(1.0, name='b') w = tf.get_variable("w", shape=[2, 10], dtype=tf.float32) a = tf.add(b, [3], name='a')print vsprint vs.nameprint b.nameprint w.nameprint a.name输出:<tensorflow.python.ops.variable_scope.VariableScope object at 0x46ee610>vsvs/b:0vs/w:0vs/a:0 |
|
1
2
3
4
5
6
7
8
9
10
11
12
13
14
15
|
with tf.variable_scope("vs") as vs: with tf.name_scope("ns1") as ns1: b1 = tf.Variable(0, name='b1') w1 = tf.get_variable("w1", shape=[10], dtype=tf.float32) a1 = tf.add(b1, [3], name='a1')print ns1print b1.nameprint w1.nameprint a1.name输出:vs/ns1/vs/ns1/b1:0vs/w1:0vs/ns1/a1:0 |
|
1
2
3
4
5
6
7
8
9
10
11
12
13
14
15
16
17
|
with tf.variable_scope("vs") as vs: with tf.variable_scope("vs1") as vs1: b2 = tf.Variable(0, name='b2') w2 = tf.get_variable("w2", shape=[2]) a2 = tf.add(b2, [3], name='a2')print vs1print vs1.nameprint b2.nameprint w2.nameprint a2.name输出:<tensorflow.python.ops.variable_scope.VariableScope object at 0x4b1e310>vs/vs1vs/vs1/b2:0vs/vs1/w2:0vs/vs1/a2:0 |
|
1
2
3
4
5
6
7
8
9
10
11
12
13
14
15
|
with tf.variable_scope("vs") as vs: with tf.name_scope(None) as n1: b3 = tf.Variable(2.0, name='b3') w3 = tf.get_variable("w3", shape=[2]) a3 = tf.add(b3, [3], name='a3')print n1print b3.nameprint w3.nameprint a3.name输出:b3:0vs/w3:0a3:0 |
总结:
1、使用tf.Variable()的时候,tf.name_scope()和tf.variable_scope() 都会给 Variable 和 op 的 name属性加上前缀。
2、使用tf.get_variable()的时候,tf.name_scope()就不会给 tf.get_variable()创建出来的Variable加前缀。
变量作用域机制主要由两个函数实现:
tf.get_variable(<name>, <shape>, <initializer>)

tf.variable_scope(<scope_name>)- 1
- 2
常用的initializer有
tf.constant_initializer(value) # 初始化一个常量值,

tf.random_uniform_initializer(a, b) # 从a到b均匀分布的初始化,

tf.random_normal_initializer(mean, stddev) # 用所给平均值和标准差初始化正态分布.- 1
- 2
- 3
对如下实例,
with tf.variable_scope(conv1):

    # Variables created here will be named "conv1/weights".

    weights = tf.get_variable('weights',kernel_shape,

              initializer=tf.random_normal_initializer())

    # Variables created here will be named "conv1/biases".

    biases = tf.get_variable('biases',biases_shape,

initializer=tf.constant_intializer(0.0))- 1
- 2
- 3
- 4
- 5
- 6
- 7
- 8
变量作用域的tf.variable_scope()带有一个名称,它将会作为前缀用于变量名,并且带有一个重用标签(后面会说到)来区分以上的两种情况。嵌套的作用域附加名字所用的规则和文件目录的规则很类似。
对于采用了变量作用域的网络结构,结构伪代码如下:
def conv_relu(input, kernel_shape, bias_shape):

    # Create variable named "weights".

    weights = tf.get_variable("weights", kernel_shape,

        initializer=tf.random_normal_initializer())

    # Create variable named "biases".

    biases = tf.get_variable("biases", bias_shape,

        initializer=tf.constant_intializer(0.0))

    conv = tf.nn.conv2d(input, weights,

        strides=[1, 1, 1, 1], padding='SAME')

    return tf.nn.relu(conv + biases)

def my_image_filter(input_images):

    with tf.variable_scope("conv1"):

    # Variables created here will be named "conv1/weights", "conv1/biases".

        relu1 = conv_relu(input_images, [5, 5, 32, 32], [32])

    with tf.variable_scope("conv2"):

    # Variables created here will be named "conv2/weights", "conv2/biases".

return conv_relu(relu1, [5, 5, 32, 32], [32])- 1
- 2
- 3
- 4
- 5
- 6
- 7
- 8
- 9
- 10
- 11
- 12
- 13
- 14
- 15
- 16
- 17
- 18
如果连续调用两次my_image_filter()将会报出ValueError:
result1 = my_image_filter(image1)

result2 = my_image_filter(image2)

# Raises ValueError(... conv1/weights already exists ...)- 1
- 2
- 3
若不在网络架构中采用变量作用域则不会报错,但是会产生两组变量,而不是共享变量。
变量作用域是怎么工作的?
理解tf.get_variable()
情况1:当tf.get_variable_scope().reuse == False时,该方法用来创建新变量。
with tf.variable_scope("foo"):

    v = tf.get_variable("v", [1])

assert v.name == "foo/v:0"- 1
- 2
- 3
该情况下方法会生成一个“foo/v”,并检查确保没有其他变量使用该全称。如果该全程已经有其他的变量在使用了,则会抛出ValueError。
情况2:当tf.get_variable_scope().reuse == True时,该方法是为重用变量所设置
with tf.variable_scope("foo"):

    v = tf.get_variable("v", [1])

with tf.variable_scope("foo", reuse=True):

    v1 = tf.get_variable("v", [1])

assert v1 == v- 1
- 2
- 3
- 4
- 5
该情况下会搜索一个已存在的“foo/v”并将该变量的值赋给v1,若找不到“foo/v”变量则会抛出ValueError。
注意reuse标签可以被手动设置为True,但不能手动设置为False。reuse 参数是不可继承的,所以当你设置一个变量作用域为重用作用域时,那么其所有的子作用域也将会被重用。
4、TensorFlow基础(二)常用API与变量作用域的更多相关文章
- 漫漫Java路1—基础知识3—数据类型和变量作用域以及常量
强类型语言 所有变量定义后才能使用,区别于js等弱类型语言 数据类型分类 基本类型(primitive type) 引用类型(reference type) 整数类 byte:占1字节 short:占 ...
- java基础(15):常用API(Object、String、StringBuffer)
1. Java的API及Object类 在以前的学习过程中,我们都在学习对象基本特征.对象的使用以及对象的关系.接下来我们开始使用对象做事情,那么在使用对象做事情之前,我们要学习一些API中提供的常用 ...
- appium 基础:常用api接口(2)
一.获取手机分辨率 size=driver.get_window_size()#获取手机屏幕大小,分辨率 print(size)#{'width': 720, 'height': 1280} 得到的是 ...
- JS基础二--字面量和变量
/* 字面量,都是一些不可改变的值, 比如:1 2 3 4 5 字面量都是可以直接使用,但是我们一般不会直接使用字面量. 变量,变量可以用来保存字 ...
- JS基础:常用API
全局属性 typeof() 检测数据类型 parseInt() 从字符串解析一个整数 parseFloat() 从字符串解析一个小数 Number() 强制类型转换为数字 String() 强制类型转 ...
- TensorFlow基础二(Shape)
首先说明tf中tensor有两种shape,分别为static (inferred) shape和dynamic (true) shape,其中static shape用于构建图,由创建这个tenso ...
- python开发基础(二)常用数据类型调用方法
1 数字: int 2 3 int : 转换,将字符串转化成数字 4 num1 = '123' 5 num2 = int (a) 6 numadd = num2 +1000 7 print(num2) ...
- C++基础知识篇:C++ 变量作用域
作用域是程序的一个区域,一般来说有三个地方可以定义变量: 在函数或一个代码块内部声明的变量,称为局部变量. 在函数参数的定义中声明的变量,称为形式参数. 在所有函数外部声明的变量,称为全局变量. 我们 ...
- java基础3.0:Java常用API
本篇介绍Java基础中常用API使用,当然只是简单介绍,围绕重要知识点引入,巩固开发知识,深入了解每个API的使用,查看JavaAPI文档是必不可少的. 一.java.lang包下的API Java常 ...
随机推荐
- Golang基本结构之练习(day2)
笔记: . 任何一个代码文件隶属于一个包 . import 关键字,引用其他包: import(“fmt”) import(“os”) 通常习惯写成: import ( “fmt” “os” ) . ...
- Zookeeper 源码(五)Leader 选举
Zookeeper 源码(五)Leader 选举 前面学习了 Zookeeper 服务端的相关细节,其中对于集群启动而言,很重要的一部分就是 Leader 选举,接着就开始深入学习 Leader 选举 ...
- winscp 使用root身份登录
参考: https://www.haiyun.me/archives/winscp-sftp-sudo-root.html 一般root账户在服务器上会被禁止ssh,此时普通用户通过sudo执行管理员 ...
- jquery,禁止冒泡和默认行为
如果在页面中重叠了多个元素,并且重叠的这些元素都绑定了同一个事件,那么就会出现冒泡问题.//HTML 页面<div style="width:200px;height:200px;ba ...
- mysql查询今天、昨天、近7天、近30天、本月、上一月的SQL语句
mysql查询今天.昨天.近7天.近30天.本月.上一月的SQL语句 这篇文章主要介绍了mysql查询今天.昨天.近7天.近30天.本月.上一月的SQL语句,一般在一些统计报表中比较常用这个时间段,需 ...
- ADO接口之_RecordsetPtr
转自:http://hi.baidu.com/%CE%D2%B6%CF%C1%CB%CB%BC%C4%EE/blog/item/e057c526c6af6c29c995596e.html _Recor ...
- Configuring Oracle E-Business Suite Integrated SOA Gateway Release 12.1.2 and Release 12.1.3 in a Multinode Environment (Doc ID 1081100.1)
Configuring Oracle E-Business Suite Integrated SOA Gateway Release 12.1.2 and Release 12.1.3 in a Mu ...
- 博客和Github简单练习
我的第一篇博客 1.首先是自我介绍 姓名:孙弘毅 班级:网工142 学号:1413042050 兴趣:游戏,看书 至于我写了多少代码我也不清楚,反正不多 2.Github 注册流程 (1)百度Git ...
- Git Note - Branch
1. add a new branch cd workspace git branch user1/newbranch1 git checkout user1/newbranch1 or git ch ...
- linux下svn服务器的搭建
网上的教程实在是太恶心了,不是太老,就是有问题,刚参考的一篇文章也有问题.自己记录下来,以后用就方便了,现在一边重新安装一遍,一边记录.笔者亲测,今天是5月29号深夜. linux用的是centos6 ...