吴裕雄--天生自然 pythonTensorFlow图形数据处理:循环神经网络预测正弦函数
import numpy as np

import tensorflow as tf

import matplotlib.pyplot as plt

# 定义RNN的参数。

HIDDEN_SIZE = 30                            # LSTM中隐藏节点的个数。

NUM_LAYERS = 2                              # LSTM的层数。

TIMESTEPS = 10                              # 循环神经网络的训练序列长度。

TRAINING_STEPS = 10000                      # 训练轮数。

BATCH_SIZE = 32                             # batch大小。

TRAINING_EXAMPLES = 10000                   # 训练数据个数。

TESTING_EXAMPLES = 1000                     # 测试数据个数。

SAMPLE_GAP = 0.01                           # 采样间隔。
# 产生正弦数据。

def generate_data(seq):

    X = []

    y = []

    # 序列的第i项和后面的TIMESTEPS-1项合在一起作为输入;第i + TIMESTEPS项作为输

    # 出。即用sin函数前面的TIMESTEPS个点的信息,预测第i + TIMESTEPS个点的函数值。

    for i in range(len(seq) - TIMESTEPS):

        X.append([seq[i: i + TIMESTEPS]])

        y.append([seq[i + TIMESTEPS]])

    return np.array(X, dtype=np.float32), np.array(y, dtype=np.float32)

# 用正弦函数生成训练和测试数据集合。

test_start = (TRAINING_EXAMPLES + TIMESTEPS) * SAMPLE_GAP

test_end = test_start + (TESTING_EXAMPLES + TIMESTEPS) * SAMPLE_GAP

train_X, train_y = generate_data(np.sin(np.linspace(0, test_start, TRAINING_EXAMPLES + TIMESTEPS, dtype=np.float32)))

test_X, test_y = generate_data(np.sin(np.linspace(test_start, test_end, TESTING_EXAMPLES + TIMESTEPS, dtype=np.float32)))
#  定义网络结构和优化步骤。

def lstm_model(X, y, is_training):

    # 使用多层的LSTM结构。

    cell = tf.nn.rnn_cell.MultiRNNCell([tf.nn.rnn_cell.BasicLSTMCell(HIDDEN_SIZE) for _ in range(NUM_LAYERS)])

    # 使用TensorFlow接口将多层的LSTM结构连接成RNN网络并计算其前向传播结果。

    outputs, _ = tf.nn.dynamic_rnn(cell, X, dtype=tf.float32)

    output = outputs[:, -1, :]

    # 对LSTM网络的输出再做加一层全链接层并计算损失。注意这里默认的损失为平均

    # 平方差损失函数。

    predictions = tf.contrib.layers.fully_connected(output, 1, activation_fn=None)

    # 只在训练时计算损失函数和优化步骤。测试时直接返回预测结果。

    if not is_training:

        return predictions, None, None

    # 计算损失函数。

    loss = tf.losses.mean_squared_error(labels=y, predictions=predictions)

    # 创建模型优化器并得到优化步骤。

    train_op = tf.contrib.layers.optimize_loss(loss, tf.train.get_global_step(),optimizer="Adagrad", learning_rate=0.1)

    return predictions, loss, train_op
# 定义测试方法。

def run_eval(sess, test_X, test_y):

    # 将测试数据以数据集的方式提供给计算图。

    ds = tf.data.Dataset.from_tensor_slices((test_X, test_y))

    ds = ds.batch(1)

    X, y = ds.make_one_shot_iterator().get_next()

    # 调用模型得到计算结果。这里不需要输入真实的y值。

    with tf.variable_scope("model", reuse=True):

        prediction, _, _ = lstm_model(X, [0.0], False)

    # 将预测结果存入一个数组。

    predictions = []

    labels = []

    for i in range(TESTING_EXAMPLES):

        p, l = sess.run([prediction, y])

        predictions.append(p)

        labels.append(l)

    # 计算rmse作为评价指标。

    predictions = np.array(predictions).squeeze()

    labels = np.array(labels).squeeze()

    rmse = np.sqrt(((predictions - labels) ** 2).mean(axis=0))

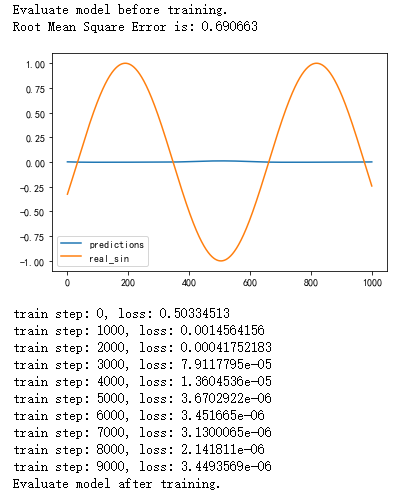
    print("Root Mean Square Error is: %f" % rmse)

    #对预测的sin函数曲线进行绘图。

    plt.figure()

    plt.plot(predictions, label='predictions')

    plt.plot(labels, label='real_sin')

    plt.legend()

    plt.show()
#  执行训练和测试。

# 将训练数据以数据集的方式提供给计算图。

ds = tf.data.Dataset.from_tensor_slices((train_X, train_y))

ds = ds.repeat().shuffle(1000).batch(BATCH_SIZE)

X, y = ds.make_one_shot_iterator().get_next()

# 定义模型,得到预测结果、损失函数,和训练操作。

with tf.variable_scope("model"):

    _, loss, train_op = lstm_model(X, y, True)

with tf.Session() as sess:

    sess.run(tf.global_variables_initializer())

    # 测试在训练之前的模型效果。

    print("Evaluate model before training.")

    run_eval(sess, test_X, test_y)

    # 训练模型。

    for i in range(TRAINING_STEPS):

        _, l = sess.run([train_op, loss])

        if i % 1000 == 0:

            print("train step: " + str(i) + ", loss: " + str(l))

    # 使用训练好的模型对测试数据进行预测。

    print("Evaluate model after training.")

    run_eval(sess, test_X, test_y)


吴裕雄--天生自然 pythonTensorFlow图形数据处理:循环神经网络预测正弦函数的更多相关文章
- 吴裕雄--天生自然 pythonTensorFlow图形数据处理:数据集高层操作
import tempfile import tensorflow as tf # 1. 列举输入文件. # 输入数据生成的训练和测试数据. train_files = tf.train.match_ ...
- 吴裕雄--天生自然 pythonTensorFlow图形数据处理:输入数据处理框架
import tensorflow as tf # 1. 创建文件列表,通过文件列表创建输入文件队列 files = tf.train.match_filenames_once("F:\\o ...
- 吴裕雄--天生自然 pythonTensorFlow图形数据处理:数据集基本使用方法
import tempfile import tensorflow as tf # 1. 从数组创建数据集. input_data = [1, 2, 3, 5, 8] dataset = tf.dat ...
- 吴裕雄--天生自然 pythonTensorFlow图形数据处理:输入文件队列
import tensorflow as tf # 1. 生成文件存储样例数据. def _int64_feature(value): return tf.train.Feature(int64_li ...
- 吴裕雄--天生自然 pythonTensorFlow图形数据处理:多线程队列操作
import tensorflow as tf #1. 定义队列及其操作. queue = tf.FIFOQueue(100,"float") enqueue_op = queue ...
- 吴裕雄--天生自然 pythonTensorFlow图形数据处理:队列操作
import tensorflow as tf #1. 创建队列,并操作里面的元素. q = tf.FIFOQueue(2, "int32") init = q.enqueue_m ...
- 吴裕雄--天生自然 pythonTensorFlow图形数据处理:图像预处理完整样例
import numpy as np import tensorflow as tf import matplotlib.pyplot as plt #随机调整图片的色彩,定义两种顺序. def di ...
- 吴裕雄--天生自然 pythonTensorFlow图形数据处理:TensorFlow图像处理函数
import numpy as np import tensorflow as tf import matplotlib.pyplot as plt #读取图片 image_raw_data = tf ...
- 吴裕雄--天生自然 pythonTensorFlow图形数据处理:读取MNIST手写图片数据写入的TFRecord文件
import numpy as np import tensorflow as tf from tensorflow.examples.tutorials.mnist import input_dat ...
随机推荐
- PHP ~ 通过程序删除图片,同时删除数据库中的图片数据 和 图片文件
删除单张图片 <?php require_once '../../conn.php'; //连接数据库 $ID = $_GET['ID' ...
- 3 ~ express ~ 静态文件托管
静态资源文件处理 (一)设置静态资源托管目录 /* * 当 用户访问的 url 以 /public 开始 ,那么直接返回对应 __dirname + '/public' 下的文件 . 注意是双下划 ...
- C#后台执行JavaScript
方法一: Page.RegisterClientScriptBlock 方法 命名空間: System.Web.UI 这个方法现在已经过时.改用ClientScriptManager.Register ...
- Fiddler 自动响应
使用目的:提前设置接口返回规则 便于前端联调 不用每次断点修改数据 操作:
- 记录一道神仙CTF-wtf.sh-150
记录一道完全超出我能力的CTF神仙题(不愧是世界级比赛的真题orz),此题我仅解出了第一部分的flag,第二部分则参考了WP.不得不说这种题目解出来还是很有自豪感的嘛~ 直接看题! 0x01 第一部 ...
- POJ - 2718 Smallest Difference(全排列)
题意:将n个数字分成两组,两组分别组成一个数字,问两个数字的最小差值.要求,当组内数字个数多于1个时,组成的数字不允许有前导0.(2<=n<=10,每个数字范围是0~9) 分析: 1.枚举 ...
- python导出oracle中的表内容,并生成excel文件
export NLS_LANG=AMERICAN_AMERICA.ZHS16GBK; ### 如果oracle表中有中文输出,为防止乱码,执行脚本前,需要先制定字符集: #!/usr/bin/pyth ...
- 字符串编码研究:Unicode
Unicode Unicode 编码系统可分为编码方式和实现方式两个层次. 1.编码方式 Unicode字符平面映射定义了所有的Unicode字符集. 2.实现方式(UTF8,UTF16) UTF-8 ...
- HashMap的fast-fail和ConcurrentHashMap的fail-safe实例
声明:迁移自本人CSDN博客https://blog.csdn.net/u013365635 Java HashMap遍历过程中如果元素被修改会导致遍历失败,ConcurrentHashMap则不会有 ...
- nfs自动挂载
服务器端 /etc/exports /mnt *(rw,sync,no_root_squash,anonuid=500,anongid=500)systemctl restart nfs 客户端 挂载 ...
