简单服务器端Blazor Cookie身份验证的演示

为了演示身份验证如何在服务器端 Blazor 应用程序中工作,我们将把身份验证简化为最基本的元素。 我们将简单地设置一个 cookie,然后读取应用程序中的 cookie。
应用程序身份验证

大多数商业 web 应用程序都要求用户登录到应用程序中。

用户输入他们的用户名和密码,对照成员资格数据库进行检查。
一旦通过身份验证,该应用程序即可识别用户,并且现在可以安全地传递内容。
理解了服务器端 Blazor 应用程序的身份验证过程,我们就可以实现一个满足我们需要的身份验证和成员资格管理系统(例如,一个允许用户创建和管理其用户帐户的系统)。
注意:此示例代码不会检查是否有人使用了合法的用户名和密码! 您将需要添加正确的代码进行检查。 这段代码只是对授权用户的过程的演示。
创建应用程序

打开Visual Studio 2019。
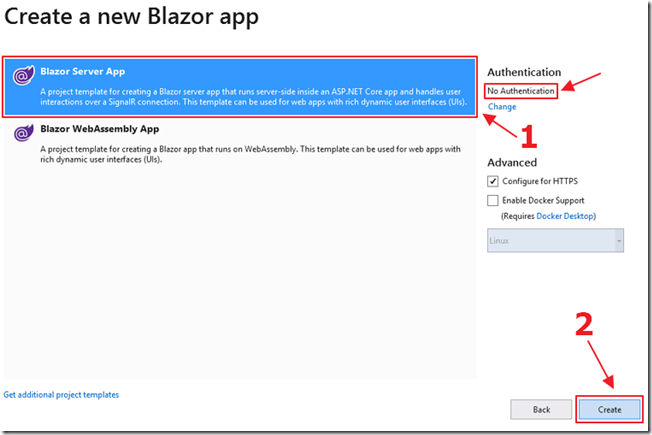
创建没有身份验证的 Blazor 服务器应用程序。
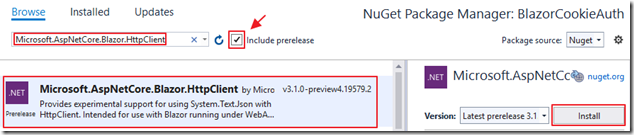
添加Nuget软件包
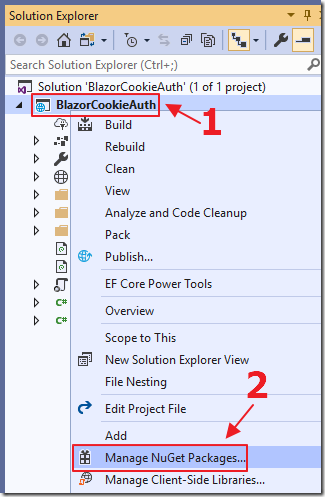
在解决方案资源管理器中,右键单击项目名称并选择 Manage NuGet Packages。
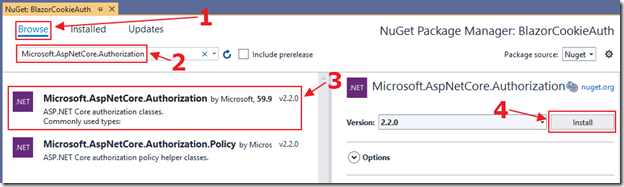
添加对以下库的引用:
- Microsoft.AspNetCore.Authorization
- Microsoft.AspNetCore.Http
- Microsoft.AspNetCore.Identity
另外还有
- Microsoft.AspNetCore.Blazor.HttpClient
添加Cookie身份验证
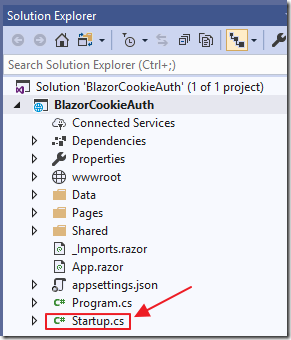
打开Startup.cs文件。
在文件顶部添加以下using语句:
 // ******

 // BLAZOR COOKIE Auth Code (begin)

 using Microsoft.AspNetCore.Authentication.Cookies;

 using Microsoft.AspNetCore.Http;

 using System.Net.Http;

 // BLAZOR COOKIE Auth Code (end)

 // ******
将Start 类改为如下,添加注释标记为 BLAZOR COOKIE Auth Code 的部分:
 public class Startup

     {

         public Startup(IConfiguration configuration)

         {

             Configuration = configuration;

         }

         public IConfiguration Configuration { get; }

         // This method gets called by the runtime. Use this method to

         // add services to the container.

         // For more information on how to configure your application,

         // visit https://go.microsoft.com/fwlink/?LinkID=398940

         public void ConfigureServices(IServiceCollection services)

         {

             // ******

             // BLAZOR COOKIE Auth Code (begin)

             services.Configure<CookiePolicyOptions>(options =>

             {

                 options.CheckConsentNeeded = context => true;

                 options.MinimumSameSitePolicy = SameSiteMode.None;

             });

             services.AddAuthentication(

                 CookieAuthenticationDefaults.AuthenticationScheme)

                 .AddCookie();

             // BLAZOR COOKIE Auth Code (end)

             // ******

             services.AddRazorPages();

             services.AddServerSideBlazor();

             services.AddSingleton<WeatherForecastService>();

             // ******

             // BLAZOR COOKIE Auth Code (begin)

             // From: https://github.com/aspnet/Blazor/issues/1554

             // HttpContextAccessor

             services.AddHttpContextAccessor();

             services.AddScoped<HttpContextAccessor>();

             services.AddHttpClient();

             services.AddScoped<HttpClient>();

             // BLAZOR COOKIE Auth Code (end)

             // ******

         }

         // This method gets called by the runtime. Use this method to configure the HTTP request pipeline.

         public void Configure(IApplicationBuilder app, IWebHostEnvironment env)

         {

             if (env.IsDevelopment())

             {

                 app.UseDeveloperExceptionPage();

             }

             else

             {

                 app.UseExceptionHandler("/Error");

                 // The default HSTS value is 30 days.

                 // You may want to change this for production scenarios,

                 // see https://aka.ms/aspnetcore-hsts.

                 app.UseHsts();

             }

             app.UseHttpsRedirection();

             app.UseStaticFiles();

             app.UseRouting();

             // ******

             // BLAZOR COOKIE Auth Code (begin)

             app.UseHttpsRedirection();

             app.UseStaticFiles();

             app.UseCookiePolicy();

             app.UseAuthentication();

             // BLAZOR COOKIE Auth Code (end)

             // ******

             app.UseEndpoints(endpoints =>

             {

                 endpoints.MapBlazorHub();

                 endpoints.MapFallbackToPage("/_Host");

             });

         }

     }
首先,代码添加了对cookie的支持。 Cookie由应用程序创建,并在用户登录时传递到用户的Web浏览器。Web浏览器将Cookie传递回应用程序以指示用户已通过身份验证。 当用户“注销”时,cookie被删除。
这段代码还添加了:
- HttpContextAccessor
- HttpClient
在代码中使用依赖注入访问的服务。
查看这个链接可以获得关于 httpcontexcessor 如何让我们确定登录用户是谁的完整解释。
添加登录/注销页面
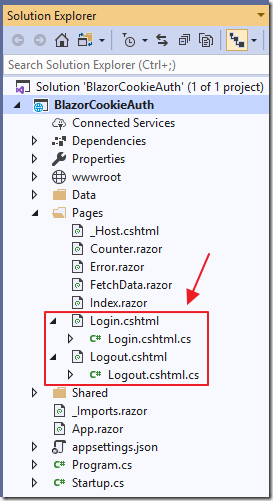
登录(和注销)由.cshtml页面执行。
添加以下Razor页面和代码:
Login.cshtml
 @page

 @model BlazorCookieAuth.Server.Pages.LoginModel

 @{

     ViewData["Title"] = "Log in";

 }

 <h2>Login</h2>
Login.cshtml.cs
 using System;

 using System.Collections.Generic;

 using System.Security.Claims;

 using System.Threading.Tasks;

 using Microsoft.AspNetCore.Authentication;

 using Microsoft.AspNetCore.Authentication.Cookies;

 using Microsoft.AspNetCore.Authorization;

 using Microsoft.AspNetCore.Mvc;

 using Microsoft.AspNetCore.Mvc.RazorPages;

 namespace BlazorCookieAuth.Server.Pages

 {

     [AllowAnonymous]

     public class LoginModel : PageModel

     {

         public string ReturnUrl { get; set; }

         public async Task<IActionResult>

             OnGetAsync(string paramUsername, string paramPassword)

         {

             string returnUrl = Url.Content("~/");

             try

             {

                 // 清除现有的外部Cookie

                 await HttpContext

                     .SignOutAsync(

                     CookieAuthenticationDefaults.AuthenticationScheme);

             }

             catch { }

             // *** !!! 在这里您可以验证用户 !!! ***

             // 在此示例中,我们仅登录用户(此示例始终登录用户)

             //

             var claims = new List<Claim>

             {

                 new Claim(ClaimTypes.Name, paramUsername),

                 new Claim(ClaimTypes.Role, "Administrator"),

             };

             var claimsIdentity = new ClaimsIdentity(

                 claims, CookieAuthenticationDefaults.AuthenticationScheme);

             var authProperties = new AuthenticationProperties

             {

                 IsPersistent = true,

                 RedirectUri = this.Request.Host.Value

             };

             try

             {

                 await HttpContext.SignInAsync(

                 CookieAuthenticationDefaults.AuthenticationScheme,

                 new ClaimsPrincipal(claimsIdentity),

                 authProperties);

             }

             catch (Exception ex)

             {

                 string error = ex.Message;

             }

             return LocalRedirect(returnUrl);

         }

     }

 }
Logout.cshtml
 @page

 @model BlazorCookieAuth.Server.Pages.LogoutModel

 @{

     ViewData["Title"] = "Logout";

 }

 <h2>Logout</h2>
Logout.cshtml.cs
 using System;

 using System.Threading.Tasks;

 using Microsoft.AspNetCore.Authentication;

 using Microsoft.AspNetCore.Authentication.Cookies;

 using Microsoft.AspNetCore.Mvc;

 using Microsoft.AspNetCore.Mvc.RazorPages;

 namespace BlazorCookieAuth.Server.Pages

 {

     public class LogoutModel : PageModel

     {

         public async Task<IActionResult> OnGetAsync()

         {

             // 清除现有的外部Cookie

             await HttpContext

                 .SignOutAsync(

                 CookieAuthenticationDefaults.AuthenticationScheme);

             return LocalRedirect(Url.Content("~/"));

         }

     }

 }
添加客户代码

使用以下代码将一个名为 LoginControl.razor 的页面添加到 Shared 文件夹:
@page "/loginControl"
@using System.Web;
<AuthorizeView>
<Authorized>
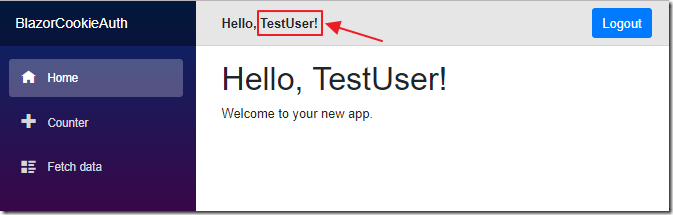
<b>Hello, @context.User.Identity.Name!</b>
<a class="ml-md-auto btn btn-primary"
href="/logout?returnUrl=/"
target="_top">Logout</a>
</Authorized>
<NotAuthorized>
<input type="text"
placeholder="User Name"
@bind="@Username" />
<input type="password"
placeholder="Password"
@bind="@Password" />
<a class="ml-md-auto btn btn-primary"
href="/login?paramUsername=@encode(@Username)¶mPassword=@encode(@Password)"
target="_top">Login</a>
</NotAuthorized>
</AuthorizeView>
@code {
string Username = "";
string Password = "";
private string encode(string param)
{
return HttpUtility.UrlEncode(param);
}
}
此代码创建一个登录组件,该组件使用AuthorizeView组件根据用户当前的身份验证包装标记代码。
如果用户已登录,我们将显示其姓名和一个“注销”按钮(可将用户导航到之前创建的注销页面)。
如果未登录,我们会显示用户名和密码框以及一个登录按钮(将用户导航到之前创建的登录页面)。

最后,我们将MainLayout.razor页面(在Shared文件夹中)更改为以下内容:
 @inherits LayoutComponentBase

 <div class="sidebar">

     <NavMenu />

 </div>

 <div class="main">

     <div class="top-row px-4">

         <!-- BLAZOR COOKIE Auth Code (begin) -->

         <LoginControl />

         <!-- BLAZOR COOKIE Auth Code (end) -->

     </div>

     <div class="content px-4">

         @Body

     </div>

 </div>
这会将登录组件添加到Blazor应用程序中每个页面的顶部。

打开App.razor页面,并将所有现有代码包含在 CascadingAuthenticationState 标记中。
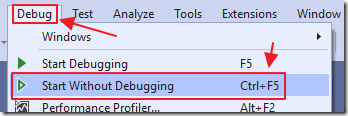
现在我们可以按F5键运行该应用程序。
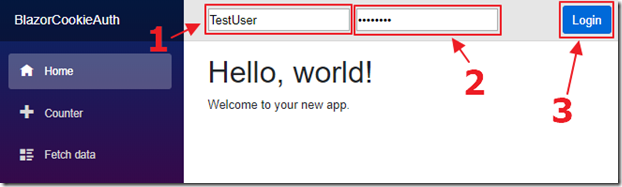
我们可以输入用户名和密码,然后单击“登录”按钮…

然后我们可以在 Google Chrome 浏览器 DevTools 中看到 cookie 已经被创建。

当我们单击注销...

Cookie被删除。
调用服务器端控制器方法
此时,所有.razor页面将正确检测用户是否已通过身份验证,并按预期运行。 但是,如果我们向服务器端控制器发出http请求,则将无法正确检测到经过身份验证的用户。

为了演示这一点,我们首先打开startup.cs页面,并将以下代码添加到app.UseEndpoints方法的末尾(在endpoints.MapFallbackToPage(“/ _ Host”)行下),以允许对控制器的http请求 正确路由:
  // ******

  // BLAZOR COOKIE Auth Code (begin)

     endpoints.MapControllerRoute("default", "{controller=Home}/{action=Index}/{id?}");

  // BLAZOR COOKIE Auth Code (end)

  // ******
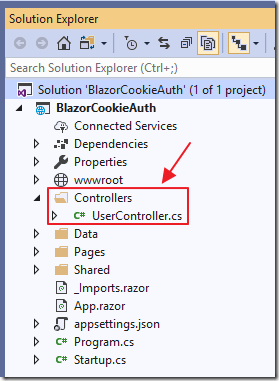
接下来,我们创建一个Controllers文件夹,并使用以下代码添加UserController.cs文件:
 using Microsoft.AspNetCore.Mvc;

 namespace BlazorCookieAuth.Controllers

 {

     [Route("api/[controller]")]

     [ApiController]

     public class UserController : Controller

     {

         // /api/User/GetUser

         [HttpGet("[action]")]

         public UserModel GetUser()

         {

             // Instantiate a UserModel

             var userModel = new UserModel

             {

                 UserName = "[]",

                 IsAuthenticated = false

             };

             // Detect if the user is authenticated

             if (User.Identity.IsAuthenticated)

             {

                 // Set the username of the authenticated user

                 userModel.UserName =

                     User.Identity.Name;

                 userModel.IsAuthenticated =

                     User.Identity.IsAuthenticated;

             };

             return userModel;

         }

     }

     // Class to hold the UserModel

     public class UserModel

     {

         public string UserName { get; set; }

         public bool IsAuthenticated { get; set; }

     }

 }
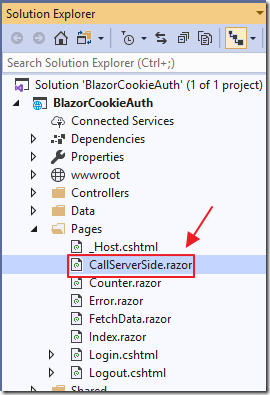
我们使用以下代码添加一个新的.razor页面CallServerSide.razor:
 @page "/CallServerSide"

 @using BlazorCookieAuth.Controllers

 @using System.Net.Http

 @inject HttpClient Http

 @inject NavigationManager UriHelper

 @inject Microsoft.AspNetCore.Http.IHttpContextAccessor HttpContextAccessor

 <h3>Call Server Side</h3>

 <p>Current User: @CurrentUser.UserName</p>

 <p>IsAuthenticated: @CurrentUser.IsAuthenticated</p>

 <button class="btn btn-primary" @onclick="GetUser">Get User</button>

 @code {

     UserModel CurrentUser = new UserModel();

     async Task GetUser()

     {

         // Call the server side controller

         var url = UriHelper.ToAbsoluteUri("/api/User/GetUser");

         var result = await Http.GetJsonAsync<UserModel>(url.ToString());

         // Update the result

         CurrentUser.UserName = result.UserName;

         CurrentUser.IsAuthenticated = result.IsAuthenticated;

     }

 }
最后,我们使用以下代码在Shared / NavMenu.razor中添加指向页面的链接:
 <li class="nav-item px-3">

       <NavLink class="nav-link" href="CallServerSide">

             <span class="oi oi-list-rich" aria-hidden="true"></span> Call Server Side

       </NavLink>

 </li>
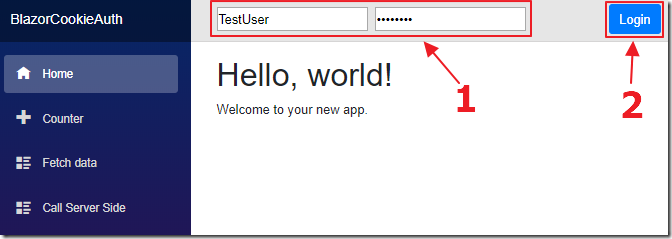
我们运行该应用程序并登录。

我们导航到新的Call Server Side控件,然后单击Get User按钮(该按钮将调用刚刚添加的UserController.cs),并且它不会检测到已登录的用户。
要解决此问题,请将CallServerSide.razor页面中的GetUser方法更改为以下内容:
 async Task GetUser()

     {

         // Code courtesy from Oqtane.org (@sbwalker)

         // We must pass the authentication cookie in server side requests

         var authToken =

         HttpContextAccessor.HttpContext.Request.Cookies[".AspNetCore.Cookies"];

         if (authToken != null)

         {

             Http.DefaultRequestHeaders

             .Add("Cookie", ".AspNetCore.Cookies=" + authToken);

             // Call the server side controller

             var url = UriHelper.ToAbsoluteUri("/api/User/GetUser");

             var result = await Http.GetJsonAsync<UserModel>(url.ToString());

             // Update the result

             CurrentUser.UserName = result.UserName;

             CurrentUser.IsAuthenticated = result.IsAuthenticated;

         }

     }
我们有一个身份验证cookie,我们只需要在DefaultRequestHeaders中传递它即可。

现在,当我们登录并单击“获取用户”按钮时,控制器方法便能够检测到已登录的用户。
简单服务器端Blazor Cookie身份验证的演示的更多相关文章
- asp.net core中使用cookie身份验证
配置 在 Startup.ConfigureServices 方法中,创建具有 AddAuthentication 和 AddCookie 方法的身份验证中间件服务: services.AddAuth ...
- 讨论一下.NET里,对cookie身份验证的超时的处理
引言 在.NET里提供了FormsAuthentication类用来对用户身份进行验证和授权.不过,对于cookie的超时处理,一直是一个头疼的问题.这里介绍一下微软对.NET 身份验证超时的处理机制 ...
- ASP.NET MVC Cookie 身份验证
1 创建一个ASP.NET MVC 项目 添加一个 AccountController 类. public class AccountController : Controller { [HttpGe ...
- 使用 cookie 的身份验证和授权
前言 在上一章 学学 dotnet core 中的身份验证和授权-1-概念 中,我们大致明白了身份验证和授权两者的关系.那么在本文中,我们将使用 cookie 来做一个简单的身份验证和授权. 本文中我 ...
- asp.net 简单的身份验证
1 通常我们希望已经通过身份验证的才能够登录到网站的后台管理界面,对于asp.net 介绍一种简单的身份验证方式 首先在webconfig文件中添加如下的代码 <!--身份验证--> &l ...
- ASP.NET没有魔法——ASP.NET Identity 的“多重”身份验证代码篇
上篇文章介绍了ASP.NET中身份验证的机制与流程,本文将使用代码的来介绍如何实现第三方账户验证与双因子验证. 本章主要内容有: ● 实现基于微软账户的第三方身份验证 ● 实现双因子身份验证 ● 验证 ...
- Forms身份验证 知识总结
最简单的Forms验证实现方法:FormsAuthentication.SetAuthCookie()方法,传递一个登录名即可FormsAuthentication.SignOut()方法退出Form ...
- ASP.NET没有魔法——ASP.NET Identity 的“多重”身份验证
ASP.NET Identity除了提供基于Cookie的身份验证外,还提供了一些高级功能,如多次输入错误账户信息后会锁定用户禁止登录.集成第三方验证.账户的二次验证等,并且ASP.NET MVC的默 ...
- asp.net core 3.x 身份验证-1涉及到的概念
前言 从本篇开始将围绕asp.net core身份验证写个小系列,希望你看完本系列后,脑子里对asp.net core的身份验证原理有个大致印象.至于身份验证是啥?与授权有啥联系?就不介绍了,太啰嗦. ...
随机推荐
- 《C程序设计语言》练习1-10
#include<stdio.h> main() { int c; c=getchar(); while (c !=EOF) { if (c=='\t') { c='\\'; putcha ...
- bean加载与注入之重新理解
1.@Autowired注解不可以用在静态属性上: 解决方法: 使用实现了ApplicationContextAware接口的自定义工具类,ApplicationContextAware可以让我们获得 ...
- 第十六届“二十一世纪的计算”学术研讨会 图灵奖获得者Butler W. Lampson主题演讲
Personal Control of Digital Data 图灵奖获得者Butler W. Lampson主题演讲" title="第十六届"二十一世纪的计算&qu ...
- make的工作方式
摘自<跟我一起写Makefile> GUN的make工作时的执行步骤如下: 1)读入所有的Makefile. 2)读入被include的其他Makeifle. 3)初始化文件中的变量. 4 ...
- 【待填坑】LG_2467_[SDOI2010]地精部落
不错的dp题...思维难度和码量成反比...
- navicat 导出查询结果
请依照下列步骤:(Windows 版本) 例子:导出查询结果到一个文本文件 在执行查询之后,保存查询及在工具栏点击导出向导/导出. 按照导出向导的步骤指导你完成 设置导出文件格式(步骤 1) 设置目标 ...
- C++求解N阶幻方
由一道数学题的联想然后根据网上的做法瞎jb乱打了一下,居然对了代码精心附上了注释,有兴趣的童鞋可以看一看..不说了,上代码!(自认为结构很清晰易懂) 1234567891011121314151617 ...
- Cisco2960 交换机密码破解方法
1. 启用超级终端并出现连接界面2. 拔掉交换机的电源3. 按下交换机上的 Mode按钮, 与此同时重新插上交换机的电源线4. 当交换机左边的sys 灯会慢慢的闪动, ( 细心的话会发现部分灯红色的闪 ...
- Introduction Of Gradient Descent
不是一个机器学习算法 是一种基于搜索的优化方法 作用:最小化一个损失函数 梯度上升法:最大化一个效用函数 import matplotlib.pyplot as plt import numpy as ...
- Vue内置组件keep-alive的使用
本文主要介绍Vue内置组件keep-alive的使用. Vue内置组件keep-alive的使用 keep-alive接收三个props:●include - 字符串或正则表达式.只有名称匹配的组件会 ...