Android笔记(六十七) 自定义控件
实际编程中,系统提供的控件往往无法满足我们的需求,一来是样子丑陋,二来是一些复杂的组合需要多次使用的话,每次都写一堆控件的组合会很耗费时间,所以我们将这些组件的组合自定义为一个新的控件,以后使用的时候直接用该控件,方便又简单。最常见的例子就是软件中的titleTar

实现自定义控件的步骤:
1.设置控件的属性
2.实现我们的View
3.引用我们自定的View
官方文档:http://developer.android.com/training/custom-views/create-view.html
下面开始:
设置控件的属性:
分析一下上面四个titleBar,都是由一个居中的文本和一个右边一个图片按钮组成,只不过后面两个没有按钮而已
那么我们自定义的这个组件就得包含一下几个基本属性:文本内容,文本大小,文本颜色,按钮路径
在value中新建一个xml文件attrs.xml,把这些属性创建出来
<?xml version="1.0" encoding="utf-8"?>

<resources>

    <declare-styleable name="MyCustomTitleBar">

        <attr name="titleText" format="string"/>

        <attr name="titleTextSize" format="dimension"/>

        <attr name="titleTextColor" format="color"/>

        <attr name="titleButtonImage" format="reference"/>

    </declare-styleable>

</resources>
declare-styleable标签是用来定义自定义控件的属性的,我们的控件属性都以attr形式存放在declare-styleable标签中,format是用来形容该属性的类型,有如下值可选:string,color,dimension,integer,enum,reference,float,boolean,fraction,flag
实现我们的View
定义一个继承自RelativeLayout的类MyCustomTitltBar,然后在他的构造方法中获取我们自定义的控件样式
package cn.lixyz.customviewdemo;

import android.annotation.SuppressLint;

import android.content.Context;

import android.content.res.TypedArray;

import android.graphics.drawable.Drawable;

import android.util.AttributeSet;

import android.widget.ImageButton;

import android.widget.RelativeLayout;

import android.widget.TextView;

@SuppressLint("NewApi")

public class MyCustomTitleBar extends RelativeLayout {

    // 定义自定义控件包含的组件

    private TextView title;

    private ImageButton button;

    // 定义控件的属性

    private String titleText;

    private float titleTextSize;

    private int titleTextColor;

    private Drawable titleButtonImage;

    // 为每个控件定义LayoutParams

    private LayoutParams textLayoutParams;

    private LayoutParams buttonLayoutParams;

    public MyCustomTitleBar(Context context, AttributeSet attrs) {

        super(context, attrs);

        // 获取我们定义的属性

        TypedArray array = context.obtainStyledAttributes(attrs, R.styleable.MyCustomTitleBar);

        titleText = array.getString(R.styleable.MyCustomTitleBar_titleText);

        titleTextColor = array.getColor(R.styleable.MyCustomTitleBar_titleTextColor, 0);

        titleTextSize = array.getDimension(R.styleable.MyCustomTitleBar_titleTextSize, 10);

        titleButtonImage = array.getDrawable(R.styleable.MyCustomTitleBar_titleButtonImage);

        // 回收,以防出错

        array.recycle();

        // 新建包含的子组件

        title = new TextView(context);

        button = new ImageButton(context);

        // 为子组件赋值

        title.setText(titleText);

        title.setTextColor(titleTextColor);

        title.setTextSize(titleTextSize);

        button.setBackground(titleButtonImage);

        // 设置背景色

        setBackgroundColor(0xFF38373c);

        // 设置包含控件的属性并添加到view中

        textLayoutParams = new LayoutParams(LayoutParams.WRAP_CONTENT, LayoutParams.WRAP_CONTENT);

        textLayoutParams.addRule(RelativeLayout.CENTER_IN_PARENT);

        addView(title, textLayoutParams);

        buttonLayoutParams = new LayoutParams(LayoutParams.WRAP_CONTENT, LayoutParams.WRAP_CONTENT);

        buttonLayoutParams.addRule(RelativeLayout.ALIGN_PARENT_RIGHT);

        addView(button, buttonLayoutParams);

    }

}
其中LayoutParams是用于child view(子视图) 向 parent view(父视图)传达自己的意愿的一个东西
在获取属性的时候,android定义的格式为控件名_属性名 例如上面的MyCustomTitleBar_titleText、MyCustomTitleBar_titleTextSize
LayoutParams继承于Android.View.ViewGroup.LayoutParams.
LayoutParams相当于一个Layout的信息包,它封装了Layout的位置、高、宽等信息。假设在屏幕上一块区域是由一个Layout占领的,如果将一个View添加到一个Layout中,最好告诉Layout用户期望的布局方式,也就是将一个认可的layoutParams传递进去。
可以这样去形容LayoutParams,在象棋的棋盘上,每个棋子都占据一个位置,也就是每个棋子都有一个位置的信息,如这个棋子在4行4列,这里的“4行4列”就是棋子的LayoutParams。
但LayoutParams类也只是简单的描述了宽高,宽和高都可以设置成三种值:
1,一个确定的值;
2,FILL_PARENT,即填满(和父容器一样大小);
3,WRAP_CONTENT,即包裹住组件就好。
http://byandby.iteye.com/blog/816718
TypedArray实例是个属性的容器,通过context.obtainStyledAttributes()方法返回得到
引用我们自定的View
在布局文件中引入我们自定义的控件
<LinearLayout xmlns:android="http://schemas.android.com/apk/res/android"

    xmlns:custom="http://schemas.android.com/apk/res/cn.lixyz.customviewdemo"

    xmlns:tools="http://schemas.android.com/tools"

    android:layout_width="match_parent"

    android:layout_height="match_parent"

    android:orientation="vertical"

    android:paddingBottom="@dimen/activity_vertical_margin"

    android:paddingLeft="@dimen/activity_horizontal_margin"

    android:paddingRight="@dimen/activity_horizontal_margin"

    android:paddingTop="@dimen/activity_vertical_margin"

    tools:context="cn.lixyz.customviewdemo.MainActivity" >

    <cn.lixyz.customviewdemo.MyCustomTitleBar

        android:layout_width="wrap_content"

        android:layout_height="wrap_content"

        custom:titleButtonImage="@drawable/image"

        custom:titleText="通讯录"

        custom:titleTextColor="#ffffff"

        custom:titleTextSize="5dp" >

    </cn.lixyz.customviewdemo.MyCustomTitleBar>

    <cn.lixyz.customviewdemo.MyCustomTitleBar

        android:layout_width="wrap_content"

        android:layout_height="wrap_content"

        android:layout_marginTop="10dp"

        custom:titleButtonImage="@drawable/plus"

        custom:titleText="微信"

        custom:titleTextColor="#ffffff"

        custom:titleTextSize="5dp" >

    </cn.lixyz.customviewdemo.MyCustomTitleBar>

    <cn.lixyz.customviewdemo.MyCustomTitleBar

        android:layout_width="wrap_content"

        android:layout_height="30dp"

        android:layout_marginTop="10dp"

        custom:titleText="发现"

        custom:titleTextColor="#ffffff"

        custom:titleTextSize="5dp" >

    </cn.lixyz.customviewdemo.MyCustomTitleBar>

    <cn.lixyz.customviewdemo.MyCustomTitleBar

        android:layout_width="wrap_content"

        android:layout_height="30dp"

        android:layout_marginTop="10dp"

        custom:titleText="我"

        custom:titleTextColor="#ffffff"

        custom:titleTextSize="5dp" >

    </cn.lixyz.customviewdemo.MyCustomTitleBar>

</LinearLayout>
一定要在布局中引入我们的命名空间
格式为:xmlns:自定义名称="http://schemas.android.com/apk/res/包名"
因为只有引入了我们的命名空间,才可以使用xxx:xxx格式来设置我们定义的属性,我们平时使用的android:xx也是因为上面的xmlns:android="http://schemas.android.com/apk/res/android"
这样运行一下软件查看效果

为按钮设置点击事件
观察我们平时为按钮设置点击事件时候的方法:
bt.setOnClickListener(new View.OnClickListener() {

            @Override

            public void onClick(View v) {

                // TODO Auto-generated method stub

            }

        });
我们通过按钮的setOnClickListener方法传入一个匿名内部类OnClickListener为按钮设置点击事件,我们查看OnClickListener的介绍
    /**

     * Interface definition for a callback to be invoked when a view is clicked.

     */

    public interface OnClickListener {

        /**

         * Called when a view has been clicked.

         *

         * @param v The view that was clicked.

         */

        void onClick(View v);

    }
我们也可以仿照这个形式,为我们的MyCustomTieleBar设置一个setCustomTitleBarListener,然后传入一个内部类来让这个按钮的点击调用这个类的click方法
修改MyCustomTitleBar:
package cn.lixyz.customviewdemo;

import android.annotation.SuppressLint;

import android.content.Context;

import android.content.res.TypedArray;

import android.graphics.drawable.Drawable;

import android.util.AttributeSet;

import android.view.View;

import android.widget.ImageButton;

import android.widget.RelativeLayout;

import android.widget.TextView;

@SuppressLint("NewApi")

public class MyCustomTitleBar extends RelativeLayout {

    // 定义自定义控件包含的组件

    private TextView title;

    private ImageButton button;

    // 定义控件的属性

    private String titleText;

    private float titleTextSize;

    private int titleTextColor;

    private Drawable titleButtonImage;

    // 为每个控件定义LayoutParams

    private LayoutParams textLayoutParams;

    private LayoutParams buttonLayoutParams;

    private customTitleBarListener listener;

    public interface customTitleBarListener {

        public void click();

    }

    public void setCustomTitleBarListener(customTitleBarListener listener) {

        this.listener = listener;

    }

    public MyCustomTitleBar(Context context, AttributeSet attrs) {

        super(context, attrs);

        // 获取我们定义的属性

        TypedArray array = context.obtainStyledAttributes(attrs, R.styleable.MyCustomTitleBar);

        titleText = array.getString(R.styleable.MyCustomTitleBar_titleText);

        titleTextColor = array.getColor(R.styleable.MyCustomTitleBar_titleTextColor, 0);

        titleTextSize = array.getDimension(R.styleable.MyCustomTitleBar_titleTextSize, 10);

        titleButtonImage = array.getDrawable(R.styleable.MyCustomTitleBar_titleButtonImage);

        // 回收,以防出错

        array.recycle();

        // 新建包含的子组件

        title = new TextView(context);

        button = new ImageButton(context);

        // 为子组件赋值

        title.setText(titleText);

        title.setTextColor(titleTextColor);

        title.setTextSize(titleTextSize);

        button.setBackground(titleButtonImage);

        // 设置背景色

        setBackgroundColor(0xFF38373c);

        // 设置包含控件的属性并添加到view中

        textLayoutParams = new LayoutParams(LayoutParams.WRAP_CONTENT, LayoutParams.WRAP_CONTENT);

        textLayoutParams.addRule(RelativeLayout.CENTER_IN_PARENT);

        addView(title, textLayoutParams);

        buttonLayoutParams = new LayoutParams(LayoutParams.WRAP_CONTENT, LayoutParams.WRAP_CONTENT);

        buttonLayoutParams.addRule(RelativeLayout.ALIGN_PARENT_RIGHT);

        addView(button, buttonLayoutParams);

        button.setOnClickListener(new View.OnClickListener() {

            @Override

            public void onClick(View v) {

                listener.click();

            }

        });

    }

}
这样我们在MainActivity中就可以为按钮设置点击事件了
package cn.lixyz.customviewdemo; import android.app.Activity;
import android.os.Bundle;
import android.view.View;
import android.widget.Button;
import android.widget.Toast; public class MainActivity extends Activity { private MyCustomTitleBar addressListBar, wechatBar; @Override
protected void onCreate(Bundle savedInstanceState) {
super.onCreate(savedInstanceState);
setContentView(R.layout.activity_main); Button bt = new Button(this);
bt.setOnClickListener(new View.OnClickListener() { @Override
public void onClick(View v) {
// TODO Auto-generated method stub }
}); addressListBar = (MyCustomTitleBar) findViewById(R.id.addressListBar);
wechatBar = (MyCustomTitleBar) findViewById(R.id.wechatBar); addressListBar.setCustomTitleBarListener(new MyCustomTitleBar.customTitleBarListener() { @Override
public void click() {
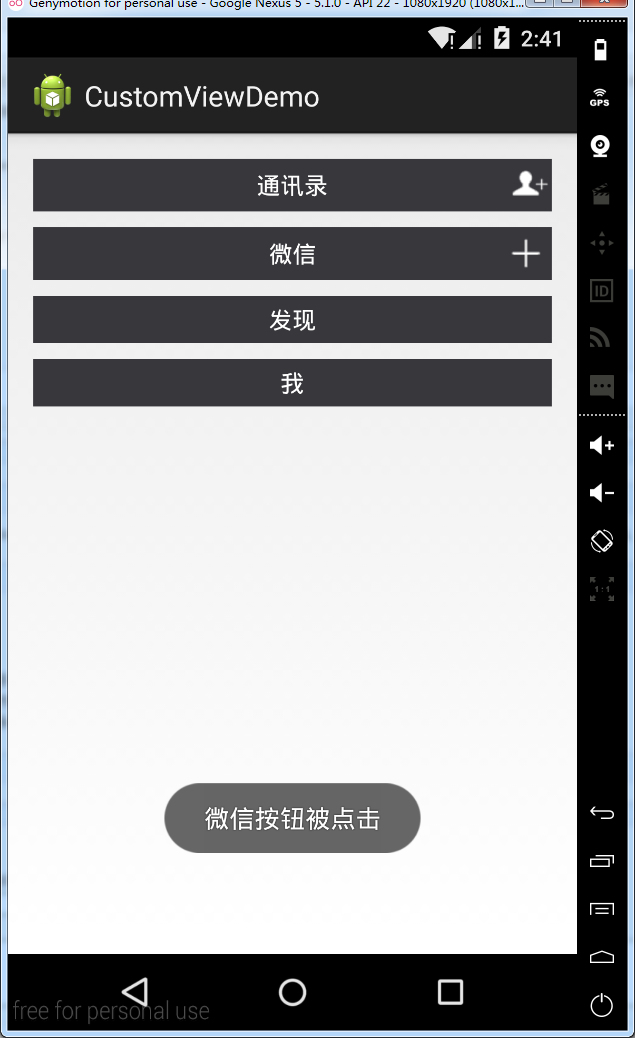
Toast.makeText(MainActivity.this, "通讯录按钮被点击", Toast.LENGTH_SHORT).show();
}
});
wechatBar.setCustomTitleBarListener(new MyCustomTitleBar.customTitleBarListener() { @Override
public void click() {
Toast.makeText(MainActivity.this, "微信按钮被点击", Toast.LENGTH_SHORT).show();
}
}); } }

Android笔记(六十七) 自定义控件的更多相关文章
- Android笔记二十七.Service组件入门(一).什么是Service?
转载请表明出处:http://blog.csdn.net/u012637501(嵌入式_小J的天空) 一.Service 1.Service简单介绍 Service为Android四大组件之中 ...
- Android笔记(六十九) 仿微信界面(一)
综合之前的Fragment和自定义组件的知识,实现微信界面 MainActivity.java package cn.lixyz.test; import android.app.Acti ...
- Android笔记(六十八) Fragment总结
Fragment的产生: 为了适应各种尺寸的屏幕,谷歌推出Fragment,可以把Fragment成Activity的一个组成部分,它拥有自己的生命周期.可以接收并处理用户的各种事件,还可以动态的增删 ...
- Android笔记(六十六) android中的动画——XML文件定义属性动画
除了直接在java代码中定义动画之外,还可以使用xml文件定义动画,以便重用. 如果想要使用XML来编写动画,首先要在res目录下面新建一个animator文件夹,所有属性动画的XML文件都应该存放在 ...
- Android笔记(六十五) android中的动画——属性动画(propertyanimation)
补间动画只能定义起始和结束两个帧在“透明度”.“旋转”.“倾斜”.“位移”4个方面的变化,逐帧动画也只能是播放多个图片,无法满足我们日常复杂的动画需求,所以谷歌在3.0开始,推出了属性动画(prope ...
- Android笔记(六十四) android中的动画——补间动画(tweened animation)
补间动画就是只需要定义动画开始和结束的位置,动画中间的变化由系统去补齐. 补间动画由一下四种方式: 1.AplhaAnimation——透明度动画效果 2.ScaleAnimation ——缩放动画效 ...
- Android笔记(六十三) android中的动画——逐帧动画( frame-by-frame animation)
就好像演电影一样,播放实现准备好的图片,来实现动画效果. 逐帧动画需要用到AnimationDrawable类,该类主要用于创建一个逐帧动画,然后我们把这个动画设置为view的背景即可. androi ...
- Android笔记(六十二)网络框架volley
什么是Volley 很多时候,我们的APP都需要用到网络技术,使用HTTP协议来发送接收数据,谷歌推出了一个网络框架——volley,该框架适合进行数据量不大,但通信频繁的网络操作. 它的优点: (1 ...
- Android笔记(十七) Android中的Service
定义和用途 Service是Android的四大组件之一,一直在后台运行,没有用户界面.Service组件通常用于为其他组件提供后台服务或者监控其他组件的运行状态,例如播放音乐.记录地理位置,监听用户 ...
随机推荐
- python问题集
1.selenium.common.exceptions.WebDriverException: Message: 'chromedriver' executable needs to be in P ...
- Python3基础 tuple 使用格式化字符串进行输出
Python : 3.7.3 OS : Ubuntu 18.04.2 LTS IDE : pycharm-community-2019.1.3 ...
- [译]在你的GitHub主页固定仓库
原文来源:https://github.blog/2016-06-16-pin-repositories-to-your-github-profile/ 您现在可以在GitHub主页上展示最能代表您工 ...
- plsql 引用型变量
set serveroutput on declare pename emp.ename%type; psal emp.sal%type; begin ; dbms_output.put_line(p ...
- django 表操作
添加表纪录 # Create your models here. class Book(models.Model): id = models.AutoField(primary_key=True) t ...
- EasyNVR智能云终端硬件盒子x86版自我维护之摄像机网页直播系统基础运维
背景分析 随着EasyNVR软件为越来越多的用户接受和使用,我们也致力于用户的需求收集和需求的调研,发现一部分用户有关于硬件设备的需求,加之我们推出的免费产品EasyNVS云管理平台,可以说用户自己搭 ...
- [LeetCode] 377. Combination Sum IV 组合之和 IV
Given an integer array with all positive numbers and no duplicates, find the number of possible comb ...
- Apollo环境配置
一.背景 Apollo(阿波罗)是携程框架部门研发的分布式配置中心,能够集中化管理应用不同环境.不同集群的配置,配置修改后能够实时推送到应用端,并且具备规范的权限.流程治理等特性,适用于微服务配置管理 ...
- IDEA--IDEA debug断点调试技巧
目录 一.Debug开篇 二.基本用法&快捷键 三.变量查看 四.计算表达式 五.智能步入 六.断点条件设置 七.多线程调试 八.回退断点 九.中断Debug Debug用来追踪代码的运行 ...
- javadoc 抽出代码中的注释
背景: 在已经有的项目里面利用javadoc来抽出代码中每个类,每个方法的注释部分,形成一个文档. 方法1 利用eslipse来实现 之后会在指定的目录下生成html文档 方法2 利用命令来执行 先把 ...