.net core使用ocelot---第二篇 身份验证
简介原文链接
接上文,我将继续介绍使用asp.net core 创建API网关,主要介绍身份验证(authentication )相关内容。
API服务是需要保护的资源,我们应该尽可能的保证他们的安全。
通常,我们会使用aspnet security 来保证我们项目的安全,aspnet security代码库是为asp.net core 设计的安全和授权中间件。已经让事情变得简单。
那么我们在项目中引入API网关会不会导致巨大的改变?答案是,不会。我们的修改微乎其微,但是却让安全和授权变得简单。
先看下面的截图。
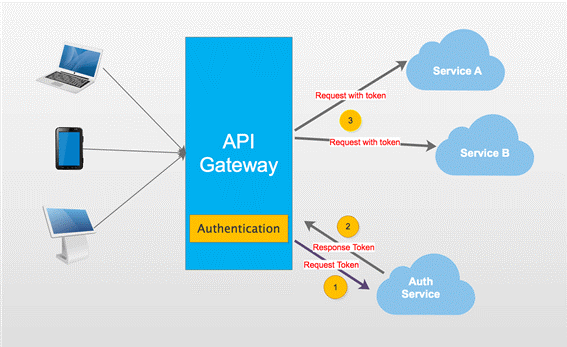
截图显示,当我们访问我们的服务,API网关会让我们首先访问其授权模块。我们必须访问授权服务获得访问令牌(access token),然后用访问令牌访问受保护的服务。
可能你倾向将授权服务独立,这意味客户端得先访问授权服务获得访问令牌。然后携带令牌访问API网关。毫无疑问这样做没问题,但是我建议将授权服务和其他服务放在一起。
APIGateway是我们所有服务的入口,对于身份未验证的客户端仅可以访问授权服务。
OK,开始我们的表演。
我会使用上一个demo的部分内容,便于理解。
Step1
|
项目名称 |
项目类型 |
描述 |
|
APIGateway |
ASP.NET Core Empty |
示例的入口 |
|
CustomersAPIServices |
ASP.NET Core Web API |
API 服务处理消费者的操作 |
|
AuthServer |
ASP.NET Core Web API |
API 服务处理授权操作 |
|
ClientApp |
Console App |
控制台程序模拟客户端 |
APIGateway和CustomerAPIServices和上篇文章的例子一样,你可以在APIGatewayBasicDemo获得。
Step2
创建AuthServer,AuthServer主要是为request请求生成访问令牌(access token),我们需要添加一个方法处理。
[HttpGet]

public IActionResult Get(string name, string pwd)

{

    //just hard code here.

    if (name == "catcher" && pwd == "")

    {

        var now = DateTime.UtcNow;

        var claims = new Claim[]

        {

            new Claim(JwtRegisteredClaimNames.Sub, name),

            new Claim(JwtRegisteredClaimNames.Jti, Guid.NewGuid().ToString()),

            new Claim(JwtRegisteredClaimNames.Iat, now.ToUniversalTime().ToString(), ClaimValueTypes.Integer64)

        };

        var signingKey = new SymmetricSecurityKey(Encoding.ASCII.GetBytes(_settings.Value.Secret));

        var tokenValidationParameters = new TokenValidationParameters

        {

            ValidateIssuerSigningKey = true,

            IssuerSigningKey = signingKey,

            ValidateIssuer = true,

            ValidIssuer = _settings.Value.Iss,

            ValidateAudience = true,

            ValidAudience = _settings.Value.Aud,

            ValidateLifetime = true,

            ClockSkew = TimeSpan.Zero,

            RequireExpirationTime = true,

        };

        var jwt = new JwtSecurityToken(

            issuer: _settings.Value.Iss,

            audience: _settings.Value.Aud,

            claims: claims,

            notBefore: now,

            expires: now.Add(TimeSpan.FromMinutes()),

            signingCredentials: new SigningCredentials(signingKey, SecurityAlgorithms.HmacSha256)

        );

        var encodedJwt = new JwtSecurityTokenHandler().WriteToken(jwt);

        var responseJson = new

        {

            access_token = encodedJwt,

            expires_in = (int)TimeSpan.FromMinutes().TotalSeconds

        };

        return Json(responseJson);

    }

    else

    {

        return Json("");

    }

}
在验证用户时。我使用硬编码将用户名写死,因为对于本文这个不是那么重要。
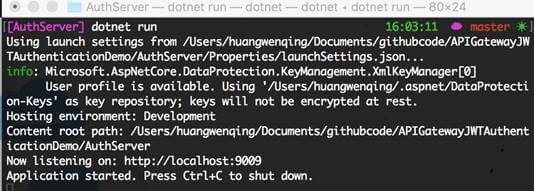
这样我们就完成了授权服务,现在跑起来。
Step3
回到CustomersAPIServices项目,我们应该保护这个服务。
修改Startup,我们可以使用授权。在这我用JwtBearer进行授权,我会给TestKey设置默认的授权方案。TestKey我将在下面提到。
public void ConfigureServices(IServiceCollection services)

{

    var audienceConfig = Configuration.GetSection("Audience");

    var signingKey = new SymmetricSecurityKey(Encoding.ASCII.GetBytes(audienceConfig["Secret"]));

    var tokenValidationParameters = new TokenValidationParameters

    {

        ValidateIssuerSigningKey = true,

        IssuerSigningKey = signingKey,

        ValidateIssuer = true,

        ValidIssuer = audienceConfig["Iss"],

        ValidateAudience = true,

        ValidAudience = audienceConfig["Aud"],

        ValidateLifetime = true,

        ClockSkew = TimeSpan.Zero,

        RequireExpirationTime = true,

    };

    services.AddAuthentication()

            .AddJwtBearer("TestKey", x =>

             {

                 x.RequireHttpsMetadata = false;

                 x.TokenValidationParameters = tokenValidationParameters;

             });

    services.AddMvc();

}

public void Configure(IApplicationBuilder app)

{

    app.UseAuthentication();

    app.UseMvc();

}
接下来,对需要保护的方法,添加Authorize。
[Authorize]

[HttpGet]

public IEnumerable<string> Get()

{

    return new string[] { "Catcher Wong", "James Li" };

}
注意
该项目基于asp.net core 2.0. 如果你的项目是1.X,可能有些不同,建议用迁移迁移到2.0.以上。接下来就是见证奇迹的时候了。

Step4
最重要的步骤来了,在APIGateway中配置授权。
public void ConfigureServices(IServiceCollection services)

{

    var audienceConfig = Configuration.GetSection("Audience");

    var signingKey = new SymmetricSecurityKey(Encoding.ASCII.GetBytes(audienceConfig["Secret"]));

    var tokenValidationParameters = new TokenValidationParameters

    {

        ValidateIssuerSigningKey = true,

        IssuerSigningKey = signingKey,

        ValidateIssuer = true,

        ValidIssuer = audienceConfig["Iss"],

        ValidateAudience = true,

        ValidAudience = audienceConfig["Aud"],

        ValidateLifetime = true,

        ClockSkew = TimeSpan.Zero,

        RequireExpirationTime = true,

    };

    services.AddAuthentication()

            .AddJwtBearer("TestKey", x =>

             {

                 x.RequireHttpsMetadata = false;

                 x.TokenValidationParameters = tokenValidationParameters;

             });

    services.AddOcelot(Configuration);

}
这个配置的大部分代码和Customer Service一样。
当Ocelot启动,它会查看ReRoutes 》AuthenticationOptions 》AuthenticationProviderKey 的值,
检查该值是否被授权服务注册,如果没有,Ocelot不会启动,如果有,Ocelot在执行时使用授权服务。
所以,我们得修改configuration.json,我们需要添加新的节点,并将其值赋为在Startup 类中定义的一样。
{

    "DownstreamPathTemplate": "/api/customers",

    "DownstreamScheme": "http",

    "DownstreamHost": "localhost",

    "DownstreamPort": ,

    "UpstreamPathTemplate": "/customers",

    "UpstreamHttpMethod": [ "Get" ],

    "AuthenticationOptions": {

        "AuthenticationProviderKey": "TestKey",

        "AllowedScopes": []

    }

}
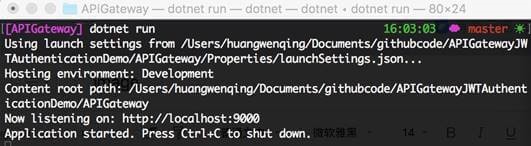
启动服务。
注意
当你启动项目时遇到下面的错误,你应该检查你的代码,查看AddJwtBearer 方法是否指明授权方案。
Unhandled Exception: System.InvalidOperationException: Scheme already exists: Bearer
Step5
我们已经准备完毕,我们用我们的客户端模拟APIGateway的某些请求。
我们先添加获得访问令牌的方法。
private static string GetJwt()

{

    HttpClient client = new HttpClient();

    client.BaseAddress = new Uri( "http://localhost:9000");

    client.DefaultRequestHeaders.Clear();

    var res2 = client.GetAsync("/api/auth?name=catcher&pwd=123").Result;

    dynamic jwt = JsonConvert.DeserializeObject(res2.Content.ReadAsStringAsync().Result);

    return jwt.access_token;

}
接下来,编写通过APIGateway访问Customer Service方法的代码。
static void Main(string[] args)

{

    HttpClient client = new HttpClient();

    client.DefaultRequestHeaders.Clear();

    client.BaseAddress = new Uri("http://localhost:9000");

    // 1. without access_token will not access the service

    //    and return 401 .

    var resWithoutToken = client.GetAsync("/customers").Result;

    //print something here

    //2. with access_token will access the service

    //   and return result.

    client.DefaultRequestHeaders.Clear();

    var jwt = GetJwt();

    client.DefaultRequestHeaders.Add("Authorization", $"Bearer {jwt}");

    var resWithToken = client.GetAsync("/customers").Result;

    //print something here

    //3. visit no auth service

    client.DefaultRequestHeaders.Clear();

    var res = client.GetAsync("/customers/1").Result;

    //print something here

    Console.Read();

}
运行结果。

完工。
源码在此。
总结
没啥。
.net core使用ocelot---第二篇 身份验证的更多相关文章
- 【asp.net core 系列】13 Identity 身份验证入门
0. 前言 通过前两篇我们实现了如何在Service层如何访问数据,以及如何运用简单的加密算法对数据加密.这一篇我们将探索如何实现asp.net core的身份验证. 1. 身份验证 asp.net ...
- 第二章 身份验证——《跟我学Shiro》
转发:https://www.iteye.com/blog/jinnianshilongnian-2019547 目录贴:跟我学Shiro目录贴 身份验证,即在应用中谁能证明他就是他本人.一般提供如他 ...
- ASP.NET Core 学习笔记 第二篇 依赖注入
前言 ASP.NET Core 应用在启动过程中会依赖各种组件提供服务,而这些组件会以接口的形式标准化,这些组件这就是我们所说的服务,ASP.NET Core框架建立在一个底层的依赖注入框架之上,它使 ...
- .net core使用ocelot---第五篇 服务质量
简介 .net core使用ocelot---第一篇 简单使用 .net core使用ocelot---第二篇 身份验证使用 .net core使用ocelot---第三篇 日志记录 .net c ...
- .net core使用ocelot---第八篇 Consul
简介 .net core使用ocelot---第一篇 简单使用 .net core使用ocelot---第二篇 身份验证使用 .net core使用ocelot---第三篇 日志记录 .net ...
- .net core使用ocelot---第七篇 服务发现
简介 .net core使用ocelot---第一篇 简单使用 .net core使用ocelot---第二篇 身份验证使用 .net core使用ocelot---第三篇 日志记录 .net ...
- .net core使用ocelot---第六篇 负载均衡
简介 .net core使用ocelot---第一篇 简单使用 .net core使用ocelot---第二篇 身份验证 .net core使用ocelot---第三篇 日志记录 .net core ...
- .net core使用ocelot---第四篇 限流熔断
简介 .net core使用ocelot---第一篇 简单使用 .net core使用ocelot---第二篇 身份验证 .net core使用ocelot---第三篇 日志记录 前几篇文章我们陆续介 ...
- .net core使用ocelot---第三篇 日志记录
简介 .net core使用ocelot---第一篇 简单使用 .net core使用ocelot---第二篇 身份验证使用 上篇介绍使用asp.net core 创建API网关.本文将介绍Ocelo ...
随机推荐
- 解决nginx反向代理webservice的soap:address location问题
原文:https://blog.csdn.net/mn960mn/article/details/50716768 一:首先来发布一个web service package com.ws.servic ...
- centos7.7离线安装nginx
一.1.安装openssl,因为编译安装nginx需要指定openssl目录 mkdir /data/openssl -p cd /data/openssl wget https://www.open ...
- eclipse中解决/**/多行注释代码后,格式变乱的问题
1 2 3 4 5
- 重新学习Spring注解——servlet3.0
53.servlet3.0-简介&测试 54.servlet3.0-ServletContainerInitializer 55.servlet3.0-ServletContext注册三大组件 ...
- LIST OF BEST OPEN SOURCE BLOCKCHAIN PLATFORMS
https://www.blockchain-council.org/blockchain/list-of-best-open-source-blockchain-platforms/ Open so ...
- eclipse 导入项目后,在工程图标上出现红叉,但是工程中的文件并没有提示错误的解决方法
进入项目包下的.settings目录,找到org.eclipse.wst.common.project.facet.core.xml文件,用记事本打开后才发现这句话有问题:<runtime na ...
- 【jupyter】文件解压
Jupyter使用便捷,但是不能上传文件夹.可以将文件夹压缩,上传后再利用python或者terminal进行解压. windows 可以用python的zipfile包来解压.比如: import ...
- 将HashMap转换为List
背景 SpringBoot中,使用@RquestBody注解 hashMap 接收多个参数的json字符串数据,包括一个数组和一个int值.数组中为一个个的对象组成. 问题 使用 map.ge ...
- ESA2GJK1DH1K基础篇: STM32+Wi-Fi(AT指令版)实现MQTT源码讲解
前言 注: 本程序发送心跳包,发送温湿度,返回控制数据这三个发送是单独的,有可能凑到一起发. 由于本身程序就是复杂性的程序,所以这节程序没有使用中断发送,没有使用环形队列发送,为了避免多条消息可能凑到 ...
- Java——判断回文
package basic; import java.util.Scanner; public class Palindrome{ public static boolean isPalindrome ...