jQuery.uploadify文件上传组件实例讲解
1、jquery.uploadify简介
在ASP.NET中上传的控件有很多,比如.NET自带的FileUpload,以及SWFUpload,Uploadify等等,尤其后面两个控件的用户体验比较好,无刷新,带上传进度等等。在最近的短信平台开发中,使用Uploadify进行文件上传。
Uploadify官网地址是:http://www.uploadify.com/ 可满足项目开发需求。

下载地址:http://www.uploadify.com/wp-content/uploads/files/uploadify.zip 版本信息如下:

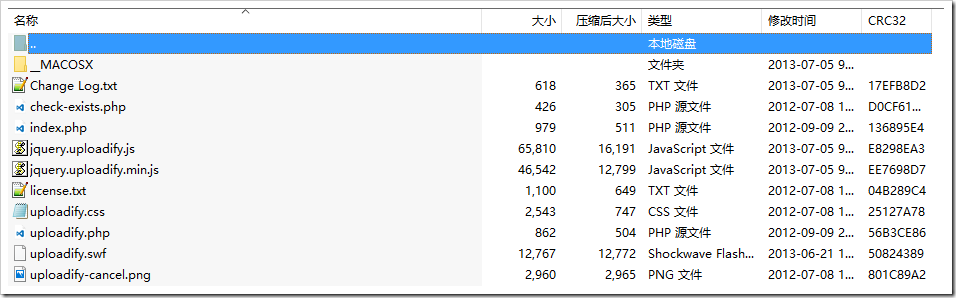
解压之后,目录结构如下(不在详细解释):
2、使用流程
下载的程序是PHP示例,由于项目使用的是asp.net mvc,使用uploadify可分以下步骤:
•(1)加入uploadify js类库(把uploadify相关js类库引用到项目的相关位置,比如放到scripts目录)
•(2)对uploadify二次进行封装,满足项目调用
•(3)编写文件上传处理方法
•(4)页面引用相关类库并编写上传脚本
2.1 对uploadify二次进行封装
针对uploadify调用进行js类库封装,满足项目使用:
|
1
2
3
4
5
6
7
8
9
10
11
12
13
14
15
16
17
18
19
20
21
22
23
24
25
26
27
28
29
30
31
32
33
34
35
36
37
38
39
40
41
42
43
44
45
46
47
48
49
50
51
52
53
54
55
56
57
58
59
60
61
62
63
64
65
66
67
68
69
70
71
72
73
74
75
76
|
//转换成key=value&key=value格式tx.toParam = function (dto) {return jQuery.param(dto);} //设置上传文件tx.uploadify = function (divId, options, action) {if (options == undefined && action == undefined) {$('#' + divId).uploadify("upload");return;}if (options == undefined) {abp.message.warn("请输入参数配置");return;}var fileexts = options.fileexts;if (fileexts == undefined || fileexts.length <= 0) {abp.message.warn("要选择文件的扩展名不能为空");return;}$('#' + divId).uploadify({uploader: '/files/upload?r=' + Math.random()+ "&fileexts=" + encodeURIComponent(fileexts)+ "&" + (options !== undefined ? tx.toParam(options.params) : ""), // 服务器端处理地址swf: '/Scripts/uploadify/uploadify.swf', // 上传使用的 Flashwidth: 60, // 按钮的宽度height: 23, // 按钮的高度buttonText: "选择文件", // 按钮上的文字buttonCursor: 'hand', // 按钮的鼠标图标fileObjName: 'Filedata', // 上传参数名称fileTypeExts: fileexts, // 扩展名fileTypeDesc: "请选择文件", // 文件说明fileDesc: '不超过200M的',sizeLimit: 204800000, //允许上传的文件大小(kb) 此为2Mauto: false, // 选择之后,自动开始上传multi: true, // 是否支持同时上传多个文件queueSizeLimit: 1, // 允许多文件上传的时候,同时上传文件的个数onSelectOnce: function (event, data) { //在单文件或多文件上传时,选择文件时触发//event 事件对象(the event object)//data 选择的操作信息//data.filesSelected 选择文件操作中选中的文件数量},onUploadStart: function (file) {//file:将要上载的文件对象ShowBusy();},onUploadComplete: function (file) {//file:上传或返回一个错误的文件对象。},onUploadSuccess: function (file, data, response) {//file:成功上传的文件对象//data:服务器端脚本返回的数据(任何由文件响应的任何东西)//response:服务器返回的响应是否真的成功或错误,如果没有响应。如果返回false,这successtimeout期权到期后的反应真是假设。if (action !== undefined) {action(JSON.parse(data));}ClearBusy();},onUploadError: function (file, errorCode, errorMsg, errorString) {//file:上传的文件对象//errorCode:返回的错误代码//errorMsg:返回的错误消息//errorString:包含错误的所有细节的可读的错误信息if (action !== undefined) {if (action !== undefined) {action({result: errorCode,message: errorMsg,filename: "",fileext: ""});}}ClearBusy();}});} |
2.2 文件上传处理
使用MVC特性,要登录之后才能进行文件上传:
|
1
2
3
4
5
6
7
8
9
10
11
12
13
14
15
16
17
18
19
20
21
22
23
24
25
26
27
28
29
30
31
32
33
34
35
36
37
38
39
40
41
42
43
44
45
46
47
48
49
50
51
52
53
54
55
56
57
58
59
60
61
62
63
64
65
66
67
68
69
70
71
72
73
74
75
76
77
78
79
80
81
82
83
84
85
86
87
88
89
90
91
92
93
94
95
96
97
98
99
100
101
|
using System;using System.IO;using System.Security.Principal;using System.Web;using System.Web.Mvc;using System.Web.Security;namespace TxSms.Web.Controllers{/// <summary>/// 文件上传管理/// </summary>[Authorize]public class FilesController : TxSmsControllerBase{private static string jsonResult = "{0}\"result\":{1},\"message\":\"{2}\",\"filename\":\"{3}\",\"fileext\":\"{4}\"{5}";/// <summary>/// 文件上传页面/// </summary>/// <returns></returns>[Authorize]public ActionResult Index(){return View();}/// <summary>/// 上传文件/// </summary>/// <param name="filedata"></param>/// <returns></returns>[Authorize]public ActionResult Upload(HttpPostedFileBase filedata){// 如果没有上传文件if (filedata == null || filedata.FileName.IsNullOrEmpty() || filedata.ContentLength == 0){return new JsonStringResult(string.Format(jsonResult, "{", -1, "", "", "", "}"));}string parmPath = Request.QueryString["path"];string parmGetzipfile = Request.QueryString["getzipfile"];if (parmGetzipfile.IsNullOrEmpty()){parmGetzipfile = "0";}// 保存到 ~/uploads 文件夹中,名称不变string time = DateTime.Now.ToString("yyyyMMddHHmmssfff");string fileext = Path.GetExtension(filedata.FileName);string filename = time + fileext;string virtualPath = parmPath.IsNullOrEmpty()? $"~/uploads/": $"~/uploads/{parmPath}/";string actualPath = Server.MapPath(virtualPath);if (!Directory.Exists(actualPath)){Directory.CreateDirectory(Server.MapPath(virtualPath));}// 文件系统不能使用虚拟路径var destFile = virtualPath + filename;string path = Server.MapPath(destFile);filedata.SaveAs(path);bool iszip = fileext != null && (fileext.Equals(".zip", StringComparison.OrdinalIgnoreCase) && parmGetzipfile.Equals("1"));if (iszip){var virtualPathZip = virtualPath + time + "/";string actualPathZip = Server.MapPath(virtualPathZip);if (!Directory.Exists(actualPathZip)){Directory.CreateDirectory(actualPathZip);}destFile = fileext = "";//第一步骤,解压TxSmsZipHelper.UnZipFile(path, actualPathZip);//第二步骤,获取excel文件,如果没有获取到,则抛出异常//获得目录信息var dir = new DirectoryInfo(actualPathZip);//获得目录文件列表var files = dir.GetFiles();foreach (FileInfo fileName in files){//var ext = Path.GetExtension(fileName.Name).ToLower();//if (ext == ".xls" || ext == ".xlsx")//{// destFile = Path.Combine(fileName.DirectoryName, fileName.Name);// break;//}destFile = virtualPathZip + fileName.Name;fileext = Path.GetExtension(fileName.Name);break;}}return new JsonStringResult(string.Format(jsonResult, "{", 0, "上传成功", destFile, fileext.ToLower(), "}"));}public class JsonStringResult : ContentResult{public JsonStringResult(string json){Content = json;ContentType = "application/json";}}}} |
文件上传路径:/files/upload
2.3 页面调用
|
1
2
3
4
5
6
7
8
9
10
11
12
13
14
15
16
17
18
19
20
21
22
23
24
25
26
27
28
29
30
31
32
33
34
35
36
37
38
39
40
41
42
43
44
45
46
|
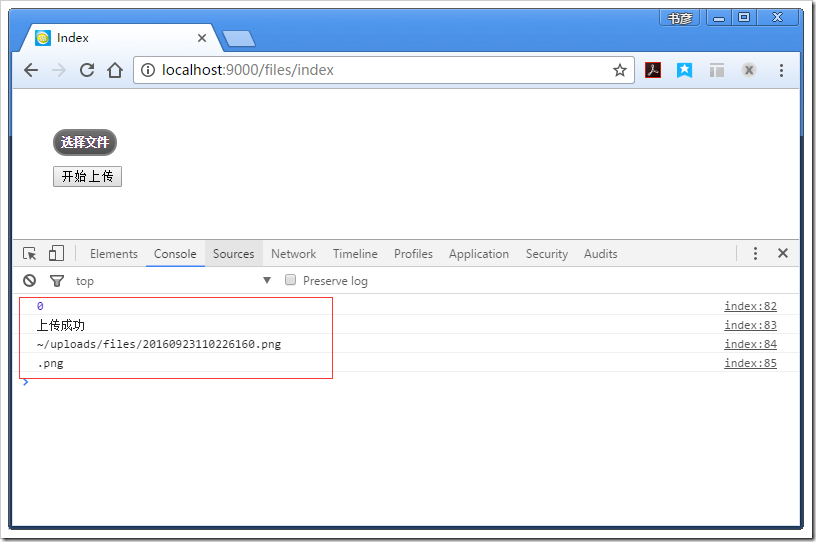
<!DOCTYPE html><html><head><meta name="viewport" content="width=device-width" /><title>Index</title><link href="/Content/themes/base/uploadify/uploadify.css" rel="stylesheet"/><script src="/Scripts/jquery-2.1.4.min.js"></script><script src="/Scripts/uploadify/jquery.uploadify.min.js"></script><script type="text/javascript">$(function () {var ASPSESSID = '3iupfg2udk4m5hyzfj5ydlso';var auth = '';//初始化tx.uploadify('uploadify',{ //参数配置fileexts: "*.jpg;*.png;*.zip", //要选择文件的扩展名,多个用;分割//formData: { ASPSESSID: ASPSESSID, AUTHID: auth },params: { //参数path: 'files',//上传路径,允许为空getzipfile: 1 //解压zip文件,并获取文件 0:不解压获取,1:解压获取}}, function (data) { //回调函数//data.result:0 表示成功,其他表示错误//data.message:信息//data.filename:文件名称//data.fileext:文件扩展console.log(data.result);console.log(data.message);console.log(data.filename);console.log(data.fileext);});$("#btnUpload").click(function () {tx.uploadify('uploadify'); //开始上传});});</script></head><body><div style="margin: 40px;"><div id="uploadify"></div><button id="btnUpload">开始上传</button></div></body></html> |
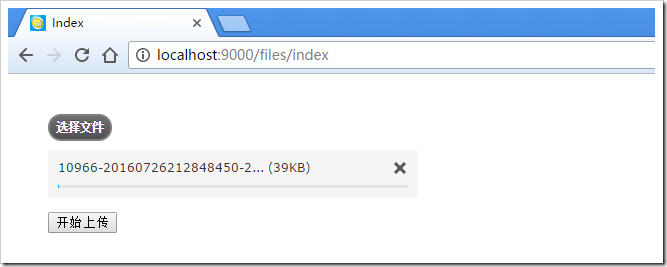
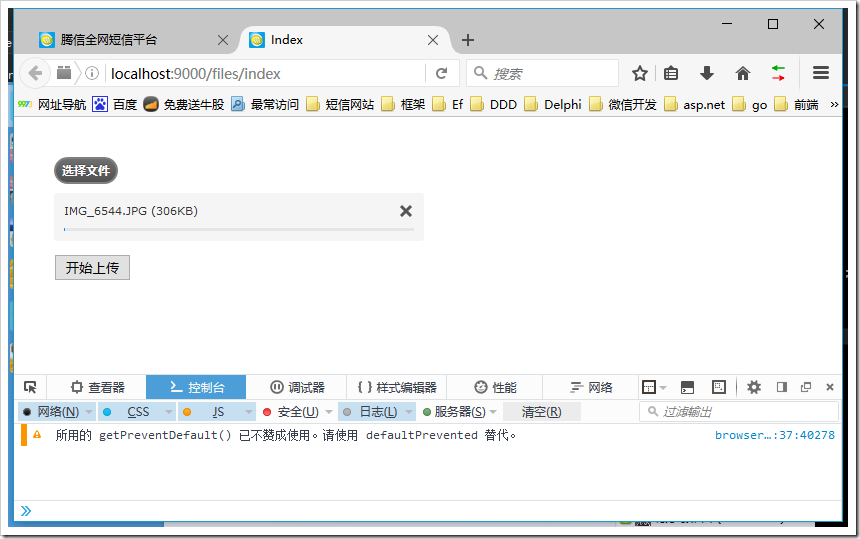
允许程序,界面如下:
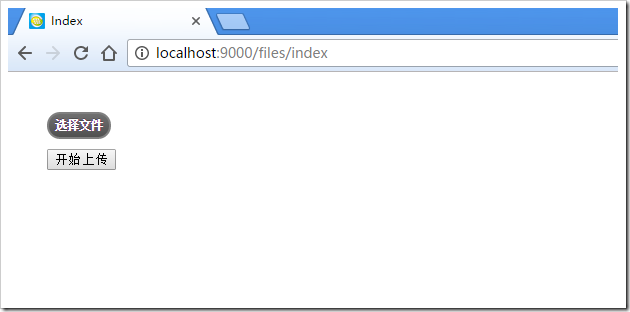
选择文件—>开始上传:
ok,到此已经完成。
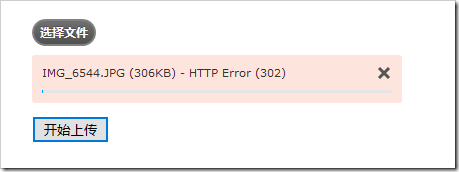
3、http 302解决方案
很怀疑二八原则,很快就出现了。同事用firefox进行测试,遇到如下提示:
查找大量资料,发下是Upload方法认证的问题,去掉[Authorize]属性标签即可,代码修改如下:
|
1
2
3
4
5
6
7
8
9
10
11
12
13
14
15
16
17
18
19
20
21
22
23
24
25
26
27
28
29
30
31
32
33
34
35
36
37
38
39
40
41
42
43
44
45
46
47
48
49
50
51
52
53
54
55
56
57
58
59
60
61
62
63
64
65
66
67
68
69
70
71
72
73
74
75
76
77
78
79
80
81
82
83
84
85
86
87
88
89
90
91
92
93
94
95
96
97
98
99
100
101
102
103
104
|
using System;using System.IO;using System.Web;using System.Web.Mvc;namespace TxSms.Web.Controllers{/// <summary>/// 文件上传管理/// </summary>//[Authorize]public class FilesController : TxSmsControllerBase{private static string jsonResult = "{0}\"result\":{1},\"message\":\"{2}\",\"filename\":\"{3}\",\"fileext\":\"{4}\"{5}";/// <summary>/// 文件上传页面/// </summary>/// <returns></returns>[Authorize]public ActionResult Index(){return View();}/// <summary>/// 上传文件/// </summary>/// <param name="filedata"></param>/// <returns></returns>//[Authorize]public ActionResult Upload(HttpPostedFileBase filedata){//加入认证信息if (this.LoginUser == null){return new JsonStringResult(string.Format(jsonResult, "{", -1, "抱歉,未登录,不允许上传", "", "", "}"));}// 如果没有上传文件if (filedata == null || filedata.FileName.IsNullOrEmpty() || filedata.ContentLength == 0){return new JsonStringResult(string.Format(jsonResult, "{", -2, "无上传文件", "", "", "}"));}string parmPath = Request.QueryString["path"];string parmGetzipfile = Request.QueryString["getzipfile"];if (parmGetzipfile.IsNullOrEmpty()){parmGetzipfile = "0";}// 保存到 ~/uploads 文件夹中,名称不变string time = DateTime.Now.ToString("yyyyMMddHHmmssfff");string fileext = Path.GetExtension(filedata.FileName);string filename = time + fileext;string virtualPath = parmPath.IsNullOrEmpty()? $"~/uploads/": $"~/uploads/{parmPath}/";string actualPath = Server.MapPath(virtualPath);if (!Directory.Exists(actualPath)){Directory.CreateDirectory(Server.MapPath(virtualPath));}// 文件系统不能使用虚拟路径var destFile = virtualPath + filename;string path = Server.MapPath(destFile);filedata.SaveAs(path);bool iszip = fileext != null && (fileext.Equals(".zip", StringComparison.OrdinalIgnoreCase) && parmGetzipfile.Equals("1"));if (iszip){var virtualPathZip = virtualPath + time + "/";string actualPathZip = Server.MapPath(virtualPathZip);if (!Directory.Exists(actualPathZip)){Directory.CreateDirectory(actualPathZip);}destFile = fileext = "";//第一步骤,解压TxSmsZipHelper.UnZipFile(path, actualPathZip);//第二步骤,获取excel文件,如果没有获取到,则抛出异常//获得目录信息var dir = new DirectoryInfo(actualPathZip);//获得目录文件列表var files = dir.GetFiles();foreach (FileInfo fileName in files){//var ext = Path.GetExtension(fileName.Name).ToLower();//if (ext == ".xls" || ext == ".xlsx")//{// destFile = Path.Combine(fileName.DirectoryName, fileName.Name);// break;//}destFile = virtualPathZip + fileName.Name;fileext = Path.GetExtension(fileName.Name);break;}}return new JsonStringResult(string.Format(jsonResult, "{", 0, "上传成功", destFile, fileext.ToLower(), "}"));}public class JsonStringResult : ContentResult{public JsonStringResult(string json){Content = json;ContentType = "application/json";}}}} |
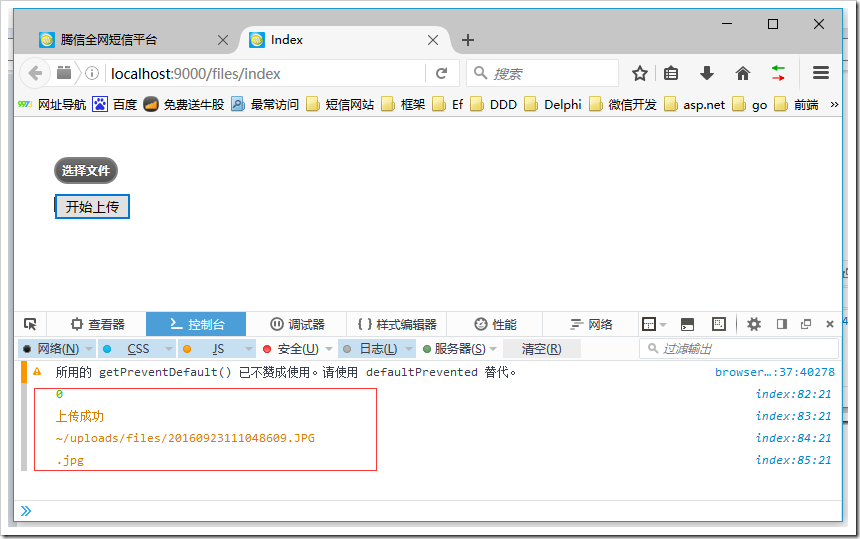
再次用firefox测试如下:
4、注意事项
1、封装的js类库适合单文件上传
2、upload里面的登录认证是通过判断当前账号信息是否为null
3、本项目使用的abp框架,有兴趣的可以去了解下:http://www.aspnetboilerplate.com/
以上所述是小编给大家介绍的jQuery.uploadify文件上传组件实例讲解,希望对大家有所帮助,如果大家有任何疑问请给我留言,小编会及时回复大家的。在此也非常感谢大家对脚本之家网站的支持!
jQuery.uploadify文件上传组件实例讲解的更多相关文章
- jquery.uploadify文件上传组件
1.jquery.uploadify简介 在ASP.NET中上传的控件有很多,比如.NET自带的FileUpload,以及SWFUpload,Uploadify等等,尤其后面两个控件的用户体验比较好, ...
- jquery uploadify文件上传插件用法精析
jquery uploadify文件上传插件用法精析 CreationTime--2018年8月2日11点12分 Author:Marydon 一.参数说明 1.参数设置 $("#fil ...
- BootStrap fileinput.js文件上传组件实例代码
1.首先我们下载好fileinput插件引入插件 ? 1 2 3 <span style="font-size:14px;"><link type="t ...
- 记录-Jquery uploadify文件上传实例
原本做的是from表单的文件上传,后来因需要用ajax异步,so接触到了Jquery uploadify上传 贴上代码,以供参考 需要引入的js文件 <link href="../re ...
- jQuery uploadify 文件上传
uploadify这个插件是基于js里面的jquery库写的.结合了ajax和flash,实现了这个多线程上传的功能.现在最新版为3.2.1. 在线实例 实例预览 Uploadify 在线实例Demo ...
- 详解jQuery uploadify文件上传插件的使用方法
uploadify这个插件是基于js里面的jquery库写的.结合了ajax和flash,实现了这个多线程上传的功能. 现在最新版为3.2.1. 在线实例 实例中用到的php文件UploaderDem ...
- C# Uploadify 文件上传组件的使用
一.页面的构建 1.要引用的JS和CSS <link href="../css/jquery-ui.css" rel="stylesheet" type= ...
- vue大文件上传组件选哪个好?
需求:项目要支持大文件上传功能,经过讨论,初步将文件上传大小控制在500M内,因此自己需要在项目中进行文件上传部分的调整和配置,自己将大小都以501M来进行限制. 第一步: 前端修改 由于项目使用的是 ...
- ASP中文件上传组件ASPUpload介绍和使用方法
[导读]要实现该功能,就要利用一些特制的文件上传组件.文件上传组件网页非常多,这里介绍国际上非常有名的ASPUpload组件 1 下载和安装ASPUpload 要实现该功能,就要利用一些特制的文件上 ...
随机推荐
- [转]Delphi调用cmd并取得输出文本
//转自http://www.oschina.net/code/snippet_136241_3980 1 procedure CheckResult(b: Boolean); begin if no ...
- c++基础_矩阵乘法
#include <iostream> using namespace std; int main(){ int a,b; cin>>a>>b; long c[a] ...
- (十)python3 生成器
生成器(generator):在 Python 中,不必创建完整的 list,从而节省大量的空间.一边循环一边计算的机制. 创建一个 generator,有很多种方法.第一种方法很简单,只要把一个列表 ...
- 用python爬取一张仓鼠图片
一. 找到一张仓鼠图片并复制一下它的url url='http://img.go007.com/2017/08/16/c407f5b732f4e748_2.jpg' 二. 调用urllib库 impo ...
- STM32——NVIV:嵌套中断向量控制器
STM32有43个channel的settable的中断源:AIRC(Application Interrupt and Reset Register)寄存器中有用于指定优先级的4 bits.这4个b ...
- Inspector's Dilemma(欧拉通路)
In a country, there are a number of cities. Each pair of city is connected by a highway, bi-directio ...
- 笔记——python语言规范
Lint 对你的代码运行pylint 定义: pylint是一个在Python源代码中查找bug的工具. 对于C和C++这样的不那么动态的(译者注: 原文是less dynamic)语言, 这些bug ...
- 获取某一个<tr>中<td>的值
$("#trId").children("td").eq(0).text(}; //当前行的第一个<td>的值 <td>下标 ...
- 九度oj 题目1438:最小公倍数
题目1438:最小公倍数 时间限制:1 秒 内存限制:128 兆 特殊判题:否 提交:2451 解决:2057 题目描述: 给定两个正整数,计算这两个数的最小公倍数. 输入: 输入包含多组测试数据,每 ...
- caca需要用到x11作为图形输出
编译错误:no output drivers were selected!. yum -y install xcb-proto yum -y install libxcb-devel.x86_64 l ...