Netty学习(二)使用及执行流程
Netty简单使用
1.本文先介绍一下 server 的 demo
2.(重点是这个)根据代码跟踪一下 Netty 的一些执行流程 和 事件传递的 pipeline.
首先到官网看一下Netty Server 和 Client的demo, https://netty.io/wiki/user-guide-for-4.x.html, 我用的是4.1.xx,一般来说不是大版本变更, 变化不会很大.下面是 Netty Server 的demo,跟官网的是一样的.
// 下面是一个接收线程, 3个worker线程

// 用 Netty 的默认线程工厂,可以不传这个参数

private final static ThreadFactory threadFactory = new DefaultThreadFactory("Netty学习之路");

// Boss 线程池,用于接收客户端连接

private final static NioEventLoopGroup boss = new NioEventLoopGroup(1,threadFactory);

// Worker线程池,用于处理客户端操作

private final static NioEventLoopGroup worker = new NioEventLoopGroup(3,threadFactory);

/*

 * 下面是在构造方法中, 如果不传线程数量,默认是0, super 到 MultithreadEventLoopGroup 这里后, 最终会用 CPU核数*2 作为线程数量, Reactor多线程模式的话,就指定 boss 线程数量=1

 *  private static final int DEFAULT_EVENT_LOOP_THREADS = Math.max(1, SystemPropertyUtil.getInt("io.netty.eventLoopThreads", NettyRuntime.availableProcessors() * 2));

 *  protected MultithreadEventLoopGroup(int nThreads, Executor executor, Object... args) {

 *  super(nThreads == 0 ? DEFAULT_EVENT_LOOP_THREADS : nThreads, executor, args);

 *  }

 */

public static void main(String[] args) throws Exception{

    try {

        new NettyServer(8888).start();

    }catch(Exception e){

        System.out.println("netty server启动失败");

        e.printStackTrace();

    }

}

static class NettyServer{

    private int port;

    NettyServer(int port){

        this.port = port;

    }

    void start()throws Exception{

        try {

            ServerBootstrap serverBootstrap = new ServerBootstrap();

            ChannelFuture future = serverBootstrap

                    .group(boss, worker)

                    .channel(NioServerSocketChannel.class)

                    // 客户端连接等待队列大小

                    .option(ChannelOption.SO_BACKLOG, 1024)

                    // 接收缓冲区

                    .option(ChannelOption.SO_RCVBUF, 32*1024)

                    // 连接超时

                    .option(ChannelOption.CONNECT_TIMEOUT_MILLIS, 10*1000)

                    .childHandler(new ChildChannelHandle())

                    .bind(this.port)

                    .sync();

            future.channel().closeFuture().sync();

        }catch(Exception e){

            throw e;

        }finally {

            boss.shutdownGracefully();

            worker.shutdownGracefully();

        }

    }

}

static class ChildChannelHandle extends ChannelInitializer<SocketChannel> {

    @Override

    protected void initChannel(SocketChannel socketChannel) throws Exception {

        ChannelPipeline pipeline = socketChannel.pipeline();

        // 字符串编码

        pipeline.addLast(new StringEncoder());

        // 字符串解码

        pipeline.addLast(new StringDecoder());

        // 自定义的handle, 状态变化后进行处理的 handle

        pipeline.addLast(new StatusHandle());

        // 自定义的handle, 现在是对读取到的消息进行处理

        pipeline.addLast(new CustomHandle());

    }

}
客户端的操作就简单的使用终端来操作了

这里对 inactive 和 active 进行了状态的输出, 输出接收数据并且原样返回给客户端
接下来看一下代码
CustomHandle
这里对接收到的客户端的数据进行处理
public class CustomHandle extends ChannelInboundHandlerAdapter {

    private Thread thread = Thread.currentThread();

    @Override

    public void channelRead(ChannelHandlerContext ctx, Object msg) throws Exception {

        System.out.println(thread.getName()+": channelRead content : "+msg);

        ctx.writeAndFlush(msg);

    }

}
StatusHandle
对状态变化后进行处理的Handle(客户端上下线事件)
###
public class StatusHandle extends ChannelInboundHandlerAdapter {
private Thread thread = Thread.currentThread();
private String ip;
    @Override

    public void channelActive(ChannelHandlerContext ctx) throws Exception {

        this.ip = ctx.channel().remoteAddress().toString();

        System.out.println(thread.getName()+": ["+this.ip+"] channelActive -------");

    }

    @Override

    public void channelInactive(ChannelHandlerContext ctx) throws Exception {

        System.out.println(thread.getName()+": ["+this.ip+"] channelInactive -------");

    }

}
上面标记了两个地方, 从这两个地方可以窥探到 Netty 的执行流程到底是怎么样的
*
NioServerSocketChannel 作用相当于NIO ServerSocketChannel
*
ChildChannelHandle extends ChannelInitializer , 实现 initChannel 方法, 这里主要是引申出来的 事件传输通道pipeline
1.NioServerSocketChannel
这个类是 Netty 用于服务端的类,用于接收客户端连接等. 用过NIO的同学都知道, serverSocket开启的时候,需要注册 ACCEPT 事件来监听客户端的连接
- (小插曲)下面是Java NIO 的事件(netty基于NIO,自然也会有跟NIO一样的事件)
- public static final int OP_READ = 1 << 0; // 读消息事件
- public static final int OP_WRITE = 1 << 2; // 写消息事件
- public static final int OP_CONNECT = 1 << 3; // 连接就绪事件
- public static final int OP_ACCEPT = 1 << 4; // 新连接事件
先看一下 NioServerSocketChannel 的继承类图

从上面的demo的 channel(NioServerSocketChannel.class) 开始说起吧,可以看到是工厂生成channel.
public B channel(Class<? extends C> channelClass) {

    if (channelClass == null) {

        throw new NullPointerException("channelClass");

    } else {

        return this.channelFactory((io.netty.channel.ChannelFactory)(new ReflectiveChannelFactory(channelClass)));

    }

}
工厂方法生成 NioServerSocketChannel 的时候调用的构造方法:
public NioServerSocketChannel(ServerSocketChannel channel) {

    super(null, channel, SelectionKey.OP_ACCEPT);

    config = new NioServerSocketChannelConfig(this, javaChannel().socket());

}
继续往下跟,跟到 AbstractNioChannel 的构造方法:
protected AbstractNioChannel(Channel parent, SelectableChannel ch, int readInterestOp) {

    super(parent);

    this.ch = ch;

    // 记住这个地方记录了 readInterestOp

    this.readInterestOp = readInterestOp;

    try {

    		// 设置为非阻塞

        ch.configureBlocking(false);

    } catch (IOException e) {

        try {

            ch.close();

        } catch (IOException e2) {

            if (logger.isWarnEnabled()) {

                logger.warn(

                        "Failed to close a partially initialized socket.", e2);

            }

        }

        throw new ChannelException("Failed to enter non-blocking mode.", e);

    }

}
回到 ServerBootstrap 的链式调用, 接下来看 bind(port) 方法,一路追踪下去,会看到
private ChannelFuture doBind(final SocketAddress localAddress) {

// 初始化和注册

    final ChannelFuture regFuture = initAndRegister();

    final Channel channel = regFuture.channel();

    if (regFuture.cause() != null) {

        return regFuture;

    }

    if (regFuture.isDone()) {

        ChannelPromise promise = channel.newPromise();

        doBind0(regFuture, channel, localAddress, promise);

        return promise;

    } else {

        final PendingRegistrationPromise promise = new PendingRegistrationPromise(channel);

        regFuture.addListener(new ChannelFutureListener() {

            @Override

            public void operationComplete(ChannelFuture future) throws Exception {

                Throwable cause = future.cause();

                if (cause != null) {

                    promise.setFailure(cause);

                } else {

                    promise.registered();

                    doBind0(regFuture, channel, localAddress, promise);

                }

            }

        });

        return promise;

    }

}
看 initAndRegister 方法
final ChannelFuture initAndRegister() {

    Channel channel = null;

    try {

        channel = channelFactory.newChannel();

        init(channel);

    } catch (Throwable t) {

        if (channel != null) {

            channel.unsafe().closeForcibly();

            return new DefaultChannelPromise(channel, GlobalEventExecutor.INSTANCE).setFailure(t);

        }

        return new DefaultChannelPromise(new FailedChannel(), GlobalEventExecutor.INSTANCE).setFailure(t);

    }

		// 看到这里的注册, 继续往下看

    ChannelFuture regFuture = config().group().register(channel);

    if (regFuture.cause() != null) {

        if (channel.isRegistered()) {

            channel.close();

        } else {

            channel.unsafe().closeForcibly();

        }

    }

    return regFuture;

}
config().group().register(channel); 往下看, 追踪到 AbstractChannel 的 register --> regist0(promise) (由于调用太多,省去了中间的一些调用代码)
private void register0(ChannelPromise promise) {

        try {

            // check if the channel is still open as it could be closed in the mean time when the register

            // call was outside of the eventLoop

            if (!promise.setUncancellable() || !ensureOpen(promise)) {

                return;

            }

            boolean firstRegistration = neverRegistered;

            // 执行注册

            doRegister();

            neverRegistered = false;

            registered = true;

            // Ensure we call handlerAdded(...) before we actually notify the promise. This is needed as the

            // user may already fire events through the pipeline in the ChannelFutureListener.

            // 这里官方也说得很清楚了,确保我们在使用 promise 的通知之前真正的调用了 pipeline 中的 handleAdded 方法

            pipeline.invokeHandlerAddedIfNeeded();

            safeSetSuccess(promise);

            // 先调用 regist 方法

            pipeline.fireChannelRegistered();

            // Only fire a channelActive if the channel has never been registered. This prevents firing

            // multiple channel actives if the channel is deregistered and re-registered.

            // 只有 channel 之前没有注册过才会调用 channelActive

            // 这里防止 channel deregistered(注销) 和 re-registered(重复调用 regist) 的时候多次调用 channelActive

            if (isActive()) {

                if (firstRegistration) {

                    // 执行 channelActive 方法

                    pipeline.fireChannelActive();

                } else if (config().isAutoRead()) {

                    // This channel was registered before and autoRead() is set. This means we need to begin read

                    // again so that we process inbound data.

                    //

                    // channel 已经注册过 并且 已经设置 autoRead().这意味着我们需要开始再次读取和处理 inbound 的数据

                    // See https://github.com/netty/netty/issues/4805

                    beginRead();

                }

            }

        } catch (Throwable t) {

            // Close the channel directly to avoid FD leak.

            closeForcibly();

            closeFuture.setClosed();

            safeSetFailure(promise, t);

        }

    }
看到 doRegister() 方法,继续跟下去, 跟踪到 AbstractNioChannel 的 doRegister() 方法
protected void doRegister() throws Exception {

    boolean selected = false;

    for (;;) {

        try {

            // 这里调用java的 NIO 注册

            selectionKey = javaChannel().register(eventLoop().unwrappedSelector(), 0, this);

            return;

        } catch (CancelledKeyException e) {

            if (!selected) {

                eventLoop().selectNow();

                selected = true;

            } else {

                throw e;

            }

        }

    }

}
写过NIO的同学应该熟悉上面的这句话:
selectionKey = javaChannel().register(eventLoop().unwrappedSelector(), 0, this);
这里就是调用了java NIO的注册, 至于为什么注册的时候 ops = 0
, 继续追踪下去,此处省略一堆调用....(实在是过于繁杂)最后发现, 最终都会调用 AbstractNioChannel 的 doBeginRead() 方法修改 selectionKey 的 interestOps ,客户端连接后,注册的读事件在这里也是相同的操作.
protected void doBeginRead() throws Exception {

    // Channel.read() or ChannelHandlerContext.read() was called

    final SelectionKey selectionKey = this.selectionKey;

    if (!selectionKey.isValid()) {

        return;

    }

    readPending = true;

    final int interestOps = selectionKey.interestOps();

    // // 这里是判断有没有注册过相同的事件,没有的话才修改 ops

    if ((interestOps & readInterestOp) == 0) {

        // 就是这里, 记得刚才注册的时候,ops == 0 吗, this.readInterestOp 在上面的初始化的时候赋了值

        // 与 0 逻辑或, 所以最终值就是 this.readInterestOp , 注册事件的数值 不清楚的话可以看一下最上面

        selectionKey.interestOps(interestOps | readInterestOp);

    }

}
上面介绍的 服务端 ACCEPT 最后调用的 NIO 的 register 方法, read 也是调用 nio 的 register, 但是在 SocketChannel(client) 调用 register 之前, 服务端是有一个 server.accept() 方法获取客户端连接, 以此为契机, 最后我们在 NioServerSocketChannel 里面找到了accept 方法.
// 1

protected int doReadMessages(List<Object> buf) throws Exception {

    // accept 客户端, 传入 serverSocketChannel

    SocketChannel ch = SocketUtils.accept(javaChannel());

    try {

        if (ch != null) {

            // 创建新的 Netty 的 Channel , 并设置 ops =1 (read). 这是在调用 doBeginRead的时候修改的 ops 的值 , 跟 server 的一样

            buf.add(new NioSocketChannel(this, ch));

            return 1;

        }

    } catch (Throwable t) {

        logger.warn("Failed to create a new channel from an accepted socket.", t);

        try {

            ch.close();

        } catch (Throwable t2) {

            logger.warn("Failed to close a socket.", t2);

        }

    }

    return 0;

}

// 2

public static SocketChannel accept(final ServerSocketChannel serverSocketChannel) throws IOException {

    try {

        return AccessController.doPrivileged(new PrivilegedExceptionAction<SocketChannel>() {

            @Override

            public SocketChannel run() throws IOException {

            		// nio 的方法

                return serverSocketChannel.accept();

            }

        });

    } catch (PrivilegedActionException e) {

        throw (IOException) e.getCause();

    }

}
// 1
protected int doReadMessages(List<Object> buf) throws Exception {
// accept 客户端, 传入 serverSocketChannel
SocketChannel ch = SocketUtils.accept(javaChannel());
try {
if (ch != null) {
// 创建新的 Netty 的 Channel , 并设置 ops =1 (read). 这是在调用 doBeginRead的时候修改的 ops 的值 , 跟 server 的一样
buf.add(new NioSocketChannel(this, ch));
return 1;
}
} catch (Throwable t) {
logger.warn("Failed to create a new channel from an accepted socket.", t);
try {
ch.close();
} catch (Throwable t2) {
logger.warn("Failed to close a socket.", t2);
}
}
return 0;
}
// 2
public static SocketChannel accept(final ServerSocketChannel serverSocketChannel) throws IOException {
try {
return AccessController.doPrivileged(new PrivilegedExceptionAction<SocketChannel>() {
@Override
public SocketChannel run() throws IOException {
// nio 的方法
return serverSocketChannel.accept();
}
});
} catch (PrivilegedActionException e) {
throw (IOException) e.getCause();
}
}
客户端连接的时候,会触发上面的 server.accept(), 然后会触发 AbstractChannel 的 register 方法 从而调用下面2个方法
AbstractChannel.this.pipeline.fireChannelRegistered();// 这个方法会调用下面的两个方法
static void invokeChannelRegistered(final AbstractChannelHandlerContext next) {

    EventExecutor executor = next.executor();

    if (executor.inEventLoop()) {

        next.invokeChannelRegistered();

    } else {

        executor.execute(new Runnable() {

            @Override

            public void run() {

                next.invokeChannelRegistered();

            }

        });

    }

}

private void invokeChannelRegistered() {

    if (invokeHandler()) {

        try {

            ((ChannelInboundHandler) handler()).channelRegistered(this);

        } catch (Throwable t) {

            notifyHandlerException(t);

        }

    } else {

        fireChannelRegistered();

    }

}
接下来我们开始讲上面提到的那个 handlerAdded 方法, 这会引申到另一个东西 pipeline.
2.ChannelInitializer
在解析这个类之前, 要先说一下 pipeline (管道,传输途径啥的都行)它就是一条 handle 消息传递链, 客户端的任何消息(事件)都经由它来处理.
先看一下 AbstractChannelHandlerContext 中的 两个方法
###
// 查找下一个 inboundHandle (从当前位置往后查找 intBound)

private AbstractChannelHandlerContext findContextInbound() {

    AbstractChannelHandlerContext ctx = this;

    do {

        ctx = ctx.next; // 往后查找

    } while (!ctx.inbound);

    return ctx;

}

// 查找下一个 OutboundHandle (从当前位置往前查找 outBound )

private AbstractChannelHandlerContext findContextOutbound() {

    AbstractChannelHandlerContext ctx = this;

    do {

        ctx = ctx.prev; // 往前查找

    } while (!ctx.outbound);

    return ctx;

}
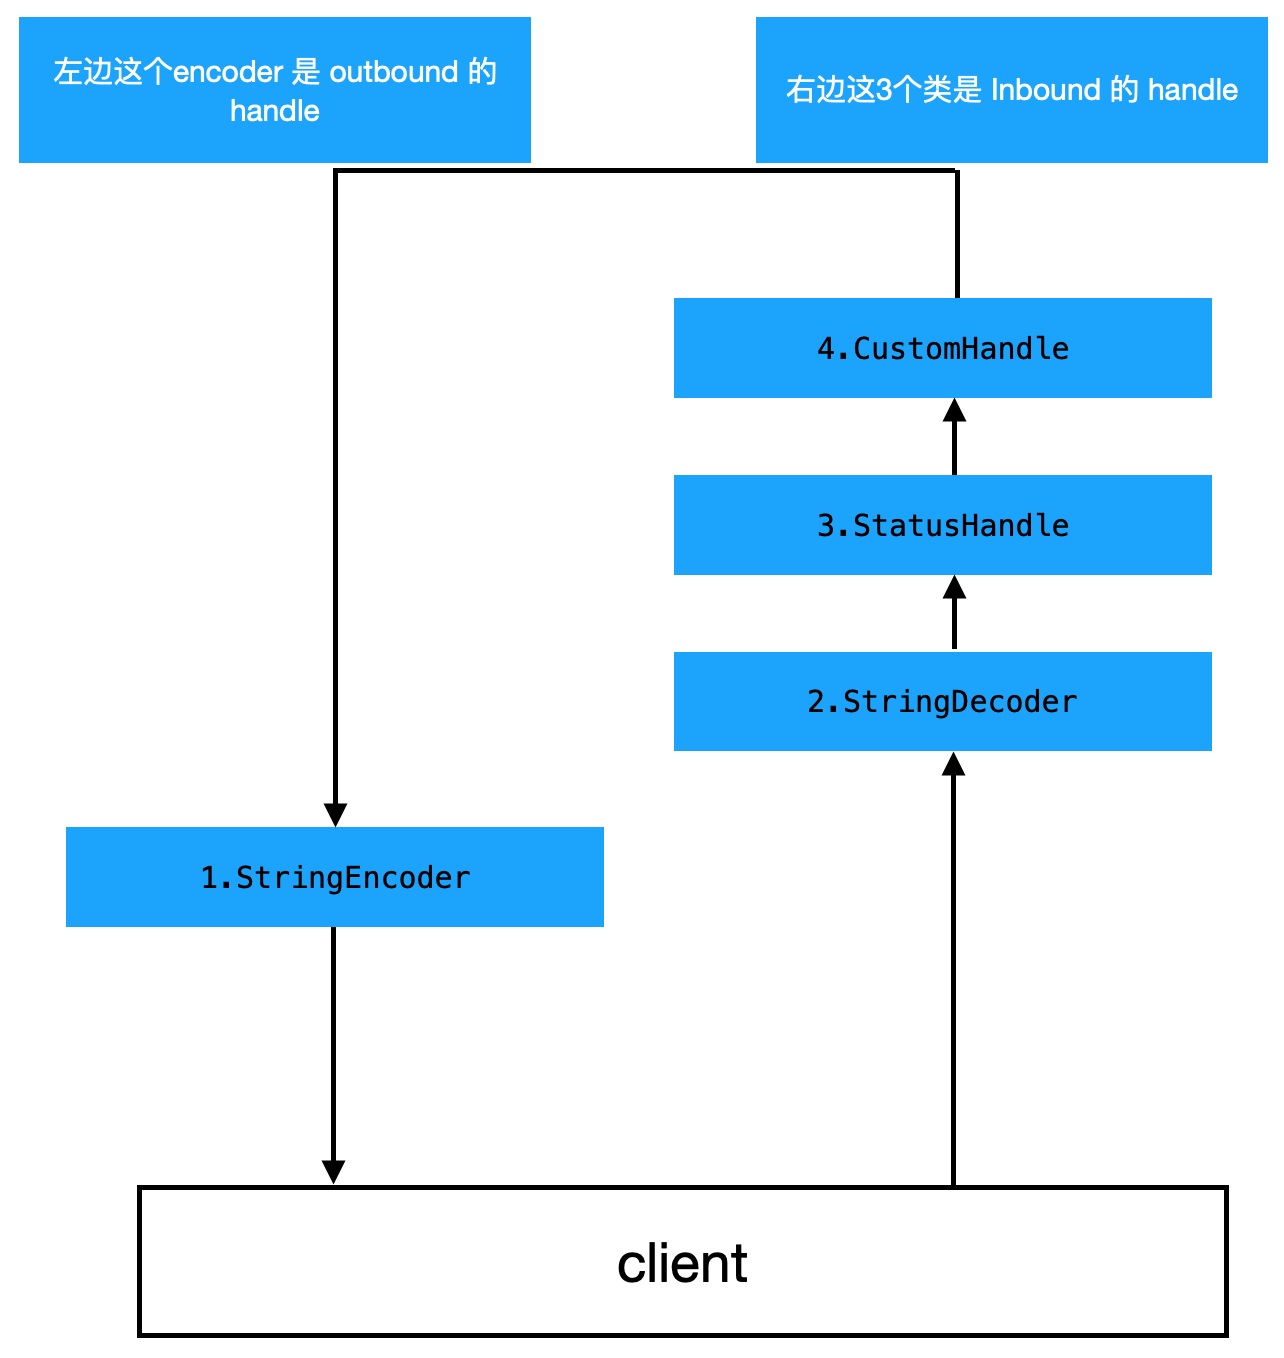
so , inbound 消息传递为从前往后, outbound 的消息传递为从后往前, 所以最先添加的 outbound 将会最后被调用
###
        pipeline.addLast(new StringEncoder());

        // 字符串解码

        pipeline.addLast(new StringDecoder());

        // 自定义的handle, 状态变化后进行处理的 handle

        pipeline.addLast(new StatusHandle());

        // 自定义的handle, 现在是对读取到的消息进行处理

        pipeline.addLast(new CustomHandle());
我们上面4个 handle 添加的顺序为 out, in , in, in , 所以最终调用的话,会变成下面这样
再看看 ChannelInitializer 这个类
###
public abstract class ChannelInitializer<C extends Channel> extends ChannelInboundHandlerAdapter

/**

 * This method will be called once the {@link Channel} was registered. After the method returns this instance

 * will be removed from the {@link ChannelPipeline} of the {@link Channel}.

 *

 * @param ch            the {@link Channel} which was registered.

 * @throws Exception    is thrown if an error occurs. In that case it will be handled by

 *                      {@link #exceptionCaught(ChannelHandlerContext, Throwable)} which will by default close

 *                      the {@link Channel}.

 * 上面的意思是说,当 channel(客户端通道)一旦被注册,将会调用这个方法, 并且在方法返回的时候, 这个实例(ChannelInitializer)将会被从 ChannelPipeline (客户端的 pipeline) 中移除

 */

protected abstract void initChannel(C ch) throws Exception;

// 第一步

public void handlerAdded(ChannelHandlerContext ctx) throws Exception {

if (ctx.channel().isRegistered()) {

    initChannel(ctx);

}

// 除了这个抽象方法, 这个类还有一个重载方法

private boolean initChannel(ChannelHandlerContext ctx) throws Exception {

    if (initMap.putIfAbsent(ctx, Boolean.TRUE) == null) { // Guard against re-entrance.

        try {

          	// 第二步

          	// 这里调用我们自己实现的那个抽象方法 , 将 我们前面定义的 handle 都加入到 client 的 pipeline 中

            initChannel((C) ctx.channel());

        } catch (Throwable cause) {

            exceptionCaught(ctx, cause);

        } finally {

          	//   第三步

            remove(ctx);

        }

        return true;

    }

    return false;

}

private void remove(ChannelHandlerContext ctx) {

    try {

        ChannelPipeline pipeline = ctx.pipeline();

        if (pipeline.context(this) != null) {

            pipeline.remove(this);

        }

    } finally {

        initMap.remove(ctx);

    }

}
终于写完了这一篇, 这篇的代码有点多, 如果只是demo的话, 不需要花费什么时间, 如果想要深入了解一下 Netty 的话, 可以从这里开始对源码的一点点分析.
最后
这次的内容到这里就结束了,最后的最后,非常感谢你们能看到这里!!你们的阅读都是对作者的一次肯定!!!
觉得文章有帮助的看官顺手点个赞再走呗(终于暴露了我就是来骗赞的(◒。◒)),你们的每个赞对作者来说都非常重要(异常真实),都是对作者写作的一次肯定(double)!!!
Netty学习(二)使用及执行流程的更多相关文章
- Netty学习——protoc的新手使用流程
Netty学习——protoc的新手使用流程 关于学习的内容笔记,记下来的东西等于又过了一次脑子,记录的更深刻一些. 1. 使用IDEA创建.proto文件,软件会提示你安装相应的语法插件 安装成功之 ...
- mybatis源码学习:插件定义+执行流程责任链
目录 一.自定义插件流程 二.测试插件 三.源码分析 1.inteceptor在Configuration中的注册 2.基于责任链的设计模式 3.基于动态代理的plugin 4.拦截方法的interc ...
- Netty学习(二)-Helloworld Netty
这一节我们来讲解Netty,使用Netty之前我们先了解一下Netty能做什么,无为而学,岂不是白费力气! 1.使用Netty能够做什么 开发异步.非阻塞的TCP网络应用程序: 开发异步.非阻塞的UD ...
- Netty学习二:Java IO与序列化
1 Java IO 1.1 Java IO 1.1.1 IO IO,即输入(Input)输出(Output)的简写,是描述计算机软硬件对二进制数据的传输.读写等操作的统称. 按照软硬件可分为: 磁盘I ...
- ThinkingInJava 学习 之 0000003 控制执行流程
1. if-else 2. 迭代 1. while 2. do-while 3. for 4. 逗号操作符 Java里唯一用到逗号操作符的地方就是for循环的控制表达式. 在控制表达式的初始化和步进控 ...
- c语言学习笔记 if语句执行流程和关系运算符
回想现实生活中,我们会遇到这样的情况,如果下雨了就带伞上班,如果没下雨就不带伞上班,这是很正常的逻辑.程序是解决生活中的问题的,那么自然在程序中也需要这样的判断,当满足某个条件的时候做一件事情,这种东 ...
- go语言学习入门篇 3-- 程序执行流程
先看下 Go 语言的程序结构: package main // 当前包名 import "fmt" // 导入程序中使用到的包 // 初始化函数 func init() { // ...
- SpringMVC 学习笔记(十一) SpirngMVC执行流程
watermark/2/text/aHR0cDovL2Jsb2cuY3Nkbi5uZXQvYTY3NDc0NTA2/font/5a6L5L2T/fontsize/400/fill/I0JBQkFCMA ...
- 面试高频SpringMVC执行流程最优解(源码分析)
文章已托管到GitHub,大家可以去GitHub查看阅读,欢迎老板们前来Star! 搜索关注微信公众号 码出Offer 领取各种学习资料! SpringMVC执行流程 SpringMVC概述 Spri ...
随机推荐
- JVM学习九-(复习)HotSpot 垃圾收集器
HotSpot 虚拟机提供了多种垃圾收集器,每种收集器都有各自的特点,虽然我们要对各个收集器进行比较,但并非为了挑选出一个最好的收集器.我们选择的只是对具体应用最合适的收集器. 新生代垃圾收集器 Se ...
- nginx入门教程 (转)
1.Nginx 状态码配置和错误文件 server { # 配置访问 /test.js 时报 403 错 location /test.js { return 403; } # 配置访问 /404 时 ...
- Linux命令date日期时间和Unix时间戳互转
A.将日期转换为Unix时间戳将当前时间以Unix时间戳表示: date +%s 输出如下: 1361542433 转换指定日期为Unix时间戳: date -d '2013-2-22 22:14' ...
- Eclipse集成Git/SVN插件及使用
感谢大佬:https://www.cnblogs.com/jpfss/p/8027347.html 1. Git插件安装 1.1 下载插件 首先打开Eclipse,然后点击Help>Instal ...
- Java数组问题:Array constants can only be used in initializers
感谢大佬:https://www.cnblogs.com/fanerwei222/p/11491571.html 感谢大佬:https://blog.csdn.net/weixin_42591732/ ...
- memcached 测试代码
转载请注明来源:https://www.cnblogs.com/hookjc/ #include<stdio.h> #include <iostream> #include & ...
- oracle锁表问题处理
文章转载自:http://blog.itpub.net/31397003/viewspace-2142672/ "ORA-00054: 资源正忙, 但指定以 NOWAIT 方式获取资源, 或 ...
- 利用系统APP实现导航---By张秀清
苹果系统本身自带一个地图APP,但是功能并不是很强大,但是一些简单的导航功能还是能做出来的,下面贴上我的代码 // // ViewController.m // 系统APP导航 // // Creat ...
- Java中File类的方法详解
File类也是Java中一个比较重要的类,通过他我们可以实现对文件的一系列操作,其内置了很多方法,下面我将按方法的功能分块,逐一讲解: 快速导航 构造方法 常用方法 创建目录 判断 `is...` t ...
- Git重命名远程分支
一.重命名本地分支 将hot_fix分支重命名为bug_fix git branch -m hot_fix bug_fix 二.推送重命名后的本地分支到远程仓库 git push origin bug ...