吴裕雄 python神经网络 手写数字图片识别(5)
import keras
import matplotlib.pyplot as plt
from keras.models import Sequential
from keras.layers import Dense,Activation,Flatten,Dropout,Convolution2D,MaxPooling2D
from keras.utils import np_utils
from keras.optimizers import RMSprop
from skimage import io
nb_classes=10
batch_size=128
####因为是卷积神经网络,输入数据的格式是图像格式,所以要进行reshape
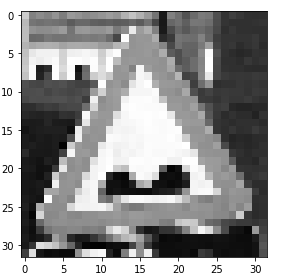
train_X = io.imread("E:\\WaySign\\0_0_colorrgb0.ppm")
train_x=np.reshape(train_X,(train_X.shape[0],32,32,1))
# test_x=np.reshape(test_X,(test_X.shape[0],28,28,1))
# train_y=np_utils.to_categorical(train_Y,nb_classes)
# test_y=np_utils.to_categorical(test_Y,nb_classes)
print(train_y.shape,'\n',test_y.shape)
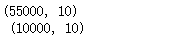
print(train_x.shape,'\n',test_x.shape)
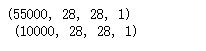
train_x[:,:,:,0].shape

###reshape后的数据显示
import matplotlib.pyplot as plt
%matplotlib inline
f,a=plt.subplots(1,10,figsize=(10,5))
for i in range(10):
a[i].imshow(train_x[i,:,:,0],cmap='gray')
print(train_Y[i])

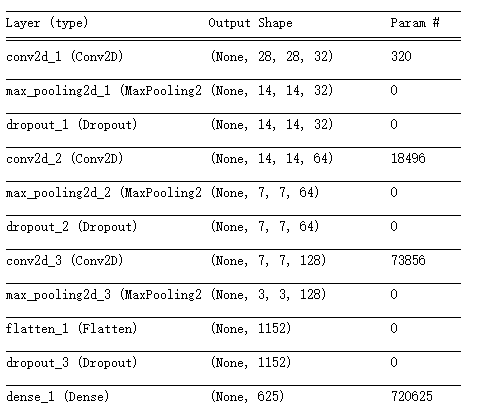
####establish a convolution nerual network
model=Sequential()
####Convolution layer 1
model.add(Convolution2D(filters=32,kernel_size=(3,3),input_shape=(28,28,1),strides=(1,1),\
padding='same',activation='relu'))
#####pooling layer with dropout
model.add(MaxPooling2D(pool_size=(2,2), strides=(2,2), padding='valid'))
model.add(Dropout(0.2))
####Convolution layer 2
model.add(Convolution2D(filters=64,kernel_size=(3,3),strides=(1,1),padding='same',\
activation='relu'))
model.add(MaxPooling2D(pool_size=(2,2), strides=(2,2), padding='valid'))
model.add(Dropout(0.2))
####Convolution layer 3
model.add(Convolution2D(filters=128,kernel_size=(3,3),strides=(1,1),padding='same',\
activation='relu'))
model.add(MaxPooling2D(pool_size=(2,2), strides=(2,2), padding='valid'))
model.add(Flatten())###理解扁平化
model.add(Dropout(0.2))
#model.add(Flatten())?
####fully connected layer 1 (fc layer)
model.add(Dense(output_dim=625,activation='relu'))
model.add(Dropout(0.5))
####fully connected layer 2 (fc layer)
model.add(Dense(output_dim=10,activation='softmax'))
model.summary()
model.compile(optimizer=RMSprop(lr=0.001,rho=0.9),loss="categorical_crossentropy",\
metrics=['accuracy'])
import time
start_time=time.time()
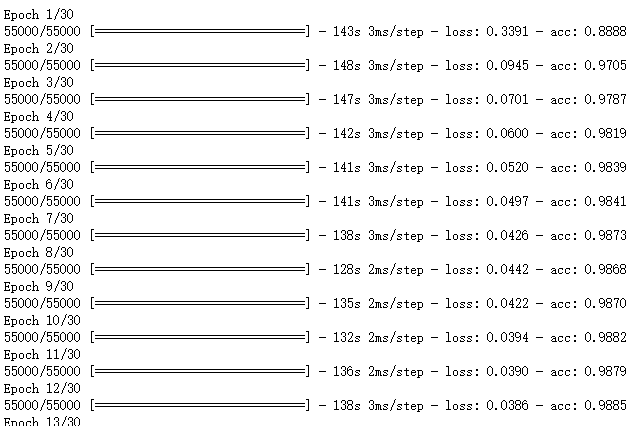
model.fit(train_x,train_y,epochs=30,batch_size=128,verbose=1)
end_time=time.time()
print("running time:%.2f"%(end_time-start_time))
evaluation=model.evaluate(test_x,test_y,batch_size=128,verbose=1)
print("model loss:%.4f"%(evaluation[0]),"model accuracy:%.4f"%(evaluation[1]))

# https://github.com/fchollet/keras/issues/431
def get_activations(model, model_inputs, print_shape_only=True, layer_name=None):
import keras.backend as K
print('----- activations -----')
activations = []
inp = model.input
model_multi_inputs_cond = True
if not isinstance(inp, list):
# only one input! let's wrap it in a list.
inp = [inp]
model_multi_inputs_cond = False
outputs = [layer.output for layer in model.layers if
layer.name == layer_name or layer_name is None] # all layer outputs
funcs = [K.function(inp + [K.learning_phase()], [out]) for out in outputs] # evaluation functions
if model_multi_inputs_cond:
list_inputs = []
list_inputs.extend(model_inputs)
list_inputs.append(1.)
else:
list_inputs = [model_inputs, 1.]
# Learning phase. 1 = Test mode (no dropout or batch normalization)
# layer_outputs = [func([model_inputs, 1.])[0] for func in funcs]
layer_outputs = [func(list_inputs)[0] for func in funcs]
for layer_activations in layer_outputs:
activations.append(layer_activations)
if print_shape_only:
print(layer_activations.shape)
else:
print(layer_activations)
return activations
# https://github.com/philipperemy/keras-visualize-activations/blob/master/read_activations.py
def display_activations(activation_maps):
import numpy as np
import matplotlib.pyplot as plt
"""
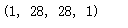
(1, 28, 28, 32)
(1, 14, 14, 32)
(1, 14, 14, 32)
(1, 14, 14, 64)
(1, 7, 7, 64)
(1, 7, 7, 64)
(1, 7, 7, 128)
(1, 3, 3, 128)
(1, 1152)
(1, 1152)
(1, 625)
(1, 625)
(1, 10)
"""
batch_size = activation_maps[0].shape[0]
assert batch_size == 1, 'One image at a time to visualize.'
for i, activation_map in enumerate(activation_maps):
print('Displaying activation map {}'.format(i))
shape = activation_map.shape
if len(shape) == 4:
activations = np.hstack(np.transpose(activation_map[0], (2, 0, 1)))
elif len(shape) == 2:
# try to make it square as much as possible. we can skip some activations.
activations = activation_map[0]
num_activations = len(activations)
if num_activations > 1024: # too hard to display it on the screen.
square_param = int(np.floor(np.sqrt(num_activations)))
activations = activations[0: square_param * square_param]
activations = np.reshape(activations, (square_param, square_param))
else:
activations = np.expand_dims(activations, axis=0)
else:
raise Exception('len(shape) = 3 has not been implemented.')
#plt.imshow(activations, interpolation='None', cmap='binary')
fig, ax = plt.subplots(figsize=(18, 12))
ax.imshow(activations, interpolation='None', cmap='binary')
plt.show()
###One image at a time to visualize.
activations = get_activations(model, (test_x[0,:,:,:])[np.newaxis,:])

(test_x[0,:,:,:])[np.newaxis,:].shape
display_activations(activations)

plt.imshow(test_x[0,:,:,0],cmap='gray')
pred_value=model.predict_classes((test_x[0,:,:,:])[np.newaxis,:],batch_size=1)
print(pred_value)

吴裕雄 python神经网络 手写数字图片识别(5)的更多相关文章
- 吴裕雄 python 神经网络——TensorFlow 卷积神经网络手写数字图片识别
import os import tensorflow as tf from tensorflow.examples.tutorials.mnist import input_data INPUT_N ...
- 用Keras搭建神经网络 简单模版(三)—— CNN 卷积神经网络(手写数字图片识别)
# -*- coding: utf-8 -*- import numpy as np np.random.seed(1337) #for reproducibility再现性 from keras.d ...
- 深度学习(一):Python神经网络——手写数字识别
声明:本文章为阅读书籍<Python神经网络编程>而来,代码与书中略有差异,书籍封面: 源码 若要本地运行,请更改源码中图片与数据集的位置,环境为 Python3.6x. 1 import ...
- 用Keras搭建神经网络 简单模版(四)—— RNN Classifier 循环神经网络(手写数字图片识别)
# -*- coding: utf-8 -*- import numpy as np np.random.seed(1337) from keras.datasets import mnist fro ...
- caffe+opencv3.3dnn模块 完成手写数字图片识别
最近由于项目需要用到caffe,学习了下caffe的用法,在使用过程中也是遇到了些问题,通过上网搜索和问老师的方法解决了,在此记录下过程,方便以后查看,也希望能为和我一样的新手们提供帮助. 顺带附上老 ...
- 基于Numpy的神经网络+手写数字识别
基于Numpy的神经网络+手写数字识别 本文代码来自Tariq Rashid所著<Python神经网络编程> 代码分为三个部分,框架如下所示: # neural network class ...
- TensorFlow 卷积神经网络手写数字识别数据集介绍
欢迎大家关注我们的网站和系列教程:http://www.tensorflownews.com/,学习更多的机器学习.深度学习的知识! 手写数字识别 接下来将会以 MNIST 数据集为例,使用卷积层和池 ...
- 一文全解:利用谷歌深度学习框架Tensorflow识别手写数字图片(初学者篇)
笔记整理者:王小草 笔记整理时间2017年2月24日 原文地址 http://blog.csdn.net/sinat_33761963/article/details/56837466?fps=1&a ...
- Tensorflow学习教程------模型参数和网络结构保存且载入,输入一张手写数字图片判断是几
首先是模型参数和网络结构的保存 #coding:utf-8 import tensorflow as tf from tensorflow.examples.tutorials.mnist impor ...
随机推荐
- MySQL中授权(grant)和撤销授权(revoke
MySQL 赋予用户权限命令的简单格式可概括为: grant 权限 on 数据库对象 to 用户 一.grant 普通数据用户,查询.插入.更新.删除 数据库中所有表数据的权利 grant s ...
- 电商系统架构总结1(EF)
最近主导了一个电商系统的设计开发过程,包括前期分析设计,框架搭建,功能模块的具体开发(主要负责在线支付部分),成功上线后的部署维护,运维策略等等全过程. 虽然这个系统不是什么超大型的电商系统 数亿计的 ...
- cocos源码分析--绘制顺序LocalZOrder、GlobalZOrder、OrderOfArrival
使用规则 节点的渲染顺序跟节点的三个成员变量有关(_localZOrder._globalZOrder._orderOfArrival)分别对应三个设置函数setLocalZOrder.setGlob ...
- http请求状态及其含义表
1xx - 信息提示 100 - 初始的请求已经接受,客户应当继续发送请求的其余部分.(HTTP 1.1新) 101 - 服务器将遵从客户的请求转换到另外一种协议.(HTTP 1.1新) 2xx ...
- 基于Linux命令行KVM虚拟机的安装配置与基本使用
背景 由于生产环境的服务器并不会安装桌面环境,简单操作的图形化安装也不适合批量部署安装.因此,我还是更倾向于在命令下安装配置KVM虚拟机.结合了一些资料和个人使用的状况,我大致列出了一些基本和常用的使 ...
- 2014年第五届蓝桥杯JavaB组省赛试题解析
题目及解析如下: 题目大致介绍: 第一题到第三题以及第六题是结果填空,方法不限只要得到最后结果就行 第四题和第五题是代码填空题,主要考察算法基本功和编程基本功 第七题到第十题是编程题,要求编程解决问题 ...
- android 开发 singleTask启动模式下传值的坑
日常填坑. 做了什么操作引起的?如下: 在活动A 启动模式设置为singleTask ,然后再用活动A启动活动B,活动B启动活动C. 现在我的活动C要使用intent携带值去启动活动A.在活动A中正常 ...
- [转] 高频 mos 选择需要考虑相关资料
节选自 http://www.dianyuan.com/bbs/987183.html [草根大侠]贴 关于MOS管导通内阻和米勒电容(Qgd)差异对效率的影响 http://www.epc.com. ...
- uva-10422-骑士-搜索题
题意: 给你一个5X5的图,棋盘上骑士的走法自己去百度,问能不能在10步内走到目标图, 解题思路: 从目标图开始往前走10步,保存所有能走到的图,然后输入,查找是否存在这个图,存在就是可以走到,不存在 ...
- 纯CSS3实现垂直居中的九种方法
浏览时看到的资料,每个都做了测试,很好,就先收了~ 测试的是谷歌浏览器,没有任何问题,用360,IE11,火狐,搜狗浏览器做测试时,第五个方法在360,搜狗,和IE11有点问题,第七个在IE11有问题 ...