android中shape的使用(android:angle小解)
本文参考http://kofi1122.blog.51cto.com/2815761/521605和http://blog.csdn.net/qizi329/article/details/6309819
转自:http://www.cnblogs.com/xiaoQLu/archive/2011/09/14/2176359.html
<shape>
<!-- 实心 -->
<solid android:color="#ff9d77"/>
<!-- 渐变 -->
<gradient
android:startColor="#ff8c00"
android:endColor="#FFFFFF"
android:angle="270" />
<!-- 描边 -->
<stroke
android:width="2dp"
android:color="#dcdcdc" />
<!-- 圆角 -->
<corners
android:radius="2dp" />
<padding
android:left="10dp"
android:top="10dp"
android:right="10dp"
android:bottom="10dp" />
</shape>
solid:实心,就是填充的意思
android:color指定填充的颜色
gradient:渐变
android:startColor和android:endColor分别为起始和结束颜色,android:angle是渐变角度,必须为45的整数倍。
另外渐变默认的模式为android:type="linear",即线性渐变,可以指定渐变为径向渐变,android:type="radial",径向渐变需要指定半径android:gradientRadius="50"。
android:angle网上有各种说法,这里,我说说自己的实验结果,渐变的时候,最原始的,即android:angle=“0”时,是从左到右,按照开始颜色到结束颜色来渲染的,android:angle=“90”是从下到上来渲染的,android:angle=“270”是从上到下来渲染的,android:angle=“180”是从右到左来渲染的,android:angle=“360”和android:angle=“0”是一样的,所以这里应该是这样的,渲染时按照最原始的渲染色板(把控件内部看作一块可以绕中心旋转的板子)围绕控件中心来逆时针旋转相应的度数,即android:angle里面的值就是所需要旋转的角度,只是这个旋转角度必须是45的整数倍
stroke:描边
android:width="2dp" 描边的宽度,android:color 描边的颜色。
我们还可以把描边弄成虚线的形式,设置方式为:
android:dashWidth="5dp"
android:dashGap="3dp"
其中android:dashWidth表示'-'这样一个横线的宽度,android:dashGap表示之间隔开的距离。
corners:圆角
android:radius为角的弧度,值越大角越圆。
我们还可以把四个角设定成不同的角度,方法为:
<corners
android:topRightRadius="20dp" 右上角
android:bottomLeftRadius="20dp" 右下角
android:topLeftRadius="1dp" 左上角
android:bottomRightRadius="0dp" 左下角
/>
这里有个地方需要注意,bottomLeftRadius是右下角,而不是左下角,这个不要记错了。
还有网上看到有人说设置成0dp无效,不过我在测试中发现是可以的,我用的是2.2,可能修复了这个问题吧,如果无效的话那就只能设成1dp了。
padding:间隔
中间文字距离边框的间隔。
大体的就是这样,以下是一个使用的具体示例:用在Selector中作为Button的背景,分别定义了按钮的一般状态、获得焦点状态和按下时的状态,具体代码如下:
main.xml:
<Button
android:layout_width="wrap_content"
android:layout_height="wrap_content"
android:text="TestShapeButton"
android:background="@drawable/button_selector"
/>
button_selector.xml:
<?xml version="1.0" encoding="utf-8"?>
<selector
xmlns:android="http://schemas.android.com/apk/res/android">
<item android:state_pressed="true" >
<shape>
<!-- 渐变 -->
<gradient
android:startColor="#ff8c00"
android:endColor="#FFFFFF"
android:type="radial"
android:gradientRadius="50" />
<!-- 描边 -->
<stroke
android:width="2dp"
android:color="#dcdcdc"
android:dashWidth="5dp"
android:dashGap="3dp" />
<!-- 圆角 -->
<corners
android:radius="2dp" />
<padding
android:left="10dp"
android:top="10dp"
android:right="10dp"
android:bottom="10dp" />
</shape>
</item>
<item android:state_focused="true" >
<shape>
<gradient
android:startColor="#ffc2b7"
android:endColor="#ffc2b7"
android:angle="270" />
<stroke
android:width="2dp"
android:color="#dcdcdc" />
<corners
android:radius="2dp" />
<padding
android:left="10dp"
android:top="10dp"
android:right="10dp"
android:bottom="10dp" />
</shape>
</item>
<item>
<shape>
<solid android:color="#ff9d77"/>
<stroke
android:width="2dp"
android:color="#fad3cf" />
<corners
android:topRightRadius="5dp"
android:bottomLeftRadius="5dp"
android:topLeftRadius="0dp"
android:bottomRightRadius="0dp"
/>
<padding
android:left="10dp"
android:top="10dp"
android:right="10dp"
android:bottom="10dp" />
</shape>
</item>
</selector>
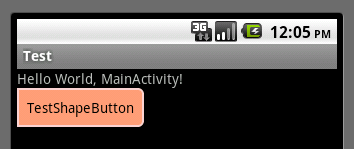
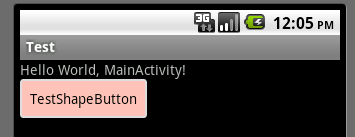
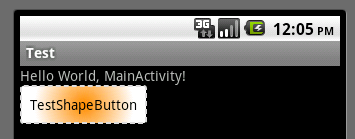
运行效果如下图:
一般状态:

获得焦点状态:

按下状态:

android中shape的使用(android:angle小解)的更多相关文章
- Android中shape属性详解
一.简单使用 刚开始,就先不讲一堆标签的意义及用法,先简单看看shape标签怎么用. 1.新建shape文件 首先在res/drawable文件夹下,新建一个文件,命名为:shape_radius.x ...
- Android 中shape的使用(圆角矩形)
一.在res/drawable文件夹下创建一个名为gradient_box的xml文件: <?xml version="1.0" encoding="utf-8&q ...
- 转 Android中shape中的属性大全
<shape> <!-- 实心 --> <solid android:color="#ff9d77"/&g ...
- 【Android 界面效果19】Android中shape的使用
Android中常常使用shape来定义控件的一些显示属性,今天看了一些shape的使用,对shape有了大体的了解,稍作总结: 先看下面的代码: <shape> ...
- Android 中 shape 图形的使用
转载于:http://kofi1122.blog.51cto.com/2815761/521605 Android中常常使用shape来定义控件的一些显示属性,今天看了一些shape的使用,对shap ...
- Android中shape中的属性大全
---恢复内容开始--- <shape> <!-- 实心 --> <solid android:color="#ff9d77"/> <!- ...
- android中shape的属性
<shape> <!– 实心 –> <solid android:color=”#ff9d77″/> <!– 渐变 –> <gradient an ...
- Android中shape的使用 (转载)
转自:http://blog.csdn.net/ekeuy/article/details/12349853 在看很多开源代码中都使用到了shape,我看代码的时候一般都一带而过了,没有仔细去研究,这 ...
- android中shape 的使用
android 开发中 对于 shape 和 selector的使用,一直都不是很熟练, 记录一下.便于以后参考. 举个项目中例子图 对于上面的2个radiobutton ,背景我们可以让美工做一个. ...
随机推荐
- HDU 5501:The Highest Mark 01背包
The Highest Mark Accepts: 71 Submissions: 197 Time Limit: 2000/1000 MS (Java/Others) Memory Limi ...
- ROS常用库(一) fake_localization
wiki是最好的学习资料,以下直接参考了wiki官网.另外po出官网网址,建议英语较好的朋友之接看原版 http://wiki.ros.org/fake_localization 概述 fake_lo ...
- VS Code 单文件、多文件(工程) 配置文件
针对于单文件编译运行,需要在代码文件夹下建立子文件夹 .vscode ,并放置三个文件 1:c_cpp_properties.json,注意更改7.8.11行的路径 { "configura ...
- delphi dll编写与调用
dll代码: mydll.dpr library mydll; uses System.SysUtils, System.Classes, uFunction in 'uFunction.pas'; ...
- webpack散记---提取公共代码
(1)作用: 减少代码冗余 提高加载速度 (2)来源 commonsChunkPlugin webpack.optimize.CommonsChunkPlugin (3)配置 { plugins:[ ...
- vue学习(五)生命周期 的钩子函数
生命周期的钩子函数 主要有以下几种 beforeCreate created beforeMount mounted beforeUpdate updated activated deactivate ...
- 每天一点点之 taro 框架开发 - taro调用组件传值
1.调用组件 组件文件 import Taro, { Component } from '@tarojs/taro' import { View } from '@tarojs/components' ...
- spark on yarn 安装笔记
yarn版本:hadoop2.7.0 spark版本:spark1.4.0 0.前期环境准备: jdk 1.8.0_45 hadoop2.7.0 Apache Maven 3.3.3 1.编译spar ...
- 使用ansible tasks生成linux巡检报告
一直想做个关于资源巡检的功能,其需求就是通过邮件的形式来查看linux资源的使用情况,超出一定的阈值时高亮显示出来.也有人说啦,这个需求通过监控zabbix, prometheus都能做呀,何必自己重 ...
- Jquery获取html标签,包含该标签本身
$(".test").prop("outerHTML"); 原生JS DOM里有一个内置属性 outerHTML,用来获取当前节点的html代码(包含当前节点) ...
