Spring boot Sample 007之spring-boot-log4j2
一、环境
1.1、Idea 2020.1
1.2、JDK 1.8
二、目的
三、步骤
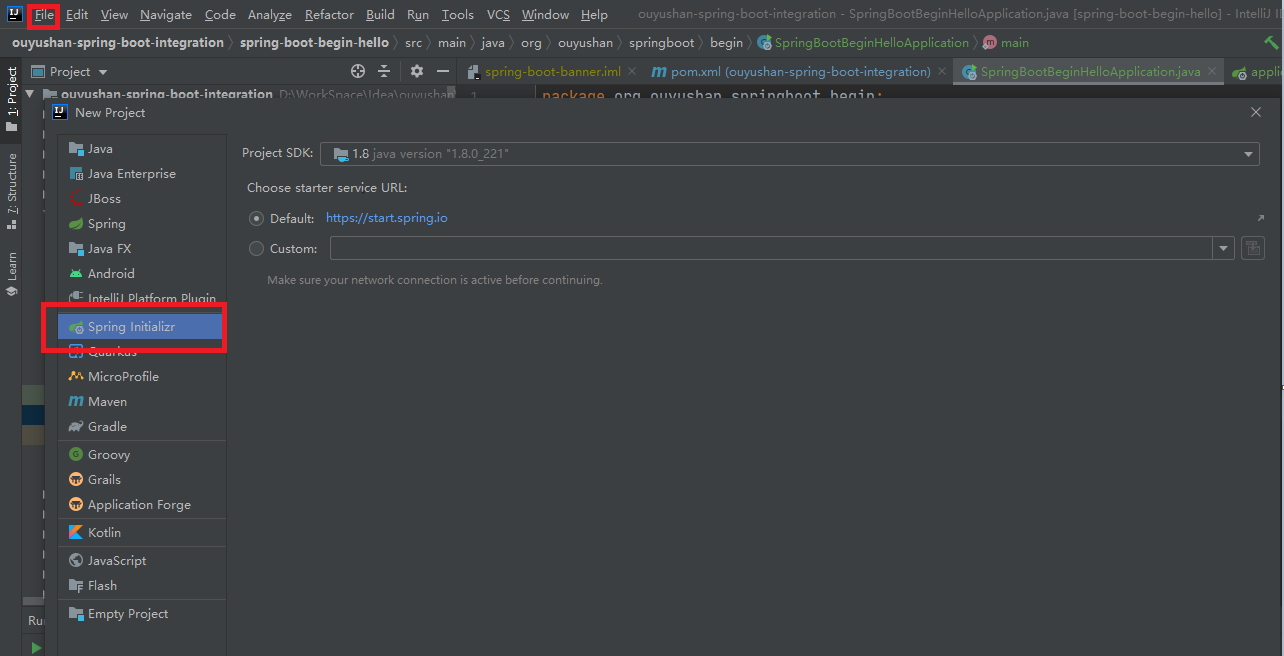
3.1、点击File -> New Project -> Spring Initializer,点击next
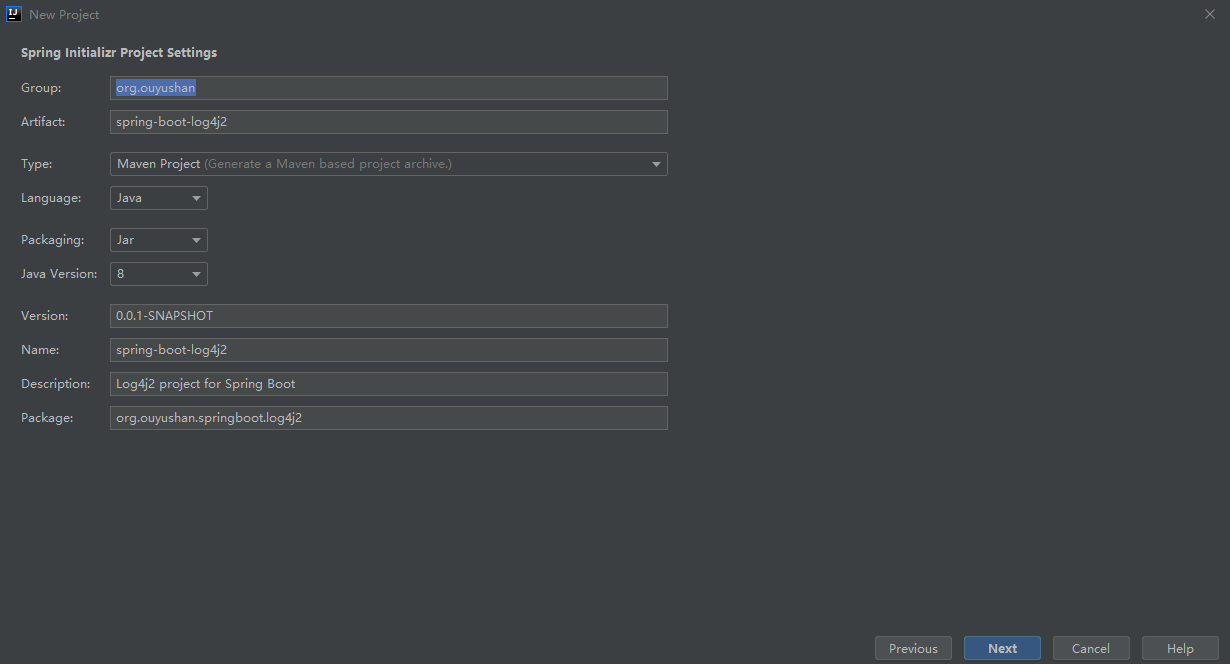
3.2、在对应地方修改自己的项目信息
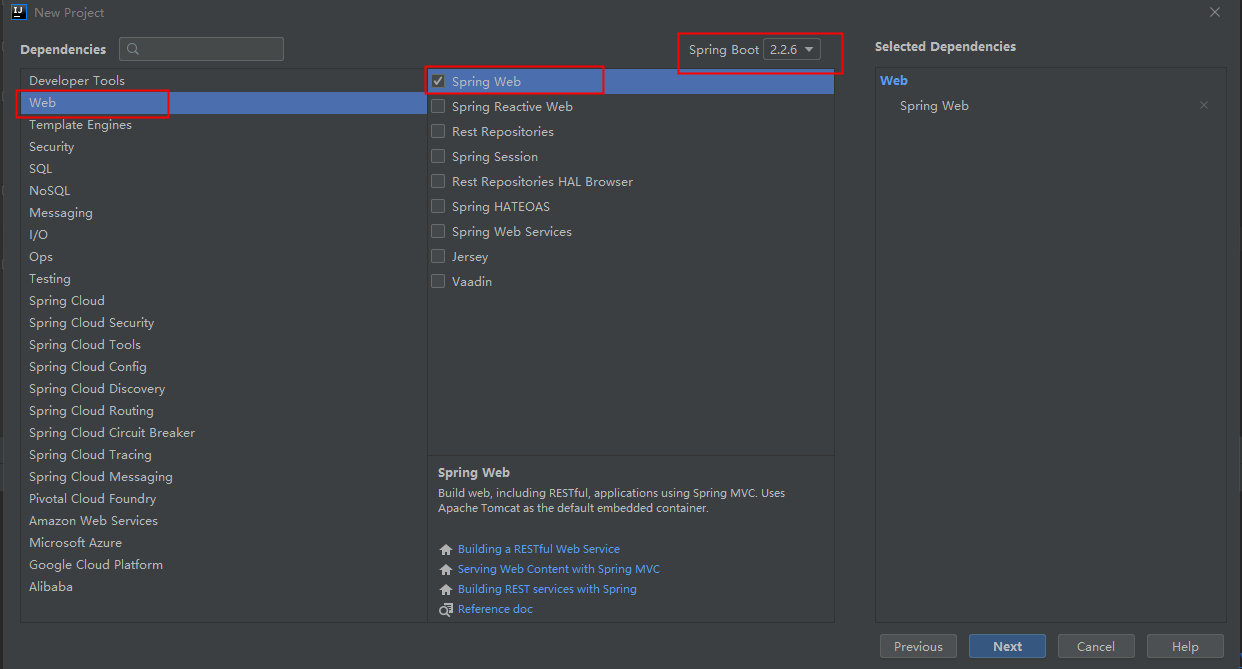
3.3、选择Web依赖,选中Spring Web。可以选择Spring Boot版本,本次默认为2.2.6,点击Next
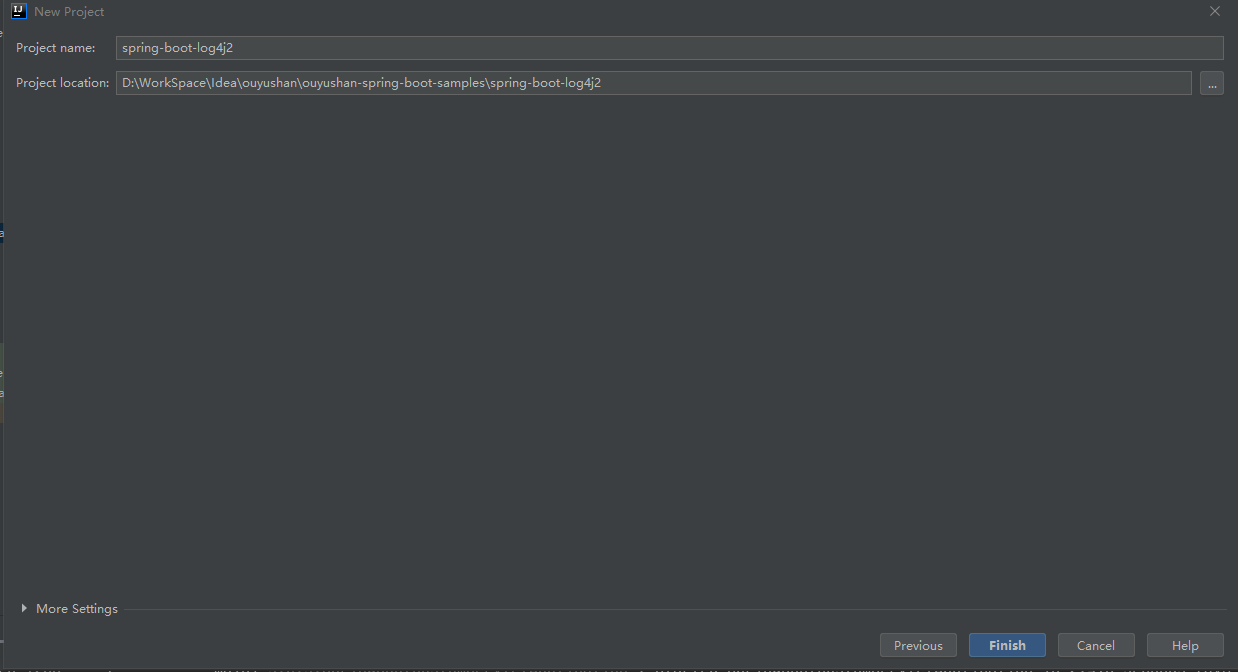
3.4、编辑工程名和项目路径,确定后点击Finish完成
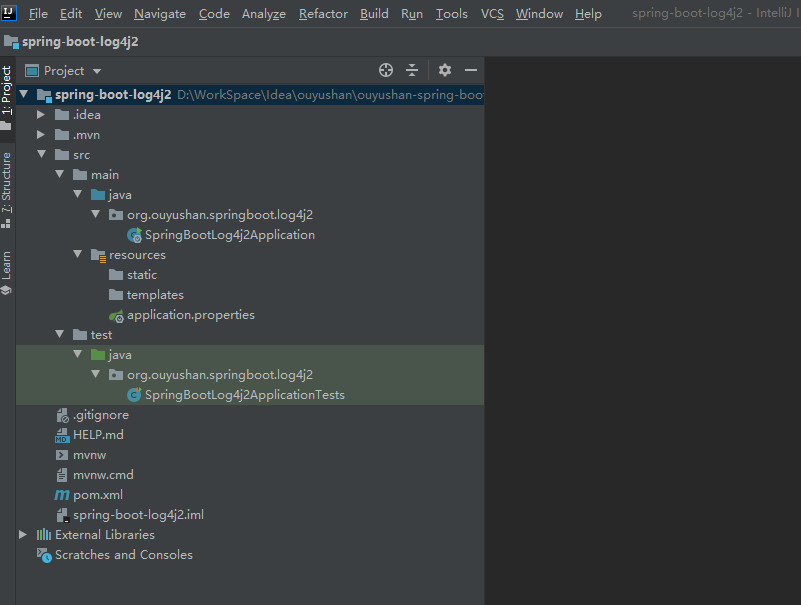
3.5、项目结构
四、添加测试文件
<?xml version="1.0" encoding="UTF-8"?>

<project xmlns="http://maven.apache.org/POM/4.0.0" xmlns:xsi="http://www.w3.org/2001/XMLSchema-instance"

         xsi:schemaLocation="http://maven.apache.org/POM/4.0.0 https://maven.apache.org/xsd/maven-4.0.0.xsd">

    <modelVersion>4.0.0</modelVersion>

    <parent>

        <groupId>org.springframework.boot</groupId>

        <artifactId>spring-boot-starter-parent</artifactId>

        <version>2.2.6.RELEASE</version>

        <relativePath/> <!-- lookup parent from repository -->

    </parent>

    <groupId>org.ouyushan</groupId>

    <artifactId>spring-boot-log4j2</artifactId>

    <version>0.0.1-SNAPSHOT</version>

    <name>spring-boot-log4j2</name>

    <description>Log4j2 project for Spring Boot</description>

    <properties>

        <java.version>1.8</java.version>

    </properties>

    <dependencies>

        <dependency>

            <groupId>org.springframework.boot</groupId>

            <artifactId>spring-boot-starter-web</artifactId>

            <exclusions>

                <!--排除默认的日志-->

                <exclusion>

                    <groupId>org.springframework.boot</groupId>

                    <artifactId>spring-boot-starter-logging</artifactId>

                </exclusion>

                <exclusion>

                    <groupId>ch.qos.logback</groupId>

                    <artifactId>logback-access</artifactId>

                </exclusion>

                <exclusion>

                    <groupId>ch.qos.logback</groupId>

                    <artifactId>logback-core</artifactId>

                </exclusion>

                <exclusion>

                    <groupId>ch.qos.logback</groupId>

                    <artifactId>logback-classic</artifactId>

                </exclusion>

            </exclusions>

        </dependency>

        <!-- 使用log4j2 -->

        <dependency>

            <groupId>org.springframework.boot</groupId>

            <artifactId>spring-boot-starter-log4j2</artifactId>

        </dependency>

        <dependency>

            <groupId>org.springframework.boot</groupId>

            <artifactId>spring-boot-starter-test</artifactId>

            <scope>test</scope>

            <exclusions>

                <exclusion>

                    <groupId>org.junit.vintage</groupId>

                    <artifactId>junit-vintage-engine</artifactId>

                </exclusion>

            </exclusions>

        </dependency>

    </dependencies>

    <build>

        <plugins>

            <plugin>

                <groupId>org.springframework.boot</groupId>

                <artifactId>spring-boot-maven-plugin</artifactId>

            </plugin>

        </plugins>

    </build>

</project>

<?xml version="1.0" encoding="UTF-8"?>

<Configuration status="WARN" monitorInterval="30">

    <Properties>

        <Property name="PID">????</Property>

        <Property name="LOG_PATTERN">%clr{%d{yyyy-MM-dd HH:mm:ss.SSS}}{faint} %clr{%5p} %clr{${sys:PID}}{magenta} %clr{---}{faint} %clr{[%15.15t]}{faint} %clr{%-40.40c{1.}}{cyan} %clr{:}{faint} %m%n%xwEx</Property>

    </Properties>

    <Appenders>

        <Console name="Console" target="SYSTEM_OUT" follow="true">

            <PatternLayout pattern="${LOG_PATTERN}"/>

        </Console>

    </Appenders>

    <Loggers>

        <Logger name="org.hibernate.validator.internal.util.Version" level="warn" />

        <Logger name="org.apache.coyote.http11.Http11NioProtocol" level="warn" />

        <Logger name="org.apache.tomcat.util.net.NioSelectorPool" level="warn" />

        <Root level="info">

            <AppenderRef ref="Console"/>

        </Root>

    </Loggers>

</Configuration>
<?xml version="1.0" encoding="UTF-8"?>

<Configuration status="WARN" monitorInterval="30">

    <Properties>

        <Property name="PID">????</Property>

        <Property name="LOG_PATTERN">%clr{%d{yyyy-MM-dd HH:mm:ss}}{faint} %clr{%5p} %clr{${sys:PID}}{magenta} %clr{---}{faint} %clr{[%15.15t]}{faint} %clr{%-40.40c{1.}}{cyan} %clr{:}{faint} %m%n%xwEx</Property>

    </Properties>

    <Appenders>

        <Console name="Console" target="SYSTEM_OUT" follow="true">

            <PatternLayout pattern="${LOG_PATTERN}"/>

        </Console>

    </Appenders>

    <Loggers>

        <Logger name="org.hibernate.validator.internal.util.Version" level="warn" />

        <Logger name="org.apache.coyote.http11.Http11NioProtocol" level="warn" />

        <Logger name="org.apache.tomcat.util.net.NioSelectorPool" level="warn" />

        <Root level="info">

            <AppenderRef ref="Console"/>

        </Root>

    </Loggers>

</Configuration>
spring:

  profiles:

    active: uat

  jackson:

    date-format: yyyy-MM-dd HH:mm:ss

    time-zone: Asia/Chongqing
logging:

  config: classpath:log4j2-dat.xml
logging:

  config: classpath:log4j2-uat.xml
<?xml version="1.0" encoding="UTF-8"?>

<!--日志级别以及优先级排序: OFF > FATAL > ERROR > WARN > INFO > DEBUG > TRACE > ALL -->

<!--status="WARN" :用于设置log4j2自身内部日志的信息输出级别,默认是OFF-->

<!--monitorInterval="30"  :间隔秒数,自动检测配置文件的变更和重新配置本身-->

<configuration status="warn" monitorInterval="60" strict="true">

  <properties>

    <!--自定义一些常量,之后使用${变量名}引用-->

    <property name="logpath">./logs</property>

    <property name="charset">UTF-8</property>

    <!--自定义的输出格式-->

    <property name="pattern">%-d{yyyy-MM-dd HH:mm:ss.SSS}@@%p@@%X{ip}@@%t %C@@%X{requestId} %M %m %n </property>

  </properties>

  <!--appenders:定义输出内容,输出格式,输出方式,日志保存策略等,常用其下三种标签[console,File,RollingFile]-->

  <!--Appender可以理解为日志的输出目的地-->

  <appenders>

    <!--console :控制台输出的配置-->

    <Console name="console" target="SYSTEM_OUT">

      <PatternLayout pattern="${pattern}" charset="${charset}"/>

    </Console>

    <!--RollingRandomAccessFile性能比RollingFile提升官网宣称是20-200%-->

    <RollingRandomAccessFile name="YZY.TRACE" immediateFlush="true" bufferSize="1024"

      fileName="${logpath}/trace.log"

      filePattern="${logpath}/trace.log.%d{yyyy-MM-dd}.gz">

      <PatternLayout pattern="${pattern}" charset="${charset}"/>

      <TimeBasedTriggeringPolicy/>

      <DefaultRolloverStrategy>

        <Delete basePath="${logpath}" maxDepth="2" followLinks="true">

          <IfFileName glob="trace.log.*.gz"/>

          <IfLastModified age="3d"/>

        </Delete>

      </DefaultRolloverStrategy>

    </RollingRandomAccessFile>

    <RollingRandomAccessFile name="YZY.SYSTEM" immediateFlush="true" bufferSize="4096"

      fileName="${logpath}/system.log"

      filePattern="${logpath}/system.log.%d{yyyy-MM-dd}.gz"

      ignoreExceptions="false">

      <!--引用上面自定义的输出格式-->

      <PatternLayout pattern="${pattern}" charset="${charset}"/>

      <Filters>

        <!--ThresholdFilter :日志输出过滤-->

        <!--level="info" :日志级别,onMatch="ACCEPT" :级别在info之上则接受,onMismatch="DENY" :级别在info之下则拒绝-->

        <!--与logger、root中定义的日志级别相配合,相当于两个闸门,先判断logger、root的级别,符合了才会用到该filter中的level,此时再进行一次筛选-->

        <ThresholdFilter level="TRACE" onMatch="ACCEPT" onMismatch="DENY"/>

        <!--<ThresholdFilter level="DEBUG" onMatch="ACCEPT" onMismatch="DENY"/>-->

        <!--<ThresholdFilter level="INFO" onMatch="ACCEPT" onMismatch="DENY"/>-->

      </Filters>

      <!-- Policies :日志滚动策略-->

      <Policies>

        <!--<TimeBasedTriggeringPolicy interval="1" modulate="true"/>-->

        <CronTriggeringPolicy schedule="0 0 2 * * ?" evaluateOnStartup="true"/>

      </Policies>

      <!-- DefaultRolloverStrategy属性如不设置,则默认为最多同一文件夹下7个文件-->

      <DefaultRolloverStrategy>

        <Delete basePath="${logpath}" maxDepth="2" followLinks="true">

          <IfFileName glob="system.log.*.gz"/>

      <!--只保留7天,超过则删除-->

          <IfLastModified age="7d"/>

        </Delete>

      </DefaultRolloverStrategy>

    </RollingRandomAccessFile>

    <RollingRandomAccessFile name="YZY.ERROR" immediateFlush="true" bufferSize="4096"

      fileName="${logpath}/error.log"

      filePattern="${logpath}/error.log.%d{yyyy-MM-dd}.gz"

      ignoreExceptions="false">

      <PatternLayout pattern="${pattern}" charset="${charset}"/>

      <Filters>

        <ThresholdFilter level="ERROR" onMatch="ACCEPT" onMismatch="DENY"/>

      </Filters>

      <TimeBasedTriggeringPolicy/>

      <DefaultRolloverStrategy>

        <Delete basePath="${logpath}" maxDepth="2" followLinks="true">

          <IfFileName glob="error.log.*.gz"/>

          <IfLastModified age="7d"/>

        </Delete>

      </DefaultRolloverStrategy>

    </RollingRandomAccessFile>

    <RollingRandomAccessFile name="YZY.AUDIT" immediateFlush="false" bufferSize="8192"

      fileName="${logpath}/audit.log"

      filePattern="${logpath}/audit.log.%d{yyyy-MM-dd}.gz"

      ignoreExceptions="false">

      <PatternLayout pattern="${pattern}" charset="${charset}"/>

      <Filters>

        <ThresholdFilter level="WARN" onMatch="ACCEPT" onMismatch="DENY"/>

      </Filters>

      <TimeBasedTriggeringPolicy/>

      <DefaultRolloverStrategy>

        <Delete basePath="${logpath}" maxDepth="2" followLinks="true">

          <IfFileName glob="audit.log.*.gz"/>

          <IfLastModified age="7d"/>

        </Delete>

      </DefaultRolloverStrategy>

    </RollingRandomAccessFile>

    <RollingRandomAccessFile name="YZY.POOL" immediateFlush="true" bufferSize="1024"

      fileName="${logpath}/pool.log"

      filePattern="${logpath}/pool.log.%d{yyyy-MM-dd}.gz"

      ignoreExceptions="false">

      <PatternLayout pattern="${pattern}" charset="${charset}"/>

      <TimeBasedTriggeringPolicy/>

      <DefaultRolloverStrategy>

        <Delete basePath="${logpath}" maxDepth="2" followLinks="true">

          <IfFileName glob="pool.log.*.gz"/>

          <IfLastModified age="3d"/>

        </Delete>

      </DefaultRolloverStrategy>

    </RollingRandomAccessFile>

    <RollingRandomAccessFile name="YZY.MONITOR" immediateFlush="true" bufferSize="1024"

      fileName="${logpath}/monitor.log"

      filePattern="${logpath}/pool.log.%d{yyyy-MM-dd}.gz"

      ignoreExceptions="false">

      <PatternLayout pattern="${pattern}" charset="${charset}"/>

      <TimeBasedTriggeringPolicy/>

      <DefaultRolloverStrategy>

        <Delete basePath="${logpath}" maxDepth="2" followLinks="true">

          <IfFileName glob="pool.log.*.gz"/>

          <IfLastModified age="3d"/>

        </Delete>

      </DefaultRolloverStrategy>

    </RollingRandomAccessFile>

    <RollingRandomAccessFile name="YZY.BIZ" immediateFlush="true"

      fileName="${logpath}/biz.log"

      filePattern="${logpath}/biz.log.%d{yyyy-MM-dd}.gz"

      ignoreExceptions="false">

      <PatternLayout pattern="${pattern}" charset="${charset}"/>

      <TimeBasedTriggeringPolicy/>

      <DefaultRolloverStrategy>

        <Delete basePath="${logpath}" maxDepth="2" followLinks="true">

          <IfFileName glob="biz.log.*.gz"/>

          <IfLastModified age="7d"/>

        </Delete>

      </DefaultRolloverStrategy>

    </RollingRandomAccessFile>

  </appenders>

  <!--然后定义logger,只有定义了logger并引入的appender,appender才会生效-->

  <loggers>

    <!--additivity="false"表示在该logger中输出的日志不会再延伸到父层logger。这里如果改为true,则会延伸到Root Logger,遵循Root Logger的配置也输出一次。-->

    <Logger additivity="false" name="YZY.TRACE" level="INFO">

      <AppenderRef ref="YZY.TRACE"/>

    </Logger>

    <Logger additivity="false" name="YZY.SYSTEM" level="INFO">

      <AppenderRef ref="YZY.SYSTEM"/>

      <AppenderRef ref="YZY.ERROR"/>

    </Logger>

    <Logger additivity="false" name="YZY.BIZ" level="INFO">

      <AppenderRef ref="YZY.BIZ"/>

    </Logger>

    <!--Logger节点用来单独指定日志的形式,name为包路径,比如要为org.apache包下所有日志指定为INFO级别等。 -->

    <Logger additivity="false" name="org.apache" level="INFO">

      <AppenderRef ref="console"/>

    </Logger>

    <Logger additivity="false"

      name="com.alibaba.dubbo.common.threadpool.monitor.MonitorPoolRunnable" level="INFO">

      <AppenderRef ref="YZY.POOL"/>

    </Logger>

    <Logger additivity="false" name="com.alibaba.dubbo.monitor.dubbo.sfextend.SfMonitorExtend"

      level="INFO">

      <AppenderRef ref="YZY.MONITOR"/>

    </Logger>

    <!--针对,request以及reponse的信息配置输出级别,生产线请配置为error-->

    <Logger additivity="true" name="com.alibaba.dubbo.rpc.protocol.rest.support" level="INFO">

      <AppenderRef ref="console"/>

    </Logger>

    <!-- 在开发和测试环境启用,输出sql -->

    <Logger additivity="true" name="com.YZY.mapper" level="DEBUG">

    </Logger>

    <!-- Root节点用来指定项目的根日志,如果没有单独指定Logger,那么就会默认使用该Root日志输出 -->

    <Root level="DEBUG" includeLocation="true">

      <AppenderRef ref="console"/>

      <AppenderRef ref="YZY.SYSTEM"/>

      <AppenderRef ref="YZY.ERROR"/>

      <AppenderRef ref="YZY.AUDIT"/>

    </Root>

  </loggers>

</configuration>
Spring boot Sample 007之spring-boot-log4j2的更多相关文章
- Spring Boot(十)Logback和Log4j2集成与日志发展史
一.简介 Java知名的日志有很多,比如:JUL.Log4j.JCL.SLF4J.Logback.Log4j2,那么这些日志框架之间有着怎样的关系?诞生的原因又是解决什么问题?下面一起来看. 1.1 ...
- Spring Boot 应用系列 4 -- Spring Boot 2 整合log4j2
一.背景 1. log4j2传承于log4j和logback,它是目前性能最好的日志处理工具,有关它们的性能对比请看: 2. 除了性能好之外,log4j2有这么几个重要的新features: (1) ...
- Spring boot Sample 012之spring-boot-web-upload
一.环境 1.1.Idea 2020.1 1.2.JDK 1.8 二.目的 spring boot 整合web实现文件上传下载 三.步骤 3.1.点击File -> New Project -& ...
- Spring boot Sample 0010之spring-boot-web-freemarker
一.环境 1.1.Idea 2020.1 1.2.JDK 1.8 二.目的 spring boot 整合freemarker模板开发web项目 三.步骤 3.1.点击File -> New Pr ...
- Spring boot Sample 009之spring-boot-web-thymeleaf
一.环境 1.1.Idea 2020.1 1.2.JDK 1.8 二.目的 spring boot 整合thymeleaf模板开发web项目 三.步骤 3.1.点击File -> New Pro ...
- Spring boot Sample 006之spring-boot-custom-servlet
一.环境 1.1.Idea 2020.1 1.2.JDK 1.8 二.步骤 2.1.点击File -> New Project -> Spring Initializer,点击next 2 ...
- Spring boot Sample 005之spring-boot-profile
一.环境 1.1.Idea 2020.1 1.2.JDK 1.8 二.目的 通过yaml文件配置spring boot 属性文件 三.步骤 3.1.点击File -> New Project - ...
- Spring Boot (五)Spring Data JPA 操作 MySQL 8
一.Spring Data JPA 介绍 JPA(Java Persistence API)Java持久化API,是 Java 持久化的标准规范,Hibernate是持久化规范的技术实现,而Sprin ...
- Spring 5.x 、Spring Boot 2.x 、Spring Cloud 与常用技术栈整合
项目 GitHub 地址:https://github.com/heibaiying/spring-samples-for-all 版本说明: Spring: 5.1.3.RELEASE Spring ...
随机推荐
- vue-infinite-scroll------vue的无线滚动插件
vue-infinite-scroll------vue的无线滚动插件 博客说明 文章所涉及的资料来自互联网整理和个人总结,意在于个人学习和经验汇总,如有什么地方侵权,请联系本人删除,谢谢! 说明 V ...
- E. Marbles 状压dp
E. Marbles 这个是一个状压dp 题目大意是:给你一个数组,数组的数在1到20之间,有一个操作就是交换相邻的两个数,问 让所有相同的数相邻的最小操作次数 dp[s] 表示s状态下的操作次数,w ...
- GroupJoin()各参数的意义及用法
EF Core中GroupJoin的注释比较复杂: public static IEnumerable<TResult> GroupJoin<TOuter, TInner, TKey ...
- 【HBase】带你了解一哈HBase的各种预分区
目录 简单了解 概述 设置预分区 一.手动指定预分区 二.使用16进制算法生成预分区 三.将分区规则写在文本文件中 四.使用JavaAPI进行预分区 简单了解 概述 由上图可以看出,每一个表都有属于自 ...
- Android 8.1 关机充电动画(一)模式选择
system:Android 8.1 platform:RK3326/PX30 uboot kernel Android 8.1 关机充电动画(一)模式选择 Android 8.1 关机充电动画(二) ...
- js es6深入应用系列(Generator)
前言 generotor 和 普通函数的不同在于function 的时候加了一个*, 是的,我们看到es5的一个陌生关键字,yield,这个是不寻常的,为什么这么说呢? 这个在c#中,很常见的一个关键 ...
- Apache Hudi典型应用场景知多少?
1.近实时摄取 将数据从外部源如事件日志.数据库提取到Hadoop数据湖 中是一个很常见的问题.在大多数Hadoop部署中,一般使用混合提取工具并以零散的方式解决该问题,尽管这些数据对组织是非常有价值 ...
- Nginx初步入门
1.Nginx介绍 官网:nginx.org Nginx ("engine x") 是一个开源的.支持高性能.高并发的WWW服务和代理服务软件. 它是由俄罗斯人IgorSysoev ...
- debian init
1 bash_completion 默认是没有bash 自动补齐的,比如apt-get install 后面是不会自动补齐的,这个在ubuntu里面是有的,debian 里面默认没有开启 开启方法 ...
- Django之MTV模式
MTV与MVC+url控制器 MVC框架: · M:model.py 就是和数据库打交道用的,创建表等操作 · V:View 视图(视图函数:逻辑处理响应函数,ht ...
