二.2vueadmin-template反向代理/路由配置,idc增查删
一.反向代理:
(1)F:\devops\data\web\vueAdmin-template\config\index.js   ---让别人也能访问我的vue前端

host: '0.0.0.0',

(2)F:\devops\data\web\vueAdmin-template\config\index.js  ---前端配置跨域(上述的跨域是后端配置的)--反向代理配置proxyTable

那dev.env.js文件中的BASE_API: '"...."',默认可不用更改

    proxyTable: {

      '/api': {   //api是我自定的接口

        target: 'http://127.0.0.1:8000',

        pathRewrite: {

          '^/api': ''

        }

      }

    },
二.自定添加idc模块
写一个模块需要做:写api配置和后端连接,还要写路由,写组件...
1.写路由src/router/index.js
  {

    path: '/idcs',      url路径

    component: Layout,   模版组件

    children: [

      {

        path: '',       为空是只要能匹配上url路径就能找到下面component中定义的组件

        name: 'Idcs',

        component: () => import('@/views/idcs/index'),  定义idcs组件

        meta: { title: 'Idcs', icon: 'tree' }

      }

    ]

  },
2.展示组件:新建views/idcs/index.vue
<template>

  <div class="idcs">

    IDCS

  </div>

</template>

<script>

  export default {

    name: 'idcs',

    data() {

      return {}

    },

    methods: {

    }

  }

</script>

<style lang='scss' scoped>

.idcs{

  position: relative;

  display: block;

}

</style>
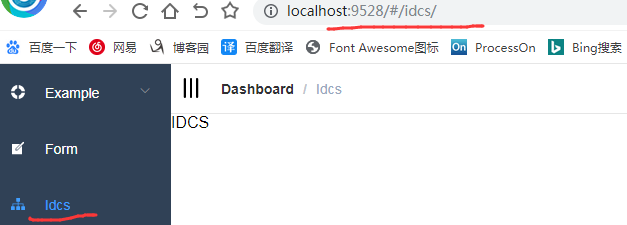
重启后如下效果有了:
三.向后端请求数据并展示---idc增查删
1.获取后端数据:
(1)新建api/idcs.js --定义接口
import axios from 'axios'

export function getIdcsList() {

  return axios.get('/api/idcs/')

}

export function createIdc(value) {

  return axios.post('/api/idcs/', value)

}

export function updateIdc(value) {

  return axios.put(`/api/idcs/${value.id}/`, value.params)

}

export function deleteIdc(id) {

  return axios.delete(`/api/idcs/${id}/`)

}
(2)views/idcs/index.vue --使用接口
.类名,样式名,name,它们的名字建议保持一致.
<template>

  <div class="idc">

    {{ idcs }}

  </div>

</template>

<script>

  import { getIdcsList } from '@/api/idcs'

  export default {

    name: 'idc',

    data() {

      return {

        idcs: []

      }

    },

    methods: {

      fetchData() {

        getIdcsList().then(

          res => {

            this.idcs = res.data.results

          }

        )

      }

    },

    created() {

      this.fetchData()

    }

  }

</script>

<style lang='scss' scoped>

  .idc {

    padding: 10px;

  }

</style>
报错如下:
createError.js:16 Uncaught (in promise) Error: Request failed with status code 404

    at createError (createError.js:16)

    at settle (settle.js:18)

    at XMLHttpRequest.handleLoad (xhr.js:77)

经排查,发现原因是我的接口url写错了:src/api/idcs.js文件中:
import axios from 'axios'

export function getIdcsList() {

  return axios.get('/api/idcs')     --->应该改为return axios.get('/api/idcs/')即末尾没加反斜杠

}
最后效果如下:已获取到数据

2.展示数据--idc查询
(1)写展示组件views/idc/list.vue:
通过https://element.eleme.cn/#/zh-CN/component/installation--找自定义表格代码模版:
<template>

  <div class="idc-list">

    <el-table

      :data="value"

      style="width: 100%">

      <el-table-column

        label="ID"

        width="">

        <template slot-scope="scope">

          <span style="margin-left: 10px">{{ scope.row.id }}</span>

        </template>

      </el-table-column>

      <el-table-column

        label="名称"

        width="">

        <template slot-scope="scope">

          <span style="margin-left: 10px">{{ scope.row.name }}</span>

        </template>

      </el-table-column>

      <el-table-column

        label="电话"

        width="">

        <template slot-scope="scope">

          <span style="margin-left: 10px">{{ scope.row.phone }}</span>

        </template>

      </el-table-column>

      <el-table-column

        label="邮箱"

        width="">

        <template slot-scope="scope">

          <span style="margin-left: 10px">{{ scope.row.email }}</span>

        </template>

      </el-table-column>

      <el-table-column

        label="地址"

        width="">

        <template slot-scope="scope">

          <span style="margin-left: 10px">{{ scope.row.address }}</span>

        </template>

      </el-table-column>

      <el-table-column

        label="简称"

        width="">

        <template slot-scope="scope">

          <span style="margin-left: 10px">{{ scope.row.letter }}</span>

        </template>

      </el-table-column>

      <el-table-column label="操作">

        <template slot-scope="scope">

          <el-button

            size="mini"

            @click="handleEdit(scope.row)">编辑</el-button>

          <el-button

            size="mini"

            type="danger"

            @click="handleDelete(scope.row)">删除</el-button>

        </template>

      </el-table-column>

    </el-table>

  </div>

</template>

<script>

  export default {

    name: 'idc-list',

    props: ['value'],

    methods: {

      handleEdit() {},

      handleDelete() {}

    }

  }

</script>

<style lang='scss'>

  .idc-list {}

</style>
(2)接口中引入展示组件,views/idcs/index.vue:
<template>

  <div class="idc">

    <idc-list :value="idcs"></idc-list>            <<<<<<引入

  </div>

</template>

<script>

  import { getIdcsList } from '@/api/idcs'

  import IdcList from './list'                           <<<<<<<<引入

  export default {

    name: 'idc',

    components: {                        <<<<<<引入组件

      IdcList

    },

    data() {

      return {

        idcs: []

      }

    },

    methods: {

      fetchData() {

        getIdcsList().then(

          res => {

            this.idcs = res.data.results

          }

        )

      }

    },

    created() {

      this.fetchData()

    }

  }

</script>

<style lang='scss' scoped>

  .idc {

    padding: 10px;

  }

</style>
最终效果如下图:

3.添加新增接口
点新增按钮时弹出窗口,这个弹窗需要一个状态来控制它展示和消失,
参考https://element.eleme.cn/#/zh-CN/component/dialog中对话框模版,此弹窗中我还要有内容,这个内容就是我要填写的一些表单。
1.1views/idcs/index.vue:
<template>

  <div class="idc">

    <el-button type="primary" @click="add" size="small">新增IDC</el-button>

    <idc-list :value="idcs"></idc-list>

    <el-dialog                 <<<<<1.引入对话框模版

      title="提示"

      :visible.sync="dialogVisible"

      width="50%">

      <span>这是一段信息</span>

      <span slot="footer" class="dialog-footer">

    <el-button @click="dialogVisible = false">取 消</el-button>

    <el-button type="primary" @click="dialogVisible = false">确 定</el-button>

      </span>

    </el-dialog>

  </div>

</template>

<script>

  import { getIdcsList } from '@/api/idcs'

  import IdcList from './list'

  export default {

    name: 'idc',

    components: {

      IdcList

    },

    data() {

      return {

        dialogVisible: false,      <<<<<2.默认

        idcs: []

      }

    },

    methods: {

      fetchData() {

        getIdcsList().then(

          res => {

            this.idcs = res.data.results

          }

        )

      },

      add() {

        this.dialogVisible = true       <<<3.新增时生效

      }

    },

    created() {

      this.fetchData()

    }

  }

</script>

<style lang='scss' scoped>

  .idc {

    padding: 10px;

  }

</style>
效果如下:
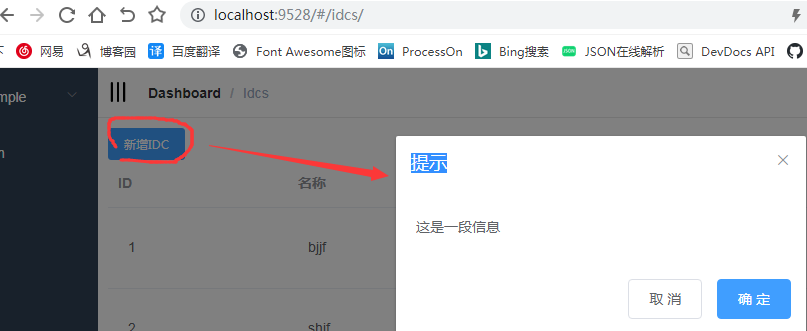
那现在就需要对此弹窗进行填充我的from表单---建议单独写一form表单组件
2.1views/idcs/form.vue,这个表单它的定位就是我每次用它时,我给它一初始化数据,它有input输入框,我去填完提交,我关闭时它把数据清空恢复。所以它需要一初始化数据的对象,用来做它的初始化数据。
参考https://element.eleme.cn/#/zh-CN/component/form自定义规则模版
<template>

  <div class="idc-form">

    <el-form :model="form" :rules="rules" ref="form" label-width="100px" class="demo-form">

      <el-form-item label="名称" prop="name">

        <el-input v-model="form.name" placeholder="请输入名称"></el-input>

      </el-form-item>

      <el-form-item label="电话" prop="phone">

        <el-input v-model="form.phone" placeholder="请输入电话"></el-input>

      </el-form-item>

      <el-form-item label="邮箱" prop="email">

        <el-input v-model="form.email" placeholder="请输入邮箱"></el-input>

      </el-form-item>

      <el-form-item label="地址" prop="address">

        <el-input v-model="form.address" placeholder="请输入地址"></el-input>

      </el-form-item>

      <el-form-item label="简称" prop="letter">

        <el-input v-model="form.letter" placeholder="请输入简称"></el-input>

      </el-form-item>

      <el-form-item>

        <div class="btn-wrapper">

          <el-button size="small" @click="cancel">取消</el-button>

          <el-button size="small" type="primary" @click="submitForm" :loading="isLoading">保存</el-button>

        </div>

      </el-form-item>

    </el-form>

  </div>

</template>

<script>

  const initizeForm = {        <<<<<<2.放它的初始化数据

    name: '',

    phone: '',

    email: '',

    address: '',

    letter: ''

  }

  export default {

    name: 'idc-form',

    data() {

      return {

        form: { ...initizeForm }      <<<<<1.初始化数据的对象,并引入上述的初始化数据

      }

    },

    methods: {

      submitForm() {},

      resetForm() {}

    }

  }

</script>

<style lang='scss' scoped>

  .idc-form {

    position: relative;

    display: block;

    .btn-wrapper{

      text-align: right;

    }

  }

</style>
2.2index.vue中引入form
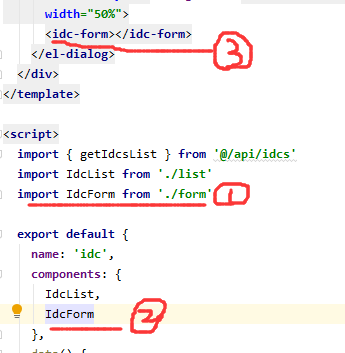
效果如下图:
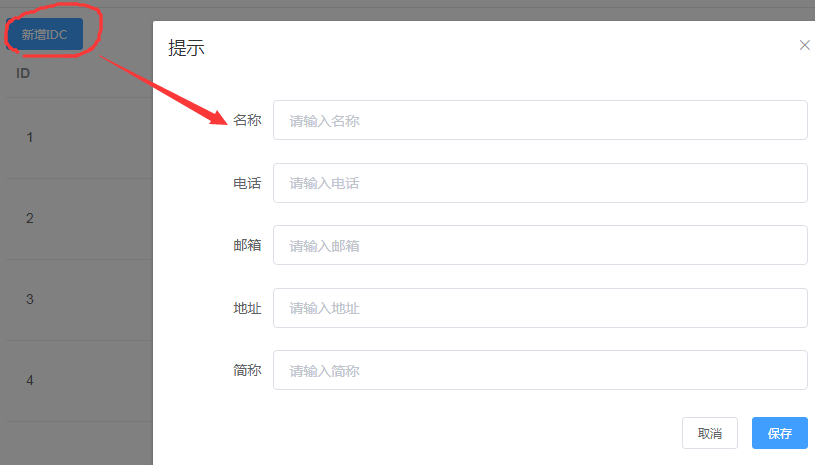
3.1form中要定义rules属性,否则无法创建,要把字段的prop传给它才能校验此字段。并且你输完数据后点保存前还要获取它校验的结果(是否符合)form.vue:
<template>

  <div class="idc-form">

    <el-form :model="form" :rules="rules" ref="form" label-width="100px" class="demo-form">

      <el-form-item label="名称" prop="name">

        <el-input v-model="form.name" placeholder="请输入名称"></el-input>

      </el-form-item>

      <el-form-item label="电话" prop="phone">

        <el-input v-model="form.phone" placeholder="请输入电话"></el-input>

      </el-form-item>

      <el-form-item label="邮箱" prop="email">

        <el-input v-model="form.email" placeholder="请输入邮箱"></el-input>

      </el-form-item>

      <el-form-item label="地址" prop="address">

        <el-input v-model="form.address" placeholder="请输入地址"></el-input>

      </el-form-item>

      <el-form-item label="简称" prop="letter">

        <el-input v-model="form.letter" placeholder="请输入简称"></el-input>

      </el-form-item>

      <el-form-item>

        <div class="btn-wrapper">

          <el-button size="small" @click="cancel">取消</el-button>

          <el-button size="small" type="primary" @click="submitForm" :loading="isLoading">保存</el-button>

        </div>

      </el-form-item>

    </el-form>

  </div>

</template>

<script>

  const initizeForm = {

    name: '',

    phone: '',

    email: '',

    address: '',

    letter: ''

  }

  export default {

    name: 'idc-form',

    props: ['isLoading'],

    data() {

      return {

        form: { ...initizeForm },

        rules: {

          name: [

            [

              { required: true, message: '请输入名称', trigger: 'blur' }

            ]

          ],

          phone: [

            [

              { required: true, message: '请输入电话', trigger: 'blur' }

            ]

          ],

          email: [

            [

              { required: true, message: '请输入邮箱', trigger: 'blur' }

            ]

          ],

          address: [

            [

              { required: true, message: '请输入地址', trigger: 'blur' }

            ]

          ],

          letter: [

            [

              { required: true, message: '请输入简称', trigger: 'blur' }

            ]

          ]

        }

      }

    },

    methods: {

      submitForm() {

        this.$refs.form.validate(valid => {

          if (!valid) {

            return

          }

          this.$emit('submit', this.form)

        })

      },

      cancel() {

        this.$emit('cancel')

      }

    }

  }

</script>

<style lang='scss' scoped>

  .idc-form {

    position: relative;

    display: block;

    .btn-wrapper{

      text-align: right;

    }

  }

</style>
3.2index.vue引入form
<template>

  <div class="idc">

    <el-button type="primary" @click="add" size="small">新增IDC</el-button>

    <idc-list :value="idcs"></idc-list>

    <el-dialog

      title="提示"

      :visible.sync="dialogVisible"

      width="50%">

      <idc-form

        ref="idcForm"

        :is-loading="isLoadingCreateIdc"

        @submit="handleSubmit"

        @cancel="handleCancel">

      </idc-form>

    </el-dialog>

  </div>

</template>

<script>

  import { getIdcsList, createIdc } from '@/api/idcs'

  import IdcList from './list'

  import IdcForm from './form'

  export default {

    name: 'idc',

    components: {

      IdcList,

      IdcForm

    },

    data() {

      return {

        dialogVisible: false,

        idcs: [],

        isLoadingCreateIdc: false

      }

    },

    methods: {

      fetchData() {

        getIdcsList().then(

          res => {

            this.idcs = res.data.results

          }

        )

      },

      add() {

        this.dialogVisible = true

      },

      handleSubmit(value) {

        this.isLoadingCreateIdc = true

        createIdc(value).then(

          () => {

            this.fetchData()

            this.handleCancel()

            this.isLoadingCreateIdc = false

          },

          () => { this.isLoadingCreateIdc = false }

        )

      },

      handleCancel() {

        this.dialogVisible = false

        this.$refs.idcForm.$refs.form.resetFields()

      }

    },

    created() {

      this.fetchData()

    }

  }

</script>

<style lang='scss' scoped>

  .idc {

    padding: 10px;

  }

</style>
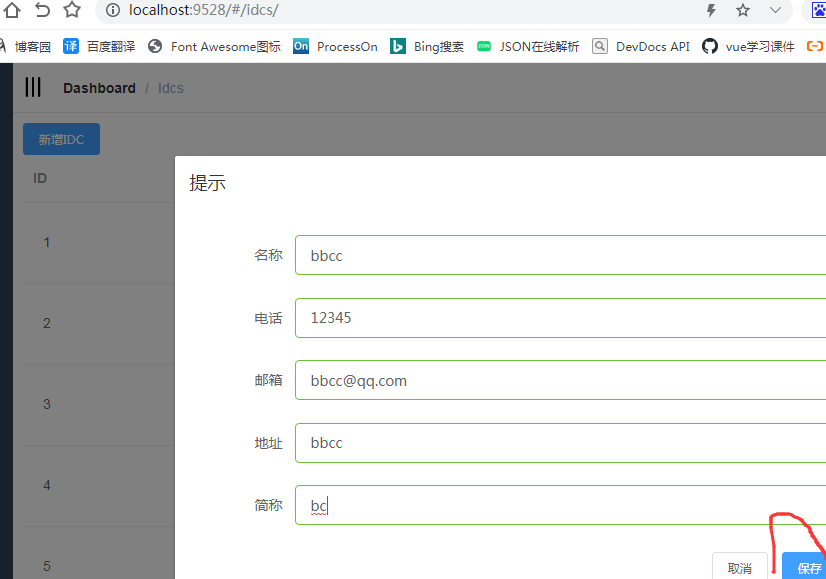
效果如下图点击保存提交数据后:页面会多出此条记录了
4.添加idc删除i接口
参考https://element.eleme.cn/#/zh-CN/component/message-box代码模版并给加加一弹窗组件,为的是让用户确认是否删除。
(1)list.vue
<template>

  <div class="idc-list">

    <el-table

      :data="value"

      style="width: 100%">

      <el-table-column

        label="ID"

        width="">

        <template slot-scope="scope">

          <span style="margin-left: 10px">{{ scope.row.id }}</span>

        </template>

      </el-table-column>

      <el-table-column

        label="名称"

        width="">

        <template slot-scope="scope">

          <span style="margin-left: 10px">{{ scope.row.name }}</span>

        </template>

      </el-table-column>

      <el-table-column

        label="电话"

        width="">

        <template slot-scope="scope">

          <span style="margin-left: 10px">{{ scope.row.phone }}</span>

        </template>

      </el-table-column>

      <el-table-column

        label="邮箱"

        width="">

        <template slot-scope="scope">

          <span style="margin-left: 10px">{{ scope.row.email }}</span>

        </template>

      </el-table-column>

      <el-table-column

        label="地址"

        width="">

        <template slot-scope="scope">

          <span style="margin-left: 10px">{{ scope.row.address }}</span>

        </template>

      </el-table-column>

      <el-table-column

        label="简称"

        width="">

        <template slot-scope="scope">

          <span style="margin-left: 10px">{{ scope.row.letter }}</span>

        </template>

      </el-table-column>

      <el-table-column label="操作">

        <template slot-scope="scope">

          <el-button

            size="mini"

            @click="handleEdit(scope.row)">编辑</el-button>

          <el-button

            size="mini"

            type="danger"

            @click="handleDelete(scope.row)">删除</el-button>

        </template>

      </el-table-column>

    </el-table>

  </div>

</template>

<script>

  export default {

    name: 'idc-list',

    props: ['value'],

    methods: {

      handleEdit() {

      },

      handleDelete(idc) {

        const id = idc.id

        const name = idc.name

        this.$confirm(`此操作将永久删除该条IDC:${name} 是否继续?`, '提示', {

          confirmButtonText: '确定',

          cancelButtonText: '取消',

          type: 'warning'

        }).then(() => {

          this.$emit('delete', id)

        }).catch(() => {

          this.$message({

            type: 'info',

            message: '已取消删除'

          })

        })

      }

    }

  }

</script>

<style lang='scss'>

  .idc-list {}

</style>
(2)form.vue:
<template>

  <div class="idc-form">

    <el-form :model="form" :rules="rules" ref="form" label-width="100px" class="demo-form">

      <el-form-item label="名称" prop="name">

        <el-input v-model="form.name" placeholder="请输入名称"></el-input>

      </el-form-item>

      <el-form-item label="电话" prop="phone">

        <el-input v-model="form.phone" placeholder="请输入电话"></el-input>

      </el-form-item>

      <el-form-item label="邮箱" prop="email">

        <el-input v-model="form.email" placeholder="请输入邮箱"></el-input>

      </el-form-item>

      <el-form-item label="地址" prop="address">

        <el-input v-model="form.address" placeholder="请输入地址"></el-input>

      </el-form-item>

      <el-form-item label="简称" prop="letter">

        <el-input v-model="form.letter" placeholder="请输入简称"></el-input>

      </el-form-item>

      <el-form-item>

        <div class="btn-wrapper">

          <el-button size="small" @click="cancel">取消</el-button>

          <el-button size="small" type="primary" @click="submitForm" :loading="isLoading">保存</el-button>

        </div>

      </el-form-item>

    </el-form>

  </div>

</template>

<script>

  const initizeForm = {

    name: '',

    phone: '',

    email: '',

    address: '',

    letter: ''

  }

  export default {

    name: 'idc-form',

    props: ['isLoading'],

    data() {

      return {

        form: { ...initizeForm },

        rules: {

          name: [

            [

              { required: true, message: '请输入名称', trigger: 'blur' }

            ]

          ],

          phone: [

            [

              { required: true, message: '请输入电话', trigger: 'blur' }

            ]

          ],

          email: [

            [

              { required: true, message: '请输入邮箱', trigger: 'blur' }

            ]

          ],

          address: [

            [

              { required: true, message: '请输入地址', trigger: 'blur' }

            ]

          ],

          letter: [

            [

              { required: true, message: '请输入简称', trigger: 'blur' }

            ]

          ]

        }

      }

    },

    methods: {

      submitForm() {

        this.$refs.form.validate(valid => {

          if (!valid) {

            return

          }

          this.$emit('submit', this.form)

        })

      },

      cancel() {

        this.$emit('cancel')

      }

    }

  }

</script>

<style lang='scss' scoped>

  .idc-form {

    position: relative;

    display: block;

    .btn-wrapper{

      text-align: right;

    }

  }

</style>
这样点击删除就实现删除idc某条记录的效果了。
5.添加idc编辑接口--新增和编辑组件合并
编辑和新增操作很像,区别就是title提示不一样而已,只是说编辑要给这弹窗中的几个框一个初始值(每一行的值),所以这里我可以把新增和编辑组件合并。
首先它需要一个title告诉我 弹窗展示的是新增还是编辑
(1)index.vue:
<template>

  <div class="idc">

    <el-button type="primary" @click="add" size="small">新增IDC</el-button>

    <idc-list :value="idcs" @edit="handleEdit" @delete="handleDelete"></idc-list>

    <el-dialog

      title="新增"

      :visible.sync="dialogVisibleForAdd"

      width="50%">

      <idc-form

        ref="idcForm"

        :is-loading="isLoadingCreateIdc"

        @submit="handleSubmitAdd"

        @cancel="handleCancelAdd">

      </idc-form>

    </el-dialog>

    <el-dialog

      title="编辑"

      :visible.sync="dialogVisibleForEdit"

      width="50%">

      <idc-form

        ref="idcForm"

        :is-loading="isLoadingEditIdc"

        :form="currentValue"

        @submit="handleSubmitEdit"

        @cancel="handleCancelEdit">

      </idc-form>

    </el-dialog>

  </div>

</template>

<script>

  import { getIdcsList, createIdc, deleteIdc, updateIdc } from '@/api/idcs'

  import IdcList from './list'

  import IdcForm from './form'

  export default {

    name: 'idc',

    components: {

      IdcList,

      IdcForm

    },

    data() {

      return {

        dialogVisibleForAdd: false,

        dialogVisibleForEdit: false,

        idcs: [],

        isLoadingCreateIdc: false,

        isLoadingEditIdc: false,

        currentValue: {}

      }

    },

    methods: {

      fetchData() {

        getIdcsList().then(

          res => {

            this.idcs = res.data.results

          }

        )

      },

      add() {

        this.dialogVisibleForAdd = true

      },

      handleSubmitAdd(value) {

        this.isLoadingCreateIdc = true

        createIdc(value).then(

          () => {

            this.fetchData()

            this.handleCancelAdd()

            this.isLoadingCreateIdc = false

          },

          () => { this.isLoadingCreateIdc = false }

        )

      },

      handleSubmitEdit(value) {

        this.isLoadingEditIdc = true

        const { id, ...params } = value

        updateIdc({ id, params }).then(

          () => {

            this.fetchData()

            this.handleCancelEdit()

            this.isLoadingEditIdc = false

          },

          () => { this.isLoadingEditIdc = false }

        )

      },

      handleCancelAdd() {

        this.dialogVisibleForAdd = false

        this.$refs.idcForm.$refs.form.resetFields()

      },

      handleCancelEdit() {

        this.dialogVisibleForEdit = false

        this.$refs.idcForm.$refs.form.resetFields()

      },

      handleDelete(id) {

        deleteIdc(id).then(

          () => {

            this.fetchData()

          },

          err => {

            console.log(err.message)

          }

        )

      },

      handleEdit(value) {

        this.currentValue = { ...value }

        this.dialogVisibleForEdit = true

      }

    },

    created() {

      this.fetchData()

    }

  }

</script>

<style lang='scss' scoped>

  .idc {

    padding: 10px;

  }

</style>
(2)from.vue:
<template>

  <div class="idc-form">

    <el-form :model="form" :rules="rules" ref="form" label-width="100px" class="demo-form">

      <el-form-item label="名称" prop="name">

        <el-input v-model="form.name" placeholder="请输入名称"></el-input>

      </el-form-item>

      <el-form-item label="电话" prop="phone">

        <el-input v-model="form.phone" placeholder="请输入电话"></el-input>

      </el-form-item>

      <el-form-item label="邮箱" prop="email">

        <el-input v-model="form.email" placeholder="请输入邮箱"></el-input>

      </el-form-item>

      <el-form-item label="地址" prop="address">

        <el-input v-model="form.address" placeholder="请输入地址"></el-input>

      </el-form-item>

      <el-form-item label="简称" prop="letter">

        <el-input v-model="form.letter" placeholder="请输入简称"></el-input>

      </el-form-item>

      <el-form-item>

        <div class="btn-wrapper">

          <el-button size="small" @click="cancel">取消</el-button>

          <el-button size="small" type="primary" @click="submitForm" :loading="isLoading">保存</el-button>

        </div>

      </el-form-item>

    </el-form>

  </div>

</template>

<script>

  export default {

    name: 'idc-form',

    props: {

      isLoading: {

        required: true,

        type: Boolean

      },

      form: {

        type: Object,

        default() {

          return {

            name: '',

            phone: '',

            email: '',

            address: '',

            letter: ''

          }

        }

      }

    },

    data() {

      return {

        rules: {

          name: [

            [

              { required: true, message: '请输入名称', trigger: 'blur' }

            ]

          ],

          phone: [

            [

              { required: true, message: '请输入电话', trigger: 'blur' }

            ]

          ],

          email: [

            [

              { required: true, message: '请输入邮箱', trigger: 'blur' }

            ]

          ],

          address: [

            [

              { required: true, message: '请输入地址', trigger: 'blur' }

            ]

          ],

          letter: [

            [

              { required: true, message: '请输入简称', trigger: 'blur' }

            ]

          ]

        }

      }

    },

    methods: {

      submitForm() {

        this.$refs.form.validate(valid => {

          if (!valid) {

            return

          }

          this.$emit('submit', this.form)

        })

      },

      cancel() {

        this.$emit('cancel')

      }

    }

  }

</script>

<style lang='scss' scoped>

  .idc-form {

    position: relative;

    display: block;

    .btn-wrapper{

      text-align: right;

    }

  }

</style>
这样就实现idc的增删改查了!
二.2vueadmin-template反向代理/路由配置,idc增查删的更多相关文章
- Nginx(http协议代理 搭建虚拟主机 服务的反向代理 在反向代理中配置集群的负载均衡)
Nginx 简介 Nginx (engine x) 是一个高性能的 HTTP 和反向代理服务.Nginx 是由伊戈尔·赛索耶夫为俄罗斯访问量第二的 Rambler.ru 站点(俄文:Рамблер)开 ...
- nginx的反向代理和配置
最近有打算研读nginx源代码,看到网上介绍nginx可以作为一个反向代理服务器完成负载均衡.所以搜罗了一些关于反向代理服务器的内容,整理综合. 一 概述 反向代理(Reverse Proxy)方式 ...
- Apache反向代理的配置
Apache反向代理的配置 一: Mac系统自带apache服务器 1. 查看apache版本命令如下: sudo apachectl -v 2. 启动apache sudo apachect ...
- Nginx专题(1):Nginx之反向代理及配置
摘要:本文从Nginx的概念出发,分别从反向代理的概念.优势.配置代码3个方面介绍了Nginx的特性之一反向代理. 文章来源:宜信技术学院 & 宜信支付结算团队技术分享第一期-宜信支付结算八方 ...
- Centos7 nginx 反向代理的配置
一.正向代理与反向代理 1.正向代理 正向代理往VPN理解 正向代理,也就是传说中的代理,他的工作原理就像一个跳板(VPN),简单的说: 我是一个用户,我访问不了某网站,但是我能访问一个代理服务器,这 ...
- nginx反向代理缓存配置
关于nginx的反向代理缓存配置,用的最多的就是CDN公司,目前CDN公司用纯nginx做缓存的已经很少了,基本都用tnginx(阿里的).openresty:但是这两款软件都是基于nignx开发的, ...
- Nginx反向代理的配置
Chapter: Nginx基本操作释疑 1. Nginx的端口修改问题 2. Nginx 301重定向的配置 3. Windows下配置Nginx使之支持PHP 4. Linux下配置Nginx使之 ...
- 【转】Nginx服务器的反向代理proxy_pass配置方法讲解
[转]Nginx服务器的反向代理proxy_pass配置方法讲解 转自:http://www.jb51.net/article/78746.htm 就普通的反向代理来讲Nginx的配置还是比较简单的, ...
- nginx反向代理的配置优化
作者:守住每一天 blog:liuyu.blog.51cto.combbs:bbs.linuxtone.orgmsn:liuyubj520#hotmail.comemail:liuyu105#gmai ...
随机推荐
- Java实现 LeetCode 446 等差数列划分 II - 子序列
446. 等差数列划分 II - 子序列 如果一个数列至少有三个元素,并且任意两个相邻元素之差相同,则称该数列为等差数列. 例如,以下数列为等差数列: 1, 3, 5, 7, 9 7, 7, 7, 7 ...
- Java中Iterator 和ListIterator的区别
1.Iterator Iterator的定义如下: public interface Iterator {} Iterator是一个接口,它是集合的迭代器.集合可以通过Iterator去遍历集合中的元 ...
- Java实现 LeetCode 26 删除排序数组中的重复项
26. 删除排序数组中的重复项 给定一个排序数组,你需要在原地删除重复出现的元素,使得每个元素只出现一次,返回移除后数组的新长度. 不要使用额外的数组空间,你必须在原地修改输入数组并在使用 O(1) ...
- java代码(7) ---guava之Bimap
guava之Bimap bimap的作用很清晰:它是一个——映射,可以通过key得到value,也可以通过value得到key 一.概述 1.bimap和普通HashMap区别 (1)在java集合类 ...
- Navicat 连接远程服务器端MySQL
Navicat是一个很好的操作各种数据库的图形化工具,我用它在本地连接过MySQL.SQL Server.SQLite,用它操作数据库确实非常方便.快捷,再搭配SQL语句,是一个很好的选择了. 废话不 ...
- Vue-websocket使用
Vue中使用websocket 1.介绍:websocket是一个双向通行工具,解决了原来的http单向通信的弊端,可以让服务器主动向客户端推送数据 // 安装客户端的socket npm i soc ...
- wget下载网盘等需要cookie的文件的方法
在浏览器(Chrome.Firefox等)上安装插件cookies 然后进入该网页,导出cookies.txt 使用命令下载: wget -c --load-cookies=cookies.txt & ...
- Email地址验证
<script>function validateForm(){ var x=document.forms["myForm"]["email"].v ...
- apt用法详解
目录 1. 常规操作 2. apt-cache 3. 配置apt-get的缓存路径 4. 常用工具集 4.1. 开发工具 4.2. 系统辅助 1. 常规操作 更新仓库 sudo apt-get upd ...
- 授权函数-web_set_user
为Web服务器指定登录字符串.当我们使用RNS服务器或者某些服务器的时候需要我们输入账号密码登录才能给进行访问,那么这个时候就需要用到该函数 int web_set_user(const char* ...
