yolo3各部分代码详解(超详细)
0.摘要
最近一段时间在学习yolo3,看了很多博客,理解了一些理论知识,但是学起来还是有些吃力,之后看了源码,才有了更进一步的理解。在这里,我不在赘述网络方面的代码,网络方面的代码比较容易理解,下面将给出整个yolo3代码的详解解析,整个源码中函数的作用以及调用关系见下图:

1.model.py
1.1 yolo_head()
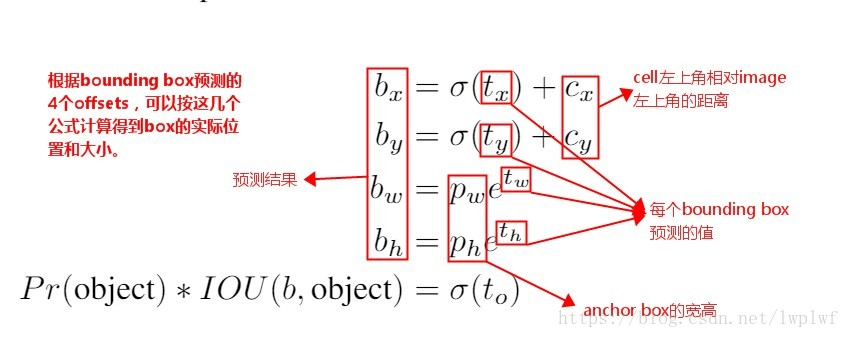
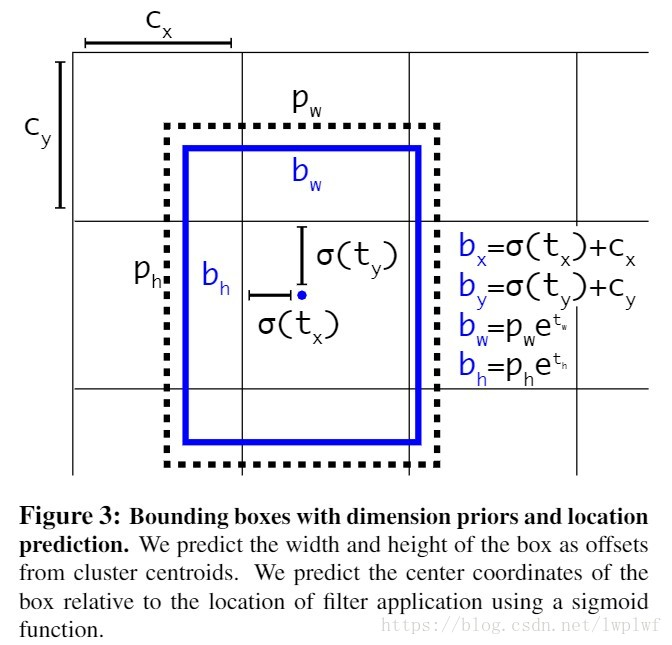
yolo_head()函数的输入是Darknet53的最后输出的三个特征图feats,anchors,num_class,input_shpe,此函数的功能是将特征图的进行解码,这一步极为重要,如其中一个特征图的shape是(13,13,255),其实质就是对应着(13,13,3,85),分别对应着13*13个网格,每个网格3个anchors,85=(x,y,w,h,confident),此时box的xy是相对于网格的偏移量,所以还需要经过一些列的处理,处理方式见下图:
def yolo_head(feats, anchors, num_classes, input_shape, calc_loss=False):

    """Convert final layer features to bounding box parameters."""

    num_anchors = len(anchors)#num_anchors=3

    # Reshape to batch, height, width, num_anchors, box_params.

    anchors_tensor = K.reshape(K.constant(anchors), [1, 1, 1, num_anchors, 2])

    #anchors=anchors[anchors_mask[1]]=anchors[[6,7,8]]= [116,90],  [156,198],  [373,326]

    """#通过arange、reshape、tile的组合,根据grid_shape(13x13、26x26或52x52)创建y轴的0~N-1的组合grid_y,再创建x轴的0~N-1的组合grid_x,将两者拼接concatenate,形成NxN的grid(13x13、26x26或52x52)"""

    grid_shape = K.shape(feats)[1:3] # height, width,#13x13或26x26或52x52

    grid_y = K.tile(K.reshape(K.arange(0, stop=grid_shape[0]), [-1, 1, 1, 1]),

        [1, grid_shape[1], 1, 1])

    grid_x = K.tile(K.reshape(K.arange(0, stop=grid_shape[1]), [1, -1, 1, 1]),

        [grid_shape[0], 1, 1, 1])

    grid = K.concatenate([grid_x, grid_y])

    grid = K.cast(grid, K.dtype(feats))

    #cast函数用法:cast(x, dtype, name=None),x:待转换的张量,type:需要转换成什么类型

    """grid形式:(0,0),(0,1),(0,2)......(1,0),(1,1).....(12,12)"""

    feats = K.reshape(

        feats, [-1, grid_shape[0], grid_shape[1], num_anchors, num_classes + 5])

    """(batch_size,13,13,3,85)"""

    "此时的xy为中心坐标,相对于左上角的中心坐标"

    # Adjust preditions to each spatial grid point and anchor size.

    """将预测值调整为真实值"""

    "将中心点相对于网格的坐标转换成在整张图片中的坐标,相对于13/26/52的相对坐标"

    "将wh转换成预测框的wh,并处以416归一化"

    box_xy = (K.sigmoid(feats[..., :2]) + grid) / K.cast(grid_shape[::-1], K.dtype(feats))#实际上就是除以13或26或52

    #box_xy = (K.sigmoid(feats[:,:,:,:2]) + grid) / K.cast(grid_shape[::-1], K.dtype(feats))

    # ...操作符,在Python中,“...”(ellipsis)操作符,表示其他维度不变,只操作最前或最后1维;

    box_wh = K.exp(feats[..., 2:4]) * anchors_tensor / K.cast(input_shape[::-1], K.dtype(feats))

    box_confidence = K.sigmoid(feats[..., 4:5])

    box_class_probs = K.sigmoid(feats[..., 5:])

    #切片省略号的用法,省略前面左右的冒号,参考博客:https://blog.csdn.net/z13653662052/article/details/78010654?depth_1-utm_source=distribute.pc_relevant.none-task&utm_source=distribute.pc_relevant.none-task

    if calc_loss == True:

        return grid, feats, box_xy, box_wh

    return box_xy, box_wh, box_confidence, box_class_probs

    #预测框相对于整张图片中心点的坐标与预测框的wh
1.2 yolo_correct_box()
此函数的功能是将yolo_head()输出,也即是box相对于整张图片的中心坐标转换成box的左上角右下角的坐标
 def yolo_correct_boxes(box_xy, box_wh, input_shape, image_shape):

     '''Get corrected boxes'''

     '''对上面函数输出的预测的坐标进行修正

     比如

     image_shape

     为[600,800],input_shape

     为[300, 500],那么

     new_shape

     为[300, 400]

     offset

     为[0, 0.125]

     scales

     为[0.5, 0.625]'''

     # 将box_xy, box_wh转换为输入图片上的真实坐标,输出boxes是框的左下、右上两个坐标(y_min, x_min, y_max, x_max)

     # ...操作符,在Python中,“...”(ellipsis)操作符,表示其他维度不变,只操作最前或最后1维;

     # np.array[i:j:s],当s<0时,i缺省时,默认为-1;j缺省时,默认为-len(a)-1;所以array[::-1]相当于array[-1:-len(a)-1:-1],也就是从最后一个元素到第一个元素复制一遍,即倒序

     box_yx = box_xy[..., ::-1]#将xy坐标进行交换,反序(y,x)

     box_hw = box_wh[..., ::-1]

     input_shape = K.cast(input_shape, K.dtype(box_yx))

     image_shape = K.cast(image_shape, K.dtype(box_yx))

     new_shape = K.round(image_shape * K.min(input_shape/image_shape))

     #.round用于取近似值,保留几位小数,第一个参数是一个浮点数,第二个参数是保留的小数位数,可选,如果不写的话默认保留到整数

     offset = (input_shape-new_shape)/2./input_shape

     scale = input_shape/new_shape

     box_yx = (box_yx - offset) * scale

     box_hw *= scale

     """获得预测框的左上角与右下角的坐标"""

     box_mins = box_yx - (box_hw / 2.)

     box_maxes = box_yx + (box_hw / 2.)

     boxes =  K.concatenate([

         box_mins[..., 0:1],  # y_min

         box_mins[..., 1:2],  # x_min

         box_maxes[..., 0:1],  # y_max

         box_maxes[..., 1:2]  # x_max

     ])#...操作符,在Python中,“...”(ellipsis)操作符,表示其他维度不变,只操作最前或最后1维;

     # Scale boxes back to original image shape.

     boxes *= K.concatenate([image_shape, image_shape])

     return boxes#得到预测框的左下角坐标与右上角坐标
1.3 yolo_box_and_score
获得box与得分
 def yolo_boxes_and_scores(feats, anchors, num_classes, input_shape, image_shape):

     '''Process Conv layer output'''

     box_xy, box_wh, box_confidence, box_class_probs = yolo_head(feats,

         anchors, num_classes, input_shape)

     boxes = yolo_correct_boxes(box_xy, box_wh, input_shape, image_shape)

     boxes = K.reshape(boxes, [-1, 4])#reshape,将不同网格的值转换为框的列表。即(?,13,13,3,4)->(?,4)  ?:框的数目

     box_scores = box_confidence * box_class_probs

     box_scores = K.reshape(box_scores, [-1, num_classes])#reshape,将框的得分展平,变为(?,80); ?:框的数目

     return boxes, box_scores#返回预测框的左下角与右上角的坐标与得分
1.4 yolo_eval()
此函数的作用是删除冗余框,保留最优框,用到非极大值抑制算法
 def yolo_eval(yolo_outputs,

               anchors,

               num_classes,

               image_shape,

               max_boxes=20,

               score_threshold=.6,

               iou_threshold=.5):

     """Evaluate YOLO model on given input and return filtered boxes."""

     """      yolo_outputs        #模型输出,格式如下【(?,13,13,255)(?,26,26,255)(?,52,52,255)】 ?:bitch size; 13-26-52:多尺度预测; 255:预测值(3*(80+5))

               anchors,            #[(10,13), (16,30), (33,23), (30,61), (62,45), (59,119), (116,90), (156,198),(373,326)]

               num_classes,     # 类别个数,coco集80类

               image_shape,        #placeholder类型的TF参数,默认(416, 416);

               max_boxes=20,       #每张图每类最多检测到20个框同类别框的IoU阈值,大于阈值的重叠框被删除,重叠物体较多,则调高阈值,重叠物体较少,则调低阈值

               score_threshold=.6, #框置信度阈值,小于阈值的框被删除,需要的框较多,则调低阈值,需要的框较少,则调高阈值;

               iou_threshold=.5):  #同类别框的IoU阈值,大于阈值的重叠框被删除,重叠物体较多,则调高阈值,重叠物体较少,则调低阈值"""

     num_layers = len(yolo_outputs)# #yolo的输出层数;num_layers = 3  -> 13-26-52

     anchor_mask = [[6,7,8], [3,4,5], [0,1,2]] if num_layers==3 else [[3,4,5], [1,2,3]] # default setting

     # 每层分配3个anchor box.如13*13分配到[6,7,8]即[(116,90)(156,198)(373,326)]

     input_shape = K.shape(yolo_outputs[0])[1:3] * 32

     # 输入shape(?,13,13,255);即第一维和第二维分别*32  ->13*32=416; input_shape:(416,416)

     #yolo_outputs=[(batch_size,13,13,255),(batch_size,26,26,255),(batch_size,52,52,255)]

     #input_shape=416*416

     boxes = []

     box_scores = []

     for l in range(num_layers):

         _boxes, _box_scores = yolo_boxes_and_scores(yolo_outputs[l],

             anchors[anchor_mask[l]], num_classes, input_shape, image_shape)

         boxes.append(_boxes)

         box_scores.append(_box_scores)

     boxes = K.concatenate(boxes, axis=0)

     box_scores = K.concatenate(box_scores, axis=0) #K.concatenate:将数据展平 ->(?,4)

     #可能会产生很多个预选框,需要经过(1)阈值的删选,(2)非极大值抑制的删选

     mask = box_scores >= score_threshold#得分大于置信度为True,否则为Flase

     max_boxes_tensor = K.constant(max_boxes, dtype='int32')

     boxes_ = []

     scores_ = []

     classes_ = []

     """

     # ---------------------------------------#

     #   1、取出每一类得分大于score_threshold

     #   的框和得分

     #   2、对得分进行非极大抑制

     # ---------------------------------------#

     # 对每一个类进行判断"""

     for c in range(num_classes):

         # TODO: use keras backend instead of tf.

         class_boxes = tf.boolean_mask(boxes, mask[:, c])#将输入的数组挑出想要的数据输出,将得分大于阈值的坐标挑选出来

         #将第c类中得分大于阈值的坐标挑选出来

         class_box_scores = tf.boolean_mask(box_scores[:, c], mask[:, c])

         # 将第c类中得分大于阈值的框挑选出来

         """非极大值抑制部分"""

         # 非极大抑制,去掉box重合程度高的那一些

         """原理:(1)从最大概率矩形框F开始,分别判断A~E与F的重叠度IOU是否大于某个设定的阈值;

                 (2)假设B、D与F的重叠度超过阈值,那么就扔掉B、D;并标记第一个矩形框F,是我们保留下来的。

                 (3)从剩下的矩形框A、C、E中,选择概率最大的E,然后判断E与A、C的重叠度,重叠度大于一定的阈值,那么就扔掉;并标记E是我们保留下来的第二个矩形框。

                 就这样一直重复,找到所有被保留下来的矩形框。"""

         nms_index = tf.image.non_max_suppression(

             class_boxes, class_box_scores, max_boxes_tensor, iou_threshold=iou_threshold)

         class_boxes = K.gather(class_boxes, nms_index)

         class_box_scores = K.gather(class_box_scores, nms_index)

         classes = K.ones_like(class_box_scores, 'int32') * c#将class_box_scores中的数变成1

         boxes_.append(class_boxes)

         scores_.append(class_box_scores)

         classes_.append(classes)

     boxes_ = K.concatenate(boxes_, axis=0)

     scores_ = K.concatenate(scores_, axis=0)

     classes_ = K.concatenate(classes_, axis=0)

     #return 经过非极大值抑制保留下来的一个框

     return boxes_, scores_, classes_
1.5 preprocess_true_box()
 def preprocess_true_boxes(true_boxes, input_shape, anchors, num_classes):

     '''

     在preprocess_true_boxes中,输入:

     true_boxes:检测框,批次数16,最大框数20,每个框5个值,4个边界点和1个类别序号,如(16, 20, 5);

     input_shape:图片尺寸,如(416, 416);

     anchors:anchor box列表;

     num_classes:类别的数量;

     Preprocess true boxes to training input format

     Parameters

     ----------

     true_boxes: array, shape=(m, T, 5)

         Absolute x_min, y_min, x_max, y_max, class_id relative to input_shape.

     input_shape: array-like, hw, multiples of 32

     anchors: array, shape=(N, 2), wh

     num_classes: integer

     Returns

     -------

     y_true: list of array, shape like yolo_outputs, xywh are reletive value

     '''

     # 检查有无异常数据 即txt提供的box id 是否存在大于 num_class的情况

     # true_boxes.shape  = (图片张数,每张图片box个数,5)(5是左上右下点坐标加上类别下标)

     assert (true_boxes[..., 4]<num_classes).all(), 'class id must be less than num_classes'

     num_layers = len(anchors)//3 # default setting

     anchor_mask = [[6,7,8], [3,4,5], [0,1,2]] if num_layers==3 else [[3,4,5], [1,2,3]]

     true_boxes = np.array(true_boxes, dtype='float32')

     input_shape = np.array(input_shape, dtype='int32')    # [416 416] shape(2,)

     # 将每个box的左上点和右下点坐标相加除2,即取中点!

     """计算true_boxes:

        true_boxes:真值框,左上和右下2个坐标值和1个类别,如[184, 299, 191, 310, 0.0],结构是(16, 20, 5),16是批次数,20是框的最大数,5是框的5个值;

        boxes_xy:xy是box的中心点,结构是(16, 20, 2);

        boxes_wh:wh是box的宽和高,结构也是(16, 20, 2);

        input_shape:输入尺寸416x416;

        true_boxes:第0和1位设置为xy,除以416,归一化,第2和3位设置为wh,除以416,归一化,如[0.449, 0.730, 0.016, 0.026, 0.0]。"""

     boxes_xy = (true_boxes[..., 0:2] + true_boxes[..., 2:4]) // 2

     # 得到box宽高

     boxes_wh = true_boxes[..., 2:4] - true_boxes[..., 0:2]

     # 中心坐标 和 宽高 都变成 相对于input_shape的比例

     true_boxes[..., 0:2] = boxes_xy/input_shape[::-1]

     true_boxes[..., 2:4] = boxes_wh/input_shape[::-1]

     # 这个m应该是batch的大小 即是输入图片的数量

     m = true_boxes.shape[0]

     # grid_shape [13,13 ]   [26,26]  [52,52]

     grid_shapes = [input_shape//{0:32, 1:16, 2:8}[l] for l in range(num_layers)]

     #y_true是全0矩阵(np.zeros)列表,即[(16,13,13,3,6), (16,26,26,3,6), (16,52,52,3,6)]

     y_true = [np.zeros((m,grid_shapes[l][0],grid_shapes[l][1],len(anchor_mask[l]),5+num_classes),

         dtype='float32') for l in range(num_layers)]

     # y_true  m*13*13*3*(5+num_clasess)

     #         m*26*26*3*(5+num_classes)

     #         m*52*52*3*(5+num_classes)

     # Expand dim to apply broadcasting.

     # Expand dim to apply broadcasting.

     #在原先axis出添加一个维度,由(9,2)转为(1,9,2)

     anchors = np.expand_dims(anchors, 0)

     # 网格中心为原点(即网格中心坐标为 (0,0) ), 计算出anchor 右下角坐标

     anchor_maxes = anchors / 2.

     #计算出左上标

     anchor_mins = -anchor_maxes

     # 去掉异常数据

     valid_mask = boxes_wh[..., 0]>0

     for b in range(m):

         # Discard zero rows.

         wh = boxes_wh[b, valid_mask[b]]

         if len(wh)==0: continue

         # Expand dim to apply broadcasting.

         wh = np.expand_dims(wh, -2)

         box_maxes = wh / 2.

         box_mins = -box_maxes

         # # 假设 bouding box 的中心也位于网格的中心

         """计算标注框box与anchor box的iou值,计算方式很巧妙:

         box_mins的shape是(7,1,2),anchor_mins的shape是(1,9,2),intersect_mins的shape是(7,9,2),即两两组合的值;

         intersect_area的shape是(7,9);

         box_area的shape是(7,1);

         anchor_area的shape是(1,9);

         iou的shape是(7,9);

         IoU数据,即anchor box与检测框box,两两匹配的iou值"""

         intersect_mins = np.maximum(box_mins, anchor_mins)#逐位比较

         intersect_maxes = np.minimum(box_maxes, anchor_maxes)

         intersect_wh = np.maximum(intersect_maxes - intersect_mins, 0.)

         intersect_area = intersect_wh[..., 0] * intersect_wh[..., 1]#宽*高

         box_area = wh[..., 0] * wh[..., 1]

         anchor_area = anchors[..., 0] * anchors[..., 1]

         iou = intersect_area / (box_area + anchor_area - intersect_area)

         # Find best anchor for each true box

         best_anchor = np.argmax(iou, axis=-1)

         """设置y_true的值:

            t是box的序号;n是最优anchor的序号;l是层号;

            如果最优anchor在层l中,则设置其中的值,否则默认为0;

            true_boxes是(16, 20, 5),即批次、box数、框值;

            true_boxes[b, t, 0],其中b是批次序号、t是box序号,第0位是x,第1位是y;

            grid_shapes是3个检测图的尺寸,将归一化的值,与框长宽相乘,恢复为具体值;

            k是在anchor box中的序号;

            c是类别,true_boxes的第4位;

            将xy和wh放入y_true中,将y_true的第4位框的置信度设为1,将y_true第5~n位的类别设为1;"""

         for t, n in enumerate(best_anchor):

             # 遍历anchor 尺寸 3个尺寸

             # 因为此时box 已经和一个anchor box匹配上,看这个anchor box属于那一层,小,中,大,然后将其box分配到那一层

             for l in range(num_layers):

                 if n in anchor_mask[l]:

                     #因为grid_shape格式是hw所以是x*grid_shapes[l][1]=x*w,求出对应所在网格的横坐标,这里的x是相对于整张图片的相对坐标,

                     # 是在原先坐标上除以了w,所以现在要乘以w

                     i = np.floor(true_boxes[b,t,0]*grid_shapes[l][1]).astype('int32')

                     #np.around 四舍五入

                     #np.floor向下取整

                     #np.ceil向上取整

                     #np.where条件选取

                     # np.floor 返回不大于输入参数的最大整数。 即对于输入值 x ,将返回最大的整数 i ,使得 i <= x。

                     # true_boxes x,y,w,h, 此时x y w h都是相对于整张图像的

                     # 第b个图像 第 t个 bounding box的 x 乘以 第l个grid shap的x(grid shape 格式是hw,

                     # 因为input_shape格式是hw)

                     # 找到这个bounding box落在哪个cell的中心

                     #i,j是所在网格的位置

                     j = np.floor(true_boxes[b,t,1]*grid_shapes[l][0]).astype('int32')

                     # 找到n 在 anchor_box的索引位置

                     k = anchor_mask[l].index(n)

                     # 得到box的id

                     c = true_boxes[b,t, 4].astype('int32')

                     # 第b个图像 第j行 i列 第k个anchor x,y,w,h,confindence,类别概率

                     y_true[l][b, j, i, k, 0:4] = true_boxes[b,t, 0:4]

                     y_true[l][b, j, i, k, 4] = 1

                     # 置信度是1 因为含有目标

                     y_true[l][b, j, i, k, 5+c] = 1

                     # 类别的one-hot编码

     return y_true
1.6 yolo_loss
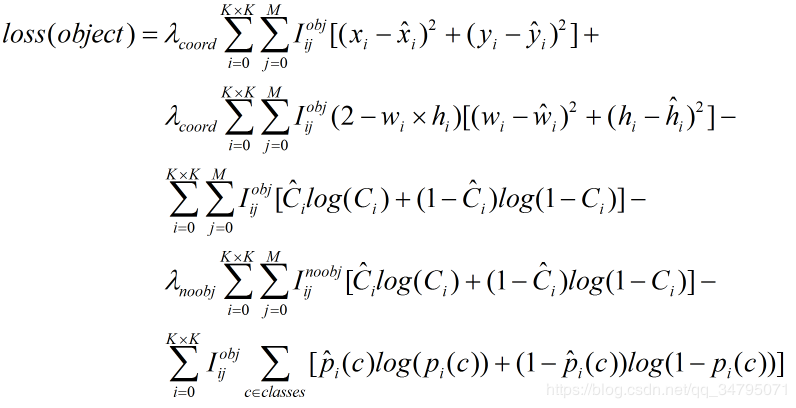
此函数定义损失函数,损失函数包括三个部分,坐标损失,置信度损失,类别损失:
 def yolo_loss(args, anchors, num_classes, ignore_thresh=.5, print_loss=False):

     """true_boxes : 实际框的位置和类别,我们的输入。三个维度:

     第一个维度:图片张数

     第二个维度:一张图片中有几个实际框

     第三个维度: [x, y, w, h, class],x,y 是实际框的中心点坐标,w,h 是框的宽度和高度。x,y,w,h 均是除以图片分辨率得到的[0,1]范围的值。

     anchors : 实际anchor boxes 的值,论文中使用了五个。[w,h],都是相对于gird cell 长宽的比值。二个维度:

     第一个维度:anchor boxes的数量,这里是5

     第二个维度:[w,h],w,h,都是相对于gird cell 长宽的比值。

     """

     '''Return yolo_loss tensor

     Parameters

     ----------

     yolo_outputs: list of tensor, the output of yolo_body or tiny_yolo_body

     y_true: list of array, the output of preprocess_true_boxes

     anchors: array, shape=(N, 2), wh

     num_classes: integer

     ignore_thresh: float, the iou threshold whether to ignore object confidence loss

     Returns

     -------

     loss: tensor, shape=(1,)

     '''

     num_layers = len(anchors)//3 # default setting

     yolo_outputs = args[:num_layers]

     y_true = args[num_layers:]

     anchor_mask = [[6,7,8], [3,4,5], [0,1,2]] if num_layers==3 else [[3,4,5], [1,2,3]]

     input_shape = K.cast(K.shape(yolo_outputs[0])[1:3] * 32, K.dtype(y_true[0]))

     grid_shapes = [K.cast(K.shape(yolo_outputs[l])[1:3], K.dtype(y_true[0])) for l in range(num_layers)]

     loss = 0

     m = K.shape(yolo_outputs[0])[0] # batch size, tensor

     mf = K.cast(m, K.dtype(yolo_outputs[0]))

     for l in range(num_layers):

         object_mask = y_true[l][..., 4:5]#置信度

         true_class_probs = y_true[l][..., 5:]#类别

         grid, raw_pred, pred_xy, pred_wh = yolo_head(yolo_outputs[l],

              anchors[anchor_mask[l]], num_classes, input_shape, calc_loss=True)

         pred_box = K.concatenate([pred_xy, pred_wh])

         # Darknet raw box to calculate loss.

         # 这是对x,y,w,b转换公式的反变换

         raw_true_xy = y_true[l][..., :2]*grid_shapes[l][::-1] - grid

         raw_true_wh = K.log(y_true[l][..., 2:4] / anchors[anchor_mask[l]] * input_shape[::-1])

         # 这部操作是避免出现log(0) = 负无穷,故当object_mask置信率接近0是返回全0结果

         # K.switch(条件函数,返回值1,返回值2)其中1,2要等shape

         raw_true_wh = K.switch(object_mask, raw_true_wh, K.zeros_like(raw_true_wh)) # avoid log(0)=-inf

         #提升针对小物体的小技巧:针对 YOLOv3来说,regression损失会乘一个(2-w*h)的比例系数,

         # w 和 h 分别是ground truth 的宽和高。如果不减去 w*h,AP 会有一个明显下降。如果继续往上加,如 (2-w*h)*1.5,总体的 AP 还会涨一个点左右(包括验证集和测试集),大概是因为 COCO 中小物体实在太多的原因。

         box_loss_scale = 2 - y_true[l][...,2:3]*y_true[l][...,3:4]

         # Find ignore mask, iterate over each of batch.

         ignore_mask = tf.TensorArray(K.dtype(y_true[0]), size=1, dynamic_size=True)

         object_mask_bool = K.cast(object_mask, 'bool')

         ##将真实标定的数据置信率转换为T or F的掩膜

         def loop_body(b, ignore_mask):

             true_box = tf.boolean_mask(y_true[l][b,...,0:4], object_mask_bool[b,...,0])#挑选出置信度大于0的框的相应的坐标,truebox形式为中心坐标xy与hw

             iou = box_iou(pred_box[b], true_box)#计算iou,pre_box是通过yolo_head解码之后的xywh

             best_iou = K.max(iou, axis=-1)#选取最大iou的

             ignore_mask = ignore_mask.write(b, K.cast(best_iou<ignore_thresh, K.dtype(true_box)))

             return b+1, ignore_mask

         _, ignore_mask = K.control_flow_ops.while_loop(lambda b,*args: b<m, loop_body, [0, ignore_mask])

         ignore_mask = ignore_mask.stack()#将一个列表中维度数目为R的张量堆积起来形成维度为R+1的新张量

         ignore_mask = K.expand_dims(ignore_mask, -1)

         # K.binary_crossentropy is helpful to avoid exp overflow.

         xy_loss = object_mask * box_loss_scale * K.binary_crossentropy(raw_true_xy, raw_pred[...,0:2], from_logits=True)

         wh_loss = object_mask * box_loss_scale * 0.5 * K.square(raw_true_wh-raw_pred[...,2:4])

         confidence_loss = object_mask * K.binary_crossentropy(object_mask, raw_pred[...,4:5], from_logits=True)+ \

             (1-object_mask) * K.binary_crossentropy(object_mask, raw_pred[...,4:5], from_logits=True) * ignore_mask

         class_loss = object_mask * K.binary_crossentropy(true_class_probs, raw_pred[...,5:], from_logits=True)

         xy_loss = K.sum(xy_loss) / mf

         wh_loss = K.sum(wh_loss) / mf

         confidence_loss = K.sum(confidence_loss) / mf

         class_loss = K.sum(class_loss) / mf

         loss += xy_loss + wh_loss + confidence_loss + class_loss

         if print_loss:

             loss = tf.Print(loss, [loss, xy_loss, wh_loss, confidence_loss, class_loss, K.sum(ignore_mask)], message='loss: ')

     return loss
2.train.py
整个训练分为两个阶段,第一个阶段为0~50epoch,训练最后的loss层,前面的层被冻结,第二个阶段为50~100个epoch训练前面的层
 def _main():

     annotation_path = '2007_train.txt'

     log_dir = 'logs/000/'

     classes_path = 'model_data/voc_classes.txt'

     anchors_path = 'model_data/yolo_anchors.txt'

     class_names = get_classes(classes_path)

     num_classes = len(class_names)

     anchors = get_anchors(anchors_path)

     input_shape = (416,416) # multiple of 32, hw

     is_tiny_version = len(anchors)==6 # default setting

     if is_tiny_version:

         model = create_tiny_model(input_shape, anchors, num_classes,

             freeze_body=2, weights_path='model_data/tiny_yolo_weights.h5')

     else:

         model = create_model(input_shape, anchors, num_classes,

             freeze_body=2, weights_path='model_data/yolo_weights.h5') # make sure you know what you freeze

     logging = TensorBoard(log_dir=log_dir)

     checkpoint = ModelCheckpoint(log_dir + 'ep{epoch:03d}-loss{loss:.3f}-val_loss{val_loss:.3f}.h5',

         monitor='val_loss', save_weights_only=True, save_best_only=True, period=3)

     reduce_lr = ReduceLROnPlateau(monitor='val_loss', factor=0.1, patience=3, verbose=1)

     """monitor:被监测的量

        factor:每次减少学习率的因子,学习率将以lr = lr*factor的形式被减少

        patience:当patience个epoch过去而模型性能不提升时,学习率减少的动作会被触发

        mode:‘auto’,‘min’,‘max’之一,在min模式下,如果检测值触发学习率减少。在max模式下,当检测值不再上升则触发学习率减少。

        epsilon:阈值,用来确定是否进入检测值的“平原区”

        cooldown:学习率减少后,会经过cooldown个epoch才重新进行正常操作

        min_lr:学习率的下限"""

     early_stopping = EarlyStopping(monitor='val_loss', min_delta=0, patience=10, verbose=1)

     """monitor: 被监测的数据。

        min_delta: 在被监测的数据中被认为是提升的最小变化, 例如,小于 min_delta 的绝对变化会被认为没有提升。

        patience: 没有进步的训练轮数,在这之后训练就会被停止。

        verbose: 详细信息模式。

        mode: {auto, min, max} 其中之一。 在 min 模式中, 当被监测的数据停止下降,训练就会停止;在 max 模式中,当被监测的数据停止上升,训练就会停止;在 auto 模式中,方向会自动从被监测的数据的名字中判断出来。

        baseline: 要监控的数量的基准值。 如果模型没有显示基准的改善,训练将停止。

        restore_best_weights: 是否从具有监测数量的最佳值的时期恢复模型权重。 如果为 False,则使用在训练的最后一步获得的模型权重"""

     val_split = 0.1

     with open(annotation_path) as f:

         lines = f.readlines()

     np.random.seed(10101)

     np.random.shuffle(lines)

     np.random.seed(None)

     num_val = int(len(lines)*val_split)

     num_train = len(lines) - num_val

     # Train with frozen layers first, to get a stable loss.

     # Adjust num epochs to your dataset. This step is enough to obtain a not bad model.

     if True:

         model.compile(optimizer=Adam(lr=1e-3), loss={

             # use custom yolo_loss Lambda layer.

             # # 使用定制的 yolo_loss Lambda层

             'yolo_loss': lambda y_true, y_pred: y_pred})

         #解释:模型compile时传递的是自定义的loss,而把loss写成一个层融合到model里面后,

         # y_pred就是loss。自定义损失函数规定要以y_true, y_pred为参数

         batch_size = 32

         print('Train on {} samples, val on {} samples, with batch size {}.'.format(num_train, num_val, batch_size))

         model.fit_generator(data_generator_wrapper(lines[:num_train], batch_size, input_shape, anchors, num_classes),

                 steps_per_epoch=max(1, num_train//batch_size),

                 validation_data=data_generator_wrapper(lines[num_train:], batch_size, input_shape, anchors, num_classes),

                 validation_steps=max(1, num_val//batch_size),

                 epochs=50,

                 initial_epoch=0,

                 callbacks=[logging, checkpoint])

         model.save_weights(log_dir + 'trained_weights_stage_1.h5')

     # Unfreeze and continue training, to fine-tune.

     # Train longer if the result is not good.

     if True:

         for i in range(len(model.layers)):

             model.layers[i].trainable = True

         model.compile(optimizer=Adam(lr=1e-4), loss={'yolo_loss': lambda y_true, y_pred: y_pred}) # recompile to apply the change

         print('Unfreeze all of the layers.')

         batch_size = 32 # note that more GPU memory is required after unfreezing the body

         print('Train on {} samples, val on {} samples, with batch size {}.'.format(num_train, num_val, batch_size))

         model.fit_generator(data_generator_wrapper(lines[:num_train], batch_size, input_shape, anchors, num_classes),

             steps_per_epoch=max(1, num_train//batch_size),

             validation_data=data_generator_wrapper(lines[num_train:], batch_size, input_shape, anchors, num_classes),

             validation_steps=max(1, num_val//batch_size),

             epochs=100,

             initial_epoch=50,

             callbacks=[logging, checkpoint, reduce_lr, early_stopping])

         model.save_weights(log_dir + 'trained_weights_final.h5')

     # Further training if needed.

 def get_classes(classes_path):

     '''loads the classes'''

     with open(classes_path) as f:

         class_names = f.readlines()

     class_names = [c.strip() for c in class_names]

     return class_names

 def get_anchors(anchors_path):

     '''loads the anchors from a file'''

     with open(anchors_path) as f:

         anchors = f.readline()

     anchors = [float(x) for x in anchors.split(',')]

     return np.array(anchors).reshape(-1, 2)

 def create_model(input_shape, anchors, num_classes, load_pretrained=True, freeze_body=2,

             weights_path='model_data/yolo_weights.h5'):

     '''create the training model'''

     K.clear_session() # get a new session

     image_input = Input(shape=(None, None, 3))

     h, w = input_shape

     num_anchors = len(anchors)

     y_true = [Input(shape=(h//{0:32, 1:16, 2:8}[l], w//{0:32, 1:16, 2:8}[l], \

         num_anchors//3, num_classes+5)) for l in range(3)]

     model_body = yolo_body(image_input, num_anchors//3, num_classes)

     print('Create YOLOv3 model with {} anchors and {} classes.'.format(num_anchors, num_classes))

     if load_pretrained:

         model_body.load_weights(weights_path, by_name=True, skip_mismatch=True)

         print('Load weights {}.'.format(weights_path))

         """根据预训练权重的地址weights_path,加载权重文件,设置参数为,按名称对应by_name,

            略过不匹配skip_mismatch;

            选择冻结模式:模式1是冻结185层,模式2是保留最底部3层,其余全部冻结。

            整个模型共有252层;将所冻结的层,设置为不可训练,trainable=False;"""

         if freeze_body in [1, 2]:

             # Freeze darknet53 body or freeze all but 3 output layers.

             num = (185, len(model_body.layers)-3)[freeze_body-1]

             for i in range(num): model_body.layers[i].trainable = False

             print('Freeze the first {} layers of total {} layers.'.format(num, len(model_body.layers)))

     """Lambda是Keras的自定义层,输入为model_body.output和y_true,输出output_shape是(1,),即一个损失值;

        自定义Lambda层的名字name为yolo_loss;

        层的参数是锚框列表anchors、类别数num_classes和IoU阈值ignore_thresh。

        其中,ignore_thresh用于在物体置信度损失中过滤IoU较小的框;

        yolo_loss是损失函数的核心逻辑。"""

     model_loss = Lambda(yolo_loss, output_shape=(1,), name='yolo_loss',

         arguments={'anchors': anchors, 'num_classes': num_classes, 'ignore_thresh': 0.5})(

         [*model_body.output, *y_true])

     """把loss写成一个层,作为最后的输出,搭建模型的时候,就只需要将模型的output定义为loss

     ,而compile的时候,直接将loss设置为y_pred(因为模型的输出就是loss,所以y_pred就是loss),

     无视y_true,训练的时候,y_true随便扔一个符合形状的数组进去就行了"""

     #keras.layer.Lambda将任意表达式封装为 Layer 对象

     #keras.layers.Lambda(function, output_shape=None, mask=None, arguments=None)

     #function: 需要封装的函数。 将输入张量作为第一个参数。

     # output_shape: 预期的函数输出尺寸。可以是元组或者函数。 如果是元组,它只指定第一个维度;

     # arguments: 可选的。传递给函数function的关键字参数。

     model = Model([model_body.input, *y_true], model_loss)

     #构建了以图片数据和图片标签(y_true)为输入,

     # 模型损失(model_loss)为输出(y_pred)的模型 model。

     return model

 def create_tiny_model(input_shape, anchors, num_classes, load_pretrained=True, freeze_body=2,

             weights_path='model_data/tiny_yolo_weights.h5'):

     '''create the training model, for Tiny YOLOv3'''

     K.clear_session() # get a new session

     image_input = Input(shape=(None, None, 3))

     h, w = input_shape

     num_anchors = len(anchors)

     y_true = [Input(shape=(h//{0:32, 1:16}[l], w//{0:32, 1:16}[l], \

         num_anchors//2, num_classes+5)) for l in range(2)]

     model_body = tiny_yolo_body(image_input, num_anchors//2, num_classes)

     print('Create Tiny YOLOv3 model with {} anchors and {} classes.'.format(num_anchors, num_classes))

     if load_pretrained:

         model_body.load_weights(weights_path, by_name=True, skip_mismatch=True)

         print('Load weights {}.'.format(weights_path))

         if freeze_body in [1, 2]:

             # Freeze the darknet body or freeze all but 2 output layers.

             num = (20, len(model_body.layers)-2)[freeze_body-1]

             for i in range(num): model_body.layers[i].trainable = False

             print('Freeze the first {} layers of total {} layers.'.format(num, len(model_body.layers)))

     model_loss = Lambda(yolo_loss, output_shape=(1,), name='yolo_loss',

         arguments={'anchors': anchors, 'num_classes': num_classes, 'ignore_thresh': 0.7})(

         [*model_body.output, *y_true])

     model = Model([model_body.input, *y_true], model_loss)

     return model

 def data_generator(annotation_lines, batch_size, input_shape, anchors, num_classes):

     '''data generator for fit_generator

         annotation_lines:标注数据的行,每行数据包含图片路径,和框的位置信息,种类

         batch_size:每批图片的大小

         input_shape: 图片的输入尺寸

         anchors: 大小

         num_classes: 类别数

         '''

     n = len(annotation_lines)

     i = 0

     while True:

         image_data = []

         box_data = []

         for b in range(batch_size):

             if i==0:

                 np.random.shuffle(annotation_lines)

             image, box = get_random_data(annotation_lines[i], input_shape, random=True)#从标记的样本分离image与box,得到样本图片与样本label

             image_data.append(image)

             box_data.append(box)

             i = (i+1) % n

         image_data = np.array(image_data)

         box_data = np.array(box_data)

         y_true = preprocess_true_boxes(box_data, input_shape, anchors, num_classes)

         yield [image_data, *y_true], np.zeros(batch_size)

 def data_generator_wrapper(annotation_lines, batch_size, input_shape, anchors, num_classes):

     n = len(annotation_lines)

     if n==0 or batch_size<=0: return None

     return data_generator(annotation_lines, batch_size, input_shape, anchors, num_classes)

 if __name__ == '__main__':

     _main()
3.utils.py
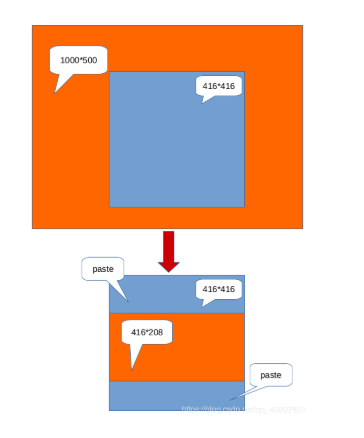
3.1 letter_image_box(),此函数的作用主要是将输入的图片进行等比例缩小,并在空余地方填成灰色
 def letterbox_image(image, size):

     '''resize image with unchanged aspect ratio using padding'''

     iw, ih = image.size#图像初始的大小,任意值   以(1000,500)为例

     w, h = size #模型要求的(416,416)

     scale = min(w/iw, h/ih)#416/1000  0.416<0.832  ,416/500

     nw = int(iw*scale) #416/1000*1000=416

     nh = int(ih*scale)#416/1000*400=208

     image = image.resize((nw,nh), Image.BICUBIC)

     new_image = Image.new('RGB', size, (128,128,128))#new : 这个函数创建一幅给定模式(mode)和尺寸(size)的图片。如果省略 color 参数,则创建的图片被黑色填充满,

                                                      # 如果 color 参数是 None 值,则图片还没初始化

     new_image.paste(image, ((w-nw)//2, (h-nh)//2)) #w-nw=0,(h-nh)//2=(416-208)//2=108

     return new_image
它的作用如下:
3.2 get_random_data()
此函数的功能主要是进行数据增强与输入图像预处理(同letter_image_box)
 def get_random_data(annotation_line, input_shape, random=True, max_boxes=20, jitter=.3, hue=.1, sat=1.5, val=1.5, proc_img=True):

     '''random preprocessing for real-time data augmentation

     annotation_lines:标注数据的行,每行数据包含图片路径,和框的位置信息,种类

     return:imagedata是经过resize并填充的样本图片,resize成(416,416),并填充灰度

            boxdata是每张image中做的标记label,shpe,对应着truebox,批次数16,最大框数20,每个框5个值,4个边界点和1个类别序号,如(16, 20, 5)

            为(,batchsize,maxbox,5),每张图片最多的有maxbox个类,5为左上右下的坐标'''

     line = annotation_line.split()#删除空格

     image = Image.open(line[0])

     iw, ih = image.size

     h, w = input_shape#(416,416)

     box = np.array([np.array(list(map(int,box.split(',')))) for box in line[1:]])

     if not random:

         # resize image

         #将图片等比例转换为416x416的图片,其余用灰色填充,

         # 即(128, 128, 128),同时颜色值转换为0~1之间,即每个颜色值除以255;

         scale = min(w/iw, h/ih)

         nw = int(iw*scale)

         nh = int(ih*scale)

         dx = (w-nw)//2

         dy = (h-nh)//2

         image_data=0

         if proc_img:

             image = image.resize((nw,nh), Image.BICUBIC)

             new_image = Image.new('RGB', (w,h), (128,128,128))

             new_image.paste(image, (dx, dy))

             image_data = np.array(new_image)/255.

             # 上面的作用和letter_box一致,加了一个把rgb范围变成0-1

             # correct boxes   max_boxes=20

         # correct boxes

         # 将边界框box等比例缩小,再加上填充的偏移量dx和dy,因为新的图片部分用灰色填充,影

         # 响box的坐标系,box最多有max_boxes个,即20个

         box_data = np.zeros((max_boxes,5))#shap->(20,5)

         if len(box)>0:

             np.random.shuffle(box)

             if len(box)>max_boxes: box = box[:max_boxes]

             box[:, [0,2]] = box[:, [0,2]]*scale + dx

             box[:, [1,3]] = box[:, [1,3]]*scale + dy

             box_data[:len(box)] = box

         return image_data, box_data

     # resize image

     #通过jitter参数,随机计算new_ar和scale,生成新的nh和nw,

     # 将原始图像随机转换为nw和nh尺寸的图像,即非等比例变换图像。

     #也即是数据增强

     new_ar = w/h * rand(1-jitter,1+jitter)/rand(1-jitter,1+jitter)

     scale = rand(.25, 2)

     if new_ar < 1:

         nh = int(scale*h)

         nw = int(nh*new_ar)

     else:

         nw = int(scale*w)

         nh = int(nw/new_ar)

     image = image.resize((nw,nh), Image.BICUBIC)

     # place image

     dx = int(rand(0, w-nw))

     dy = int(rand(0, h-nh))

     new_image = Image.new('RGB', (w,h), (128,128,128))

     new_image.paste(image, (dx, dy))

     image = new_image

     # flip image or not

     #根据随机数flip,随机左右翻转FLIP_LEFT_RIGHT图片

     flip = rand()<.5

     if flip: image = image.transpose(Image.FLIP_LEFT_RIGHT)

     # distort image

     #在HSV坐标域中,改变图片的颜色范围,hue值相加,sat和vat相乘,

     # 先由RGB转为HSV,再由HSV转为RGB,添加若干错误判断,避免范围过大

     hue = rand(-hue, hue)

     sat = rand(1, sat) if rand()<.5 else 1/rand(1, sat)

     val = rand(1, val) if rand()<.5 else 1/rand(1, val)

     x = rgb_to_hsv(np.array(image)/255.)

     x[..., 0] += hue

     x[..., 0][x[..., 0]>1] -= 1

     x[..., 0][x[..., 0]<0] += 1

     x[..., 1] *= sat

     x[..., 2] *= val

     x[x>1] = 1

     x[x<0] = 0

     image_data = hsv_to_rgb(x) # numpy array, 0 to 1

     # correct boxes

     #将所有的图片变换,增加至检测框中,并且包含若干异常处理,避免变换之后的值过大或过小,去除异常的box

     box_data = np.zeros((max_boxes,5))

     if len(box)>0:

         np.random.shuffle(box)

         box[:, [0,2]] = box[:, [0,2]]*nw/iw + dx

         box[:, [1,3]] = box[:, [1,3]]*nh/ih + dy

         if flip: box[:, [0,2]] = w - box[:, [2,0]]

         box[:, 0:2][box[:, 0:2]<0] = 0

         box[:, 2][box[:, 2]>w] = w

         box[:, 3][box[:, 3]>h] = h

         box_w = box[:, 2] - box[:, 0]

         box_h = box[:, 3] - box[:, 1]

         box = box[np.logical_and(box_w>1, box_h>1)] # discard invalid box

         if len(box)>max_boxes: box = box[:max_boxes]

         box_data[:len(box)] = box

     return image_data, box_data
4.yolo.py()
此函数主要用于检测图片或者视频
     def generate(self):

         """①加载权重参数文件,生成检测框,得分,以及对应类别

           ②利用model.py中的yolo_eval函数生成检测框,得分,所属类别

           ③初始化时调用generate函数生成图片的检测框,得分,所属类别(self.boxes, self.scores, self.classes)"""

         model_path = os.path.expanduser(self.model_path)

         assert model_path.endswith('.h5'), 'Keras model or weights must be a .h5 file.'

         # Load model, or construct model and load weights.

         num_anchors = len(self.anchors)

         num_classes = len(self.class_names)

         is_tiny_version = num_anchors==6 # default setting

         try:

             self.yolo_model = load_model(model_path, compile=False)

         except:

             self.yolo_model = tiny_yolo_body(Input(shape=(None,None,3)), num_anchors//2, num_classes) \

                 if is_tiny_version else yolo_body(Input(shape=(None,None,3)), num_anchors//3, num_classes)

             self.yolo_model.load_weights(self.model_path) # make sure model, anchors and classes match

         else:

             ##[-1]:网络最后一层输出。 output_shape[-1]:输出维度的最后一维。 -> (?,13,13,255)

             # 255 = 9/3*(80+5). 9/3:每层特征图对应3个anchor box  80:80个类别 5:4+1,框的4个值+1个置信度

             assert self.yolo_model.layers[-1].output_shape[-1] == \

                 num_anchors/len(self.yolo_model.output) * (num_classes + 5), \

                 'Mismatch between model and given anchor and class sizes'

             #Python assert(断言)用于判断一个表达式,在表达式条件为 false 的时候触发异常。

             #断言可以在条件不满足程序运行的情况下直接返回错误,而不必等待程序运行后出现崩溃的情况

         print('{} model, anchors, and classes loaded.'.format(model_path))

         # Generate colors for drawing bounding boxes.

         # Generate colors for drawing bounding boxes.

         # 生成绘制边框的颜色。

         # h(色调):x/len(self.class_names)  s(饱和度):1.0  v(明亮):1.0

         # 对于80种coco目标,确定每一种目标框的绘制颜色,即:将(x/80, 1.0, 1.0)的颜色转换为RGB格式,并随机调整颜色以便于肉眼识别,

         # 其中:一个1.0表示饱和度,一个1.0表示亮度

         hsv_tuples = [(x / len(self.class_names), 1., 1.)

                       for x in range(len(self.class_names))]

         self.colors = list(map(lambda x: colorsys.hsv_to_rgb(*x), hsv_tuples)) #hsv转换为rgb

         # hsv取值范围在【0,1】,而RBG取值范围在【0,255】,所以乘上255

         self.colors = list(

             map(lambda x: (int(x[0] * 255), int(x[1] * 255), int(x[2] * 255)),

                 self.colors))

         np.random.seed(10101)  # Fixed seed for consistent colors across runs.

         np.random.shuffle(self.colors)  # Shuffle colors to decorrelate adjacent classes.

         np.random.seed(None)  # Reset seed to default.

         # Generate output tensor targets for filtered bounding boxes.

         #为过滤的边界框生成输出张量目标

         self.input_image_shape = K.placeholder(shape=(2, ))

         if self.gpu_num>=2:

             self.yolo_model = multi_gpu_model(self.yolo_model, gpus=self.gpu_num)

         boxes, scores, classes = yolo_eval(self.yolo_model.output, self.anchors,

                 len(self.class_names), self.input_image_shape,

                 score_threshold=self.score, iou_threshold=self.iou)

         return boxes, scores, classes

     def detect_image(self, image):

         """开始计时->①调用letterbox_image函数,即:先生成一个用“绝对灰”R128-G128-B128填充的416×416新图片,然后用按比例缩放(采样方式:BICUBIC)后的输入图片粘贴,粘贴不到的部分保留为灰色。②model_image_size定义的宽和高必须是32的倍数;若没有定义model_image_size,将输入的尺寸调整为32的倍数,并调用letterbox_image函数进行缩放。③将缩放后的图片数值除以255,做归一化。④将(416,416,3)数组调整为(1,416,416,3)元祖,满足网络输入的张量格式:image_data。

         ->①运行self.sess.run()输入参数:输入图片416×416,学习模式0测试/1训练。

         self.yolo_model.input: image_data,self.input_image_shape: [image.size[1], image.size[0]],

         K.learning_phase(): 0。②self.generate(),读取:model路径、anchor box、coco类别、加载模型yolo.h5.,对于80中coco目标,确定每一种目标框的绘制颜色,即:将(x/80,1.0,1.0)的颜色转换为RGB格式,并随机调整颜色一遍肉眼识别,其中:一个1.0表示饱和度,一个1.0表示亮度。③若GPU>2调用multi_gpu_model()

          ->①yolo_eval(self.yolo_model.output),max_boxes=20,每张图没类最多检测20个框。

          ②将anchor_box分为3组,分别分配给三个尺度,yolo_model输出的feature map

          ③特征图越小,感受野越大,对大目标越敏感,选大的anchor box->

          分别对三个feature map运行out_boxes, out_scores, out_classes,返回boxes、scores、classes。

          """

         start = timer()

         # # 调用letterbox_image()函数,即:先生成一个用“绝对灰”R128-G128-B128“填充的416x416新图片,

         # 然后用按比例缩放(采样方法:BICUBIC)后的输入图片粘贴,粘贴不到的部分保留为灰色

         if self.model_image_size != (None, None):  #判断图片是否存在

             assert self.model_image_size[0]%32 == 0, 'Multiples of 32 required'

             assert self.model_image_size[1]%32 == 0, 'Multiples of 32 required'

             # assert断言语句的语法格式 model_image_size[0][1]指图像的w和h,且必须是32的整数倍

             boxed_image = letterbox_image(image, tuple(reversed(self.model_image_size)))

             # #letterbox_image对图像调整成输入尺寸(w,h)

         else:

             new_image_size = (image.width - (image.width % 32),

                               image.height - (image.height % 32))

             boxed_image = letterbox_image(image, new_image_size)

         image_data = np.array(boxed_image, dtype='float32')

         print(image_data.shape)#(416,416,3)

         image_data /= 255.#将缩放后图片的数值除以255,做归一化

         image_data = np.expand_dims(image_data, 0)  # Add batch dimension.

         # 批量添加一维 -> (1,416,416,3) 为了符合网络的输入格式 -> (bitch, w, h, c)

         out_boxes, out_scores, out_classes = self.sess.run(

             [self.boxes, self.scores, self.classes],

             feed_dict={

                 self.yolo_model.input: image_data,#图像数据

                 self.input_image_shape: [image.size[1], image.size[0]],#图像尺寸416x416

                 K.learning_phase(): 0#学习模式 0:测试模型。 1:训练模式

             })#目的为了求boxes,scores,classes,具体计算方式定义在generate()函数内。在yolo.py第61行

         print('Found {} boxes for {}'.format(len(out_boxes), 'img'))

         # 绘制边框,自动设置边框宽度,绘制边框和类别文字,使用Pillow绘图库(PIL,头有声明)

         # 设置字体

         font = ImageFont.truetype(font='font/FiraMono-Medium.otf',

                     size=np.floor(3e-2 * image.size[1] + 0.5).astype('int32'))

         # 设置目标框线条的宽度

         thickness = (image.size[0] + image.size[1]) // 300#厚度

         ## 对于c个目标类别中的每个目标框i,调用Pillow画图

         for i, c in reversed(list(enumerate(out_classes))):

             predicted_class = self.class_names[c] #类别  #目标类别的名字

             box = out_boxes[i]#框

             score = out_scores[i]#置信度

             label = '{} {:.2f}'.format(predicted_class, score)

             draw = ImageDraw.Draw(image)#创建一个可以在给定图像上绘图的对象

             label_size = draw.textsize(label, font)##标签文字   #返回label的宽和高(多少个pixels)

             #返回给定字符串的大小,以像素为单位。

             top, left, bottom, right = box

             # 目标框的上、左两个坐标小数点后一位四舍五入

             """防止检测框溢出"""

             top = max(0, np.floor(top + 0.5).astype('int32'))

             left = max(0, np.floor(left + 0.5).astype('int32'))

             # 目标框的下、右两个坐标小数点后一位四舍五入,与图片的尺寸相比,取最小值

             # 防止边框溢出

             bottom = min(image.size[1], np.floor(bottom + 0.5).astype('int32'))

             right = min(image.size[0], np.floor(right + 0.5).astype('int32'))

             print(label, (left, top), (right, bottom))

             # 确定标签(label)起始点位置:标签的左、下

             if top - label_size[1] >= 0:

                 text_origin = np.array([left, top - label_size[1]])

             else:

                 text_origin = np.array([left, top + 1])

             # My kingdom for a good redistributable image drawing library.

             # 画目标框,线条宽度为thickness

             for i in range(thickness):#画框

                 draw.rectangle(

                     [left + i, top + i, right - i, bottom - i],

                     outline=self.colors[c])

                 # 画标签框

             draw.rectangle( #文字背景

                 [tuple(text_origin), tuple(text_origin + label_size)],

                 fill=self.colors[c])

             # 填写标签内容

             draw.text(text_origin, label, fill=(0, 0, 0), font=font)#文案

             del draw

         end = timer()

         print(end - start)

         return image

     def close_session(self):

         self.sess.close()
以上即是主要yolo3的主要部分,下面将会对模型进行测试
5.测试
在理解完原理与上述代码之后,下面进行测试(当然也可以不用理解源码也可以直接测试)
(1) 首先需要下载yolo3.weights,下载地址:
https://pjreddie.com/media/files/yolov3.weights(2) 在pycharm的终端中输入python convert.py yolov3.cfg yolov3.weights model_data/yolo_weights.h5作用是将yolo3.weights文件转换成Keras可以处理的.h5权值文件,
(3)随便在网上下载一张图片进行测试,比如笔者用一张飞机的照片
(4)在源码中,不能直接运行yolo.py,因为在此代码中没有if__name__=='__main__':
所以需要自己添加:
 if __name__ == '__main__':

     """测试图片"""

     yolo = YOLO()

     path = r'F:\chorme_download\keras-yolo3-master\微信图片_20200313132254.jpg'

     try:

         image = Image.open(path)

     except:

         print('Open Error! Try again!')

     else:

         r_image = yolo.detect_image(image)

         r_image.show()

     yolo.close_session()

     """测试视频,将detect_video中的path置0即调用自己电脑的摄像头"""

     yolo=YOLO()

     detect_video(yolo,0)
6.结果
本文为原创,制作不易,转载请标明出处,谢谢!!!yolo3各部分代码详解(超详细)的更多相关文章
- poi导出word表格详解 超详细了
转:非常感谢原作者 poi导出word表格详解 2018年07月20日 10:41:33 Z丶royAl 阅读数:36138 一.效果如下 二.js代码 function export_word( ...
- Transform详解(超详细) Attention is all you need论文
一.背景 自从Attention机制在提出 之后,加入Attention的Seq2 Seq模型在各个任务上都有了提升,所以现在的seq2seq模型指的都是结合rnn和attention的模型.传统的基 ...
- JAVA反射概念及使用详解(超详细)
JAVA反射概念及使用详解 一.什么是反射? 反射:框架设计的灵魂 框架:半成品软件.可以在框架的基础上进行软件开发,简化编码 反射:将类的各个组成部分封装为其他对象,这就是反射机制 好处: ...
- http协议详解(超详细)
http1. 基础概念篇 1.1 介绍 HTTP是Hyper Text Transfer Protocol(超文本传输协议)的缩写.它的发展是万维网协会(World Wide Web Consorti ...
- Nginx优化详解-------超详细
一.一般来说nginx 配置文件中对优化比较有作用的为以下几项: 1. worker_processes 8; nginx 进程数,建议按照cpu 数目来指定,一般为它的倍数 (如,2个四核的cp ...
- Linux系统管理图文详解超详细精心整理
前言:带你遨游于linux系统管理知识的海洋,沐浴春日里的阳光,循序渐进,看完之后收获满满. 本次讲解基于linux(centos6.5)虚拟机做的测试,centos7估计以后有时间再更新啊. lin ...
- 【Linux】saltstack的使用详解 超详细
一.salt常用命令 salt 该命令执行salt的执行模块,通常在master端运行,也是我们最常用到的命令 salt [options] '<target>' <function ...
- SSD算法及Caffe代码详解(最详细版本)
SSD(single shot multibox detector)算法及Caffe代码详解 https://blog.csdn.net/u014380165/article/details/7282 ...
- Kaggle网站流量预测任务第一名解决方案:从模型到代码详解时序预测
Kaggle网站流量预测任务第一名解决方案:从模型到代码详解时序预测 2017年12月13日 17:39:11 机器之心V 阅读数:5931 近日,Artur Suilin 等人发布了 Kaggl ...
随机推荐
- 101)PHP,多文件上传
就是在之前的单文件上传的基础上加了一个函数: <?php /** * 上传函数 * @param $tmp_file $_FILES的五个信息,比如upload($_FILES('mingzi' ...
- CMOS
CMOS是Complementary Metal Oxide Semiconductor(互补金属氧化物半导体)的缩写.它是指制造大规模集成电路芯片用的一种技术或用这种技术制造出来的芯片,是电脑主板上 ...
- [Linux] Ubuntu 配置nfs
安装NFS Server: 1. 执行命令 "$ sudo apt-get install nfs-kernel-server",安装nfs server 端 2. 创建需要用来分 ...
- ambulance|severely|halt
N-COUNT 救护车An ambulance is a vehicle for taking people to and from hospital. very seriously 严重地 Thei ...
- es6变量和函数的提升、暂时性死区?
es6变量和函数的提升.暂时性死区?
- HDU-1251-统计难题(Trie树)(BST)(AVL)
字典树解法(Trie树) Accepted 1251 156MS 45400K 949 B C++ #include"iostream" #include"cstdlib ...
- 二评北科团委:“斩首计划”进行时,其用心也毒
近日,在同学们和热心群众的共同努力下,各高校相继悬崖勒马,北大马会.北语新新青年.人大新光等进步社团均顺利注册.而北科团委倒行逆施,可谓一枝独秀,对于齐民学社的同学们的诉求,不仅不予以回应,反而采取表 ...
- [LC] 165. Compare Version Numbers
Compare two version numbers version1 and version2.If version1 > version2 return 1; if version1 &l ...
- java异常分析;剖析printStackTrace和fillInStackTrace
Java异常的栈轨迹(Stack Trace) 捕获到异常时,往往需要进行一些处理.比较简单直接的方式就是打印异常栈轨迹Stack Trace.说起栈轨迹,可能很多人和我一样,第一反应就是printS ...
- C++ 标准IO
标准输入 gets() 1 char * (char *str) gets() 主要是从标准输入流读取字符串并回显,读到换行符时退出,并会将换行符省去. 返回值为获得的字符串的首地址. 123 cha ...