[Converge] Backpropagation Algorithm
Ref: CS231n Winter 2016: Lecture 4: Backpropagation
Ref: How to implement a NN;中文翻译版本
Ref: Jacobian矩阵和Hessian矩阵
关于这部分内容,请详看链接二内容,并请自在本上手动推导。
Chain Rule:

根据Chain Rule进行梯度传递:

 x = 1.37 代入1/x的导数 --> -0.53
 x = 0.37 代入1的导数 乘以 (-0.53) --> -0.53
 x = -1, ex x (-0.53) = e-1 x (-0.53) --> -0.2
 x = 1, 1 * (-1) * (-0.2) --> 0.2
 加号 则可 直接传递下去
 偏导:w0是-1*0.2 = -0.2; x0是2*0.2 = 0.4
以下真是一个演示sigmoid的伟大例子:

归纳出三个tricky:

关于反向传播那些事儿
- Part 1: Linear regression
- Intermezzo 1: Logistic classification function
- Part 2: Logistic regression (classification)
- Part 3: Hidden layer
以上部分,总归是对如下代码的理解:
# Python imports

import numpy as np # Matrix and vector computation package

import matplotlib.pyplot as plt  # Plotting library

from matplotlib.colors import colorConverter, ListedColormap # some plotting functions

from mpl_toolkits.mplot3d import Axes3D  # 3D plots

from matplotlib import cm # Colormaps

# Allow matplotlib to plot inside this notebook

# Set the seed of the numpy random number generator so that the tutorial is reproducable

np.random.seed(seed=1)

# Define and generate the samples

nb_of_samples_per_class = 20  # The number of sample in each class

blue_mean      = [0]  # The mean of the blue class

red_left_mean  = [-2]  # The mean of the red class

red_right_mean = [2]  # The mean of the red class

std_dev        = 0.5  # standard deviation of both classes

# Generate samples from both classes

x_blue      = np.random.randn(nb_of_samples_per_class,   1) * std_dev + blue_mean

x_red_left  = np.random.randn(nb_of_samples_per_class/2, 1) * std_dev + red_left_mean

x_red_right = np.random.randn(nb_of_samples_per_class/2, 1) * std_dev + red_right_mean

# Merge samples in set of input variables x, and corresponding set of

# output variables t

x = np.vstack((x_blue, x_red_left, x_red_right))

t = np.vstack((np.ones((x_blue.shape[0],1)),

               np.zeros((x_red_left.shape[0],1)),

               np.zeros((x_red_right.shape[0], 1))))

# 已备齐数据

###############################################################################

# Plot samples from both classes as lines on a 1D space

plt.figure(figsize=(8,0.5))

plt.xlim(-3,3)

plt.ylim(-1,1)

# Plot samples

plt.plot(x_blue, np.zeros_like(x_blue), 'b|', ms = 30)

plt.plot(x_red_left, np.zeros_like(x_red_left), 'r|', ms = 30)

plt.plot(x_red_right, np.zeros_like(x_red_right), 'r|', ms = 30)

plt.gca().axes.get_yaxis().set_visible(False)

plt.title('Input samples from the blue and red class')

plt.xlabel('$x$', fontsize=15)

plt.show()

###############################################################################

# Define the rbf function

def rbf(z):

    return np.exp(-z**2)

# Plot the rbf function

z = np.linspace(-6,6,100)

plt.plot(z, rbf(z), 'b-')

plt.xlabel('$z$', fontsize=15)

plt.ylabel('$e^{-z^2}$', fontsize=15)

plt.title('RBF function')

plt.grid()

plt.show()

###############################################################################

# Define the logistic function

def logistic(z):

    return 1 / (1 + np.exp(-z))

# Function to compute the hidden activations

def hidden_activations(x, wh):

    return rbf(x * wh)

# Define output layer feedforward

def output_activations(h , wo):

    return logistic(h * wo - 1)

# Define the neural network function

def nn(x, wh, wo):

    return output_activations(hidden_activations(x, wh), wo)

# Define the neural network prediction function that only returns

#  1 or 0 depending on the predicted class

def nn_predict(x, wh, wo):

    return np.around(nn(x, wh, wo))

###############################################################################

# Define the cost function

def cost(y, t):

    return - np.sum(np.multiply(t, np.log(y)) + np.multiply((1-t), np.log(1-y)))

# Define a function to calculate the cost for a given set of parameters

def cost_for_param(x, wh, wo, t):

    return cost(nn(x, wh, wo) , t)

###############################################################################

# Plot the cost in function of the weights

# Define a vector of weights for which we want to plot the cost

nb_of_ws = 200 # compute the cost nb_of_ws times in each dimension

wsh = np.linspace(-10, 10, num=nb_of_ws) # hidden weights

wso = np.linspace(-10, 10, num=nb_of_ws) # output weights

ws_x, ws_y = np.meshgrid(wsh, wso) # generate grid

cost_ws = np.zeros((nb_of_ws, nb_of_ws)) # initialize cost matrix

# Fill the cost matrix for each combination of weights

for i in range(nb_of_ws):

    for j in range(nb_of_ws):

        cost_ws[i,j] = cost(nn(x, ws_x[i,j], ws_y[i,j]) , t)  # 画权值对应的cost等高图,很好的表现方式

# Plot the cost function surface

fig = plt.figure()

ax = Axes3D(fig)

# plot the surface

surf = ax.plot_surface(ws_x, ws_y, cost_ws, linewidth=0, cmap=cm.pink)

ax.view_init(elev=60, azim=-30)

cbar = fig.colorbar(surf)

ax.set_xlabel('$w_h$',  fontsize=15)

ax.set_ylabel('$w_o$',  fontsize=15)

ax.set_zlabel('$\\xi$', fontsize=15)

cbar.ax.set_ylabel('$\\xi$', fontsize=15)

plt.title('Cost function surface')

plt.grid()

plt.show()

###############################################################################

# Define the error function

def gradient_output(y, t):

    return y - t

# Define the gradient function for the weight parameter at the output layer

def gradient_weight_out(h, grad_output):

    return  h * grad_output

# Define the gradient function for the hidden layer

def gradient_hidden(wo, grad_output):

    return wo * grad_output

# Define the gradient function for the weight parameter at the hidden layer

def gradient_weight_hidden(x, zh, h, grad_hidden):

    return x * -2 * zh * h * grad_hidden

# Define the update function to update the network parameters over 1 iteration

def backprop_update(x, t, wh, wo, learning_rate):

    # Compute the output of the network

    # This can be done with y = nn(x, wh, wo), but we need the intermediate

    #  h and zh for the weight updates.

    zh = x * wh

    h = rbf(zh)  # hidden_activations(x, wh)

    y = output_activations(h, wo)

    # 以上是正向计算出output的过程

    # Compute the gradient at the output

    grad_output = gradient_output(y, t)  #计算cost

    # Get the delta for wo

    d_wo = learning_rate * gradient_weight_out(h, grad_output)  # <-- 计算w0的改变量

    # Compute the gradient at the hidden layer

    grad_hidden = gradient_hidden(wo, grad_output)

    # Get the delta for wh

    d_wh = learning_rate * gradient_weight_hidden(x, zh, h, grad_hidden)    # <-- 计算wh的改变量

    # return the update parameters

    return (wh-d_wh.sum(), wo-d_wo.sum())  # 减小cost,返回更新后的权值对

###############################################################################

# Run backpropagation

# Set the initial weight parameter

wh = 2

wo = -5

# Set the learning rate

learning_rate = 0.2

# Start the gradient descent updates and plot the iterations

nb_of_iterations = 50  # number of gradient descent updates

lr_update   = learning_rate / nb_of_iterations # learning rate update rule 设置学习率每次减小的量

w_cost_iter = [(wh, wo, cost_for_param(x, wh, wo, t))]  # List to store the weight values over the iterations

for i in range(nb_of_iterations):

    learning_rate -= lr_update   # decrease the learning rate 学习率在不断的减小

    # Update the weights via backpropagation

    wh, wo = backprop_update(x, t, wh, wo, learning_rate)  # 参数是旧权值,返回了新权值

    w_cost_iter.append((wh, wo, cost_for_param(x, wh, wo, t)))  # Store the values for plotting


# 通过打印w_cost_iter查看迹线  ----> 见【result】

# Print the final cost

print('final cost is {:.2f} for weights wh: {:.2f} and wo: {:.2f}'.format(cost_for_param(x, wh, wo, t), wh, wo))

###############################################################################

# Plot the weight updates on the error surface

# Plot the error surface

fig  = plt.figure()

ax   = Axes3D(fig)

surf = ax.plot_surface(ws_x, ws_y, cost_ws, linewidth=0, cmap=cm.pink)

ax.view_init(elev=60, azim=-30)

cbar = fig.colorbar(surf)

cbar.ax.set_ylabel('$\\xi$', fontsize=15)

# Plot the updates

for i in range(1, len(w_cost_iter)):

    wh1, wo1, c1 = w_cost_iter[i-1]

    wh2, wo2, c2 = w_cost_iter[i]

    # Plot the weight-cost value and the line that represents the update

    ax.plot([wh1], [wo1], [c1], 'w+')  # Plot the weight cost value

    ax.plot([wh1, wh2], [wo1, wo2], [c1, c2], 'w-')

# Plot the last weights

wh1, wo1, c1 = w_cost_iter[len(w_cost_iter)-1]

ax.plot([wh1], [wo1], c1, 'w+')

# Shoz figure

ax.set_xlabel('$w_h$', fontsize=15)

ax.set_ylabel('$w_o$', fontsize=15)

ax.set_zlabel('$\\xi$', fontsize=15)

plt.title('Gradient descent updates on cost surface')

plt.grid()

plt.show()
Result: 学习率不同
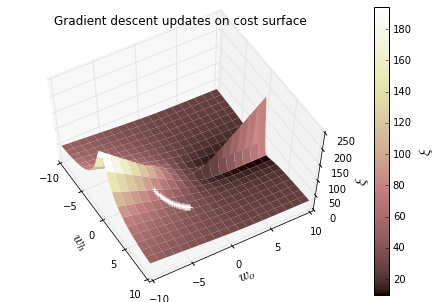

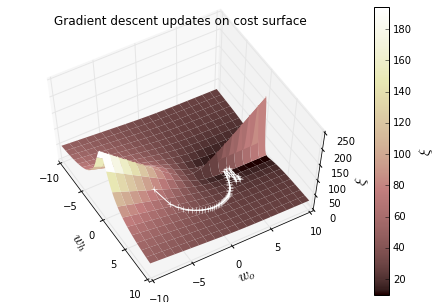
再添加一层隐藏层,如下,推导后可见递推过程:

关于多分类那些事儿
# Python imports

import numpy as np # Matrix and vector computation package

import matplotlib.pyplot as plt  # Plotting library

from matplotlib.colors import colorConverter, ListedColormap # some plotting functions

from mpl_toolkits.mplot3d import Axes3D  # 3D plots

from matplotlib import cm # Colormaps

# Allow matplotlib to plot inside this notebook

###############################################################################

# Define the softmax function

def softmax(z):

    return np.exp(z) / np.sum(np.exp(z))

###############################################################################

# Plot the softmax output for 2 dimensions for both classes

# Plot the output in function of the weights

# Define a vector of weights for which we want to plot the ooutput

nb_of_zs = 200

zs = np.linspace(-10, 10, num=nb_of_zs) # input

zs_1, zs_2 = np.meshgrid(zs, zs) # generate grid
# 200*200的矩阵

y = np.zeros((nb_of_zs, nb_of_zs, 2)) # initialize output

# Fill the output matrix for each combination of input z's

for i in range(nb_of_zs):

    for j in range(nb_of_zs):

        y[i,j,:] = softmax( np.asarray( [zs_1[i,j], zs_2[i,j]] ) )

                   # Grid上的某个像素点的坐标值天然地代表两个值
                   # 将两值通过softmax转换后获得对比结果

###############################################################################

# Plot the cost function surfaces for both classes

fig = plt.figure()

# Plot the cost function surface for t=1

ax = fig.gca(projection='3d')

surf = ax.plot_surface(zs_1, zs_2, y[:,:,0], linewidth=0, cmap=cm.coolwarm)

ax.view_init(elev=30, azim=70)

cbar = fig.colorbar(surf)

ax.set_xlabel('$z_1$', fontsize=15)

ax.set_ylabel('$z_2$', fontsize=15)

ax.set_zlabel('$y_1$', fontsize=15)

ax.set_title ('$P(t=1|\mathbf{z})$')

cbar.ax.set_ylabel('$P(t=1|\mathbf{z})$', fontsize=15)

plt.grid()

plt.show()

###############################################################################
Result:
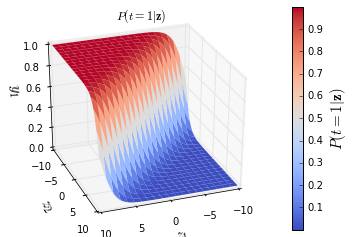
注解:
zs_1

Out[49]:

array([[-10.        ,  -9.89949749,  -9.79899497, ...,   9.79899497,

          9.89949749,  10.        ],

       [-10.        ,  -9.89949749,  -9.79899497, ...,   9.79899497,

          9.89949749,  10.        ],

       [-10.        ,  -9.89949749,  -9.79899497, ...,   9.79899497,

          9.89949749,  10.        ],

       ...,

       [-10.        ,  -9.89949749,  -9.79899497, ...,   9.79899497,

          9.89949749,  10.        ],

       [-10.        ,  -9.89949749,  -9.79899497, ...,   9.79899497,

          9.89949749,  10.        ],

       [-10.        ,  -9.89949749,  -9.79899497, ...,   9.79899497,

          9.89949749,  10.        ]])

zs_2

Out[50]:

array([[-10.        , -10.        , -10.        , ..., -10.        ,

        -10.        , -10.        ],

       [ -9.89949749,  -9.89949749,  -9.89949749, ...,  -9.89949749,

         -9.89949749,  -9.89949749],

       [ -9.79899497,  -9.79899497,  -9.79899497, ...,  -9.79899497,

         -9.79899497,  -9.79899497],

       ...,

       [  9.79899497,   9.79899497,   9.79899497, ...,   9.79899497,

          9.79899497,   9.79899497],

       [  9.89949749,   9.89949749,   9.89949749, ...,   9.89949749,

          9.89949749,   9.89949749],

       [ 10.        ,  10.        ,  10.        , ...,  10.        ,

         10.        ,  10.        ]])
zs_1, zs_2
关于softmax激活函数对于自变量z的求导过程如下:

采用矢量化的表示
一、正向传播

01. node.
我们有N个输入数据,每个数据有两个可能的类别选项,那么我们可以得到矩阵X(输入数据)如下:

其中,xij表示第i个样本的第j个类别选项的概率。
经过softmax函数之后,该模型输出的最终结果T为:

其中,当且仅当第i个样本属于类别j时,tij=1。
因此,我们定义
- 蓝色样本的标记是
T = [0 1], - 红色样本的标记是
T = [1 0]
02. edge.

03. node and edge --> values on hidden layer


04. output layer

之后计算结果如下:

助解:
- 不同行代表不同样本。
- 每一行给出两个概率值。
二、反向传播

如何计算误差
如果需要对N个样本进行C个分类,那么它的损失函数ξ是:【cross-entropy】

损失函数的误差梯度δo可以非常方便得到:

其中,Zo(Zo=H⋅Wo+bo)是一个n*2的矩阵,
[Y:是一个经过模型得到的n*2的输出矩阵] - [T:是一个n*2的目标矩阵]
因此,δo 也是一个n*2的矩阵。
如何更新权重(仅输出层)
对于N个样本,对输出层的梯度δwoj是通过∂ξ/∂woj计算的,具体计算如下:

其中,woj表示Wo的第j行,即是一个1*2的向量。因此,我们可以将上式改写成一个矩阵操作,即:

最后梯度的结果是一个3*2的Jacobian矩阵,如下:

如何更新偏差项(仅输出层)
对于偏差项bo可以采用相同的方式进行更新。对于批处理的N个样本,对输出层的梯度∂ξ/∂bo的计算如下:

最后梯度的结果是一个2*1的Jacobian矩阵,如下:

如何更新权重(Hidden Layer)

如何更新偏差项(Hidden Layer)

三、梯度检查
在编程计算反向传播梯度时,很容易产生错误。这就是为什么一直推荐在你的模型中一定要进行梯度检查。
梯度检查是通过对于每一个参数进行梯度数值计算进行的,即检查这个数值与通过反向传播的梯度进行比较计算。
对于每个参数的数值梯度应该接近于反向传播梯度的参数。
Ref: http://blog.csdn.net/u012526120/article/details/48973497
对于一个函数来说,通常有两种计算梯度的方式:
- 数值梯度(numerical gradient);
- 解析梯度(analytic gradient);
From 231n Lec03

###############################################################################

# Gradient checking

###############################################################################

# Combine all parameter matrices in a list

# Combine all parameter gradients in a list

params      = [Wh, bh, Wo, bo]

grad_params = [JWh, Jbh, JWo, Jbo]

# Set the small change to compute the numerical gradient

eps = 0.0001

# Check each parameter matrix

for p_idx in range(len(params)):

    # Check each parameter in each parameter matrix

    for row in range(params[p_idx].shape[0]):

        for col in range(params[p_idx].shape[1]):

            # 遍历(检查)每一个矩阵的每一个元素

            # Copy the parameter matrix and change the current parameter slightly

            p_matrix_min = params[p_idx].copy()

            p_matrix_min[row,col] -= eps

            p_matrix_plus = params[p_idx].copy()

            p_matrix_plus[row,col] += eps

            # Copy the parameter list, and change the updated parameter matrix

            params_min = params[:]

            params_min[p_idx]  = p_matrix_min

            params_plus = params[:]

            params_plus[p_idx] =  p_matrix_plus

            # Compute the numerical gradient 计算数值梯度

            grad_num = ( cost(nn(X, *params_plus), T) - cost(nn(X, *params_min), T) )/(2*eps)

            # cost(交叉entropy误差); nn(计算正向传播输出)

            # Raise error if the numerical grade is not close to the backprop gradient

            if not np.isclose(grad_num, grad_params[p_idx][row,col]):

                raise ValueError('Numerical gradient of {:.6f} is not close to the backpropagation gradient of {:.6f}!'.format(float(grad_num), float(grad_params[p_idx][row,col])))

print('No gradient errors found')
计算数值梯度

grad_num, grad_params[p_idx][row,col]对比如下,可见十分接近。
0.0469372659495

0.0469372661302

0.808593180182

0.808593180814

-0.0596231433292

-0.0596231429511

-0.091797324302

-0.0917973244116

-0.348418390672

-0.348418391494

0.523644930297

0.523644931161

1.57820501329

1.57820501394

-8.92123130654

-8.92123130677

15.5379406418

15.5379406533

-19.8494527815

-19.8494527829

19.8494527815

19.8494527829

-23.0447452795

-23.0447452822

23.0447452795

23.0447452822

-23.6601089617

-23.6601089633

23.6601089617

23.6601089633

-43.2009781318

-43.2009781406

43.2009781319

43.2009781406
四、动量方法
定义速度:(初始化)
Wh

array([[-9.02740895,  0.98074176, -8.04226996],

       [-4.07352687,  9.53464723,  5.84734039]])

bh

array([[-4.63991557, -5.38003474,  4.98589781]])

Wo

array([[ 8.05340601, -7.95188719],

       [ 8.18246481, -8.23254238],

       [-8.08833273,  8.01526731]])

bo

array([[ 3.41333769, -3.31267928]])

#############################################################################

Vs = [np.zeros_like(M) for M in [Wh, bh, Wo, bo]]


Vs

[array([[ 0.,  0.,  0.], [ 0.,  0.,  0.]]),
 array([[ 0.,  0.,  0.]]),
 array([[ 0.,  0.], [ 0.,  0.], [ 0.,  0.]]),
 array([[ 0.,  0.]])]
# Start the gradient descent updates and plot the iterations

nb_of_iterations = 300  # number of gradient descent updates

ls_costs = [cost(nn(X, Wh, bh, Wo, bo), T)]  # list of cost over the iterations

for i in range(nb_of_iterations):
    # Update the velocities and the parameters
    Vs = update_velocity(X, T, [Wh, bh, Wo, bo], Vs, momentum_term, learning_rate)  # 先得到 new v

    Wh, bh, Wo, bo = update_params([Wh, bh, Wo, bo], Vs)                            # 加入new v,求new param

    ls_costs.append(cost(nn(X, Wh, bh, Wo, bo), T))
核心函数分析:
# Define the update function to update the network parameters over 1 iteration
# 一次迭代后获得的各层梯度,也就是Jacabian matrix

def backprop_gradients(X, T, Wh, bh, Wo, bo):

    # Compute the output of the network

    # Compute the activations of the layers

    H = hidden_activations(X, Wh, bh)

    Y = output_activations(H, Wo, bo)

    # Compute the gradients of the output layer

    Eo  = error_output(Y, T)

    JWo = gradient_weight_out(H, Eo)

    Jbo = gradient_bias_out(Eo)

    # Compute the gradients of the hidden layer

    Eh  = error_hidden(H, Wo, Eo)

    JWh = gradient_weight_hidden(X, Eh)

    Jbh = gradient_bias_hidden(Eh)

    return [JWh, Jbh, JWo, Jbo]  # Jeff:每层俩参数,两层就是四个

def update_velocity(X, T, ls_of_params, Vs, momentum_term, learning_rate):

    # ls_of_params = [Wh, bh, Wo, bo]

    # Js = [JWh, Jbh, JWo, Jbo]

    Js = backprop_gradients(X, T, *ls_of_params)
return [momentum_term * V - learning_rate * J for V,J in zip(Vs, Js)]

def update_params(ls_of_params, Vs):

    # ls_of_params = [Wh, bh, Wo, bo]

    # Vs = [VWh, Vbh, VWo, Vbo]
return [P + V for P,V in zip(ls_of_params, Vs)]
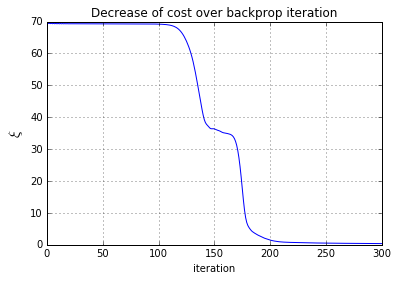
加了惯性后的梯度下降迹线图:(是有点不同的感觉)
五、参数的可视化
可视化训练分类结果
# Plot the resulting decision boundary

# Generate a grid over the input space to plot the color of the

#  classification at that grid point

nb_of_xs = 200

xs1 = np.linspace(-2, 2, num=nb_of_xs)

xs2 = np.linspace(-2, 2, num=nb_of_xs)

xx, yy = np.meshgrid(xs1, xs2) # create the grid

# Initialize and fill the classification plane

classification_plane = np.zeros((nb_of_xs, nb_of_xs))

for i in range(nb_of_xs):

    for j in range(nb_of_xs):

        pred = nn_predict(np.asmatrix([xx[i,j], yy[i,j]]), Wh, bh, Wo, bo)

        classification_plane[i,j] = pred[0,0]  #这里只需要判断一个elem就好了


# classification_plane构成的密集网格点,计算每个点的分类结果

# Create a color map to show the classification colors of each grid point

cmap = ListedColormap([

        colorConverter.to_rgba('b', alpha=0.30),

        colorConverter.to_rgba('r', alpha=0.30)])

# Plot the classification plane with decision boundary and input samples

plt.contourf(xx, yy, classification_plane, cmap=cmap)
# 对二值图找轮廓 <---

# Plot both classes on the x1, x2 plane

plt.plot(x_red[:,0], x_red[:,1], 'ro', label='class red')

plt.plot(x_blue[:,0], x_blue[:,1], 'bo', label='class blue')

plt.grid()

plt.legend(loc=1)

plt.xlabel('$x_1$', fontsize=15)

plt.ylabel('$x_2$', fontsize=15)

plt.axis([-1.5, 1.5, -1.5, 1.5])

plt.title('red vs blue classification boundary')

plt.show()
NB: nn_predict时,需要改变为 keepdims=False,如下:
# Define the softmax function

def softmax(z):

    return np.exp(z) / np.sum(np.exp(z), axis=1, keepdims=True))
pred = nn_predict(np.asmatrix([xx[1,1], yy[1,1]]), Wh, bh, Wo, bo)

pred

Out[162]: matrix([[ 1.,  0.]])

pred[0,0]  # 这里只需看一个就好,另一个肯定是相反的

Out[163]: 1.0
输入域的转换(隐藏层的升维效果)
# Plot the projection of the input onto the hidden layer

# Define the projections of the blue and red classes

H_blue = hidden_activations(x_blue, Wh, bh)

H_red  = hidden_activations(x_red, Wh, bh)
#

# Plot the error surface

fig = plt.figure()

ax  = Axes3D(fig)

ax.plot(np.ravel(H_blue[:,0]), np.ravel(H_blue[:,1]), np.ravel(H_blue[:,2]), 'bo')

ax.plot(np.ravel(H_red[:,0]),  np.ravel(H_red[:,1]),  np.ravel(H_red[:,2]),  'ro')

ax.set_xlabel('$h_1$', fontsize=15)

ax.set_ylabel('$h_2$', fontsize=15)

ax.set_zlabel('$h_3$', fontsize=15)

ax.view_init(elev=10, azim=-40)

plt.title('Projection of the input X onto the hidden layer H')

plt.grid()

plt.show()
思考,这样的数据表现对理解有什么帮助?
-- 升维后,貌似成为了超平面可分!

参见:http://cs.stanford.edu/people/karpathy/convnetjs/demo/classify2d.html
思考题
"不管层数增加几层,只要不升维,就是不能分类,为什么?“
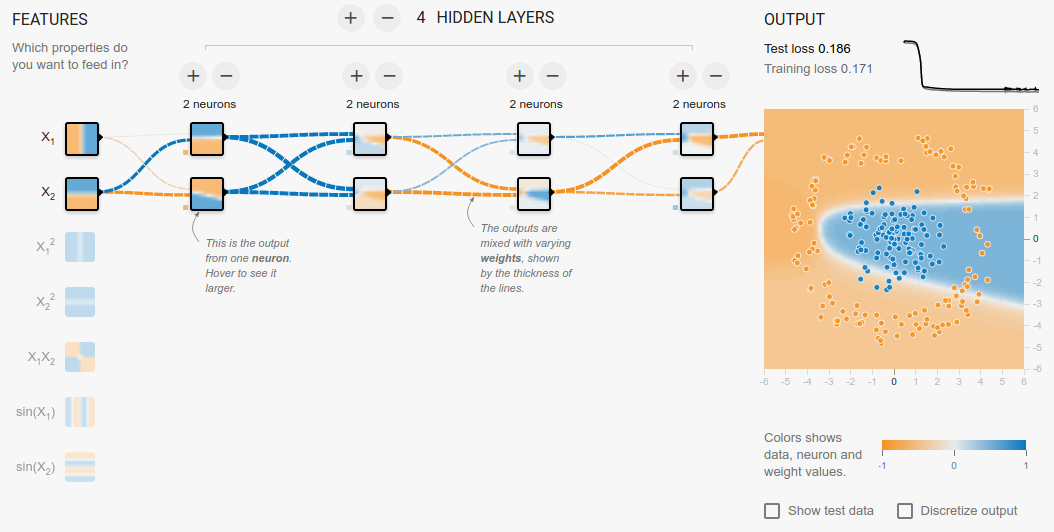
更多层的网络
My node:
- 第一,在一个大型的训练数据集上面,我们可以节省时间和内存,因为这个算法减少了很多的矩阵操作。
- 第二,增加了训练样本的多样性。
后记:
本文只是一个非常非常简要的阅读笔记。Peter Roelants的这系列博文需要认认真真在本子上推导,并总结相关细节操作。
这些操作在tensorflow上可能只是某个参数的设置,但原理的深刻理解决定了在该领域的发展上限。
[Converge] Backpropagation Algorithm的更多相关文章
- CheeseZH: Stanford University: Machine Learning Ex4:Training Neural Network(Backpropagation Algorithm)
1. Feedforward and cost function; 2.Regularized cost function: 3.Sigmoid gradient The gradient for t ...
- The Backpropagation Algorithm
https://page.mi.fu-berlin.de/rojas/neural/chapter/K7.pdf 7.1 Learning as gradient descent We saw in ...
- BP反向传播算法的工作原理How the backpropagation algorithm works
In the last chapter we saw how neural networks can learn their weights and biases using the gradient ...
- 反向传播算法 Backpropagation Algorithm
假设我们有一个固定样本集,它包含 个样例.我们可以用批量梯度下降法来求解神经网络.具体来讲,对于单个样例(x,y),其代价函数为:这是一个(二分之一的)方差代价函数.给定一个包含 个样例的数据集,我们 ...
- 神经网络(9)--如何求参数: backpropagation algorithm(反向传播算法)
Backpropagation algorithm(反向传播算法) Θij(l) is a real number. Forward propagation 上图是给出一个training examp ...
- Feedforward and BackPropagation Algorithm
在下图所示的Neural Network中,我们将拥有三个节点的layer1及layer4分别称为输入和输出层,而中间的两层layer2,layer3称为隐藏层(hidden layer).输入数据X ...
- 一文弄懂神经网络中的反向传播法(Backpropagation algorithm)
最近在看深度学习的东西,一开始看的吴恩达的UFLDL教程,有中文版就直接看了,后来发现有些地方总是不是很明确,又去看英文版,然后又找了些资料看,才发现,中文版的译者在翻译的时候会对省略的公式推导过程进 ...
- (六) 6.2 Neurons Networks Backpropagation Algorithm
今天得主题是BP算法.大规模的神经网络可以使用batch gradient descent算法求解,也可以使用 stochastic gradient descent 算法,求解的关键问题在于求得每层 ...
- 吴恩达机器学习笔记30-神经网络的反向传播算法(Backpropagation Algorithm)
之前我们在计算神经网络预测结果的时候我们采用了一种正向传播方法,我们从第一层开始正向一层一层进行计算,直到最后一层的ℎ
随机推荐
- 【转】使用lockbits方法处理图像
许多图像处理任务即时是最简单的文件类型转换,例如从32位深度到8位深度的格式转化,直接获得像素阵列要比使用GetPixel和SetPixel等方法的效率高得多. 你可能会发现DotNet采用托管机制, ...
- 【进阶修炼】——改善C#程序质量(4)
46, 显示释放资源,需要实现IDisposable接口. 最好按照微软建议的Dispose模式实现.实现了IDisposable接口后,在Using代码块中,垃圾会得到自动清理. 47, 即使提供了 ...
- 实验四 使用ASP.NET内置对象 总结
这次实验内容是ASP.NET的一些内置对象的熟悉,感觉看到了上学期JSP的影子,很多地方都很像.像Response对象,Request对象,Context对象等等.以前我老是搞混Response对象和 ...
- Loss is its own Reward: Self-Supervision for Reinforcement Learning
作者用action, reward, state等当做lalbel,进行有监督训练.
- pandas 的算术运算和数据对齐
pandas 还有一个重要的功能,就是他可以对不同索引的对象进行算数运算.对象相加, 如果存在不同的索引对,则结果的索引就是该索引对的并集. 先来个例子 Series In [33]: s1 = Se ...
- c++ 的类 和 类继承, 什么是c++中的基类和派生类?
闲云潭影日悠悠,物换星移几度秋 你既然已经做出了选择, 又何必去问为什么选择.鬼谷绝学的要义, 从来都不是回答, 而是抉与择 普通类 #ifndef TABTENN0_H_ #define TABTE ...
- 【转】【Python】Python网络编程
Socket简介 在网络上的两个程序通过一个双向的通信连接实现数据的交换,这个链接的一端称为一个Socket(套接字),用于描述IP地址和端口. 建立网络通信连接至少要一对端口号(Socket),So ...
- (笔记)Linux中的终端、控制台、tty、pty
1>tty(终端设备的统称): tty一词源于teletypes,或者teletypewriters,原来指的是电传打字机,是通过串行线用打印机键盘阅读和发送信息的东西,后来这东西被键盘与显示器 ...
- 高通 双MIC 设置
android O中设置双MIC降噪,需要在build.prop添加属性"ro.vendor.audio.sdk.fluencetype"属性. 属性值位于hardware/qco ...
- Prolog学习:数独和八皇后问题
上一篇简单介绍了下Prolog的一些基本概念,今天我们来利用这些基本概念解决两个问题:数独和八皇后问题. 数独 数独是一个很经典的游戏: 玩家需要根据n×n盘面上的已知数字,推理出所有剩余空格的数字, ...


