Redis 缓存 + Spring 的集成示例(转载)
1. 依赖包安装
pom.xml 加入:
<groupId>org.springframework.data</groupId>
<artifactId>spring-data-redis</artifactId>
<version>1.6.0.RELEASE</version>
</dependency>
<dependency>
<groupId>redis.clients</groupId>
<artifactId>jedis</artifactId>
<version>2.7.3</version>
</dependency>
xxxxxxxxxx
<dependency>
<groupId>org.springframework.data</groupId>
<artifactId>spring-data-redis</artifactId>
<version>1.6.0.RELEASE</version>
</dependency>
<dependency>
<groupId>redis.clients</groupId>
<artifactId>jedis</artifactId>
<version>2.7.3</version>
</dependency>
2. Spring 项目集成进缓存支持
要启用缓存支持,我们需要创建一个新的 CacheManager bean。CacheManager 接口有很多实现,本文演示的是和 Redis 的集成,自然就是用 RedisCacheManager 了。Redis 不是应用的共享内存,它只是一个内存服务器,就像 MySql 似的,我们需要将应用连接到它并使用某种“语言”进行交互,因此我们还需要一个连接工厂以及一个 Spring 和 Redis 对话要用的 RedisTemplate,这些都是 Redis 缓存所必需的配置,把它们都放在自定义的 CachingConfigurerSupport 中:
import org.springframework.cache.CacheManager;
import org.springframework.cache.annotation.CachingConfigurerSupport;
import org.springframework.cache.annotation.EnableCaching;
import org.springframework.context.annotation.Bean;
import org.springframework.context.annotation.Configuration;
import org.springframework.data.redis.cache.RedisCacheManager;
import org.springframework.data.redis.connection.RedisConnectionFactory;
import org.springframework.data.redis.connection.jedis.JedisConnectionFactory;
import org.springframework.data.redis.core.RedisTemplate;
@Configuration
@EnableCaching
public class RedisCacheConfig extends CachingConfigurerSupport {
@Bean
public JedisConnectionFactory redisConnectionFactory() {
JedisConnectionFactory redisConnectionFactory = new JedisConnectionFactory();
redisConnectionFactory.setHostName("192.168.1.166");
redisConnectionFactory.setPort(6379);
return redisConnectionFactory;
}
@Bean
public RedisTemplate<String, String> redisTemplate(RedisConnectionFactory cf) {
RedisTemplate<String, String> redisTemplate = new RedisTemplate<String, String>();
redisTemplate.setConnectionFactory(cf);
return redisTemplate;
}
@Bean
public CacheManager cacheManager(RedisTemplate redisTemplate) {
RedisCacheManager cacheManager = new RedisCacheManager(redisTemplate);
cacheManager.setDefaultExpiration(3000);
return cacheManager;
}
}
xxxxxxxxxx
package com.defonds.bdp.cache.redis;
import org.springframework.cache.CacheManager;
import org.springframework.cache.annotation.CachingConfigurerSupport;
import org.springframework.cache.annotation.EnableCaching;
import org.springframework.context.annotation.Bean;
import org.springframework.context.annotation.Configuration;
import org.springframework.data.redis.cache.RedisCacheManager;
import org.springframework.data.redis.connection.RedisConnectionFactory;
import org.springframework.data.redis.connection.jedis.JedisConnectionFactory;
import org.springframework.data.redis.core.RedisTemplate;
@Configuration
@EnableCaching
public class RedisCacheConfig extends CachingConfigurerSupport {
@Bean
public JedisConnectionFactory redisConnectionFactory() {
JedisConnectionFactory redisConnectionFactory = new JedisConnectionFactory();
redisConnectionFactory.setHostName("192.168.1.166");
redisConnectionFactory.setPort(6379);
return redisConnectionFactory;
}
@Bean
public RedisTemplate<String, String> redisTemplate(RedisConnectionFactory cf) {
RedisTemplate<String, String> redisTemplate = new RedisTemplate<String, String>();
redisTemplate.setConnectionFactory(cf);
return redisTemplate;
}
@Bean
public CacheManager cacheManager(RedisTemplate redisTemplate) {
RedisCacheManager cacheManager = new RedisCacheManager(redisTemplate);
cacheManager.setDefaultExpiration(3000);
return cacheManager;
}
}
当然也别忘了把这些 bean 注入 Spring,不然配置无效。在 applicationContext.xml 中加入以下
xxxxxxxxxx
<context:component-scan base-package="com.defonds.bdp.cache.redis" />
3. 缓存某些方法的执行结果并缓存数据一致性保证
设置好缓存配置之后我们就可以使用 @Cacheable 注解来缓存方法执行的结果了,比如根据省份名检索城市的 provinceCities 方法和根据 city_code 检索城市的 searchCity 方法:
@Cacheable("provinceCities")
public List<City> provinceCities(String province) {
logger.debug("province=" + province);
return this.cityMapper.provinceCities(province);
}
// R
@Cacheable("searchCity")
public City searchCity(String city_code){
logger.debug("city_code=" + city_code);
return this.cityMapper.searchCity(city_code);
}
@CacheEvict(value = { "provinceCities"}, allEntries = true)
public void insertCity(String city_code, String city_jb,
String province_code, String city_name,
String city, String province) {
City cityBean = new City();
cityBean.setCityCode(city_code);
cityBean.setCityJb(city_jb);
cityBean.setProvinceCode(province_code);
cityBean.setCityName(city_name);
cityBean.setCity(city);
cityBean.setProvince(province);
this.cityMapper.insertCity(cityBean);
}
// U
@CacheEvict(value = { "provinceCities", "searchCity" }, allEntries = true)
public int renameCity(String city_code, String city_name) {
City city = new City();
city.setCityCode(city_code);
city.setCityName(city_name);
this.cityMapper.renameCity(city);
return 1;
}
// D
@CacheEvict(value = { "provinceCities", "searchCity" }, allEntries = true)
public int deleteCity(String city_code) {
this.cityMapper.deleteCity(city_code);
return 1;
}
xxxxxxxxxx
// R
@Cacheable("provinceCities")
public List<City> provinceCities(String province) {
logger.debug("province=" + province);
return this.cityMapper.provinceCities(province);
}
// R
@Cacheable("searchCity")
public City searchCity(String city_code){
logger.debug("city_code=" + city_code);
return this.cityMapper.searchCity(city_code);
}
@CacheEvict(value = { "provinceCities"}, allEntries = true)
public void insertCity(String city_code, String city_jb,
String province_code, String city_name,
String city, String province) {
City cityBean = new City();
cityBean.setCityCode(city_code);
cityBean.setCityJb(city_jb);
cityBean.setProvinceCode(province_code);
cityBean.setCityName(city_name);
cityBean.setCity(city);
cityBean.setProvince(province);
this.cityMapper.insertCity(cityBean);
}
// U
@CacheEvict(value = { "provinceCities", "searchCity" }, allEntries = true)
public int renameCity(String city_code, String city_name) {
City city = new City();
city.setCityCode(city_code);
city.setCityName(city_name);
this.cityMapper.renameCity(city);
return 1;
}
// D
@CacheEvict(value = { "provinceCities", "searchCity" }, allEntries = true)
public int deleteCity(String city_code) {
this.cityMapper.deleteCity(city_code);
return 1;
}
5. 自定义缓存数据 key 生成策略
对于使用 @Cacheable 注解的方法,每个缓存的 key 生成策略默认使用的是参数名+参数值,比如以下方法:
public User findByUsername(String username)
xxxxxxxxxx
@Cacheable("users")
public User findByUsername(String username)
这个方法的缓存将保存于 key 为 users~keys 的缓存下,对于 username 取值为 "赵德芳" 的缓存,key 为 "username-赵德芳"。一般情况下没啥问题,二般情况如方法 key 取值相等然后参数名也一样的时候就出问题了,如:
public Integer getLoginCountByUsername(String username)
xxxxxxxxxx
@Cacheable("users")
public Integer getLoginCountByUsername(String username)
这个方法的缓存也将保存于 key 为 users~keys 的缓存下。对于 username 取值为 "赵德芳" 的缓存,key 也为 "username-赵德芳",将另外一个方法的缓存覆盖掉。
解决办法是使用自定义缓存策略,对于同一业务(同一业务逻辑处理的方法,哪怕是集群/分布式系统),生成的 key 始终一致,对于不同业务则不一致:
public KeyGenerator customKeyGenerator() {
return new KeyGenerator() {
@Override
public Object generate(Object o, Method method, Object... objects) {
StringBuilder sb = new StringBuilder();
sb.append(o.getClass().getName());
sb.append(method.getName());
for (Object obj : objects) {
sb.append(obj.toString());
}
return sb.toString();
}
};
}
xxxxxxxxxx
@Bean
public KeyGenerator customKeyGenerator() {
return new KeyGenerator() {
@Override
public Object generate(Object o, Method method, Object... objects) {
StringBuilder sb = new StringBuilder();
sb.append(o.getClass().getName());
sb.append(method.getName());
for (Object obj : objects) {
sb.append(obj.toString());
}
return sb.toString();
}
};
}
这对于集群系统、分布式系统之间共享缓存很重要,真正实现了分布式缓存。
笔者建议:缓存方法的 @Cacheable 最好使用方法名,避免不同的方法的 @Cacheable 值一致,然后再配以以上缓存策略。
6. 缓存的验证
6.1 缓存的验证
为了确定每个缓存方法到底有没有走缓存,我们打开了 MyBatis 的 SQL 日志输出,并且为了演示清楚,我们还清空了测试用 Redis 数据库。
先来验证 provinceCities 方法缓存,Eclipse 启动 tomcat 加载项目完毕,使用 JMeter 调用 /bdp/city/province/cities.json 接口: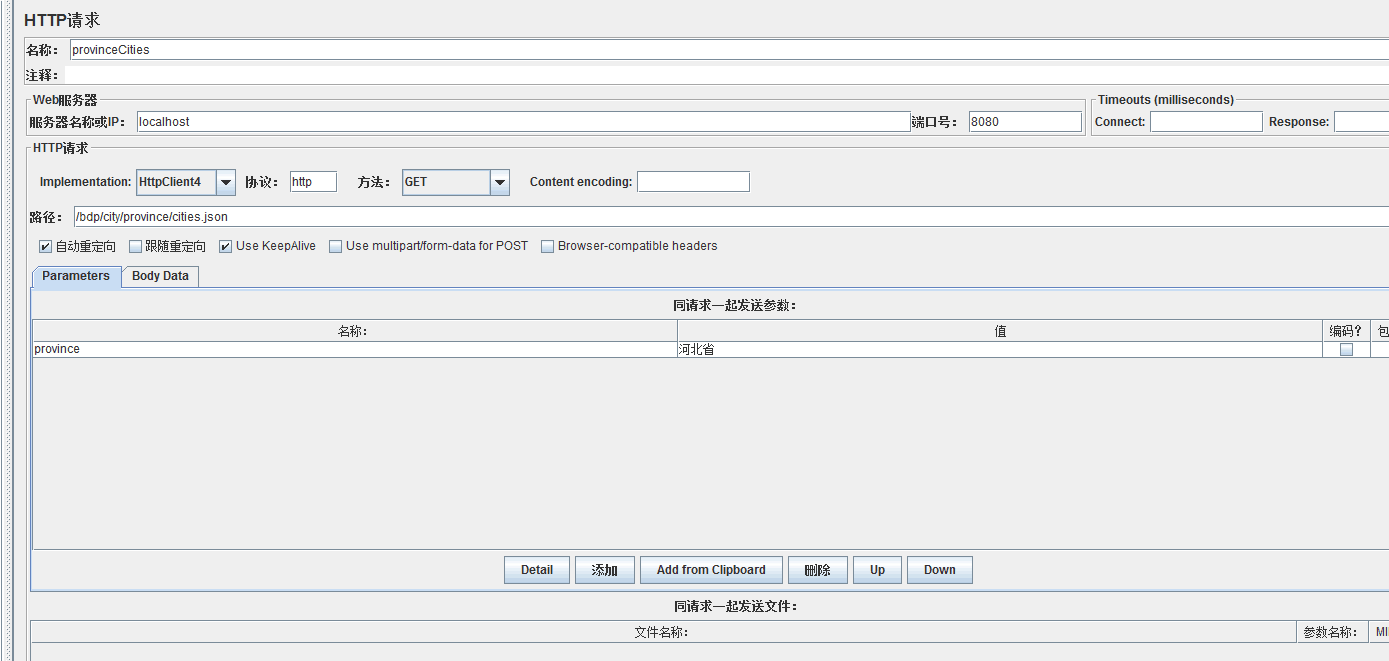
Eclipse 控制台输出如下:
说明这一次请求没有命中缓存,走的是 db 查询。JMeter 再次请求,Eclipse 控制台输出:
标红部分以下是这一次请求的 log,没有访问 db 的 log,缓存命中。查看本次请求的 Redis 存储情况:
同样可以验证 city_code 为 1492 的 searchCity 方法的缓存是否有效:
图中标红部分是 searchCity 的缓存存储情况。
6.2 缓存一致性的验证
先来验证 insertCity 方法的缓存配置,JMeter 调用 /bdp/city/create.json 接口: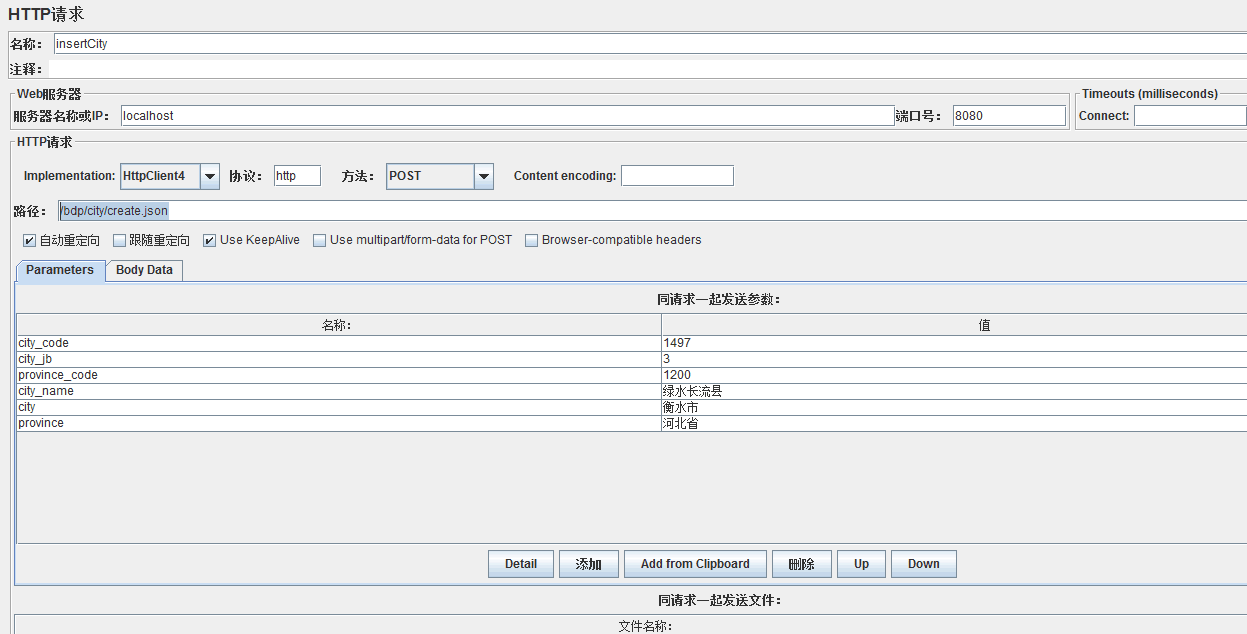
之后看 Redis 存储:
可以看出 provinceCities 方法的缓存已被清理掉,insertCity 方法的缓存奏效。
然后验证 renameCity 方法的缓存配置,JMeter 调用 /bdp/city/rename.json 接口: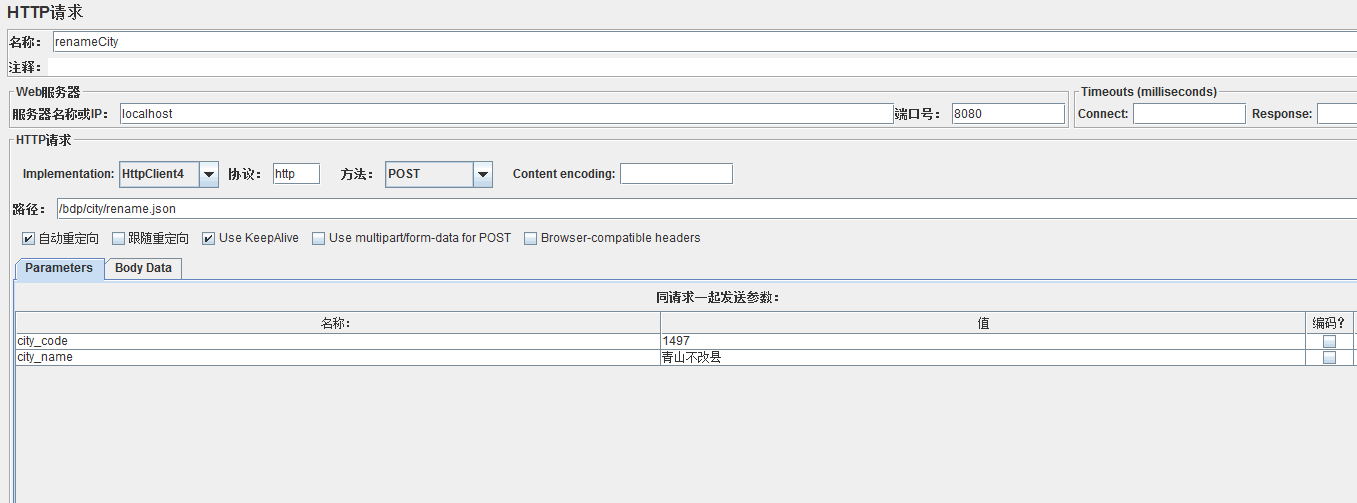
之后再看 Redis 存储:
searchCity 方法的缓存也已被清理,renameCity 方法的缓存也奏效。
7. 注意事项
- 要缓存的 Java 对象必须实现 Serializable 接口,因为 Spring 会将对象先序列化再存入 Redis,比如本文中的 com.defonds.bdp.city.bean.City 类,如果不实现 Serializable 的话将会遇到类似这种错误:nested exception is java.lang.IllegalArgumentException: DefaultSerializer requires a Serializable payload but received an object of type [com.defonds.bdp.city.bean.City]]。
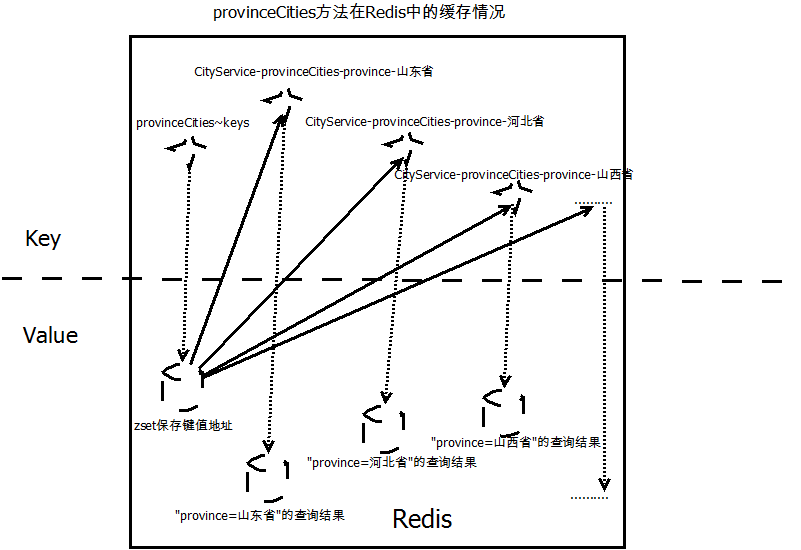
- 缓存的生命周期我们可以配置,然后托管 Spring CacheManager,不要试图通过 redis-cli 命令行去管理缓存。比如 provinceCities 方法的缓存,某个省份的查询结果会被以 key-value 的形式存放在 Redis,key 就是我们刚才自定义生成的 key,value 是序列化后的对象,这个 key 会被放在 key 名为 provinceCities~keys key-value 存储中,参考下图"provinceCities 方法在 Redis 中的缓存情况"。可以通过 redis-cli 使用 del 命令将 provinceCities~keys 删除,但每个省份的缓存却不会被清除。
- CacheManager 必须设置缓存过期时间,否则缓存对象将永不过期,这样做的原因如上,避免一些野数据“永久保存”。此外,设置缓存过期时间也有助于资源利用最大化,因为缓存里保留的永远是热点数据。
- 缓存适用于读多写少的场合,查询时缓存命中率很低、写操作很频繁等场景不适宜用缓存。
Redis 缓存 + Spring 的集成示例(转载)的更多相关文章
- Redis 缓存 + Spring 的集成示例(转)
<整合 spring 4(包括mvc.context.orm) + mybatis 3 示例>一文简要介绍了最新版本的 Spring MVC.IOC.MyBatis ORM 三者的整合以及 ...
- spring Cache /Redis 缓存 + Spring 的集成示例
spring Cache https://www.ibm.com/developerworks/cn/opensource/os-cn-spring-cache/ spring+redis 缓存 ht ...
- Redis 缓存 + Spring 的集成示例
参考网址:http://blog.csdn.net/defonds/article/details/48716161
- 【spring boot】【redis】spring boot 集成redis的发布订阅机制
一.简单介绍 1.redis的发布订阅功能,很简单. 消息发布者和消息订阅者互相不认得,也不关心对方有谁. 消息发布者,将消息发送给频道(channel). 然后是由 频道(channel)将消息发送 ...
- Redis缓存与springboot集成
注意点:
- redis 缓存
本篇博客只介绍 redis 作为缓存的的一些使用,以及在项目中如何把redis和spring如何集成. 1:redis的maven依赖,redis 依赖 spring-redis 依赖: < ...
- redis之spring应用
前言 读本文之前,需要大家对redis有所了解,大家可以去看一下我之前分享的redis安装及简单使用这一随笔,而本文我将跟大家分享学习一下redis与spring的集成.当然,首先需要打开我们的red ...
- redis缓存的安装和使用(转)
redis缓存的安装和使用 转载自:http://www.open-open.com/lib/view/open1384091914836.html Redis介绍 Redis本质上一个Key/ ...
- 如约而至,Java 10 正式发布! Spring+SpringMVC+MyBatis+easyUI整合进阶篇(十四)Redis缓存正确的使用姿势 努力的孩子运气不会太差,跌宕的人生定当更加精彩 优先队列详解(转载)
如约而至,Java 10 正式发布! 3 月 20 日,Oracle 宣布 Java 10 正式发布. 官方已提供下载:http://www.oracle.com/technetwork/java ...
随机推荐
- django中使用POST方法 获取POST数据
在django中获取post数据,首先要规定post发送的数据类型是什么. 1.获取POST中表单键值数据 如果要在django的POST方法中获取表单数据,则在客户端使用JavaScript发送PO ...
- H3C AP实现定时重启
#job radio_diable view system time 1 repeating at 03:00 command wlan radio disable all time 2 rep ...
- Lintcode: Minimum Subarray 解题报告
Minimum Subarray 原题链接: http://lintcode.com/zh-cn/problem/minimum-subarray/# Given an array of intege ...
- PD003-NET通用后台系统
PD003-NET通用后台系统 开发语言.Net 成品成品 前端技术jquery 数据库sql server .net 通用后台框架 详细信息 基于EF+MVC+Bootstrap构建通用后台管理 ...
- ios 让textView被键盘挡住上移
注册键盘通知 #pragma mark - 键盘通知 - (void)addNoticeForKeyboard { //注册键盘出现的通知 [[NSNotificationCenter default ...
- 纯CSS3悬停图标旋转导航动画代码
分享一款纯CSS3悬停图标旋转导航动画代码.这是一款鼠标移到图标上动画旋转显示导航菜单.效果图如下: 在线预览 源码下载 实现的代码. html代码: <div id="x_con ...
- CAD技巧之001——如何将单个字合并起来
CAD技巧之001——如何将单个字合并起来 很多同志如果遇到奇葩的单个文字合并,怎么办,重新书写?复制粘贴?如果工作量很大,怎么办呢. 今天九天就教您一个好方法! 废话不多说,上动画片
- executor.Executor: Managed memory leak detected; size = 37247642 bytes, TID = 5
https://stackoverflow.com/questions/34359211/debugging-managed-memory-leak-detected-in-spark-1-6-0 h ...
- <第一次买基金就赚钱>读书笔记
基金,是指专门用于某种特定目的的并进行独立核算的资金 基金的开放日指基金契约规定的投资者可以在销售网点办理基金申购.赎回交易业务的日期 基金资产总值是指一个基金所拥有的资产(包括现金.股票.债券和其他 ...
- [uart]linux uart应用层配置
http://www.raviyp.com/embedded/189-serial-port-programming-in-linux-using-c-working-code