FPN在faster_rcnn中实现细节代码说明
代码参考自:https://github.com/DetectionTeamUCAS/FPN_Tensorflow
主要分析fpn多层金字塔结构的输出如何进行预测。
FPN金字塔结构插入在faster_rcnn的特征图获取之后,在rpn结构之前。
具体代码如下所示:
代码结构追溯至FPN部分:
train.py(line 46 :build_whole_detection_network函数)
build_whole_network(line 372: build_whole_detection_network函数)
按照注释分别查看7个步骤:
    1. build base network

    2. build rpn

    3. generate_anchors
4. postprocess rpn proposals. such as: decode, clip, NMS(所得第一次框处理)
5. build Fast-RCNN(5,roipooling 6,inference rois to obtain fc 7,cls reg)
    6. postprocess_fastrcnn(最后框处理)
    FPN部分在build base network中,得到的plist即为金字塔特征图的集合
        build_base_network一步一步回溯找到原函数resnet_base(fpn操作在这里,如下代码)
 def resnet_base(img_batch, scope_name, is_training=True):

     '''

     this code is derived from light-head rcnn.

     https://github.com/zengarden/light_head_rcnn

     It is convenient to freeze blocks. So we adapt this mode.

     '''

     if scope_name == 'resnet_v1_50':

         middle_num_units = 6

     elif scope_name == 'resnet_v1_101':

         middle_num_units = 23

     else:

         raise NotImplementedError('We only support resnet_v1_50 or resnet_v1_101. Check your network name....yjr')

     blocks = [resnet_v1_block('block1', base_depth=64, num_units=3, stride=2),

               resnet_v1_block('block2', base_depth=128, num_units=4, stride=2),

               resnet_v1_block('block3', base_depth=256, num_units=middle_num_units, stride=2),

               resnet_v1_block('block4', base_depth=512, num_units=3, stride=1)]

     # when use fpn . stride list is [1, 2, 2]

     with slim.arg_scope(resnet_arg_scope(is_training=False)):

         with tf.variable_scope(scope_name, scope_name):

             # Do the first few layers manually, because 'SAME' padding can behave inconsistently

             # for images of different sizes: sometimes 0, sometimes 1

             net = resnet_utils.conv2d_same(

                 img_batch, 64, 7, stride=2, scope='conv1')

             net = tf.pad(net, [[0, 0], [1, 1], [1, 1], [0, 0]])

             net = slim.max_pool2d(

                 net, [3, 3], stride=2, padding='VALID', scope='pool1')

     not_freezed = [False] * cfgs.FIXED_BLOCKS + (4-cfgs.FIXED_BLOCKS)*[True]

     # Fixed_Blocks can be 1~3

     with slim.arg_scope(resnet_arg_scope(is_training=(is_training and not_freezed[0]))):

         C2, end_points_C2 = resnet_v1.resnet_v1(net,

                                                 blocks[0:1],

                                                 global_pool=False,

                                                 include_root_block=False,

                                                 scope=scope_name)

     # C2 = tf.Print(C2, [tf.shape(C2)], summarize=10, message='C2_shape')

     add_heatmap(C2, name='Layer2/C2_heat')

     with slim.arg_scope(resnet_arg_scope(is_training=(is_training and not_freezed[1]))):

         C3, end_points_C3 = resnet_v1.resnet_v1(C2,

                                                 blocks[1:2],

                                                 global_pool=False,

                                                 include_root_block=False,

                                                 scope=scope_name)

     # C3 = tf.Print(C3, [tf.shape(C3)], summarize=10, message='C3_shape')

     add_heatmap(C3, name='Layer3/C3_heat')

     with slim.arg_scope(resnet_arg_scope(is_training=(is_training and not_freezed[2]))):

         C4, end_points_C4 = resnet_v1.resnet_v1(C3,

                                                 blocks[2:3],

                                                 global_pool=False,

                                                 include_root_block=False,

                                                 scope=scope_name)

     add_heatmap(C4, name='Layer4/C4_heat')

     # C4 = tf.Print(C4, [tf.shape(C4)], summarize=10, message='C4_shape')

     with slim.arg_scope(resnet_arg_scope(is_training=is_training)):

         C5, end_points_C5 = resnet_v1.resnet_v1(C4,

                                                 blocks[3:4],

                                                 global_pool=False,

                                                 include_root_block=False,

                                                 scope=scope_name)

     # C5 = tf.Print(C5, [tf.shape(C5)], summarize=10, message='C5_shape')

     add_heatmap(C5, name='Layer5/C5_heat')

     feature_dict = {'C2': end_points_C2['{}/block1/unit_2/bottleneck_v1'.format(scope_name)],

                     'C3': end_points_C3['{}/block2/unit_3/bottleneck_v1'.format(scope_name)],

                     'C4': end_points_C4['{}/block3/unit_{}/bottleneck_v1'.format(scope_name, middle_num_units - 1)],

                     'C5': end_points_C5['{}/block4/unit_3/bottleneck_v1'.format(scope_name)],

                     # 'C5': end_points_C5['{}/block4'.format(scope_name)],

                     }

     # feature_dict = {'C2': C2,

     #                 'C3': C3,

     #                 'C4': C4,

     #                 'C5': C5}

     pyramid_dict = {}

     with tf.variable_scope('build_pyramid'):

         with slim.arg_scope([slim.conv2d], weights_regularizer=slim.l2_regularizer(cfgs.WEIGHT_DECAY),

                             activation_fn=None, normalizer_fn=None):

             P5 = slim.conv2d(C5,

                              num_outputs=256,

                              kernel_size=[1, 1],

                              stride=1, scope='build_P5')

             if "P6" in cfgs.LEVLES:

                 P6 = slim.max_pool2d(P5, kernel_size=[1, 1], stride=2, scope='build_P6')

                 pyramid_dict['P6'] = P6

             pyramid_dict['P5'] = P5

             for level in range(4, 1, -1):  # build [P4, P3, P2]

                 pyramid_dict['P%d' % level] = fusion_two_layer(C_i=feature_dict["C%d" % level],

                                                                P_j=pyramid_dict["P%d" % (level+1)],

                                                                scope='build_P%d' % level)

             for level in range(4, 1, -1):

                 pyramid_dict['P%d' % level] = slim.conv2d(pyramid_dict['P%d' % level],

                                                           num_outputs=256, kernel_size=[3, 3], padding="SAME",

                                                           stride=1, scope="fuse_P%d" % level)

     for level in range(5, 1, -1):

         add_heatmap(pyramid_dict['P%d' % level], name='Layer%d/P%d_heat' % (level, level))

     # return [P2, P3, P4, P5, P6]

     print("we are in Pyramid::-======>>>>")

     print(cfgs.LEVLES)

     print("base_anchor_size are: ", cfgs.BASE_ANCHOR_SIZE_LIST)

     print(20 * "__")

     return [pyramid_dict[level_name] for level_name in cfgs.LEVLES]

     # return pyramid_dict  # return the dict. And get each level by key. But ensure the levels are consitant

     # return list rather than dict, to avoid dict is unordered
观察原特征图的结构C2,C3,C4,C5, 以及特征金字塔的结构P5,P4,P3,P2,为5层的特征金字塔结构 。
操作如图:
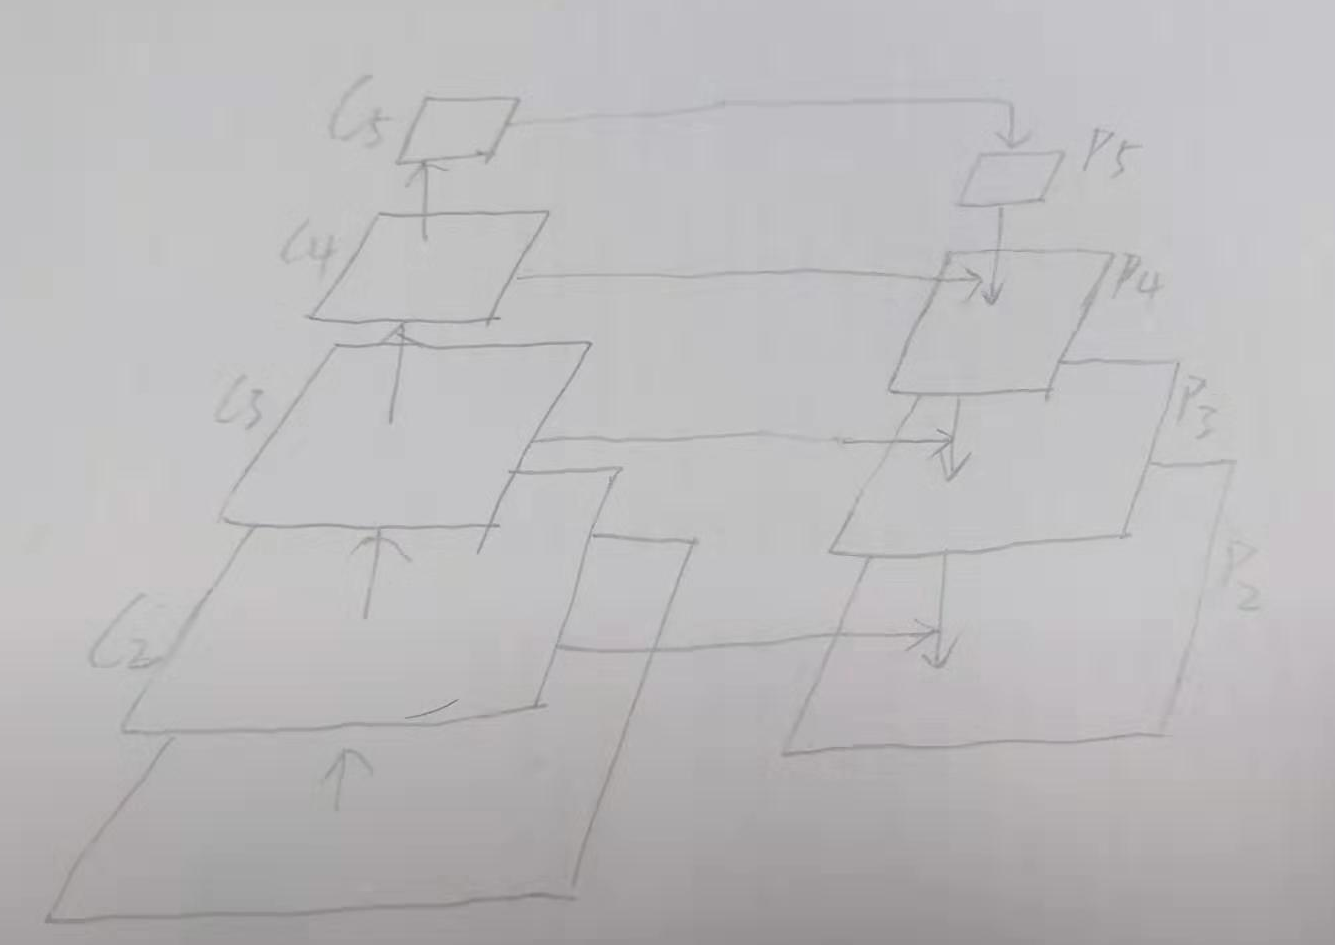
金字塔结构的总层数为(p5,p6,p4,p3,p2)
P5 = conv2d(C5) (因金字塔特征图每层的构造是 上面一层的2x upsaming 和左边的1*1conv后的结果相加)
P6 = max_pool(P5)
核心的融合部分在下面代码中显示:
P4 = C4 + P5
P3 = C3 + P4
P2 = C2 + P3
             for level in range(4, 1, -1):  # build [P4, P3, P2]

                 pyramid_dict['P%d' % level] = fusion_two_layer(C_i=feature_dict["C%d" % level],

                                                                P_j=pyramid_dict["P%d" % (level+1)],

                                                                scope='build_P%d' % level)
最后的P_LIST共有: LEVLES = ['P2', 'P3', 'P4', 'P5', 'P6']层级
对应每层特征图设置不同大小的anchors
Instead, we assign anchors of a single scale to each level. Formally, we define the anchors to have areas of {32,64,128,256,512} pixels on {P2,P3,P4,P5,P6} respectively.
As in [29] we also use anchors of multiple aspect ratios{1:2, 1:1, 2:1}at each level. So in total there are anchors over the pyramid
后面得到全部金字塔特征图的roi,下一步是要把roi对应到各自层的特征图上取roi特征,不同大小的roi对应不同的特征图,较大的roi对应深层的特征图,按照公式

确定对应的层,然后送入roi pooling,统一特征图尺寸。
在roipooling之后的处理过程都基本一样了;
原来是一个map进行predict产生一些proposals;经过处理之后,送入全连接层之后进行cls and reg;
FPN现在是多个map进行predict产生更多不同尺度(更加鲁棒)的proposals,经过处理之后,也是送入全连接层之后进行cls and reg。
FPN在faster_rcnn中实现细节代码说明的更多相关文章
- 你所不知道的 C# 中的细节
前言 有一个东西叫做鸭子类型,所谓鸭子类型就是,只要一个东西表现得像鸭子那么就能推出这玩意就是鸭子. C# 里面其实也暗藏了很多类似鸭子类型的东西,但是很多开发者并不知道,因此也就没法好好利用这些东西 ...
- Java泛型中的细节
Java泛型中的细节 如果没有泛型 学习Java,必不可少的一个过程就是需要掌握泛型.泛型起源于JDK1.5,为什么我们要使用泛型呢?泛型可以使编译器知道一个对象的限定类型是什么,这样编译器就可以在一 ...
- linux内核分析作业4:使用库函数API和C代码中嵌入汇编代码两种方式使用同一个系统调用
系统调用:库函数封装了系统调用,通过库函数和系统调用打交道 用户态:低级别执行状态,代码的掌控范围会受到限制. 内核态:高执行级别,代码可移植性特权指令,访问任意物理地址 为什么划分级别:如果全部特权 ...
- Gradle中的buildScript代码块
在编写Gradle脚本的时候,在build.gradle文件中经常看到这样的代码: build.gradle 1 2 3 4 5 6 7 8 9 buildScript { repositories ...
- Oracle中经典分页代码!
在Oracle中因为没有top关键字,所以在sqlserver中的分页代码并不适用于Oracle,那么在Oracle中如何来实现分页呢? --查询所有数据 STUNO STUNAME STUAGE S ...
- python学习之——计算给出代码中注释、代码、空行的行数
题目:计算给出代码中注释.代码.空行的行数 来源:网络 思路:注释行以 ‘#’开头,空行以 ‘\n’ 开头,以此作为判断 def count_linenum(fname): fobj = open(f ...
- netbeans中实体类代码的bug
用了netbeans中实体类代码后,忽然报错: com.sun.tools.javac.code.Symbol$CompletionFailure: 找不到sun.util.logging.Platf ...
- 在Flex (Flash)中嵌入HTML 代码或页面—Flex IFrame
在flex组件中嵌入html代码,可以利用flex iframe.这个在很多时候会用到的,有时候flex必须得这样做,如果你不这样做还真不行-- flex而且可以和html进行JavaScript交互 ...
- Scala 深入浅出实战经典 第45讲: scala中context bounds代码实例
王家林亲授<DT大数据梦工厂>大数据实战视频 Scala 深入浅出实战经典(1-64讲)完整视频.PPT.代码下载:百度云盘:http://pan.baidu.com/s/1c0noOt6 ...
随机推荐
- autoit3 脚本自动安装实例
软件自动安装的相关实例!贴出来用于参考,并部分相关语法与示例 #RequireAdmin If DriveMapGet("T:")=="" Then Drive ...
- Appium API文档中文版
传送门 https://testerhome.com/topics/3144
- js手机号码中间用星号代替。银行卡后四位之外改为星号
如手机号码13123456789,中间四位用'*'代替 var phone='13123456789' 方法1(字符串的截取): ,)+); 方法2(正则表达式): })\d{}(\d+)/,&quo ...
- webpack 图片文件处理loader
目录结构: 引用图片: body { /*background: red;*/ /*background: url("../img/test2.jpg"); 小图片*/ backg ...
- Python3解leetcode Isomorphic Strings
问题描述: Given two strings s and t, determine if they are isomorphic. Two strings are isomorphic if the ...
- POJ 3130 How I Mathematician Wonder What You Are! (半平面相交)
Description After counting so many stars in the sky in his childhood, Isaac, now an astronomer and a ...
- webBrowser强制在本窗口打开,禁止在新窗口打开
有时需要用WebBrowser加载URL,来实现某些功能.而这时,我们就不希望所打开的页面中的链接,在新窗口中打开,因为这样的话,实际上是用系统默认的浏览器打开了,从而脱离了你的WebBrowser, ...
- Python操作 Memcache
Memcached Memcached 是一个高性能的分布式内存对象缓存系统,用于动态Web应用以减轻数据库负载.它通过在内存中缓存数据和对象来减少读取数据库的次数,从而提高动态.数据 库驱动网站的速 ...
- Android实战技巧:Dialog (转)
转:http://blog.csdn.net/hitlion2008/article/details/7567549#t0 Dialog是任何系统都必须有的一个控件,作为辅助窗口,用于显示一些消息,或 ...
- Docker问题方案收集
1.问题: Unable to connect to unix:///var/run/docker.sock (Permission denied) from PHP code 解决方法: Make ...