OtterTune配置记录
0. 准备两台Ubuntu 18.04的虚拟机,安装mysql(供server-side存储调优数据用)和postgresql(供client-side存储业务数据用,这里以PostgreSQL为例。因为ottertune官方只给了postgres的knob configuration.....)。然后按照官方配置(https://github.com/cmu-db/ottertune/wiki/Linux-Quick-Setup)安装好必要的包。
Ref: https://www.cnblogs.com/leolztang/p/5094930.html
https://blog.csdn.net/skh2015java/article/details/80156278
https://blog.csdn.net/qq_19330913/article/details/80468494
https://www.cnblogs.com/hfdp/p/6088288.html
https://blog.csdn.net/chengyuqiang/article/details/70153980?utm_source=blogxgwz5
安装配置postgresql:
 wget --quiet -O - https://www.postgresql.org/media/keys/ACCC4CF8.asc | sudo apt-key add -

 sudo add-apt-repository "deb http://apt.postgresql.org/pub/repos/apt/ bionic-pgdg main"

 sudo apt-get update

 sudo apt-get install postgresql-9.6

 sudo apt-get remove postgresql-    #安装9.6时自动带上了10...不知道为啥。要卸载掉防止端口冲突。可以用sudo lsof -i:5432看一下

 、修改postgres数据库用户的密码

 打开客户端工具(psql)

 sudo -u postgres psql

 其中,sudo -u postgres 是使用postgres 用户登录的意思。PostgreSQL数据默认会创建一个postgres的数据库用户作为数据库的管理员,密码是随机的

 postgres=# ALTER USER postgres WITH PASSWORD '******';

 postgres=#为PostgreSQL下的命令提示符,--注意最后的分号;

 、退出PostgreSQL psql客户端

 postgres=# \q

 、修改ubuntu操作系统的postgres用户的密码(密码要与数据库用户postgres的密码相同)

 su root

 删除PostgreSQL用户密码

 sudo passwd -d postgres

 passwd -d 是清空指定用户密码的意思

 设置PostgreSQL系统用户的密码

 sudo -u postgres passwd

 按照提示,输入两次新密码

 、修改PostgresSQL数据库配置实现远程访问

 sudo gedit /etc/postgresql/9.6/main/postgresql.conf

 .监听任何地址访问,修改连接权限

 #listen_addresses = 'localhost' 改为 listen_addresses = '*'

 .启用密码验证

 #password_encryption = on 改为 password_encryption = on

 . 确保端口为5432

 port =                 # (change requires restart)

 sudo gedit /etc/postgresql/9.6/main/pg_hba.conf

 在文档末尾加上以下内容

 host all all 0.0.0.0/ trust

 、重启服务

 /etc/init.d/postgresql restart

 、5432端口的防火墙设置

 5432为postgreSQL默认的端口

 sudo iptables -A INPUT -p tcp -m state --state NEW -m tcp --dport  -j ACCEPT

 安装好之后可以

 psql -U postgres -h 192.168.1.170

 测试一下

 Ref: https://blog.csdn.net/zj0078/article/details/71156064
修改系统默认python版本
原因:ubuntu系统安装了python2.7和python3.,默认使用的是python 2.7。导致从2.7找不到包

解决办法:使用以下命令来修改默认python版本:

sudo cp /usr/bin/python /usr/bin/python_bak

sudo rm /usr/bin/python

sudo ln -s /usr/bin/python3. /usr/bin/python

这样在终端中运行Python时,默认启动的就是3.6版本了
如果在C2步骤中出错,那么还需要修改默认java版本
sudo update-alternatives --config java

选择/usr/lib/jvm/jdk1.8.0_212/bin/java 所在的number
OtterTune分为两部分:server side: 包括一个MySQL数据库(用于存储调优数据,供ml model用),Django(FrontEnd User Interface),Celery(用于调度ML task);client side: Target_DBMS(存储用户的业务数据用,支持多种DBMS),Controller(用于控制target DBMS),Driver(用于调用controller,入口是fabfile.py)
Ref: https://github.com/cmu-db/ottertune/wiki/Getting-Started-ottertune
https://blog.csdn.net/weixin_40449300/article/details/87904128
https://blog.csdn.net/u013385018/article/details/84028360
https://blog.csdn.net/u013385018/article/details/84201771
说实话见到很多帖子都在讨论它,但大多都是空泛的复述论文,实际上很少有人真正deploy过......这点还是挺让我惊讶的
-------------------------------------------Test OtterTune with real target DBMS-------------------------------------------
这里以postgreSQL为例。
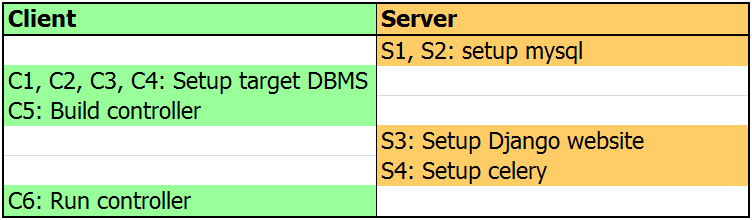
按照S1, S2, C1, C2, C3, C4, C5, S3, S4, C6的顺序执行如下步骤即可
-----------------------------------------------------Server-side配置-----------------------------------------------------
S1. 新建名为ottertune的数据库
mysqladmin create -u root -p ottertune
S2. 编辑配置文件
cd /ottertune/server/website
cp website/settings/credentials_TEMPLATE.py website/settings/credentials.py
并填入USERNAME, PASSWORD等信息,设置DEBUG=True
示例文件:
 #

 # OtterTune - credentials_TEMPLATE.py

 #

 # Copyright (c) -, Carnegie Mellon University Database Group

 #

 """

 Private/custom Django settings for the OtterTune project.

 """

 # pylint: disable=invalid-name

 # ==============================================

 # SECRET KEY CONFIGURATION

 # ==============================================

 # SECURITY WARNING: keep the secret key used in production secret!

 SECRET_KEY = 'ADD ME!!'

 # ==============================================

 # DATABASE CONFIGURATION

 # ==============================================

 DATABASES = {

     'default': {

         'ENGINE': 'django.db.backends.mysql',

         'NAME': 'ottertune',

         'USER': 'root',

         'PASSWORD': '',

         'HOST': '',

         'PORT': '',

         'OPTIONS': {

             'init_command': "SET sql_mode='STRICT_TRANS_TABLES',innodb_strict_mode=1",

         },

     }

 }

 # ==============================================

 # DEBUG CONFIGURATION

 # ==============================================

 # Can override the DEBUG setting here

 DEBUG = True

 # ==============================================

 # MANAGER CONFIGURATION

 # ==============================================

 # Admin and managers for this project. These people receive private

 # site alerts.

 ADMINS = (

     # ('Your Name', 'your_email@example.com'),

 )

 MANAGERS = ADMINS

 # ==============================================

 # GENERAL CONFIGURATION

 # ==============================================

 # Hosts/domain names that are valid for this site; required if DEBUG is False

 # See https://docs.djangoproject.com/en/1.5/ref/settings/#allowed-hosts

 ALLOWED_HOSTS = []
S3:Set up Django(用于监控)
Firstly, you need to migrate the Django models into the database. (相当于配置Django网站后端,将需要的表放进mysql的OtterTune数据库内)
python3 manage.py makemigrations website
python3 manage.py migrate
Create the super user
python manage.py createsuperuser
这一步操作完成后,将在mysql的OtterTune数据库中建立如下表:
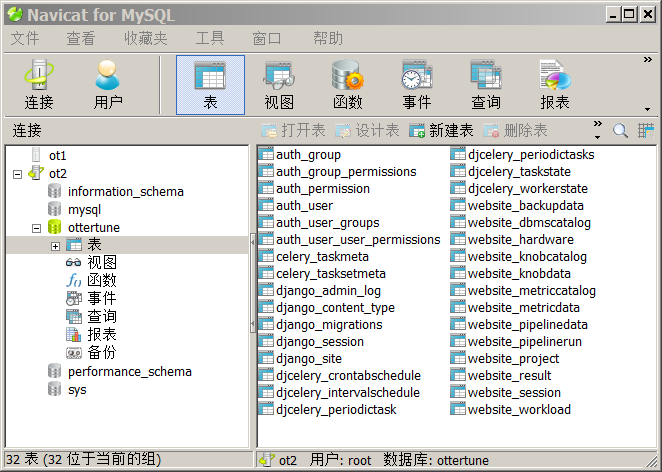
值得注意的是website_knobcatalog和website_metriccatalog这两个表,分别存储了待观测的knob和metric名称。这是dump出来的表内容(以postgresql为例)
S4:Start Celery(用于调度ML task)
OtterTune uses Celery to schedule machine learning tasks. Before staring the celery worker, you may want to start a message broker required by celery. In our case, we use RabbitMq.
sudo rabbitmq-server -detached
Then you can start the celery worker:
python3 manage.py celery worker --loglevel=info --pool=threads
Then you can start Django Server:
python manage.py runserver 0.0.0.0:8000
OtterTune has periodical ML tasks (i.e. knob identification and metrics pruning), which run every time period. You can use celery beat to start the periodical tasks.
python3 manage.py celerybeat --verbosity=2 --loglevel=info
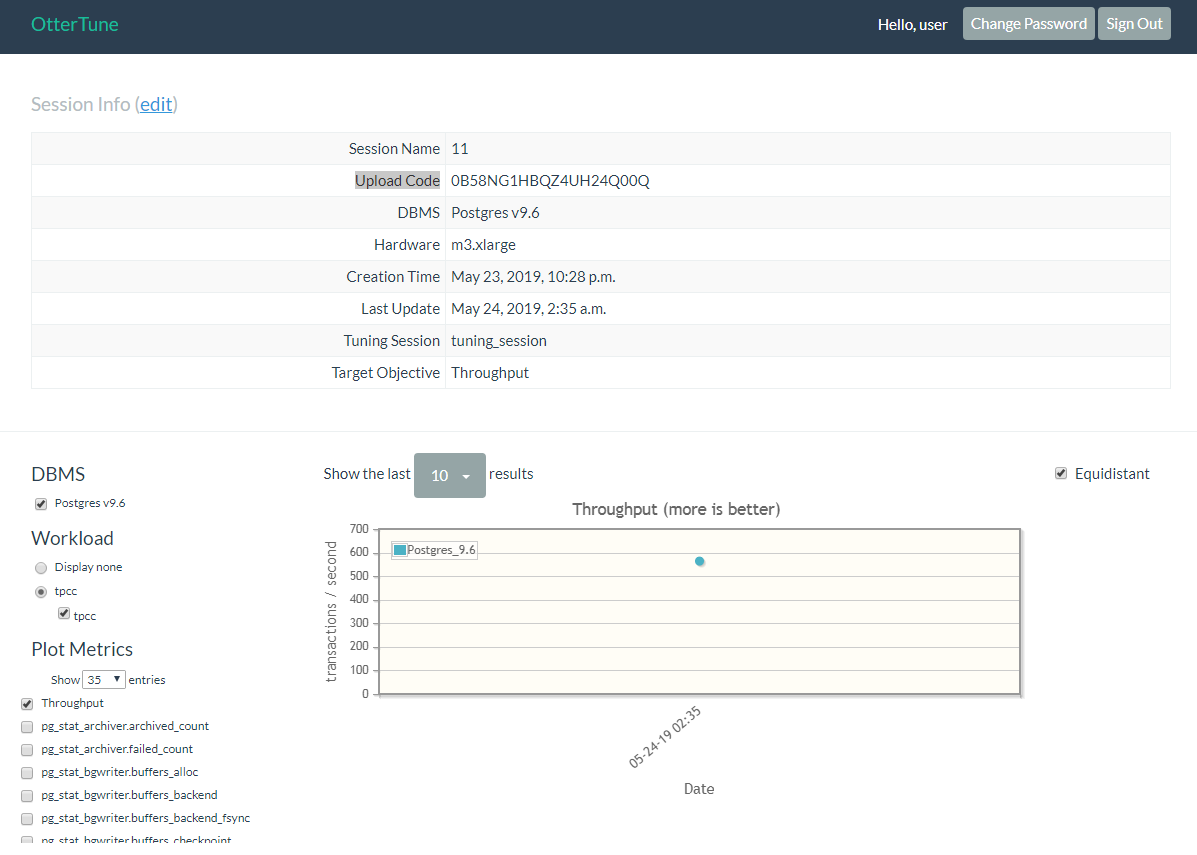
完成后打开http://127.0.0.1:8080,在里面建立一个tuning session,并记下upload code
-----------------------------------------------------Client-side配置-----------------------------------------------------
首先将ottertune、oltpbench都git clone到home/username/下面
C1. 编辑/ottertune/client/driver/driver_config.json,填入target DBMS类型、用户名密码等信息,并填写其中涉及到的所有配置文件
注意
1. 对于save_path这一项,要事先建立好对应的文件夹
2. 对于upload code这一项,要和S4中分配给的upload code一致
示例文件:
 -------------/ottertune/client/driver/driver_config.json-------------

 {

   "database_type" : "postgres",

   "database_name" : "tpcc",

   "database_disk": "/dev/sda1",

   "database_conf": "/etc/postgresql/9.6/main/postgresql.conf",

   "database_save_path": "/home/tidb/ottertune",

   "username" : "postgres",

   "password" : "******",

   "oltpbench_home": "/home/tidb/oltpbench",

   "oltpbench_config": "/home/tidb/oltpbench/config/tpcc_config_postgres.xml",

   "oltpbench_workload": "tpcc",

   "oltpbench_log" : "/home/tidb/ottertune/client/driver/oltp.log",

   "controller_config": "/home/tidb/ottertune/client/controller/config/sample_postgres_config.json",

   "controller_log" : "/home/tidb/ottertune/client/driver/controller.log",

   "save_path": "/home/tidb/ottertune/server/results",

   "upload_url" : "http://127.0.0.1:8000",

   "upload_code" : "0B58NG1HBQZ4UH24Q00Q",

   "lhs_knob_path" : "/home/tidb/ottertune/client/driver/knobs/postgres-96.json",

   "lhs_save_path" : "/home/tidb/ottertune/client/driver/configs"

 }

 -------------/home/tidb/ottertune/client/controller/config/sample_postgres_config.json-------------

 {

   "database_type" : "postgres",

   "database_url" : "jdbc:postgresql://localhost:5432/postgres",

   "username" : "postgres",

   "password" : "asdfgh",

   "upload_code" : "DEPRECATED",

   "upload_url" : "DEPRECATED",

   "workload_name" : "tpcc"

 }

 -------------/oltpbench/config/tpcc_config_postgres.xml-------------

 <?xml version="1.0"?>

 <parameters>

     <!-- Connection details -->

     <dbtype>postgres</dbtype>

     <driver>org.postgresql.Driver</driver>

     <DBUrl>jdbc:postgresql://localhost:5432/tpcc</DBUrl>

     <username>postgres</username>

     <password>******</password>

     <isolation>TRANSACTION_READ_COMMITTED</isolation>

     <!-- Scale factor is the number of warehouses in TPCC -->

     <scalefactor></scalefactor>

     <!-- The workload -->

     <terminals></terminals>

     <works>

         <work>

           <time></time>

           <rate></rate>

           <ratelimited bench="tpcc">true</ratelimited>

           <weights>,,,,</weights>

         </work>

     </works>

     <!-- TPCC specific -->

        <transactiontypes>

         <transactiontype>

             <name>NewOrder</name>

         </transactiontype>

         <transactiontype>

             <name>Payment</name>

         </transactiontype>

         <transactiontype>

             <name>OrderStatus</name>

         </transactiontype>

         <transactiontype>

             <name>Delivery</name>

         </transactiontype>

         <transactiontype>

             <name>StockLevel</name>

         </transactiontype>

        </transactiontypes>

 </parameters>
C2. 配置oltpbench(用于周期性在target DBMS上run benchmark):参考https://github.com/oltpbenchmark/oltpbench/wiki#Environment%20Setup
如果出现错误,sudo update-alternatives --config java,选择/usr/lib/jvm/jdk1.8.0_212/bin/java 所在的number
C3. 在target DBMS(postgres)中新建名为tpcc的数据库,供oltpbench用
psql -U postgres -h 192.168.1.170
postgres=# create database tpcc owner postgres;
postgres=# grant all privileges on database tpcc to postgres;
C4. load oltpbench into target DBMS
./oltpbenchmark -b tpcc -c config/tpcc_config_postgres.xml --create=true --load=true
C5. Build controller
cd ottertune/client/controller
gradle build
C6. 运行
运行时发现几个bug:
1. 在ottertune/client/driver/fabfile.py line236, 'Output into file' 需要改为 'Output Raw data into file'
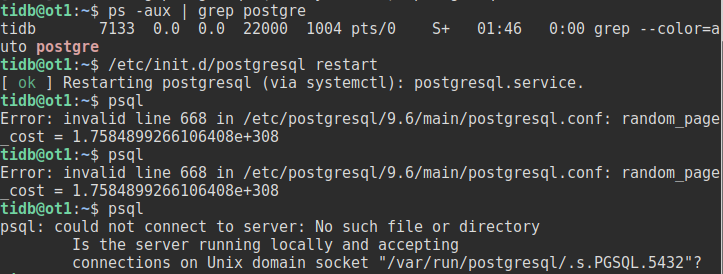
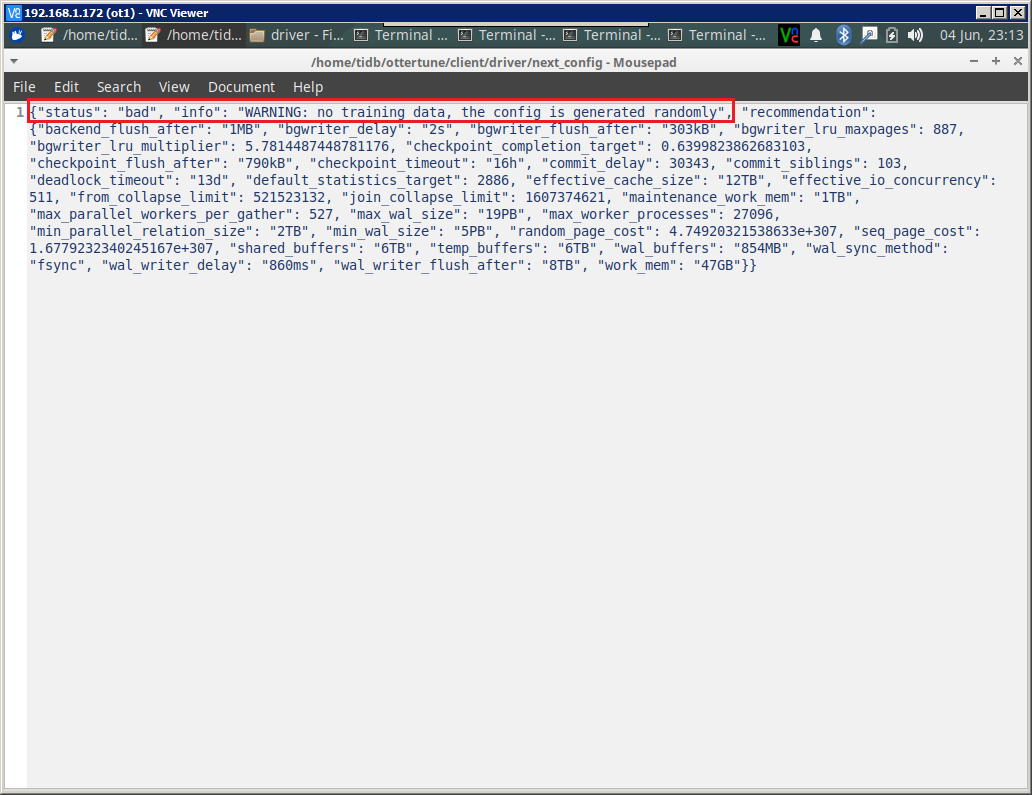
2. loop一次之后发现这玩意把我的postgreSQL的配置(postgresql.conf)改崩溃了......感觉要自己魔改一番了...
目测是ottertune在修改时没有考虑好数据类型(原版的random_page_cost值是4.0 科学计数法在这里肯定是认不出来的啊)
After setting the above three configurations, you can run the loop in the description above. In each loop, it collects target DBMS info, uploads to the server, gets new recommended configuration, installs the config and restarts DBMS. Users can continue to run loops until they are satisfied with the recommended configuration. Functions are defined in the driver file ottertune/client/driver/fabfile.py
fab loop runs one single loop.
fab run_loops:max_iter=10 runs 10 loops. You can set max_iter to change the maximum iterations.
注意在刚开始运行时,因为ML model缺乏足够的训练数据,所以生成的configuration可能是random的:
-------------------------------------------Test OtterTune with fake workload data-------------------------------------------
这里fake workload data是用data_generator.py自己random生成出来的,不是真的在target DBMS上跑出来的knob-metric samples。
个人感觉这个就是用来测试下django interface的显示效果....实际意义不大
F0:首先完成上面的S1, S2, C1, C2, C3, C4操作
F1:生成一些fake workload data
cd /ottertune/server/website/script/controller_simulator/
python data_generator.py 2 5
这里2表示workload数量(模拟在target DBMS跑过的不同workload)
5表示对于每个workload,会被观测到的训练样本数(knob/metric samples. 模拟每个workload在target DBMS上观测到的结果)
生成好的数据会被放在generated_data文件夹下
F2:Initialize Django Server,初始化ottertune MySQL数据库
cd /ottertune/server/website fab
fab create_test_website
F3:启动Django
fab start_debug_server
F4:上传fake workload data到Django interface
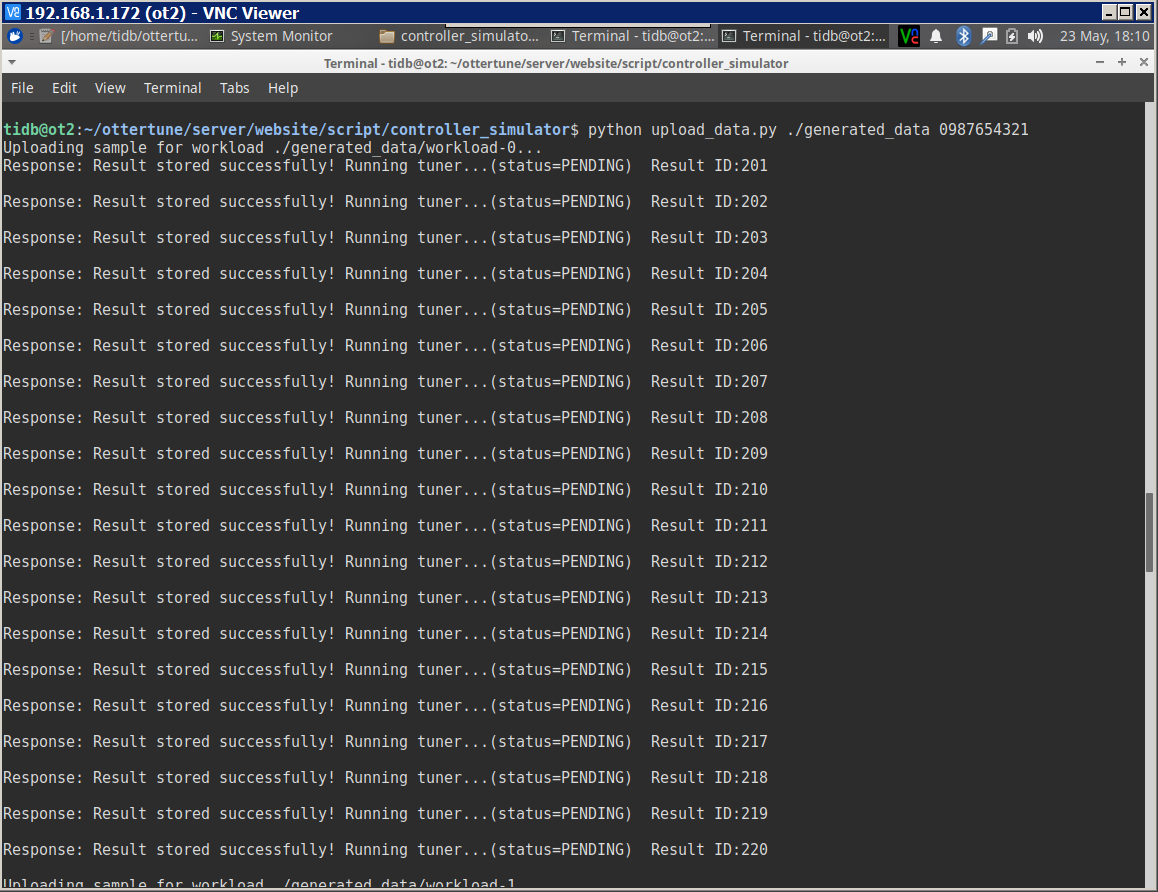
cd /ottertune/server/website/script/controller_simulator/
python upload_data.py ./generated_data 0987654321
[其中0987654321是upload code,和下图网页上的upload code对应。详细可参考 https://github.com/cmu-db/ottertune/wiki/Finding-a-Session's-Upload-Code ]
在bash中可以看到,当上传好后,系统就会自动运行ML pipeline
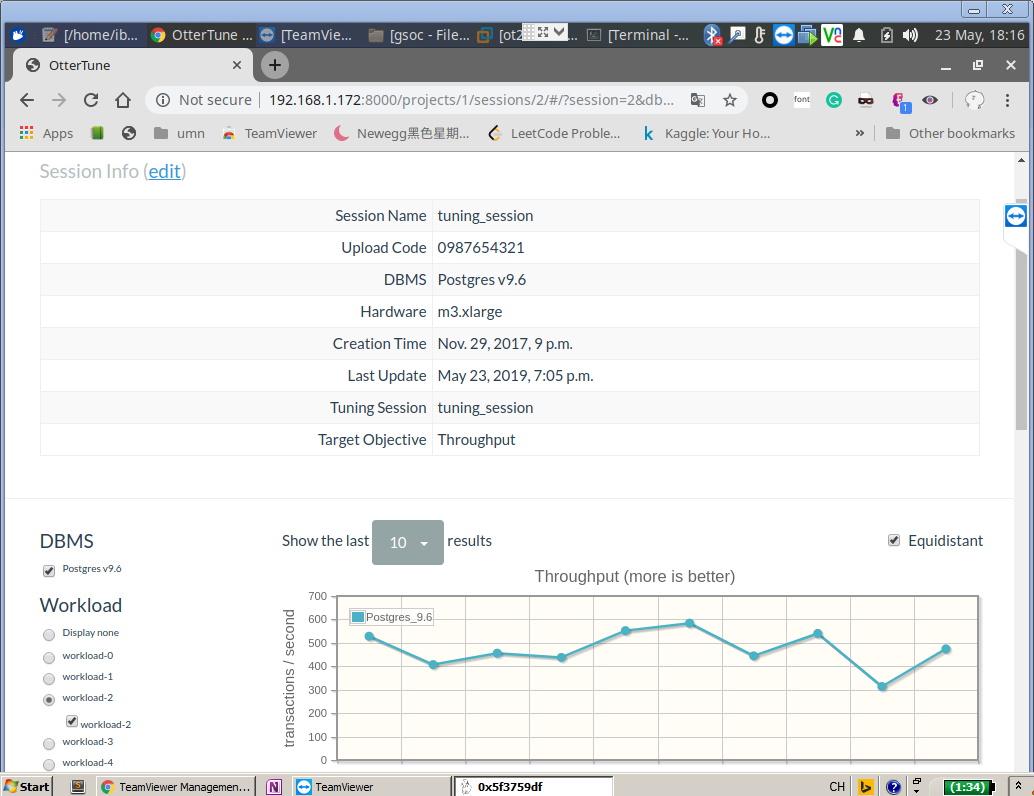
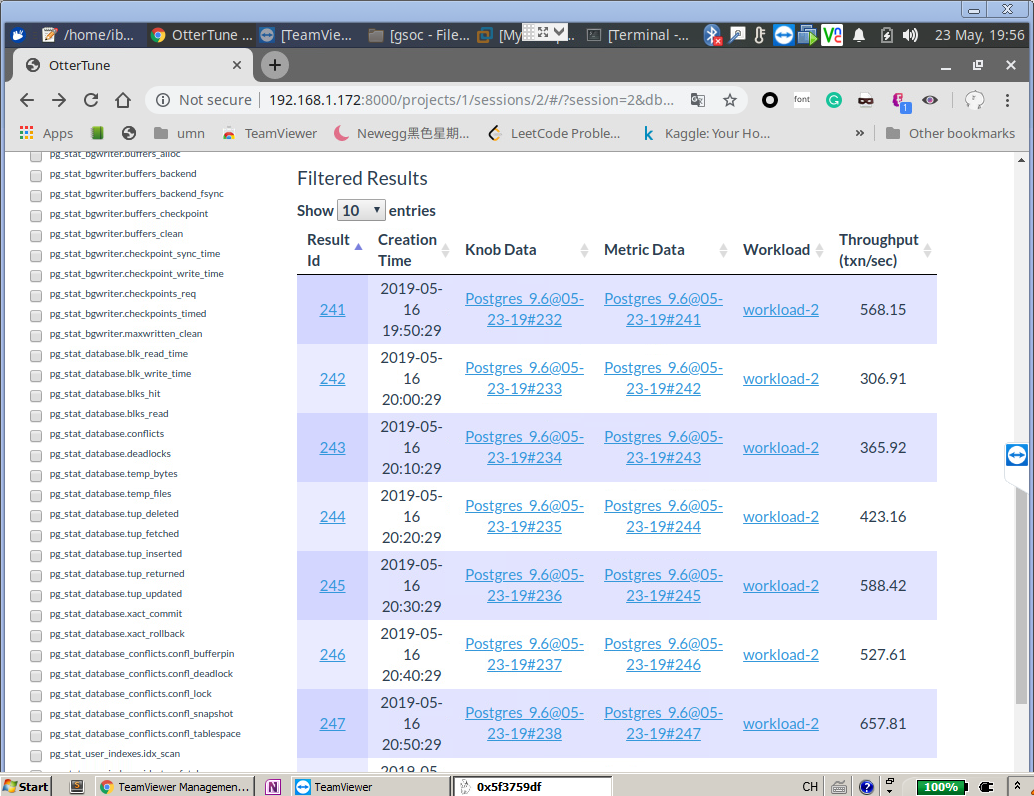
F5:进入http://192.168.1.172:8000,用user/abcd123登陆,单击test_project -> tuning_session.
左边可以选择workload和要优化的metric,右边就可以看到metric在不同knob configuration下的表现。点击下面具体的Result ID就可以看到这一metric value对应的knob
OtterTune配置记录的更多相关文章
- Bandwagon的配置记录(二) —— ftp文件传输
SSH登录服务器 登录的方法在Bandwagon的配置记录(一) —— kexue上网 配置前的准备 1.新建一个目录( /home/ftp ),以后可以把文件放在这里,这里相当于是个中转站 cd ...
- kafka配置记录
1. 准备三台机器,系统CentOs6 2. 安装好JDK和zookeeper 参考: zookeeper配置记录 3. 解压安装包到指定目录 tar -zxvf kafka_2.12-2.1.0.t ...
- spring cloud config配置记录
1. spring cloud config配置记录 1.1. pom <!-- 分布式配置中心 --> <dependency> <groupId>org.spr ...
- 使用SecureCRT / win7远程桌面连接ubuntu配置记录(有更新)
2017-03-03 更新于末尾 1.Windows7 — Ubuntu 远程桌面连接中 Tab 键不能补全的解决办法 2.xrdp远程连接ubuntu无法使用原机的中文输入法 2017-02-22 ...
- MAC OS X Yosemite的PyQt4配置记录
MAC OS X Yosemite的PyQt4配置记录 声明: 1)本报告由博客园bitpeach撰写,版权所有,免费转载,请注明出处,并请勿作商业用途. 2)若本文档内有侵权文字或图片等内容,请联系 ...
- (转)Nginx的https配置记录以及http强制跳转到https的方法梳理
Nginx的https配置记录以及http强制跳转到https的方法梳理 原文:http://www.cnblogs.com/kevingrace/p/6187072.html 一.Nginx安装(略 ...
- jenkins配置记录
jenkins配置记录 http://www.cnblogs.com/kevingrace/p/6022447.html
- Vue-cli 多页相关配置记录
Vue-cli 多页相关配置记录 搭建一个顺手的MPA项目脚手架,其实根据项目的不同目录结构和打包配置都可以进行灵活的调整.这次的项目可能是包含各种客户端和管理后台在一起的综合项目所以需要将样式和脚本 ...
- 使用SecureCRT连接虚拟机(ubuntu)配置记录
这种配置方法,可以非常方便的操作虚拟机里的Linux系统,且让VMware在后台运行,因为有时候我直接在虚拟机里操作会稍微卡顿,或者切换速度不理想,使用该方法亲测本机效果确实ok,特此记录. Secu ...
随机推荐
- 【NOIP2016提高A组8.12】奇袭
题目 由于各种原因,桐人现在被困在Under World(以下简称UW)中,而UW马上要迎来最终的压力测试--魔界入侵. 唯一一个神一般存在的Administrator被消灭了,靠原本的整合骑士的力量 ...
- 【leetcode】1170. Compare Strings by Frequency of the Smallest Character
题目如下: Let's define a function f(s) over a non-empty string s, which calculates the frequency of the ...
- List中的Map
List中的Map import java.util.ArrayList; import java.util.HashMap; import java.util.List; import java.u ...
- 最小生成树(Kruskal算法)模板
#include<iostream> #include<algorithm> using namespace std; ],n; struct node { int u,v,v ...
- [517]Kite 题解
前言 今天又是爆零的一天. 被同学坑了,还以为四边形的点是按任意序给定的,然后打了一个特别复杂的矩形判断QAQ. 题意简述 按顺序给定一个四边形,求有多少个点在这个四边形的对称轴上. 题解 分情况讨论 ...
- zk的KeeperErrorCode = ConnectionLoss错误
额,这东西都快把人搞崩溃了,各种排查各种正常. 最后竟然是因为我在客户端未连接上zkserver的时候就进行了create操作造成的错误. 噗, Exception in thread "m ...
- 标签button:点击button按钮时,出现了页面自动刷新的情况
原html: <button class="btn btn-primary" id="btnSubmit" name="btnSubmit&qu ...
- PHP 设计模式总结
回想了一下php的设计模式,好像记得不完全了.此处对php设计模式重新做一下复习总结. 单例模式 单例模式的核心只包括一个特殊的类,保证系统中只能有一个实例,即一个类中只能有一个实例化对象,避免系统中 ...
- linux中的udev(unix devices)
最开始的时候,linux预先定义了很多种设备文件,(不管这种设备是否存在), 在/dev/下 但是即使这些设备文件不存在, 这样/dev下的文件就会很多, 而且像upan在插拔顺序不同, 所对应的映射 ...
- floding regions