SpringBoot 2.3 升级到 SpringBoot 2.7 爬坑-- SpringDoc & Swagger
注意:Swagger支持SpringBoot2.0但不支持SpringBoot3.0
OpenApi
OpenApi是一个用于描述、定义和共享 RESTful API 文档的规范。最新规范是 OpenAPI 3.0
Swagger
Swagger 是一个用于设计和测试 RESTful APIs 的工具。
它提供了API 描述、请求和响应示例、API 测试和文档生成等丰富的功能。最新版本是Swagger3,支持OpenAPI3.0规范
SpringFox
SpringFox 是 Spring 社区维护的一个项目(非官方),帮助使用者将 Swagger 2 集成到 Spring 中。
SpringDoc
SpringDoc 也是 Spring 社区维护的一个项目(非官方),帮助使用者将 Swagger 3 集成到 Spring 中
OpenAPI 定义了一种标准的格式来表示 API 文档,而 Swagger 是一个实现 OpenAPI 规范的工具
SpringFox和SpringDoc是Spring社区维护的一个非官方项目,分别帮助开发者将Swagger 2、Swagger 3集成到Spring中。SpringFox已经很久没有更新,因此SpringDoc无疑是更好的选择。
POM
<springdoc.version>1.6.9</springdoc.version>

<!--这个包,包括了 swagger-annotations 、 webmvc-core等-->

<dependency>

    <groupId>org.springdoc</groupId>

    <artifactId>springdoc-openapi-ui</artifactId>

    <version>${springdoc.version}</version>

</dependency>

<!--swagger在内网开发环境,所以安全方面的暂时没加-->

<dependency>

    <groupId>org.springdoc</groupId>

    <artifactId>springdoc-openapi-security</artifactId>

    <version>${springdoc.version}</version>

</dependency>
yml
只要 dev、test 内网环境中配置,开放外试的话,最好加上授权
# Docs API配置

springdoc:

  swagger-ui:

    # API文档, 默认路径:swagger-ui/index.html, 通过http://localhost:8080/docs/index.html访问

    path: /docs/index.html

    # 开启Swagger UI界面

    enabled: true

    # 根据HTTP方法对API路径进行排序

    operations-sorter: method

  api-docs:

    # OpenAPI的路径描述,默认路径:/v3/api-docs, 通过http://localhost:8080/docs/api访问文档描述

    # OpenAPI描述定义默认为JSON格式, 通过http://localhost:8080/docs/api.yaml获取yaml格式

    path: /docs/api

    # 开启api-docs

    enabled: true

  # 配置需要生成接口文档的扫描包路径

  packages-to-scan: com.cuwor.admin.controller

  # 配置需要生成接口文档的接口路径

  # paths-to-match:  /test/**,/user/**
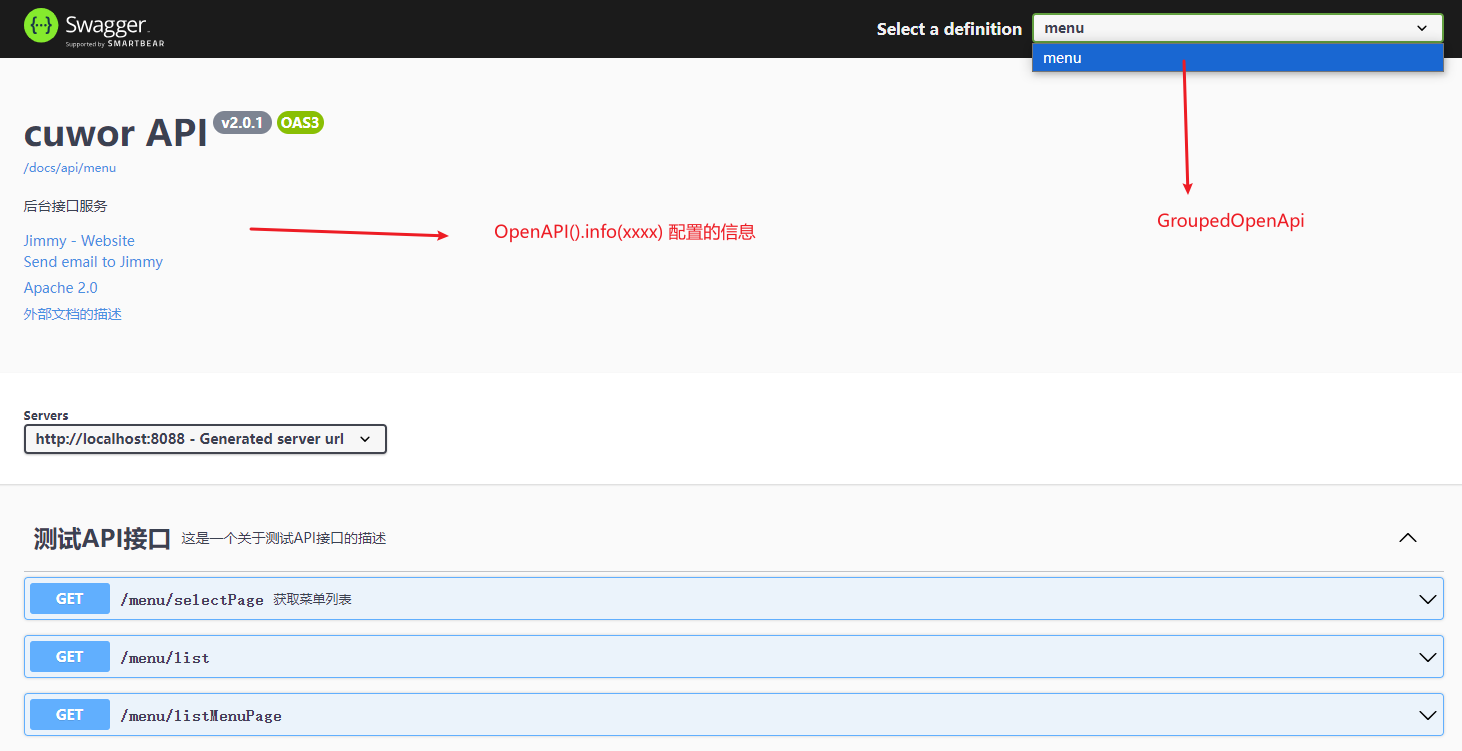
配置自定义的 OpenAPI 规范
OpenApiConfig
package com.vipsoft.base.config;

import io.swagger.v3.oas.models.ExternalDocumentation;

import io.swagger.v3.oas.models.OpenAPI;

import io.swagger.v3.oas.models.info.Contact;

import io.swagger.v3.oas.models.info.Info;

import io.swagger.v3.oas.models.info.License;

import org.springdoc.core.GroupedOpenApi;

import org.springframework.context.annotation.Bean;

import org.springframework.context.annotation.Configuration;

@Configuration

public class OpenApiConfig {

    /**

     * 配置自定义的 OpenAPI 规范

     * 通过 @Bean 注解声明该方法返回一个 Spring Bean,该 Bean 是一个 OpenAPI 对象

     * 该方法允许通过 Spring Context 初始化 OpenAPI 对象,并自定义 API 的标题、版本、描述等信息

     *

     * @return 自定义的 OpenAPI 对象

     */

    @Bean

    public OpenAPI customOpenAPI() {

        // 创建并配置 OpenAPI 对象

        return new OpenAPI()

                .info(new Info()

                        .title("VipSoft API")            // 设置 API 标题

                        .version("v2.0.1")             // 设置 API 版本

                        .description("后台接口服务")     // 设置 API 描述

                        .license(new License().name("Apache 2.0").url("http://www.vipsoft.com")) // 设置 API 的许可证信息,包括许可证名称和 URL

                        .contact(new Contact()

                                .name("Jimmy")        // 设置联系人名称

                                .url("http://www.vipsoft.com") // 设置联系人的 URL

                                .email("47262947@qq.com"))) // 设置联系人的电子邮件地址

                .externalDocs(new ExternalDocumentation()

                        .description("外部文档的描述") // 设置外部文档的描述

                        .url("http://www.vipsoft.com")); // 设置外部文档的 URL

    }

    /**

     * 配置并返回一个GroupedOpenApi实例,用于指定一组API接口

     *

     * @return GroupedOpenApi实例,配置了组名为"test",匹配路径为"/test/**"的接口

     */

    @Bean

    public GroupedOpenApi testApi() {

        return GroupedOpenApi.builder()

                .group("menu") // 设置组名

                .pathsToMatch("/menu/**") // 设置需要匹配的路径模式

                .build();

    }

}
也可以在配置中分组
# Docs API配置

springdoc:

  swagger-ui:

    path: /docs/index.html

    enabled: true

  group-configs:

    - group: '测试1'

      paths-to-match: /test/**

    - group: '测试2'

      paths-to-match: /test/**
拦截器去除 swagger 的接口验证
WebConfig
package com.vipsoft.admin.config;

import com.vipsoft.admin.interceptor.AuthInterceptor;

import org.springframework.beans.factory.annotation.Autowired;

import org.springframework.context.annotation.Bean;

import org.springframework.context.annotation.Configuration;

import org.springframework.web.cors.CorsConfiguration;

import org.springframework.web.cors.UrlBasedCorsConfigurationSource;

import org.springframework.web.filter.CorsFilter;

import org.springframework.web.servlet.config.annotation.InterceptorRegistration;

import org.springframework.web.servlet.config.annotation.InterceptorRegistry;

import org.springframework.web.servlet.config.annotation.WebMvcConfigurer;

@Configuration

public class WebConfig implements WebMvcConfigurer {

    @Autowired

    private AuthInterceptor authorizationInterceptor;

    /**

     * 添加拦截器

     */

    @Override

    public void addInterceptors(InterceptorRegistry registry) {

        //拦截路径可自行配置多个 可用 ,分隔开

        InterceptorRegistration registration= registry.addInterceptor(authorizationInterceptor);

        registration.addPathPatterns("/**");

        registration.excludePathPatterns(

                "/swagger-ui.html",

                "/swagger-resources/**",

                "/docs/**",

                "/error",

                "/webjars/**"

        );

    }

    /**

     * 跨域配置

     */

    @Bean

    public CorsFilter corsFilter()

    {

        CorsConfiguration config = new CorsConfiguration();

        config.setAllowCredentials(true);

        // 设置访问源地址

        config.addAllowedOriginPattern("*");

        // 设置访问源请求头

        config.addAllowedHeader("*");

        // 设置访问源请求方法

        config.addAllowedMethod("*");

        // 有效期 1800秒

        config.setMaxAge(1800L);

        // 添加映射路径,拦截一切请求

        UrlBasedCorsConfigurationSource source = new UrlBasedCorsConfigurationSource();

        source.registerCorsConfiguration("/**", config);

        // 返回新的CorsFilter

        return new CorsFilter(source);

    }

}
模型
/**

 * 菜单权限表 sys_menu

 */

@TableName("sys_menu")

@Schema(description = "菜单信息")

public class SysMenu extends BaseEntity

{

    private static final long serialVersionUID = 1L;

    /** 菜单ID */

    @Schema(description = "菜单ID", example = "")

    private Long menuId;

    /** 菜单名称 */

    @Schema(description = "菜单名称", example = "用户管理")

    @TableField("menu_name")

    private String menuName;

}
Controller 配置
package com.vipsoft.admin.controller;

import com.baomidou.mybatisplus.core.metadata.IPage;

import com.vipsoft.admin.entity.SysMenu;

import com.vipsoft.admin.service.ISysMenuService;

import com.vipsoft.base.core.ApiResult;

import com.vipsoft.base.security.AuthIgnore;

import io.swagger.v3.oas.annotations.Operation;

import io.swagger.v3.oas.annotations.media.Content;

import io.swagger.v3.oas.annotations.media.Schema;

import io.swagger.v3.oas.annotations.responses.ApiResponse;

import io.swagger.v3.oas.annotations.tags.Tag;

import org.springframework.beans.factory.annotation.Autowired;

import org.springframework.web.bind.annotation.GetMapping;

import org.springframework.web.bind.annotation.RequestMapping;

import org.springframework.web.bind.annotation.RestController;

import java.util.List;

/**

 * 菜单信息

 *

 */

@Tag(name = "测试API接口", description = "这是一个关于测试API接口的描述")

@RestController

@RequestMapping("/menu")

public class SysMenuController {

    @Autowired

    private ISysMenuService menuService;

    /**

     * 获取菜单列表

     */

    @Operation(summary = "获取菜单列表", description = "通过 MyBatisPlus 获取",method = "GET")

    @ApiResponse(responseCode = "1", description = "成功",content = @Content(mediaType = "application/json", schema = @Schema(implementation = SysMenu.class)))

    @ApiResponse(responseCode = "-1", description = "获取失败")

    @GetMapping("/selectPage")

    @AuthIgnore

    public ApiResult selectPage(SysMenu menu) {

        IPage menus = menuService.selectPage(menu);

        return new ApiResult(menus);

    }

}

常用注解
| 注解 | 描述 |
|---|---|
| @Tag | 为一组 API 操作添加标签,便于在文档中组织和分组。 |
| @Operation | 描述一个 API 操作,包括摘要和详细描述。 |
| @Parameter | 描述方法参数,包括路径变量、请求体和查询参数。 |
| @Schema | 描述数据模型的属性和结构,通常用于模型类或 API 方法的参数和返回值。 |
| @ApiResponse | 描述单个 HTTP 响应状态码的详细信息。 |
| @ApiResponses | 描述多个 HTTP 响应状态码的详细信息。 |
| @RequestBody | 指定请求体的内容类型和结构。 |
| @Content | 描述响应内容的类型和格式。 |
| @SecurityRequirement | 描述 API 操作所需的安全要求,例如认证和授权。 |
| @Hidden | 指定某个 API 操作或模型在文档中隐藏。 |
| @Deprecated | 表示某个 API 操作或模型已被弃用。 |
| @ArraySchema | 描述数组类型的响应内容,通常用于返回列表。 |
| @ExampleObject | 提供示例对象,用于 API 文档中展示请求或响应的示例。 |
| @MediaType | 指定请求或响应的媒体类型。 |
| @Link | 描述 API 之间的链接关系。 |
| @ParameterObject | 描述复合参数对象,通常用于请求体中的复杂结构。 |
SpringBoot 2.3 升级到 SpringBoot 2.7 爬坑-- SpringDoc & Swagger的更多相关文章
- java springboot调用第三方接口 借助hutoool工具类 爬坑
楼主是个后端小白一枚,之前没接触过后端,只学了java基本语法,还是在学校老师教的,学的很浅,什么ssh.ssm框架都没有学,最近在自学spring boot,看书学也看不是很懂,就在b站上看教学视频 ...
- SpringMVC Web项目升级为Springboot项目(二)
一.访问原项目地址,报404错误 由于原项目地址启动路径为http://localhost:8080/xxx Spring boot默认启动路径为http://localhost:8080/ 所以需要 ...
- SpringBoot学习(3)-SpringBoot添加支持CORS跨域访问
SpringBoot学习(3)-SpringBoot添加支持CORS跨域访问 https://blog.csdn.net/yft_android/article/details/80307672
- SpringBoot自定义错误信息,SpringBoot适配Ajax请求
SpringBoot自定义错误信息,SpringBoot自定义异常处理类, SpringBoot异常结果处理适配页面及Ajax请求, SpringBoot适配Ajax请求 ============== ...
- SpringBoot自定义错误页面,SpringBoot 404、500错误提示页面
SpringBoot自定义错误页面,SpringBoot 404.500错误提示页面 SpringBoot 4xx.html.5xx.html错误提示页面 ====================== ...
- SpringBoot切换Tomcat容器,SpringBoot使用Jetty容器
SpringBoot切换Tomcat容器, SpringBoot修改为Jetty容器, SpringBoot使用undertow容器, SpringBoot使用Jetty容器 ============ ...
- SpringBoot源码分析之SpringBoot的启动过程
SpringBoot源码分析之SpringBoot的启动过程 发表于 2017-04-30 | 分类于 springboot | 0 Comments | 阅读次数 SpringB ...
- springboot(十一)-为什么要用springboot
前言 学习了一段时间springboot,一般都可以在项目中使用springboot开发了.因为springboot的东西并不多,或者说,springboot根本就没有新东西. 好了,现在问一句,我们 ...
- springboot项目--传入参数校验-----SpringBoot开发详解(五)--Controller接收参数以及参数校验----https://blog.csdn.net/qq_31001665/article/details/71075743
https://blog.csdn.net/qq_31001665/article/details/71075743 springboot项目--传入参数校验-----SpringBoot开发详解(五 ...
- 【spring-boot 源码解析】spring-boot 依赖管理
关键词:spring-boot 依赖管理.spring-boot-dependencies.spring-boot-parent 问题 maven 工程,依赖管理是非常基本又非常重要的功能,现在的工程 ...
随机推荐
- windows10开启电源模式中的休眠选项
使用管理员权限开启PowerShell,输入命令: powercfg -h on
- baselines算法库common/vec_env/dummy_vec_env.py模块分析
baselines算法库设计可以和多个并行环境进行交互,也就是并行采样,实现多进程并行采样的模块为subproc_vec_env.py,与此相对的只实现单个进程下多环境交互的模块即为本文所要讲的dum ...
- (数据科学学习手札163)ibis:极具潜力的Python数据分析框架
本文完整代码及附件已上传至我的Github仓库https://github.com/CNFeffery/DataScienceStudyNotes 1 简介 大家好我是费老师,今天要给大家介绍的Pyt ...
- 微服务架构springcloud
码云地址:https://gitee.com/lpxs/lp-springcloud.git 有问题可以多沟通:136358344@qq.com. 微服务架构 一.服务化简介 服务化的核心就是将传统的 ...
- 初三年后集训测试---T1排序
初三年后集训测试 $T 1 $ 排序 $$HZOI$$ ·题意: 给定 \(4n\) 个整数,求 : \[\max\{\sum_{i=1}^{4n}(A_{i,1} \times A_{i,2} - ...
- 修改kubeadm证书过期时间及更新k8s集群证书
一.为什么要修改 kubeadm 证书时间 Kubernetes 官方提供了 kubeadm 工具安装 kubernetes 集群,使用这个工具安装集群非常便捷,使部署和升级 Kubernetes 变 ...
- Windows添加软件开机自启动
两种方式 1.添加快捷方式到开始菜单 打开我的电脑找到C:\ProgramData\Microsoft\Windows\Start Menu\Programs\Startup 文件夹, 如果难找的话可 ...
- NET Core 多身份校验与策略模式
背景需求: 系统需要对接到XXX官方的API,但因此官方对接以及管理都十分严格.而本人部门的系统中包含诸多子系统,系统间为了稳定,程序间多数固定Token+特殊验证进行调用,且后期还要提供给其他兄 ...
- docker image 变小的办法
https://www.docker.com/blog/intro-guide-to-dockerfile-best-practices/ https://medium.com/sciforce/st ...
- vue 中 elementUI el-table 实现滚动加载
vue 中 elementUI el-table 实现滚动加载 一.需求 vue 中 elementUI el-table 实现滚动加载,场景:当表格需要显示大量数据时,又想通过一页来进行展示数据. ...
