Java 之NIO
1. NIO 简介
- Java NIO(New IO)是从1.4版本开始引入的一个新的IO API,可以替代标准的Java IO API;
- NIO 与原来的IO有同样的作用和目的,但是使用的方式完全不同,NIO支持面向缓冲区的,基于通道的IO操作;
- Java NIO系统的核心在于:通道(Channel)和缓冲区(Buffer);简单说,通道负责传输,缓冲区负责存储;
- NIO 将以更加高效的方式进行文件的读写操作;
1.1 IO和NIO的主要区别
- IO
- 面向流
- 阻塞IO
- NIO
- 面向缓冲区
- 非阻塞IO
- 选择器
2. 缓冲区(Buffer)
2.1 缓冲区概述
- 缓冲区:主要用于与NIO通道进行交互,数据从通道读入缓冲区,从缓冲区写入通道中;
- 缓冲区就是数组,用于存储不同数据类型的数据,按数据类型不同,提供了相应类型的缓冲区:
ByteBuffer,CharBuffer,ShortBuffer,IntBuffer,LongBuffer,FloatBuffer,DoubleBuffer;
2.2 与缓冲区相关的方法和属性
- 常用方法
allocate():获取缓冲区;put(): 将数据存入到缓冲区中;get(): 从缓冲区中获取数据;flip(): 从写入数据模式切换到读取数据模式;rewind(): 将position设置为0,可以再次读取数据;clear(): 清空缓冲区,但是缓冲区中的数据依然存在,但是处于"被遗忘"状态;hasRemaining(): 判断缓冲区中是否还有剩余数据;remaining(): 获取缓冲区中还可以被操作数据的数量;
- 缓冲区的四个核心属性
- capacity:表示缓冲区中最大存储数据的容量,一旦声明,就不能改变;
- limit: 表示缓冲区中可以操作数据的大小(limit后的数据不能进行读写);
- position: 表示缓冲区中正在操作数据的位置;
- mark: 可以记录当前 position的位置,可以通过
reset()恢复到mark的位置;
// 测试类

public class TestBuffer{

    @Test

    public void test01(){

        // 分配一个指定大小的缓冲区

        ByteBuffer buf = ByteBuffer.allocate(1024);

        String str = "abcd";

        System.out.println(buf.position());

        System.out.println(buf.limit());

        System.out.println(buf.position());

        // 将数据存入到缓冲区

        buf.put(str.getBytes());

        // 切换到读取数据模式

        buf.flip();

        // 读取缓冲区的数据

        byte[] dst = new byte[buf.limit()];

        buf.get(dst);

        System.out.println(new String(dst,0,dst.length);

    }

}
2.3 直接缓冲区和非直接缓冲区
- 直接缓冲区: 通过
allocateDirect()方法分配缓冲区,将缓冲区建立在物理内存中;只有ByteBuffer支持;
也可以通过 FileChannel的map()方法,将文件区域直接映射到内存中来创建,该方法返回MappedByteBuffer - 非直接缓冲区: 通过
allocate()方法分配缓冲区,将缓冲区建立在JVM的内存中;
3. 通道(Channel)
- 通道:表示IO源与目标打开的连接;在Java NIO 中负责缓冲区中数据的传输;
- 通道本身不能直接访问数据,只能与缓冲区进行交互;
3.1 通道的主要实现类
- FileChannel;
- SocketChannel;
- ServerSocketChannel;
- DatagramChannel;
3.2 获取通道
- Java 针对支持通道的类提供了
getChannel()方法,支持通道的类有:- 本地IO:
- FileInputStream/FileOutputStream
- RandomAccessFile
- 网络IO
- Socket
- ServerSocket
- DatagramSocket
- 本地IO:
- 在 JDK1.7 中的 NIO2,针对各个通道提供了静态方法
open(); - 在 JDK1.7 中的 NIO2,Files 工具类的
newByteChannel();
public class TestChannel{

    // 1. 利用通道完成文件的复制(非直接缓冲区)

    @Test

    public void test01(){

        FileInputStream fis = null;

        FileOutputStream fos = null;

        FileChannel inChannel = null;

        FileChannel outChannel = null;

        try{

            fis = new FileInputStream("1.jpg");

            fos = new FileOutputStream("2.jpg");

            // 获取通道

            inChannel = fis.getChannel();

            outChannel = fos.getChannel();

            // 分配指定大小的缓冲区

            ByteBuffer buf = ByteBuffer.allocate(1024);

            // 将数据存入缓冲区(读取数据)

            while(inChannel.read(buf) != -1){

                buf.flip(); // 切换读取数据的模式

                // 将缓冲区中的数据写出

                outChannel.write(buf);

                buf.clear(); // 清空缓冲区

            }

        } catch(IOException e){

            e.printStackTrace();

        }finally{

            // 关闭资源

            if(outChannel != null){

                try{

                    outChannel.close();

                }catch(IOException e){

                    e.printStackTrace();

                }

            }

            if(inChannel != null){

                try{

                    inChannel.close();

                }catch(IOException e){

                    e.printStackTrace();

                }

            }

            if(fis != null){

                try{

                    fis.close();

                }catch(IOException e){

                    e.printStackTrace();

                }

            }

            if(fos != null){

                try{

                    fos.close();

                }catch(IOException e){

                    e.printStackTrace();

                }

            }

        }

    }

    // 2. 使用直接缓冲区完成文件的复制(内存映射文件)

    @Test

    public void test02() throws IOException{

        FileChannel inChannel = FileChannel.open(Paths.get("1.jpg"),StandardOpenOption.READ);

        FileChannel outChannel = FileChannel.open(Paths.get("2.jpg"),StandardOpenOption.WRITE,

                                StandardOpenOption.READ,StandardOpenOption.CREATE_NEW);

        // 内存映射文件

        MappedByteBuffer inMappedBuf = inChannel.map(MapMode.READ_ONLY,0,inChannel.size());

        MappedByteBuffer outMappedBuf = outChannel.map(MapMode.READ_WRITE,0,inChannel.size());

        // 直接对缓冲区进行数据的读写操作

        byte[] dst = new byte[inMappedBuf.limit()];

        inMappedBuf.get(dst);

        outMappedBuf.put(dst);

        // 关闭资源

        inChannel.close();

        outChannel.close();

    }

    // 3. 使用通道直接的数据传输(使用的是直接缓冲区):

    //     transferFrom()

    //     transferTo()

    @Test

    public void test03() throws IOException {

        FileChannel inChannel = FileChannel.open(Paths.get("1.jpg"),StandardOpenOption.READ);

        FileChannel outChannel = FileChannel.open(Paths.get("2.jpg"),StandardOpenOption.WRITE,

                                StandardOpenOption.READ,StandardOpenOption.CREATE_NEW);

        // inChannel.transferTo(0,inChannel.size(),outChannel);

        outChannel.transferFrom(inChannel,0,inChannel.size());

        outChannel.close();

    }

}
3.3 分散(Scatter)与聚集(Gather)
- 分散读取(Scattering Reads): 将通道中的数据分散到多个缓冲区中;
- 聚集写入(Gathering Writes): 将多个缓冲区中的数据聚集到通道中;
//测试类

public class TestChannel{

    @Test

    public void test04() throws IOException{

        RandomAccessFile raf1 = new RandomAccessFile("1.txt","rw");

        //1. 获取通道

        FileChannel channel1 = raf1.getChannel();

        // 2. 分配指定大小的缓冲区

        ByteBuffer buf1 = ByteBuffer.allocate(100);

        ByteBuffer buf2 = ByteBuffer.allocate(1024);

        // 3. 分散读取

        ByteBuffer[] bufs = {buf1,buf2};

        channel1.read(bufs);

        for(ByteBuffer byteBuffer : bufs){

            byteBuffer.flip();

        }

        System.out.println(new String(bufs[0].array(),0,bufs[0].limit()));

        System.out.println(new String(bufs[1].array(),0,bufs[1].limit()));

        // 4. 聚集写入

        RandomAccessFile raf2 = new RandomAccessFile("2.txt","rw");

        FileChannel channel2 = raf2.getChannel();

        channel2.write(bufs);

    }

}
3.4 字符集(Charset)
- 编码
- 解码
// 测试类

public class TestChannel{

    // 查看支持的字符集

    @Test

    public void test02(){

        Map<String,Charset> map = Charset.availableCharsets();

        Set<Entry<String,Charset>> set = map.entrySet();

        for(Entry<String,Charset> entry : set){

            System.out.println(entry.getKey()+"="+entry.getValue());

        }

    }

    // 使用字符集进行编码和解码

    @Test

    public void test() throws IOException{

        Charset cs2 = Charset.forName("GBK");

        // 获取编码器

        CharsetEncoder ce = cs2.newEncoder();

        // 获取解码器

        CharsetDecoder cd = cs2.newDecoder();

        CharBuffer cBuf = CharBuffer.allocate(1024);

        cBuf.put("张三");

        cBuf.flip();

        // 编码

        ByteBuffer bBuf = ce.encode(cBuf);

        for(int i=0; i<4; i++){

            System.out.println(bBuf.get());

        }

        // 解码

        bBuf.flip();

        CharBuffer cBu = cd.decode(bBuf);

        System.out.println(cBu.toString());

    }

}
4. NIO 的非阻塞式网络通信
4.1 使用NIO完成网络通信的三个核心
- 通道(Channel): 负责连接;
- 缓冲区(Buffer): 负责数据的存取;
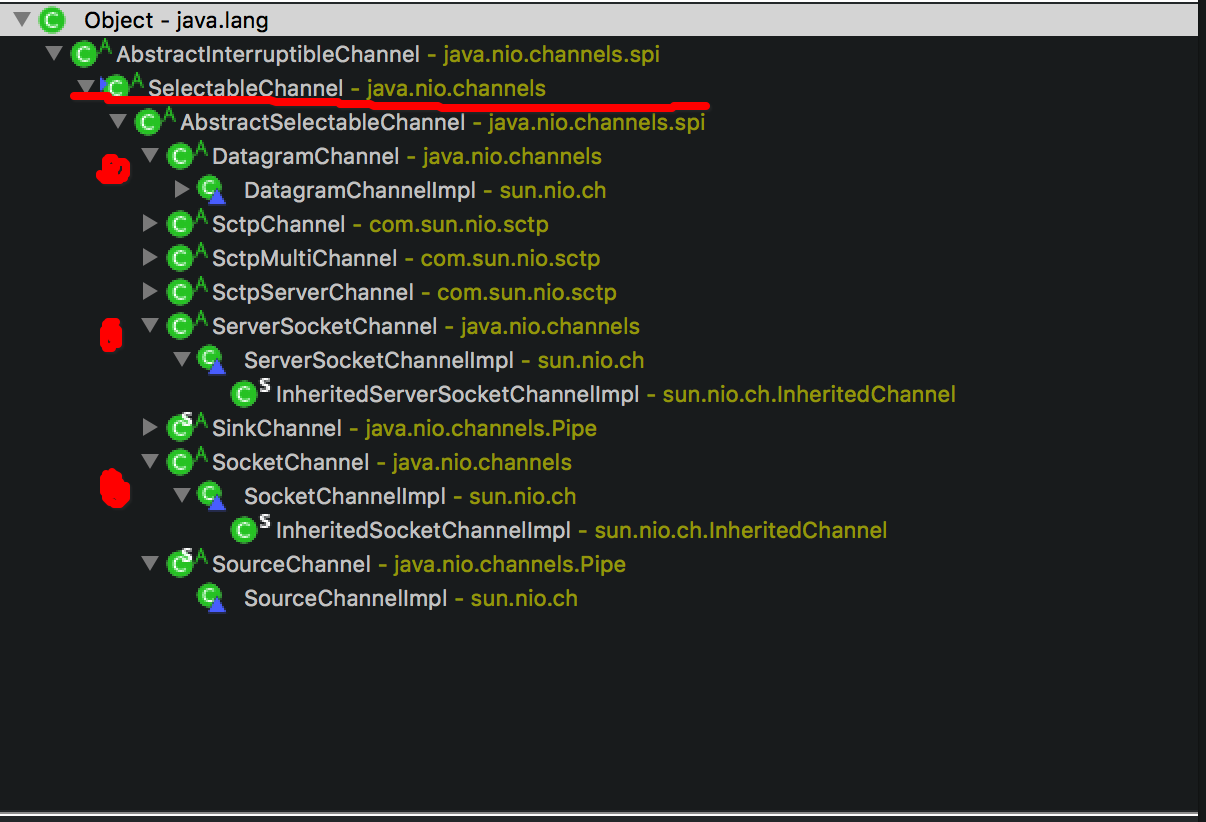
- 选择器(Selector): 是 SelectableChannel 的多路复用器,用于监控 SelectableChannel 的IO状况;
- SelectableChannel 继承体系
// NIO 阻塞式通信

public class TestBlockingNIO{

    // 客户端

    @Test

    public void client() throws IOException{

        // 1. 获取通道

        SocketChannel sChannel = SocketChannel.open(new InetSocketAddress("127.0.0.1",10000));

        FileChannel inChannel = FileChannel.open(Paths.get("1.jpg"),StandardOpenOption.READ);

        // 2. 分配指定大小的缓冲区

        ByteBuffer buf = ByteBuffer.allocate(1024);

        // 3. 读取本地文件,并发送到服务端

        while(inChannel.read(buf) != -1){

            buf.flip();

            sChannel.write(buf);

            buf.clear();

        }

        // 告诉服务端,客户端写入完成,否则服务端一直等待,处于阻塞状态

        sChannel.shutdownOutput();

        // 4. 接收服务端的反馈

        int len=0;

        while((len = sChannel.read(buf)) != -1){

            buf.flip();

            System.out.println(new String(buf.array(),0,len));

            buf.clear();

        }

        // 5. 关闭通道

        inChannel.close();

        sChannel.close();

    }

    // 服务端

    @Test

    public void server() throws IOException{

        // 1. 获取通道

        ServerSocketChannel ssChannel = ServerSocketChannel.open();

        FileChannel outChannel = FileChannel.open(Paths.get("2.jpg"),StandardOpenOption.WRITE,

                                                                   StandardOpenOption.CREATE);

        // 2. 绑定连接

        ssChannel.bind(new InetSocketAddress(10000));

        // 3. 获取客户端连接的通道

        SocketChannel sChannel = ssChannel.accept();

        // 4. 分配指定大小的缓冲区

        ByteBuffer buf = ByteBuffer.allocate(1024);

        // 5. 接收客户端的数据,并保存到本地

        while(sChannel.read(buf) != -1){

            buf.flip();

            outChannel.write(buf);

            buf.clear();

        }

        // 6. 发送反馈给客户端

        buf.put("服务端收到请求数据".getBytes());

        buf.flip();

        sChannel.write(buf);

        // 7. 关闭通道

        sChannel.close();

        outChannel.close();

        ssChannel.close();

    }

}

// NIO 非阻塞式通信

public class TestNonBlockingNIO{

    // 客户端

    @Test

    public void client(){

        // 1. 获取通道

        SocketChannel sChannel = SocketChannel.open(new InetSocketAddress("127.0.0.1",10000));

        // 2. 切换到非阻塞模式

        sChannel.configureBlocking(false);

        // 3. 分配指定大小的缓冲区

        ByteBuffer buf = ByteBuffer.allocate(1024);

        // 4. 发送数据给服务端(发送的内容: 当前时间)

        buf.put(new Date().toString().getBytes());

        buf.flip();

        sChannel.write(buf);

        buf.clear();

        // 5. 关闭通道

        sChannel.close();

    }

    // 服务端

    @Test

    public void server(){

        // 1. 获取通道

        ServerSocketChannel ssChannel = ServerSocketChannel.open();

        // 2. 切换到非阻塞模式

        ssChannel.configureBlocking(false);

        // 3. 绑定连接

        ssChannel.bind(new InetSocketAddress(10000));

        // 4. 获取选择器

        Selector selector = Selector.open();

        // 5. 将通道注册到选择器, 并且指定"监听接收事件"

        // register(Selector sel, int ops): ops 表示选择器对通道的监听事件;

        // 可以监听的事件类型(可使用SelectionKey的四个常量表示):

        //   读: SelectionKey.OP_READ (1)

        //   写: SelectionKey.OP_WRITE (4)

        //   连接: SelectionKey.OP_CONNECT (8)

        //   接收: SelectionKey.OP_ACCEPT (16)

        // SelectionKey: 表示 SelectableChannel 和 Selector 之间的注册关系

        ssChannel.register(selector,SelectionKey.OP_ACCEPT);

        // 6. 轮询式的获取选择器上已经"准备就绪"的事件

        while(selector.select() > 0){

            // 7. 获取当前选择器中所有注册的"选择键(也就是已注册的监听事件)"

            Iterator<SeletionKey> it = selector.selectedKeys().iterator();

            while(it.hasNext()){

                // 8. 获取准备"就绪"的事件

                SelectionKey sk = it.next();

                // 9. 判断具体是什么事件准备就绪

                if(sk.isAcceptable()){

                    // 10. 若"接收就绪",获取客户端连接

                    SocketChannel sChannel = ssChannel.accept();

                    // 11. 切换非阻塞模式

                    sChannel.configureBlocking(false);

                    // 12. 将该通道注册到选择器上

                    sChannel.register(selector,SelectionKey.OP_READ);

                }else if(sk.isReadable()){

                    // 13. 获取当前选择器上,"读就绪"状态的通道

                    SocketChannel sChannel = (SocketChannel)sk.channel();

                    // 14. 读取数据

                    ByteBuffer buf = ByteBuffer.allocate(1024);

                    int len = 0;

                    while((len = sChannel.read(buf)) > 0){

                        buf.flip();

                        System.out.println(new String(buf.array(),0,len));

                        buf.clear();

                    }

                }

                // 15. 取消选择键(SelectionKey)

                it.remove();

            }

        }

    }

}
4.2 DatagramChannel
- DatagramChannel 是一个能收发UDP包的通道
// 测试收发UDP 包

public class TestNonBlockingNIO{

    @Test

    public void send() throws IOException{

        DatagramChannel dc = DatagramChannel.open();

        dc.configureBlocking(false);

        ByteBuffer buf = ByteBuffer.allocate(1024);

        // Scanner 类可以获取用户输入

        Scanner scan = new Scanner(System.in);

        while(scan.hasNext()){

            String str = scan.next();

            buf.put((new Date().toString()+":\n"+str).getBytes());

            buf.filp();

            dc.send(buf,new InetSocketAddress("127.0.0.1",10000));

            buf.clear();

        }

        dc.close();

    }

    @Test

    public void receive() throws IOException{

        DatagramChannel dc = DatagramChannel.open();

        dc.configureBlocking(false);

        dc.bind(new InetSocketAddress(10000));

        Selector selector = Selector.open();

        dc.register(selector,SelectionKey.OP_READ);

        while(selector.select() > 0){

            Iterator<SelectionKey> it = selector.selectedKeys().iterator();

            while(it.hasNext()){

                SelectionKey sk = it.next();

                if(sk.isReadable()){

                    ByteBuffer buf = ByteBuffer.allocate(1024);

                    dc.receive(buf);

                    buf.flip();

                    System.out.println(new String(buf.array(),0,buf.limit()));

                    buf.clear();

                }

            }

            it.remove();

        }

    }

}
4.3 管道(Pipe)
- 管道:是两个线程之间的单向数据连接;
- 管道有一个source通道和一个sink通道,数据会被写到sink通道,从source通道读取;

// 测试类

public class TestPipe{

    @Test

    public void test() throws IOException{

        // 1. 获取管道

        Pipe pipe = Pipe.open();

        // 2. 将缓冲区中的数据写入管道

        ByteBuffer buf = ByteBuffer.allocate(1024);

        Pipe.SinkChannel sinkChannel = pipe.sink();

        buf.put("通过单向管道发送数据".getBytes());

        buf.flip();

        sinkChannel.write(buf);

        //3. 读取缓冲区中数据

        Pipe.SourceChannel sourceChannel = pipe.source();

        buf.flip();

        sourceChannel.read(buf);

        int len = sourceChannel.read(buf);

        System.out.println(new String(buf.array(),0,len));

        sourceChannel.close();

        sinkChannel.close();

    }

}
参考资料
Java 之NIO的更多相关文章
- JAVA bio nio aio
[转自]http://qindongliang.iteye.com/blog/2018539 在高性能的IO体系设计中,有几个名词概念常常会使我们感到迷惑不解.具体如下: 序号 问题 1 什么是同步? ...
- java的nio之:java的nio系列教程之buffer的概念
一:java的nio的buffer==>Java NIO中的Buffer用于和NIO通道Channel进行交互.==>数据是从通道channel读入缓冲区buffer,从缓冲区buffer ...
- java的nio之:java的nio系列教程之channel的概念
一:java的nio的channel Java NIO的通道类似流,但又有些不同: ==>既可以从通道中读取数据,又可以写数据到通道.但流的读写通常是单向的. ==>通道可以异步地读写. ...
- java的nio之:java的nio系列教程之概述
一:java的nio的核心组件?Java NIO 由以下几个核心部分组成: ==>Channels ==>Buffers ==>Selectors 虽然Java NIO 中除此之外还 ...
- java之NIO编程
所谓行文如编程,随笔好比java文件,文章好比类,参考文献是import,那么目录就是方法定义. 本篇文章处在分析thrift的nonblocking server之前,因为后者要依赖该篇文章的知识. ...
- 输入和输出--java的NIO
Java的NIO 实际开发中NIO使用到的并不多,我并不是说NIO使用情景不多,是说我自己接触的并不是很多,前面我在博客园和CSDN上转载了2篇别人写的文章,这里来大致总结下Java的NIO,大概了解 ...
- JAVA 探究NIO
事情的开始 1.4版本开始,java提供了另一套IO系统,称为NIO,(New I/O的意思),NIO支持面向缓冲区的.基于通道的IO操作. 1.7版本的时候,java对NIO系统进行了极大的扩展,增 ...
- 理解Java的NIO
同步与阻塞 同步和异步是针对应用程序和内核的交互而言的. 同步:执行一个操作之后,进程触发IO操作并等待(阻塞)或者轮询的去查看IO的操作(非阻塞)是否完成,等待结果,然后才继续执行后续的操作. 异步 ...
- Java通过NIO实现快速文件拷贝的代码
将内容过程重要的内容片段做个记录,下面的内容段是关于Java通过NIO实现快速文件拷贝的内容. public static void fileCopy( File in, File out ) thr ...
- 一个小时就能理解Java的NIO必须掌握这三大要素!
同步与阻塞 同步和异步是针对应用程序和内核的交互而言的. 同步:执行一个操作之后,进程触发IO操作并等待(阻塞)或者轮询的去查看IO的操作(非阻塞)是否完成,等待结果,然后才继续执行后续的操作. 异步 ...
随机推荐
- jQuery——实现弹窗
window.html <!DOCTYPE html PUBLIC "-//W3C//DTD XHTML 1.0 Transitional//EN" "http:/ ...
- 使用info命令查看Redis信息和状态
redis-cli连接服务器后,使用info命令查看Redis信息和状态: ? 1 info 其中memory段显示了redis的内存使用状态. 以下内容复制自:http://redisdoc.com ...
- PCB标识说明
VDC (Voltage Direct Current),直流电压 VBAT,电池供电 PWKEY,电源键 RXD,数据接收 TXD,数据发送 Receive Data ,Transmit Data ...
- SQL Server从读写频繁的大表中删除大批量数据
如果我们直接用delete from语句来删除读写频繁的大表中的数据,很有可能会因为where的条件是全表扫描从而导致整个表被锁住了.如果该表是读写频繁的生产库那简直就是一场灾难,所有的线上读写请求都 ...
- 数论 - 119. Magic Pairs
Magic Pairs Problem's Link Mean: 已知N.A0.B0,对于给定X.Y,若A0X+B0Y能被N整除,则AX+BY也能被N整除,求所有的A.B.(0<=A.B< ...
- VMware ESXi 启动时提示引导错误:不是VMware引导槽。找不到管理程序(bank6 not a vmware boot bank no hypervisor found)
VMware ESXi 启动时提示引导错误: bank6 not a vmware boot bank no hypervisor found 大概中文意思是:不是VMware引导槽.找不到管理程序. ...
- Tagger: Deep Unsupervised Perceptual Grouping
没看论文,但看了介绍视频,简直做了一个小型纪录片. 视频地址:https://www.youtube.com/watch?v=jfB_lWZA4Qo 中文翻译:http://blog.csdn.net ...
- STL的map容器将第3个模板参数设为less_equal或greater_equal会怎样?
最近都在学Linux系统编程,用C就足矣,有段时间没碰C++了,于是实现些算法练手. 实现多项式乘法的时候发现有几项没有合并同类项,最终调试到这一步时发现了问题. res是map类型,用find查找k ...
- Java的图形界面依然是跨平台的
Awt:抽象窗口工具箱,它由三部分组成: ①组件:界面元素: ②容器:装载组件的容器(例如窗体): ③布局管理器:负责决定容器中组件的摆放位置. 图形界面的应用分四步: ① 选择一个容器: ⑴wind ...
- Virtual Box下安装Oracle Linux 6.3
Oracle Linux 6.3已经公布快2年了,其功能有非常大的提升,增强了KVM,文件卷的在线resizing,LVM支持 raid4, 5, 6.支持很多其它的虚拟CPU数以及更大内存,详细能够 ...