一步步实现ArcMenu效果
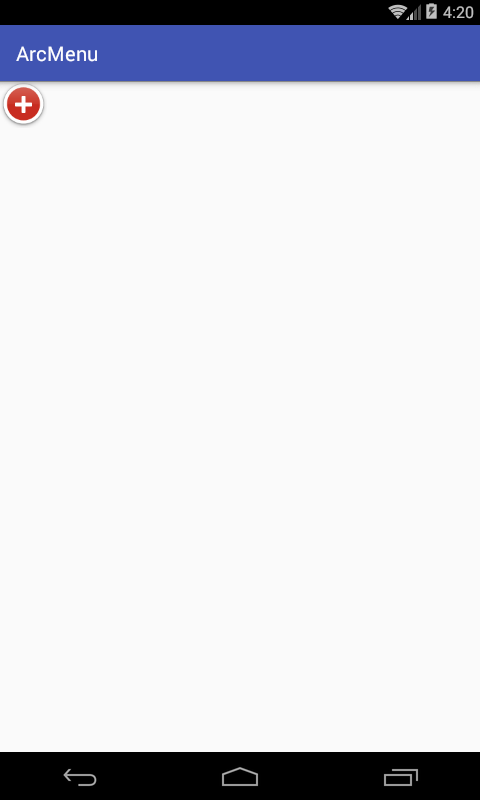
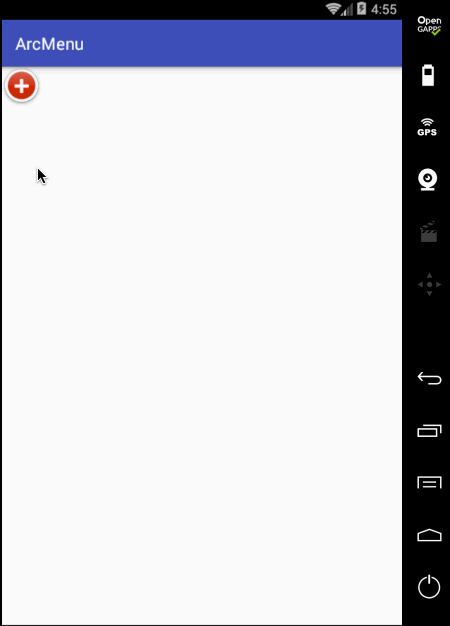
先来看一下最终要实验的效果:
是不是跟国外的一款Path的菜单效果类似,这里的动画采用补间动画去实现,正而操练一下补间动画。
布局和子视图的测量处理:
新建一自定义View继承ViewGroup:
然后在布局中进行声明:
然后在ViewGroup中需要准备子菜单元素,这里直接在布局文件中的ArcMenuView里面进行声明,首先是菜单的“+”号,由两张图片构成:
composer_button.png:
composer_icn_plus.png:

然后再准备展开的5个菜单项,可以由ImageView组成,定义在布局文件中如下:
<?xml version="1.0" encoding="utf-8"?>

<RelativeLayout xmlns:android="http://schemas.android.com/apk/res/android"

    xmlns:tools="http://schemas.android.com/tools"

    android:layout_width="match_parent"

    android:layout_height="match_parent"

    tools:context=".MainActivity">

    <com.arcmenu.test.ArcMenuView

        android:id="@+id/lay_arc_menu"

        android:layout_width="wrap_content"

        android:layout_height="wrap_content">

        <!-- "+"按钮 -->

        <RelativeLayout

            android:id="@+id/lay_plus"

            android:layout_width="wrap_content"

            android:layout_height="wrap_content"

            android:gravity="center">

            <ImageView

                android:layout_width="wrap_content"

                android:layout_height="wrap_content"

                android:layout_centerInParent="true"

                android:src="@drawable/composer_button" />

            <ImageView

                android:layout_width="wrap_content"

                android:layout_height="wrap_content"

                android:layout_centerInParent="true"

                android:src="@drawable/composer_icn_plus" />

        </RelativeLayout>

        <!-- 相机按钮 -->

        <ImageView

            android:layout_width="wrap_content"

            android:layout_height="wrap_content"

            android:src="@drawable/composer_camera" />

        <!-- 音乐按钮 -->

        <ImageView

            android:layout_width="wrap_content"

            android:layout_height="wrap_content"

            android:src="@drawable/composer_music" />

        <!-- 定位按钮 -->

        <ImageView

            android:layout_width="wrap_content"

            android:layout_height="wrap_content"

            android:src="@drawable/composer_place" />

        <!-- 月亮按鈕 -->

        <ImageView

            android:layout_width="wrap_content"

            android:layout_height="wrap_content"

            android:src="@drawable/composer_sleep" />

        <!-- 太阳按钮 -->

        <ImageView

            android:layout_width="wrap_content"

            android:layout_height="wrap_content"

            android:src="@drawable/composer_sun" />

    </com.arcmenu.test.ArcMenuView>

</RelativeLayout>
其资源图如下:


此时运行肯定看不到任何效果:
因为咱们还得处理子视图的测试及位置摆放处理,毕境不像系统写好的四大布局,所以接下来对子视图进行测量:
子视图布局处理的细节分析:
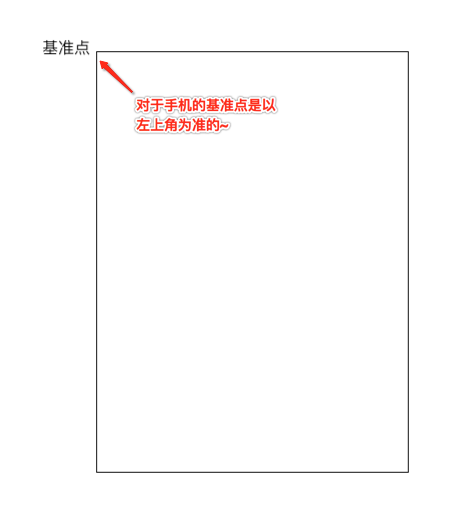
当测量好之后,要想让子视图显示成咱们想要的样子,接下来就得对子视图如何布局进行处理了,在实现之前首先得对其进行分析一下:
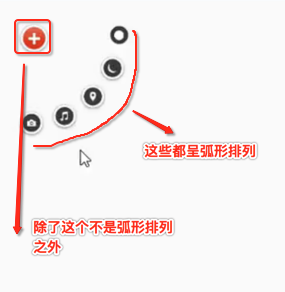
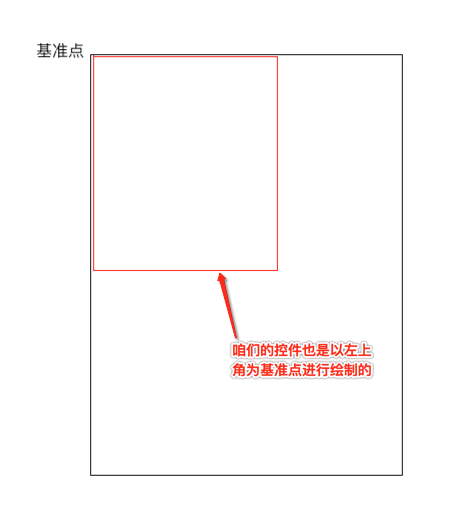
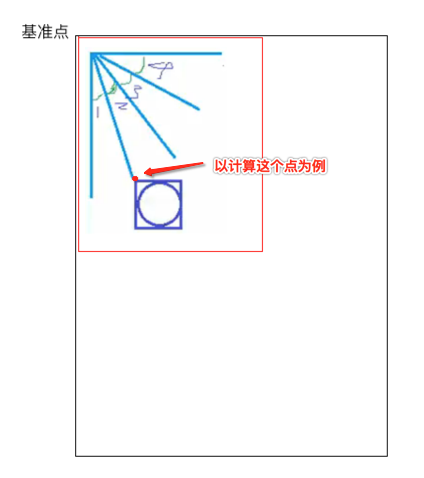
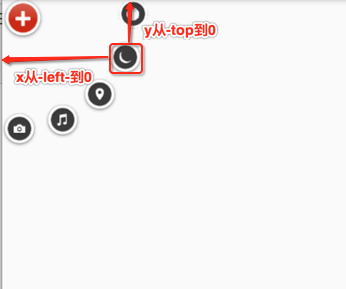
对于第一个“+”号应该就是在默认左上角的位置,而对于其它的元素则应该以弧形的样式进行摆放,那这个弧形具体的摆放规则是怎么样的呢?
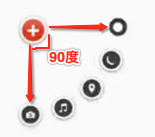
也就是这五个元素均等分了90度,现在的问题就是怎么来算这些点的摆放位置的左上右下,还是以草图进行分析:
∠1 = ∠2 = ∠3 = ∠4 = π / 2 / 4。
然后咱们可以定一个半径的长度,也就是目前已知的条件有:
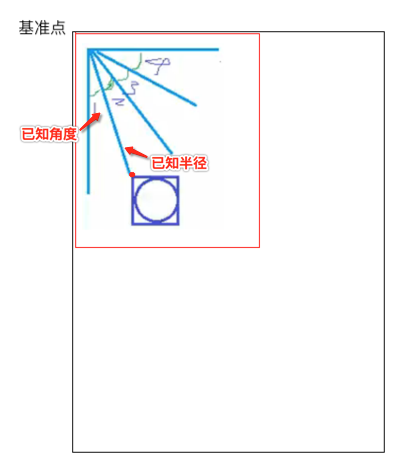
要求x、y:
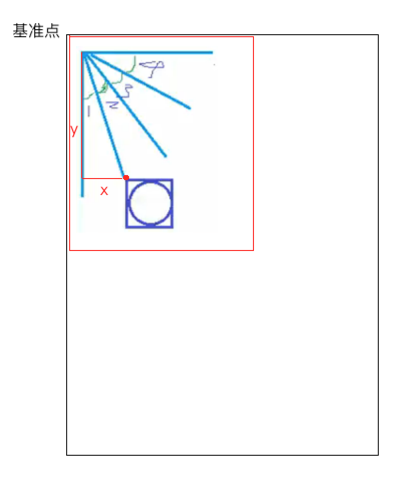
根据三角函数就可轻松求解,如下:
x = radius * Math.sin(π / 2 / 4);
y = radius * Math.cos(π / 2 / 4);
而求得了left和top,那right和bottom就比较简单了,直接加相应控件的宽高既可求得。
那如果再换一个元素其求法又有啥变化呢?

只是角度由原来的1变为了1+2,也就是2倍的角度1,因为每个夹角都是相等的,于是随着元素的变化不断去更改夹角的度数既可,其计算公式是一样的,好,有了实现的思路之后下面来用代码来实现一下子视图弧形的排列。
子视图弧形排列实现:
由于第一个"+"号元素不参与弧形的排列,所以先将它拿出来稍后再单独对它进行处理:

/**
* 圆形菜单View---布局和子视图的测量处理
*/
public class ArcMenuView extends ViewGroup { /* 定义要摆放圆的半径,其子视图的摆放位置需要依据它来计算 */
private static final float RADIUS = 130f; public ArcMenuView(Context context) {
this(context, null);
} public ArcMenuView(Context context, AttributeSet attrs) {
this(context, attrs, 0);
} public ArcMenuView(Context context, AttributeSet attrs, int defStyleAttr) {
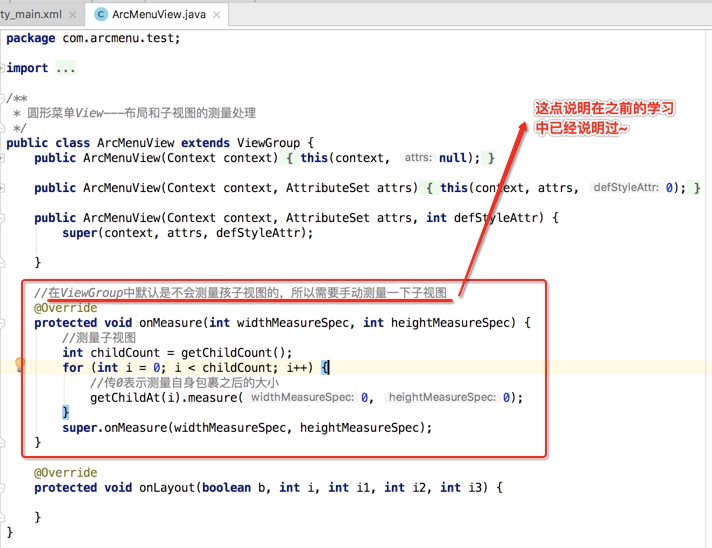
super(context, attrs, defStyleAttr); } //在ViewGroup中默认是不会测量孩子视图的,所以需要手动测量一下子视图
@Override
protected void onMeasure(int widthMeasureSpec, int heightMeasureSpec) {
//测量子视图
int childCount = getChildCount();
for (int i = 0; i < childCount; i++) {
//传0表示测量自身包裹之后的大小
getChildAt(i).measure(0, 0);
}
super.onMeasure(widthMeasureSpec, heightMeasureSpec);
} //除第一个子视图外的其余子视图成孤形排列
@Override
protected void onLayout(boolean changed, int l, int t, int r, int b) {
View child0 = getChildAt(0);//由于第一个"+"按钮不参与弧形的排列,所以先拿出来单独处理
int childCount = getChildCount();
for (int i = 0; i < childCount - 1; i++) {//以弧形来摆放其余子视图
View child = getChildAt(i + 1);
int childMesureWidth = child.getMeasuredWidth();
int childMesureHeight = child.getMeasuredHeight();
float angle = (float) ((Math.PI / 2 / 4) * i);//计算出当前要摆放子视图的角度
int childLeft = (int) (RADIUS * Math.sin(angle));
int childTop = (int) (RADIUS * Math.cos(angle));
int childRight = childLeft + childMesureWidth;
int childBottom = childTop + childMesureHeight;
child.layout(childLeft, childTop, childRight, childBottom);
}
}
}
编译运行:
接着还差一个“+”号的摆放,这个比较简单,稍加处理一下:
再次编译运行:
第0个和其余的子视图的旋转处理:
接下来增加点击的动画效果,首先处理旋转效果,先处理点击“+”号的旋转,先给“+”View增加点击事件:
/**

 * 圆形菜单View---第0个和其余子视图的旋转处理

 */

public class ArcMenuView extends ViewGroup implements View.OnClickListener {

    /* 定义要摆放圆的半径,其子视图的摆放位置需要依据它来计算 */

    private static final float RADIUS = 130f;

    public ArcMenuView(Context context) {

        this(context, null);

    }

    public ArcMenuView(Context context, AttributeSet attrs) {

        this(context, attrs, 0);

    }

    public ArcMenuView(Context context, AttributeSet attrs, int defStyleAttr) {

        super(context, attrs, defStyleAttr);

    }

    //在ViewGroup中默认是不会测量孩子视图的,所以需要手动测量一下子视图

    @Override

    protected void onMeasure(int widthMeasureSpec, int heightMeasureSpec) {

        //测量子视图

        int childCount = getChildCount();

        for (int i = 0; i < childCount; i++) {

            //传0表示测量自身包裹之后的大小

            getChildAt(i).measure(0, 0);

        }

        super.onMeasure(widthMeasureSpec, heightMeasureSpec);

    }

    //除第一个子视图外的其余子视图成孤形排列

    @Override

    protected void onLayout(boolean changed, int l, int t, int r, int b) {

        View child0 = getChildAt(0);//由于第一个"+"按钮不参与弧形的排列,所以先拿出来单独处理

        child0.layout(0, 0, child0.getMeasuredWidth(), child0.getMeasuredHeight());

        child0.setOnClickListener(this);

        int childCount = getChildCount();

        for (int i = 0; i < childCount - 1; i++) {//以弧形来摆放其余子视图

            View child = getChildAt(i + 1);

            int childMesureWidth = child.getMeasuredWidth();

            int childMesureHeight = child.getMeasuredHeight();

            float angle = (float) ((Math.PI / 2 / 4) * i);//计算出当前要摆放子视图的角度

            int childLeft = (int) (RADIUS * Math.sin(angle));

            int childTop = (int) (RADIUS * Math.cos(angle));

            int childRight = childLeft + childMesureWidth;

            int childBottom = childTop + childMesureHeight;

            child.layout(childLeft, childTop, childRight, childBottom);

        }

    }

    @Override

    public void onClick(View view) {

        switch (view.getId()) {

            case R.id.lay_plus:

                rotateChild0(view);

                break;

        }

    }

    private void rotateChild0(View view) {

        RotateAnimation rotateAnimation = new RotateAnimation(0, 360, RotateAnimation.RELATIVE_TO_SELF, 0.5f, RotateAnimation.RELATIVE_TO_SELF, 0.5f);

        rotateAnimation.setDuration(2000);

        rotateAnimation.setFillAfter(true);

        view.startAnimation(rotateAnimation);

    }

}
编译运行:
接下来再让其它的子元素也进行相应的旋转,如下:
/**

 * 圆形菜单View---第0个和其余子视图的旋转处理

 */

public class ArcMenuView extends ViewGroup implements View.OnClickListener {

    /* 定义要摆放圆的半径,其子视图的摆放位置需要依据它来计算 */

    private static final float RADIUS = 130f;

    public ArcMenuView(Context context) {

        this(context, null);

    }

    public ArcMenuView(Context context, AttributeSet attrs) {

        this(context, attrs, 0);

    }

    public ArcMenuView(Context context, AttributeSet attrs, int defStyleAttr) {

        super(context, attrs, defStyleAttr);

    }

    //在ViewGroup中默认是不会测量孩子视图的,所以需要手动测量一下子视图

    @Override

    protected void onMeasure(int widthMeasureSpec, int heightMeasureSpec) {

        //测量子视图

        int childCount = getChildCount();

        for (int i = 0; i < childCount; i++) {

            //传0表示测量自身包裹之后的大小

            getChildAt(i).measure(0, 0);

        }

        super.onMeasure(widthMeasureSpec, heightMeasureSpec);

    }

    //除第一个子视图外的其余子视图成孤形排列

    @Override

    protected void onLayout(boolean changed, int l, int t, int r, int b) {

        View child0 = getChildAt(0);//由于第一个"+"按钮不参与弧形的排列,所以先拿出来单独处理

        child0.layout(0, 0, child0.getMeasuredWidth(), child0.getMeasuredHeight());

        child0.setOnClickListener(this);

        int childCount = getChildCount();

        for (int i = 0; i < childCount - 1; i++) {//以弧形来摆放其余子视图

            View child = getChildAt(i + 1);

            int childMesureWidth = child.getMeasuredWidth();

            int childMesureHeight = child.getMeasuredHeight();

            float angle = (float) ((Math.PI / 2 / 4) * i);//计算出当前要摆放子视图的角度

            int childLeft = (int) (RADIUS * Math.sin(angle));

            int childTop = (int) (RADIUS * Math.cos(angle));

            int childRight = childLeft + childMesureWidth;

            int childBottom = childTop + childMesureHeight;

            child.layout(childLeft, childTop, childRight, childBottom);

        }

    }

    @Override

    public void onClick(View view) {

        switch (view.getId()) {

            case R.id.lay_plus:

                rotateChild0(view);

                rotateOtherChildren();

                break;

        }

    }

    private void rotateChild0(View view) {

        RotateAnimation rotateAnimation = new RotateAnimation(0, 360, RotateAnimation.RELATIVE_TO_SELF, 0.5f, RotateAnimation.RELATIVE_TO_SELF, 0.5f);

        rotateAnimation.setDuration(2000);

        rotateAnimation.setFillAfter(true);

        view.startAnimation(rotateAnimation);

    }

    private void rotateOtherChildren() {

        int childCount = getChildCount();

        for (int i = 0; i < childCount - 1; i++) {

            View child = getChildAt(i + 1);

            RotateAnimation rotateAnimation = new RotateAnimation(0, 360, RotateAnimation.RELATIVE_TO_SELF, 0.5f, RotateAnimation.RELATIVE_TO_SELF, 0.5f);

            rotateAnimation.setDuration(2000);

            rotateAnimation.setFillAfter(true);

            child.startAnimation(rotateAnimation);

        }

    }

}
编译运行:

平移处理:
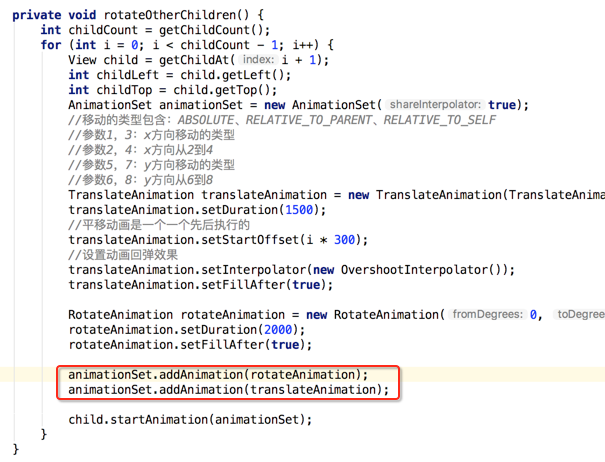
接下来处理点击“+”进行子view的平稳,默认其弧形菜单项应该是隐藏,只显示一个“+”,处理如下:

编译运行:
接下来则需要处理一点击“+”,需要让弧形的元素平移旋转出来,那如何平移呢,以其中的一个元素来分析:
所以具体代码如下:
private void rotateOtherChildren() {

        int childCount = getChildCount();

        for (int i = 0; i < childCount - 1; i++) {

            View child = getChildAt(i + 1);

            int childLeft = child.getLeft();

            int childTop = child.getTop();

            //移动的类型包含:ABSOLUTE、RELATIVE_TO_PARENT、RELATIVE_TO_SELF

            //参数1,3:x方向移动的类型

            //参数2,4:x方向从2到4

            //参数5,7:y方向移动的类型

            //参数6,8:y方向从6到8

            TranslateAnimation translateAnimation = new TranslateAnimation(TranslateAnimation.ABSOLUTE, -childLeft, TranslateAnimation.ABSOLUTE, 0, TranslateAnimation.ABSOLUTE, -childTop, TranslateAnimation.ABSOLUTE, 0);

            translateAnimation.setDuration(1500);

            translateAnimation.setFillAfter(true);

            RotateAnimation rotateAnimation = new RotateAnimation(0, 360, RotateAnimation.RELATIVE_TO_SELF, 0.5f, RotateAnimation.RELATIVE_TO_SELF, 0.5f);

            rotateAnimation.setDuration(2000);

            rotateAnimation.setFillAfter(true);

            child.startAnimation(translateAnimation);

        }

    }
先只做平移处理,旋转暂且不加,编译运行:
目前弧形菜单项是同时间平移的,而实际效果是需要一个个有个先后顺序出来,所以这里需要处理一个属性来达到此效果,如下:

再次编译运行:

另外原效果在每个弧形菜单平移完之后都会有一个回调效果,所以此时就需要加入一个插值器来达到这样的效果,如下:

再来看效果:

好这个平移效果基本差不多,此时在平移过程中把之前的旋转动画给加进来,具体如下:
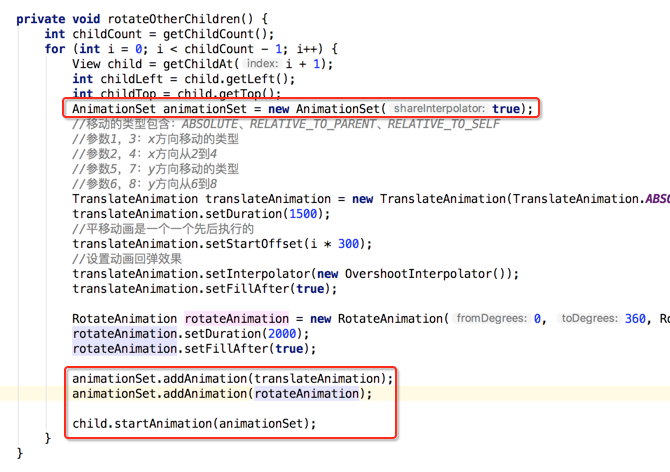

呃~~动画出问题了,这是因为目前是先添加的平移动画之后再添加的旋转动画,这个旋转的中心坐标会被不断改变,调一个顺序既可,如下:

嗯~~动画是对了,不过在动画执行完之后元素又消失了,这是因为默认元素是INVISIBLE状态的,这里简单处理就是在执行动画之前将其置为显示既可,如下:
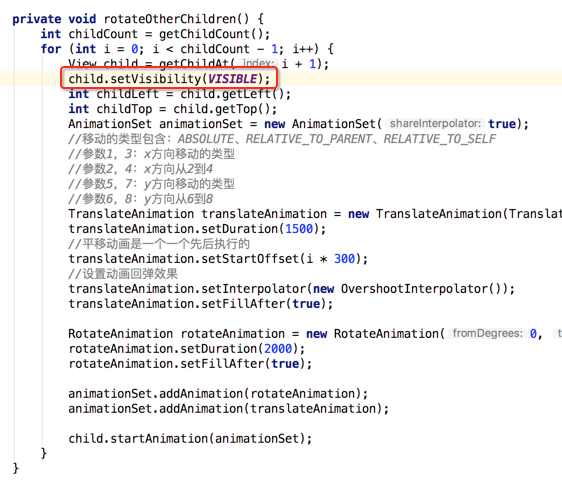
再来看:

另外还有一个旋转的小细节,目前在动画执行过程中的旋转貌似停掉了,也就是旋转的因数少了点,加大旋转角度:
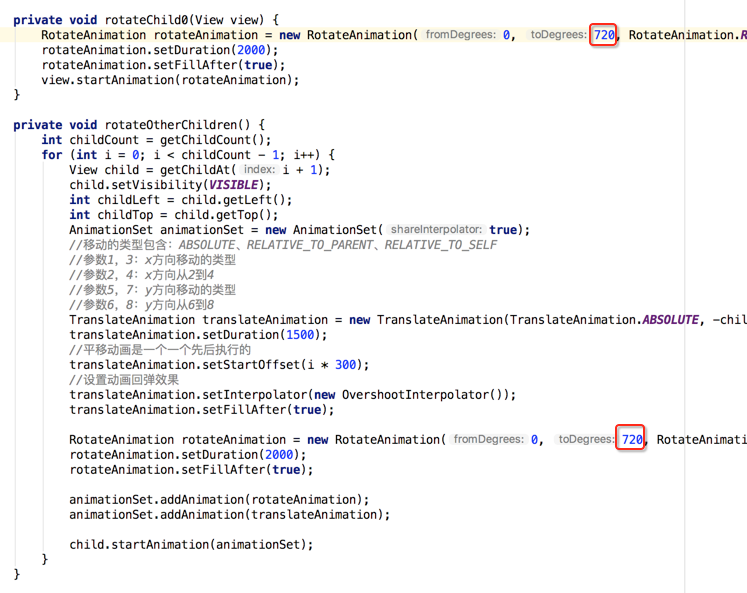
编译运行:
另外在点“+”时应该可以控制圆弧菜单项的打开和关闭,所以这里需要给程序定义状态:
/**

 * 圆形菜单View---非第0个子视图的平移处理

 */

public class ArcMenuView extends ViewGroup implements View.OnClickListener {

    /* 定义要摆放圆的半径,其子视图的摆放位置需要依据它来计算 */

    private static final float RADIUS = 130f;

    private CurrentStatus currentStatus = CurrentStatus.CLOSE;

    /* 定义卫星菜单打开和关闭状态 */

    public enum CurrentStatus {

        OPEN, CLOSE

    }

    public ArcMenuView(Context context) {

        this(context, null);

    }

    public ArcMenuView(Context context, AttributeSet attrs) {

        this(context, attrs, 0);

    }

    public ArcMenuView(Context context, AttributeSet attrs, int defStyleAttr) {

        super(context, attrs, defStyleAttr);

    }

    //在ViewGroup中默认是不会测量孩子视图的,所以需要手动测量一下子视图

    @Override

    protected void onMeasure(int widthMeasureSpec, int heightMeasureSpec) {

        //测量子视图

        int childCount = getChildCount();

        for (int i = 0; i < childCount; i++) {

            //传0表示测量自身包裹之后的大小

            getChildAt(i).measure(0, 0);

        }

        super.onMeasure(widthMeasureSpec, heightMeasureSpec);

    }

    //除第一个子视图外的其余子视图成孤形排列

    @Override

    protected void onLayout(boolean changed, int l, int t, int r, int b) {

        View child0 = getChildAt(0);//由于第一个"+"按钮不参与弧形的排列,所以先拿出来单独处理

        child0.layout(0, 0, child0.getMeasuredWidth(), child0.getMeasuredHeight());

        child0.setOnClickListener(this);

        int childCount = getChildCount();

        for (int i = 0; i < childCount - 1; i++) {//以弧形来摆放其余子视图

            View child = getChildAt(i + 1);

            int childMesureWidth = child.getMeasuredWidth();

            int childMesureHeight = child.getMeasuredHeight();

            float angle = (float) ((Math.PI / 2 / 4) * i);//计算出当前要摆放子视图的角度

            int childLeft = (int) (RADIUS * Math.sin(angle));

            int childTop = (int) (RADIUS * Math.cos(angle));

            int childRight = childLeft + childMesureWidth;

            int childBottom = childTop + childMesureHeight;

            child.layout(childLeft, childTop, childRight, childBottom);

            child.setVisibility(INVISIBLE);

        }

    }

    @Override

    public void onClick(View view) {

        switch (view.getId()) {

            case R.id.lay_plus:

                rotateChild0(view);

                animateOtherChildren();

                break;

        }

    }

    private void rotateChild0(View view) {

        RotateAnimation rotateAnimation = new RotateAnimation(0, 720, RotateAnimation.RELATIVE_TO_SELF, 0.5f, RotateAnimation.RELATIVE_TO_SELF, 0.5f);

        rotateAnimation.setDuration(2000);

        rotateAnimation.setFillAfter(true);

        view.startAnimation(rotateAnimation);

    }

    private void animateOtherChildren() {

        int childCount = getChildCount();

        for (int i = 0; i < childCount - 1; i++) {

            View child = getChildAt(i + 1);

            child.setVisibility(VISIBLE);

            int childLeft = child.getLeft();

            int childTop = child.getTop();

            AnimationSet animationSet = new AnimationSet(true);

            //移动的类型包含:ABSOLUTE、RELATIVE_TO_PARENT、RELATIVE_TO_SELF

            //参数1,3:x方向移动的类型

            //参数2,4:x方向从2到4

            //参数5,7:y方向移动的类型

            //参数6,8:y方向从6到8

            TranslateAnimation translateAnimation = new TranslateAnimation(TranslateAnimation.ABSOLUTE, -childLeft, TranslateAnimation.ABSOLUTE, 0, TranslateAnimation.ABSOLUTE, -childTop, TranslateAnimation.ABSOLUTE, 0);

            translateAnimation.setDuration(1500);

            //平移动画是一个一个先后执行的

            translateAnimation.setStartOffset(i * 300);

            //设置动画回弹效果

            translateAnimation.setInterpolator(new OvershootInterpolator());

            translateAnimation.setFillAfter(true);

            RotateAnimation rotateAnimation = new RotateAnimation(0, 720, RotateAnimation.RELATIVE_TO_SELF, 0.5f, RotateAnimation.RELATIVE_TO_SELF, 0.5f);

            rotateAnimation.setDuration(2000);

            rotateAnimation.setFillAfter(true);

            animationSet.addAnimation(rotateAnimation);

            animationSet.addAnimation(translateAnimation);

            child.startAnimation(animationSet);

        }

        changeCurrentStatus();

    }

    private void changeCurrentStatus() {

        currentStatus = currentStatus == CurrentStatus.CLOSE ? CurrentStatus.OPEN : CurrentStatus.CLOSE;

    }

}
编译运行:

状态不对,这个平移应该根据打开和关闭需要改变起始坐标和结束坐标,具体如下:
/**

 * 圆形菜单View---非第0个子视图的平移处理

 */

public class ArcMenuView extends ViewGroup implements View.OnClickListener {

    /* 定义要摆放圆的半径,其子视图的摆放位置需要依据它来计算 */

    private static final float RADIUS = 130f;

    private CurrentStatus currentStatus = CurrentStatus.CLOSE;

    /* 定义卫星菜单打开和关闭状态 */

    public enum CurrentStatus {

        OPEN, CLOSE

    }

    public ArcMenuView(Context context) {

        this(context, null);

    }

    public ArcMenuView(Context context, AttributeSet attrs) {

        this(context, attrs, 0);

    }

    public ArcMenuView(Context context, AttributeSet attrs, int defStyleAttr) {

        super(context, attrs, defStyleAttr);

    }

    //在ViewGroup中默认是不会测量孩子视图的,所以需要手动测量一下子视图

    @Override

    protected void onMeasure(int widthMeasureSpec, int heightMeasureSpec) {

        //测量子视图

        int childCount = getChildCount();

        for (int i = 0; i < childCount; i++) {

            //传0表示测量自身包裹之后的大小

            getChildAt(i).measure(0, 0);

        }

        super.onMeasure(widthMeasureSpec, heightMeasureSpec);

    }

    //除第一个子视图外的其余子视图成孤形排列

    @Override

    protected void onLayout(boolean changed, int l, int t, int r, int b) {

        View child0 = getChildAt(0);//由于第一个"+"按钮不参与弧形的排列,所以先拿出来单独处理

        child0.layout(0, 0, child0.getMeasuredWidth(), child0.getMeasuredHeight());

        child0.setOnClickListener(this);

        int childCount = getChildCount();

        for (int i = 0; i < childCount - 1; i++) {//以弧形来摆放其余子视图

            View child = getChildAt(i + 1);

            int childMesureWidth = child.getMeasuredWidth();

            int childMesureHeight = child.getMeasuredHeight();

            float angle = (float) ((Math.PI / 2 / 4) * i);//计算出当前要摆放子视图的角度

            int childLeft = (int) (RADIUS * Math.sin(angle));

            int childTop = (int) (RADIUS * Math.cos(angle));

            int childRight = childLeft + childMesureWidth;

            int childBottom = childTop + childMesureHeight;

            child.layout(childLeft, childTop, childRight, childBottom);

            child.setVisibility(INVISIBLE);

        }

    }

    @Override

    public void onClick(View view) {

        switch (view.getId()) {

            case R.id.lay_plus:

                rotateChild0(view);

                animateOtherChildren();

                break;

        }

    }

    private void rotateChild0(View view) {

        RotateAnimation rotateAnimation = new RotateAnimation(0, 720, RotateAnimation.RELATIVE_TO_SELF, 0.5f, RotateAnimation.RELATIVE_TO_SELF, 0.5f);

        rotateAnimation.setDuration(2000);

        rotateAnimation.setFillAfter(true);

        view.startAnimation(rotateAnimation);

    }

    private void animateOtherChildren() {

        int childCount = getChildCount();

        for (int i = 0; i < childCount - 1; i++) {

            final View child = getChildAt(i + 1);

            child.setVisibility(VISIBLE);

            int childLeft = child.getLeft();

            int childTop = child.getTop();

            AnimationSet animationSet = new AnimationSet(true);

            //移动的类型包含:ABSOLUTE、RELATIVE_TO_PARENT、RELATIVE_TO_SELF

            //参数1,3:x方向移动的类型

            //参数2,4:x方向从2到4

            //参数5,7:y方向移动的类型

            //参数6,8:y方向从6到8

            TranslateAnimation translateAnimation = null;

            if (CurrentStatus.CLOSE == currentStatus) {

                translateAnimation = new TranslateAnimation(TranslateAnimation.ABSOLUTE, -childLeft, TranslateAnimation.ABSOLUTE, 0, TranslateAnimation.ABSOLUTE, -childTop, TranslateAnimation.ABSOLUTE, 0);

            } else {

                translateAnimation = new TranslateAnimation(TranslateAnimation.ABSOLUTE, 0, TranslateAnimation.ABSOLUTE, -childLeft, TranslateAnimation.ABSOLUTE, 0, TranslateAnimation.ABSOLUTE, -childTop);

            }

            translateAnimation.setDuration(1500);

            //平移动画是一个一个先后执行的

            translateAnimation.setStartOffset(i * 300);

            //设置动画回弹效果

            translateAnimation.setInterpolator(new OvershootInterpolator());

            translateAnimation.setFillAfter(true);

            translateAnimation.setAnimationListener(new Animation.AnimationListener() {

                @Override

                public void onAnimationStart(Animation animation) {

                }

                @Override

                public void onAnimationEnd(Animation animation) {

                    if (CurrentStatus.CLOSE == currentStatus) {

                        child.setVisibility(INVISIBLE);

                    }

                }

                @Override

                public void onAnimationRepeat(Animation animation) {

                }

            });

            RotateAnimation rotateAnimation = new RotateAnimation(0, 720, RotateAnimation.RELATIVE_TO_SELF, 0.5f, RotateAnimation.RELATIVE_TO_SELF, 0.5f);

            rotateAnimation.setDuration(2000);

            rotateAnimation.setFillAfter(true);

            animationSet.addAnimation(rotateAnimation);

            animationSet.addAnimation(translateAnimation);

            child.startAnimation(animationSet);

        }

        changeCurrentStatus();

    }

    private void changeCurrentStatus() {

        currentStatus = currentStatus == CurrentStatus.CLOSE ? CurrentStatus.OPEN : CurrentStatus.CLOSE;

    }

}
编译运行:

至此整个效果就实现完了,可见如果不用补间动画来实现,而是采用纯View绘制的方式来实现那是何等的麻烦~
一步步实现ArcMenu效果的更多相关文章
- Google Chrome开发者工具
Google Chrome开发者工具 是内嵌到浏览器的开发工具,打开方式有两种:第一“按F12”,第二:shift+ctrl+i(火狐.360等浏览器也可以这么用) Console介绍 Console ...
- JavaScript美术馆进化史
内容选自<<JavaScript DOM 编程艺术>>第4-6章,跟着作者一起见证美术馆的进化吧. 先放效果图,然后一步步做出每个效果.每个效果都有它实用的地方,且知道过程可以 ...
- winfrom dataGridView 自定义分页实现
Winfrom 基本处于忘光的阶段.先需要做个winfrom 的软件.然后自己扩展了DataGridView带分页的控件.废话不多说 上图先 现在一步步实现其效果. 1.添加用户控件 上图即可知道 ...
- xcode6下使用autolayout+sizeclass实践
历史车轮滚滚向前,将autolayout配合sizeclass做布局的方式推上了主流,虽然有点晚,但最终还是进行了一次完整的实践,特此记录一下: 因为网上已经有很多博客介绍了autolayout配合s ...
- JavaScript学习总结【8】、面向对象编程
1.什么是面向对象编程 要理解面向对象,得先搞清楚什么是对象,首先需要明确一点这里所说的对象,不是生活中的搞男女朋友对象,面向对象就是面向着对象,换在代码中,就是一段代码相中了另一段代码,自此夜以继日 ...
- 2.4 chrome 开发者工具
开发者工具顶部有Elements.Console.Network等八个栏目.常用的有三个:Elements,用来查看需爬取字段的HTML标签信息:Console,可以检测你的JS代码:Network, ...
- 【分享】用Canvas实现画板功能
前言 PC端测试:QQ浏览器全屏绘画完成.缩小时内容会被清空,切换背景颜色内容会被重置,其他暂无发现: 手机端测试:微信内置浏览器不通过:Safari 浏览器使用画笔时没固定页面会有抖动效果,使用橡皮 ...
- 还在为不停build 烦恼么?看这里~~
如果你是一名开发者,还在为偶尔改一个坐标或者颜色值 就要重新build 好久,然后如果层次深 还要一步步进去看效果么?下面 为大家介绍一个很好的开源库 DYCI 他的github地址,首先下载到本 ...
- Android自己定义组件系列【11】——实现3D立体旋转效果
今天在网上看到一篇文章写关于Android实现3D旋转(ca=drs-">http://www.ibm.com/developerworks/cn/opensource/os-cn-a ...
随机推荐
- 设计模式七大原则(C++描述)
前言 最近在学习一些基本的设计模式,发现很多博客都是写了六个原则,但我认为有7个原则,并且我认为在编码中思想还是挺重要,所以写下一篇博客来总结下 之后有机会会写下一些设计模式的博客(咕咕咕...... ...
- Spirng 分层,增加数据访问对象层
到层关键注释 @Repository 对应的包 import org.springframework.stereotype.Repository;
- 前端手势控制图片插件书写二(transform矩阵的原理)
上次解释了如何使用代码识别双指和单指操作及放大和旋转拖动操作.这次解释下css3的transform原理 一.transform矩阵原理 transform: matrix(a,b,c,d,e,f) ...
- DS博客作业--07查找
目录 DS博客作业--07查找 1.本周学习总结(0--2分) 1.思维导图 2.谈谈你对查找运算的认识及学习体会. 2.PTA实验作业(6分) 2.1.题目1:6-1 二叉搜索树的操作集 (30 分 ...
- String类基础的那些事!
第三阶段 JAVA常见对象的学习 第一章 常见对象--String类 (一) String 类的概述及其构造方法 (1) 概述 多个字符组成的一串数据,例如 "abc" 也可以看成 ...
- DB2 数据库权限
以下内容转载: http://blog.csdn.net/xiyuan1999/article/details/8135263 DB2中的权限 DB2 中有三种主要的安全机制,可以帮助 DBA 实现 ...
- tomcat单机多应用部署配合Nginx负载均衡
一.Windows 配置tomcat . 安装两个tomcat服务器以上 . 配置环境变量 CATALINA_BASE:D:\servers\Tomcat8 CATALINA_HOME:D:\serv ...
- 关于STM32的IAP与APP互相跳转
关于STM32的IAP与APP互相跳转 之前做了一个不带系统的IAP与APP互相跳转,在网上找了资料后,很顺畅就完成了,后来在IAR集成开发环境下,IAP无系统,APP用UCOS系统做互相跳转出现了很 ...
- IoC(Inversion of Control 控制反转)
控制反转(Inversion of Control,缩写为IoC),是面向对象编程中的一种设计原则,可以用来减低计算机代码之间的耦合度.其中最常见的方式叫做依赖注入(Dependency Inject ...
- C++反汇编第五讲,认识C++中的Try catch语法,以及在反汇编中还原
我们以前讲SEH异常处理的时候已经说过了,C++中的Try catch语法只不过是对SEH做了一个封装. 如果不懂SEH异常处理,请点击博客链接熟悉一下,当然如果不想知道,也可以直接往下看.因为异常处 ...