Vue_(基础)Vue中的指令
Vue.js中文文档 传送门

Vue的指令:其实就是单个JavaScript表达式,一般来说是带有v-前缀
Vue指令:
v-model:数据双向绑定;
v-text:以纯文本方式显示数据;
v-html:可以识别HTML标签;
v-once:只渲染元素或组件一次;
v-pre:不进行编译,直接显示内容;
v-for:对集合或对象进行遍历;
一、Hello World入门
二、v-model指令
三、v-text指令
四、v-for指令
五、v-on指令
项目结构
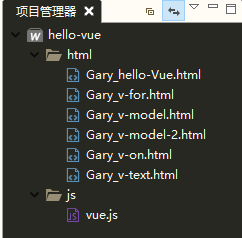
【每个demo下方都存有html源码】
一、Hello World入门
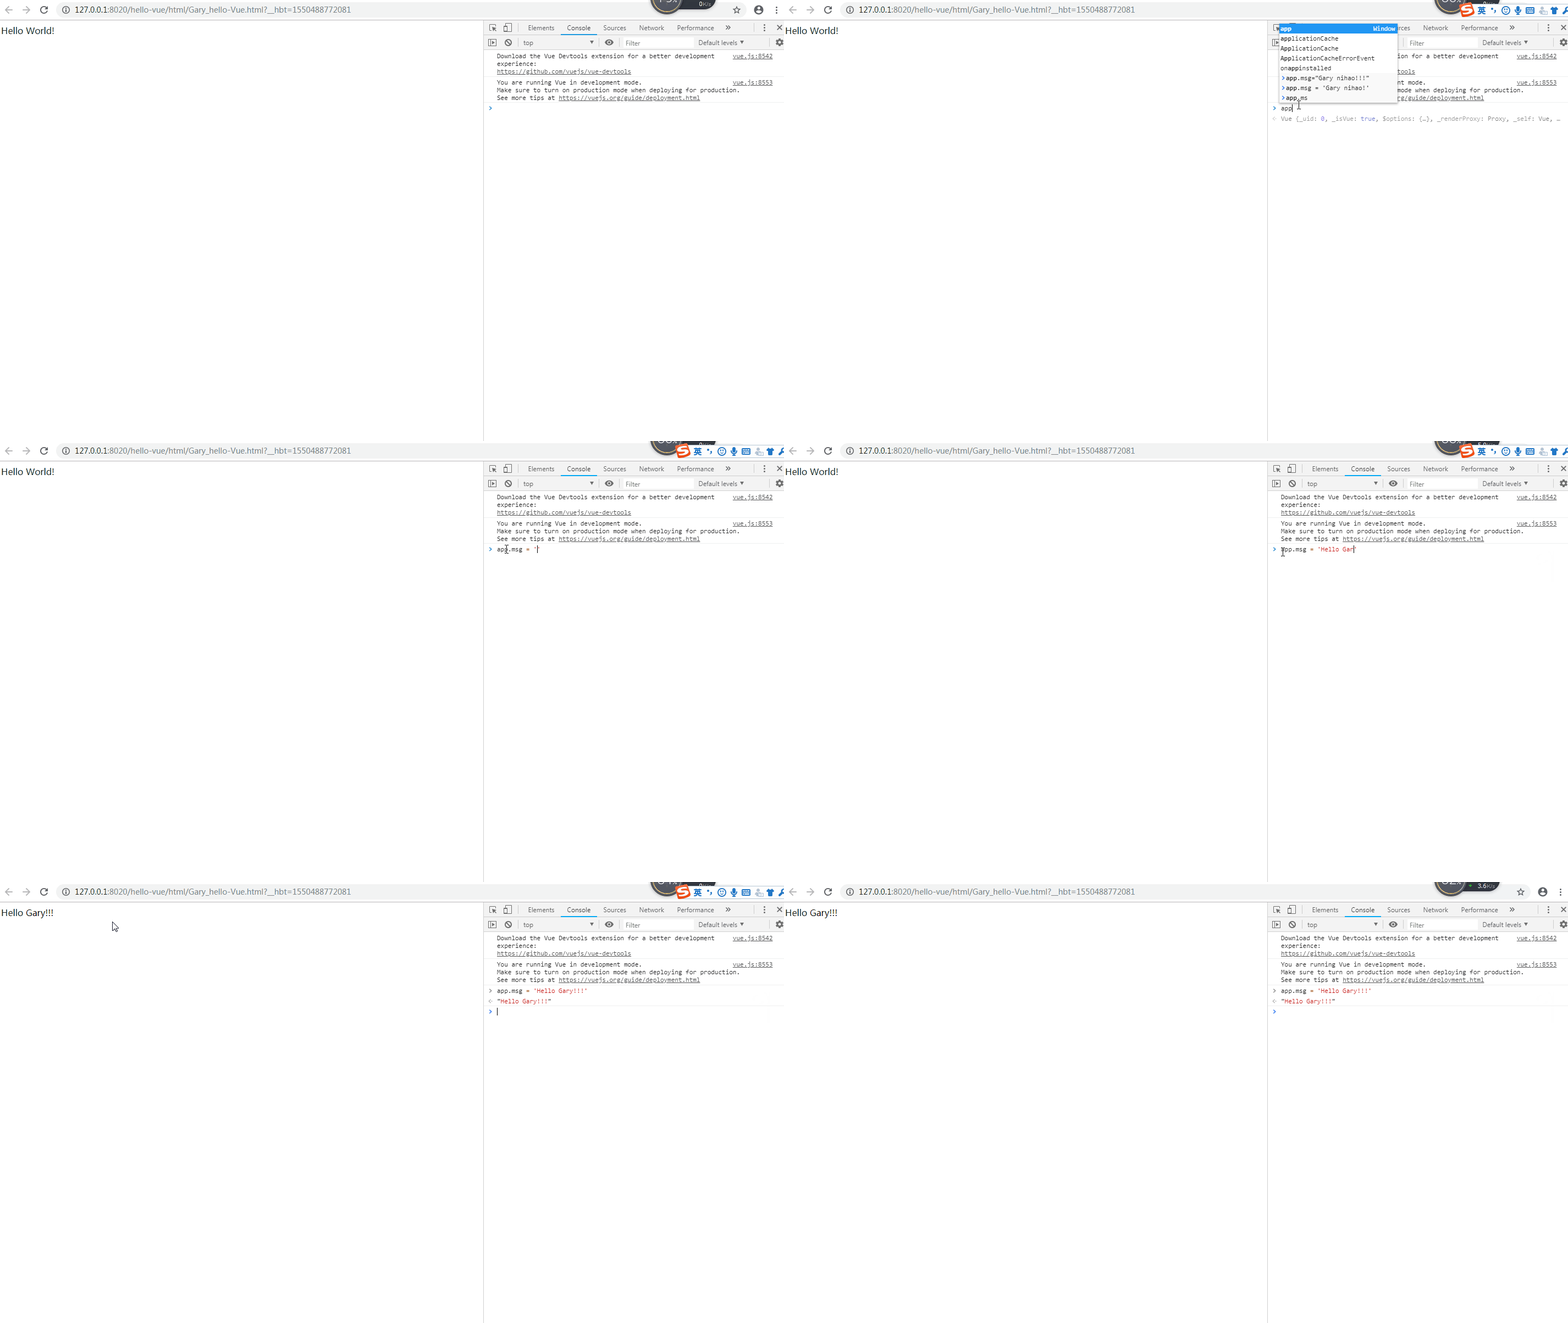
在浏览器中打印Hello World信息,并在Console控制台中可通过双向绑定快速修改app.msg中的信息
   app = new Vue({

                //获取id元素

                el:'#Gary',

                //输出信息

                data:{

                    msg:'Hello World!'

                }

            });
        <div id="Gary">

            {{msg}}

        </div>
<!DOCTYPE html>

<html>

    <head>

        <meta charset="UTF-8">

        <title>hello-vue</title>

        <script type="text/javascript" src="../js/vue.js" ></script>

        <script>

            var app = null ;

            //js加载顺序

            window.onload = function(){

                app = new Vue({

                //获取id元素

                el:'#Gary',

                //输出信息

                data:{

                    msg:'Hello World!'

                }

            });

            }

        </script>

    </head>

    <body>

        <div id="Gary">

            {{msg}}

        </div>

    </body>

</html>
Gary_hello-Vue.html
二、v-model指令 传送门
v-model:数据双向绑定
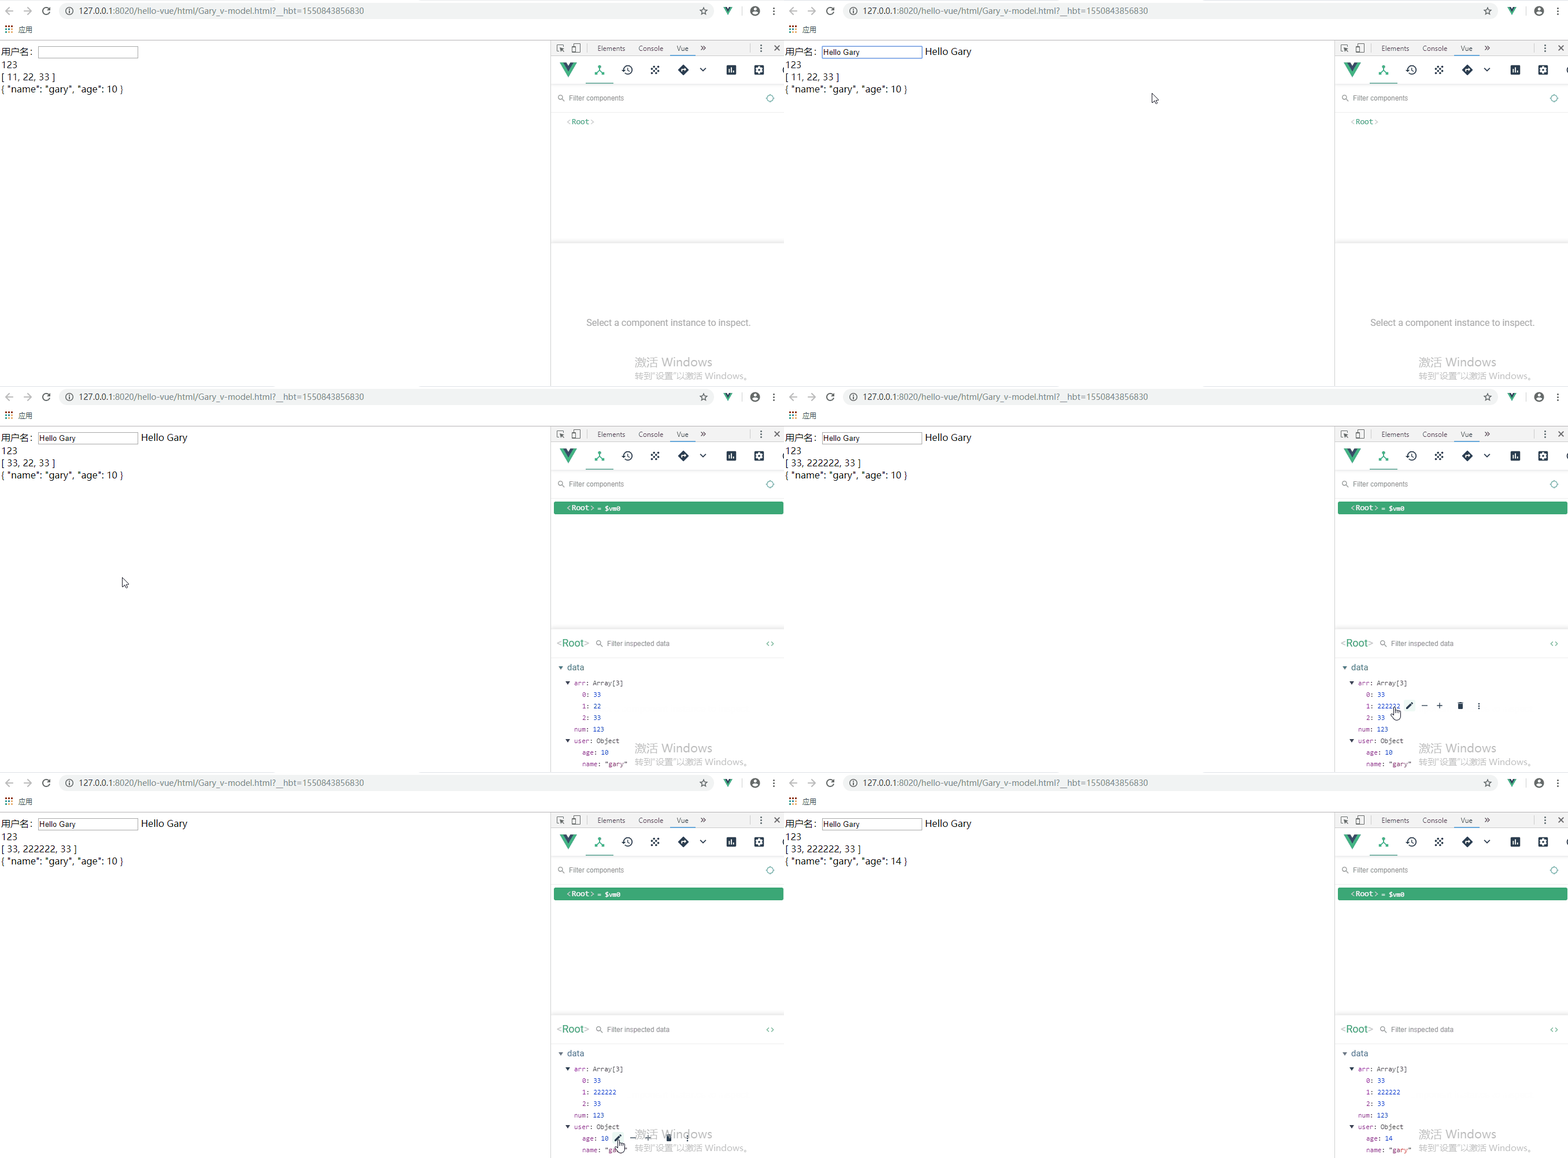
v-model绑定了input组件,获得input文本框中输入的值并通过{{username}}显示出来
   new Vue({

                    el:'#Gary',

                    data:{

                        username:'',

                        num:123,

                        arr:[11,22,33],

                        user:{

                            name:'gary',

                            age:10

                        }

                    }

                })
用户名:<input type="text" v-model="username" />

            {{username}}<br/>
<!DOCTYPE html>

<html>

    <head>

        <meta charset="UTF-8">

        <title>v-model</title>

        <script type="text/javascript" src="../js/vue.js" ></script>

        <script>

            window.onload = () =>{

                new Vue({

                    el:'#Gary',

                    data:{

                        username:'',

                        num:123,

                        arr:[11,22,33],

                        user:{

                            name:'gary',

                            age:10

                        }

                    }

                })

            }

        </script>

    </head>

    <body>

        <div id="Gary">

            <!--username为用户输入的名字-->

            用户名:<input type="text" v-model="username" />

            {{username}}<br/>

            {{num}}<br/>

            {{arr}}<br/>

            {{user}}<br/>

        </div>

    </body>

</html>
Gary_v-model.html
v-model指令与其它组件用法:checkbox、multi-checkbox、select、textarea组件

<!DOCTYPE html>

<html>

    <head>

        <meta charset="UTF-8">

        <title>v-model</title>

        <script type="text/javascript" src="../js/vue.js" ></script>

        <script>

            window.onload = () =>{

                new Vue({

                    el:'#Gary',

                    data:{

                        checked:false,

                        users:[],

                        selected:'',

                        msg:''

                    }

                });

            }

        </script>

    </head>

    <body>

        <div id="Gary">

             <div id="checkbox">

                     <input type="checkbox" v-model="checked"/>{{checked}}

             </div>

              <div id="multi-checkbox">

                     <input type="checkbox"  value="Gary-1" v-model="users"/>Gary-1

                     <input type="checkbox"  value="Gary-2" v-model="users"/>Gary-2

                     <input type="checkbox"  value="Gary-3" v-model="users"/>Gary-3

                     <br />

                     选中:{{users}}

             </div>

             <div id="select" >

                 <select v-model="selected">

                     <option>选择1</option>

                     <option>选择2</option>

                     <option>选择3</option>

                     <option>选择4</option>

                 </select>

                 <span>已选择:{{selected}}</span>

             </div>

             <div id="textarea">

                 <textarea v-model="msg"></textarea>

                 <p">{{msg}}</p>

             </div>

        </div>

    </body>

</html>
Gary_v-model-2.html
三、v-text指令 传送门
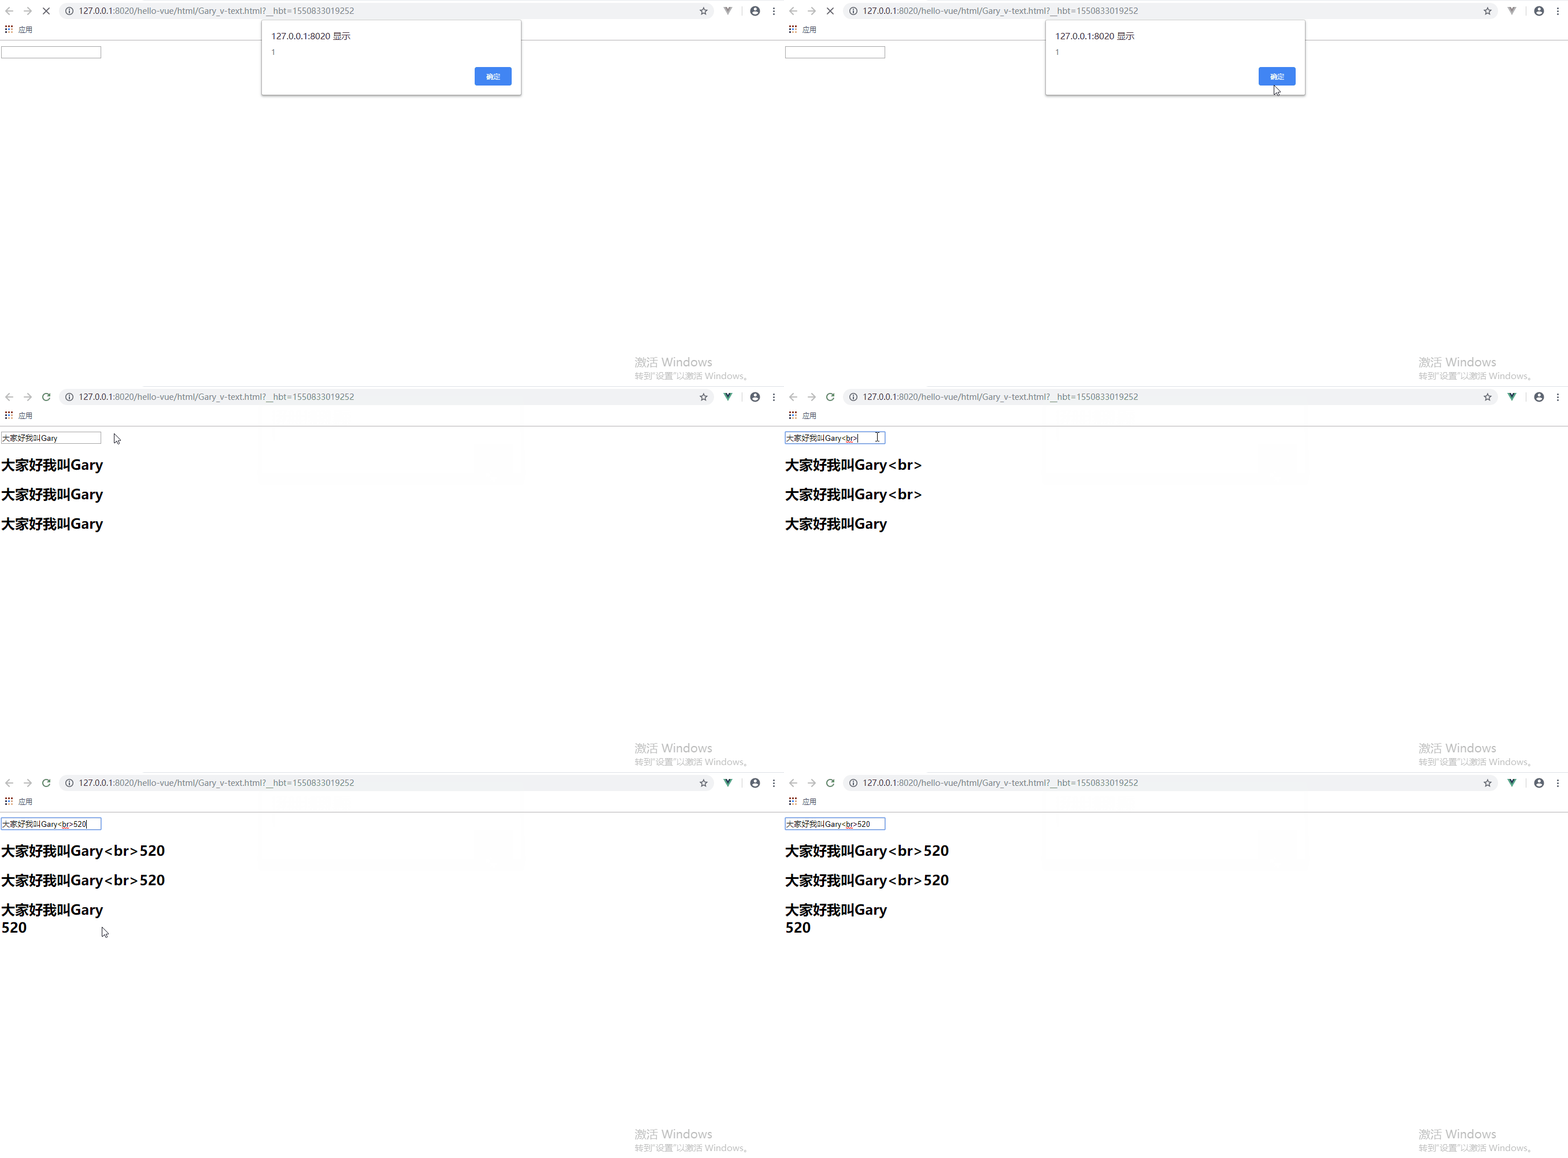
v-text:以纯文本方式显示数据
v-cloak:可以隐藏未编译的 Mustache 标签直到实例准备完毕,也就是隐藏{{}};
                new Vue({

                    el:'#Gary',

                    data:{

                           msg:'大家好我叫Gary'

                    },

                    created:function(){

                        alert(1);

                    }

                });
        <div id="Gary">

            <input type="text" v-model="msg"/>

                 <h2 v-cloak>{{msg}}</h2>

                 <h2 v-text="msg"></h2>

                 <h2 v-html="msg"></h2>

                 <!--用来显示原始 Mustache 标签-->

                 <!--<h2 v-pre>{{msg}}</h2>-->

        </div>
生命周期钩子created:该钩子在服务器端渲染期间不被调用 传送门
  created:function(){

                        alert(1);

                    }
<!DOCTYPE html>

<html>

    <head>

        <meta charset="UTF-8">

        <title>v-model</title>

        <script type="text/javascript" src="../js/vue.js" ></script>

        <script>

            window.onload = () =>{

                new Vue({

                    el:'#Gary',

                    data:{

                           msg:'大家好我叫Gary'

                    },

                    created:function(){

                        alert(1);

                    }

                });

            }

        </script>

    </head>

    <style type="text/css">

        [v-cloak]{

            display:none;

        }

    </style>

    <body>

        <div id="Gary">

            <input type="text" v-model="msg"/>

                 <h2 v-cloak>{{msg}}</h2>

                 <h2 v-text="msg"></h2>

                 <h2 v-html="msg"></h2>

                 <!--用来显示原始 Mustache 标签-->

                 <!--<h2 v-pre>{{msg}}</h2>-->

        </div>

    </body>

</html>
Gary_v-text.html
四、v-for指令 传送门
v-for:对集合或对象进行遍历
  new Vue({

                    el:'#Gary',

                    data:{

                           arr:[11,22,33,44],

                           user:{

                               id:'01',

                               name:'Gary'

                           },

                           users:[

                           {id:'01',name:"Gary01"},

                           {id:'02',name:"Gary02"},

                           {id:'03',name:"Gary03"}

                           ]

                    }

                });
 <div id="Gary">

                <ul>

                    <li v-for="value in arr">{{value}}</li><hr>

                    <li v-for="value in user">{{value}}</li><hr>

                    <!--输出value和key键值对  隐藏索引index,下标0开始-->

                    <li v-for="(value,key) in user">{{key}}-{{value}}</li><hr>

                    <!--获取元素下标可以用value.id-->

                    <li v-for="(value,index) in users">{{index}}-{{value}}</li><hr>

                </ul>

        </div>
key 传送门
为保证key都有的唯一性id,可以使用key="value.id"
<li v-for="(value,index) in users" :key="value">{{index}}-{{value.id}}</li><hr>

<!DOCTYPE html>

<html>

    <head>

        <meta charset="UTF-8">

        <title>v-model</title>

        <script type="text/javascript" src="../js/vue.js" ></script>

        <script>

            window.onload = () =>{

                new Vue({

                    el:'#Gary',

                    data:{

                           arr:[11,22,33,44],

                           user:{

                               id:'01',

                               name:'Gary'

                           },

                           users:[

                           {id:'01',name:"Gary01"},

                           {id:'02',name:"Gary02"},

                           {id:'03',name:"Gary03"}

                           ]

                    }

                });

            }

        </script>

    </head>

    <body>

        <div id="Gary">

                <ul>

                    <li v-for="value in arr">{{value}}</li><hr>

                    <li v-for="value in user">{{value}}</li><hr>

                    <!--输出value和key键值对  隐藏索引index,下标0开始-->

                    <li v-for="(value,key) in user">{{key}}-{{value}}</li><hr>

                    <!--获取元素下标可以用value.id-->

                    <li v-for="(value,index) in users">{{index}}-{{value}}</li><hr>

                    <li v-for="(value,index) in users" :key="value">{{index}}-{{value.id}}</li><hr>

                </ul>

        </div>

    </body>

</html>
Gary_v-for.html
五、v-on指令 传送门
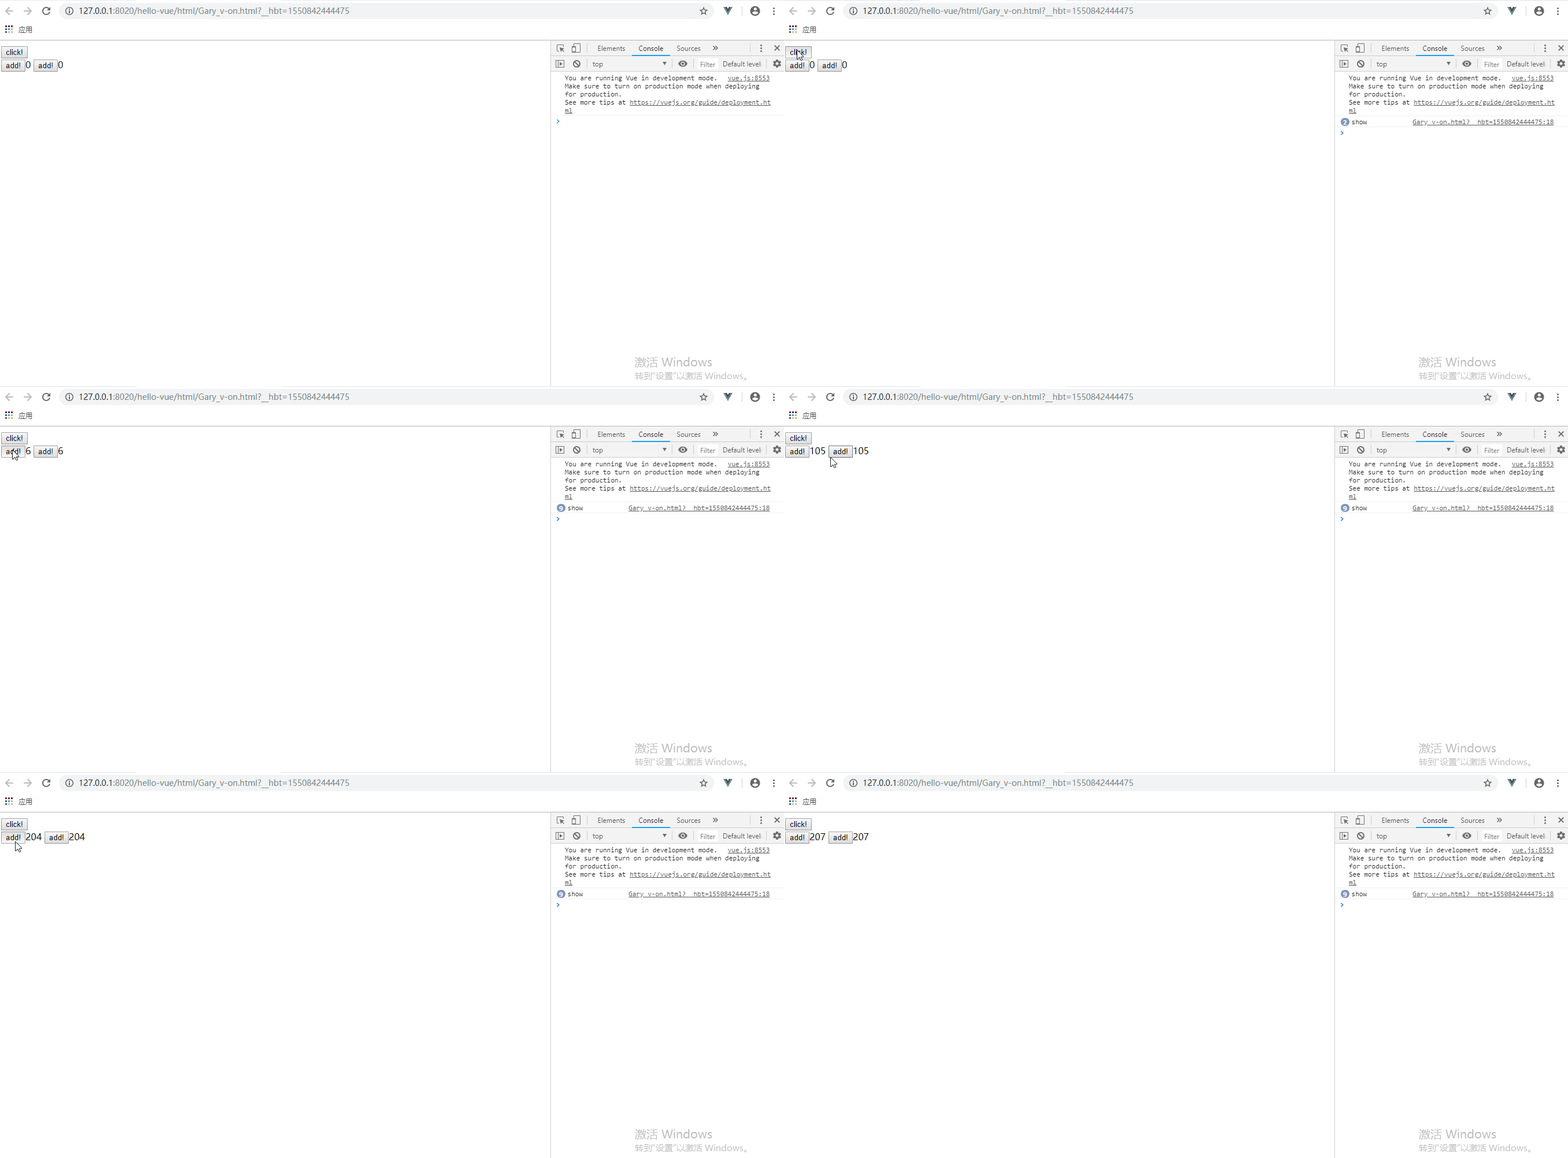
v-on:绑定事件监听器
  new Vue({

                    el:'#Gary',

                    data:{

                           result:0

                    },

                    methods:{

                        //无参

                        show:function(){

                            console.log("show");

                        },

                        //带参

                        add(a,b){

                            this.result+=a+b;

                        }

                    }

                });
v-on:click:鼠标点击按钮事件
v-on:mouseenter:鼠标进入按钮触碰事件
        <div id="Gary">

                <button v-on:click="show">click!</button><br />

                <!--@相当于v-on鼠标简写-->

                <button @click="show">click!</button><br />

                <!--鼠标点击-->

                <button v-on:click="add(1,2)">add!</button>{{result}}

                <!--鼠标进入-->

                <button v-on:mouseenter="add(10,20)">add!</button>{{result}}

        </div>
<!DOCTYPE html>

<html>

    <head>

        <meta charset="UTF-8">

        <title>v-model</title>

        <script type="text/javascript" src="../js/vue.js" ></script>

        <script>

            window.onload = () =>{

                new Vue({

                    el:'#Gary',

                    data:{

                           result:0

                    },

                    methods:{

                        //无参

                        show:function(){

                            console.log("show");

                        },

                        //带参

                        add(a,b){

                            this.result+=a+b;

                        }

                    }

                });

            }

        </script>

    </head>

    <body>

        <div id="Gary">

                <button v-on:click="show">click!</button><br />

                <!--@相当于v-on鼠标简写-->

                <button @click="show">click!</button><br />

                <!--鼠标点击-->

                <button v-on:click="add(1,2)">add!</button>{{result}}

                <!--鼠标进入-->

                <button v-on:mouseenter="add(10,20)">add!</button>{{result}}

        </div>

    </body>

</html>
Gary_v-on.html
Vue_(基础)Vue中的指令的更多相关文章
- Vue_(基础)Vue中的事件
Vue.js中文文档 传送门 Vue@事件绑定 v-show:通过切换元素的display CSS属性实现显示隐藏: v-if:根据表达式的真假实现显示隐藏,如果隐藏,它绑定的元素都会销毁,显示的时候 ...
- Vue基础系列(四)——Vue中的指令(上)
写在前面的话: 文章是个人学习过程中的总结,为方便以后回头在学习. 文章中会参考官方文档和其他的一些文章,示例均为亲自编写和实践,若有写的不对的地方欢迎大家和我一起交流. VUE基础系列目录 < ...
- Vue基础系列(五)——Vue中的指令(中)
写在前面的话: 文章是个人学习过程中的总结,为方便以后回头在学习. 文章中会参考官方文档和其他的一些文章,示例均为亲自编写和实践,若有写的不对的地方欢迎大家和我一起交流. VUE基础系列目录 < ...
- Vue中插槽指令
08.29自我总结 Vue中插槽指令 意义 就是在组件里留着差值方便后续组件内容新增 而且由于插件是写在父级中数据可以直接父级中传输而不需要传子再传父有些情况会减少写代码量 示例 <div id ...
- vue中自定义指令
//vue中自定义指令 //使用 Vue.directive(id, [definition]) 定义全局的指令 //参数1:指令的名称.注意,在定义的时候,指令的名称前面,不需要加 v-前缀; 但是 ...
- vue中的指令v-model
Vue的指令:其实就是单个JavaScript表达式,一般来说是带有v-前缀:都有着对应的官网介绍:https://cn.vuejs.org/v2/guide/forms.html v-model:数 ...
- vue中自定义指令vue.direvtive,自定义过滤器vue.filter(),vue过渡transition
自定义指令 默认设置的核心指令( v-model,v-bind,v-for,v-if,v-on等 ),Vue 也允许注册自定义指令.注意,在 Vue2.0 里面,代码复用的主要形式和抽象是组件——然而 ...
- Vue中的指令(听博主说总结的很好)
指令[重点] 作用:简化Dom操作 参考:https://cn.vuejs.org/v2/api/#%E6%8C%87%E4%BB%A4 特点: 1.都是以v-开头 2.除了插值表达式,其它都写在标签 ...
- vue中自定义指令的使用
原文地址 vue中除了内置的指令(v-show,v-model)还允许我们自定义指令 想要创建自定义指令,就要注册指令(以输入框获取焦点为例) 一.注册全局指令: // 注册一个全局自定义指令 `v- ...
随机推荐
- 5.Shell变量
5.Shell变量本章介绍 shell 中所使用的变量.Bash 会自动给其中一些变量赋默认值.5.1 波恩Shell的变量Bash 使用一些和波恩 shell 同样的变量.有时,Bash 会给它赋默 ...
- git 查看当前仓库地址以及设置新的仓库地址
1.查看当前仓库地址 git remote show origin 2.设置新的仓库地址 1.先登录 gitlab 查看当前仓库地址: 执行修改地址命令 git remote set-url orig ...
- vue 登录 + 记住密码 + 密码加密解密
<template> <el-form :model="ruleForm"> <h3 class="title">系统登录& ...
- 用Python输出一个Fibonacci数列
斐波那契数列(Fibonacci sequence),又称黄金分割数列.因数学家列昂纳多·斐波那契(Leonardoda Fibonacci)以兔子繁殖为例子而引入,故又称为“兔子数列” 用文字来说, ...
- windows 下Nginx 入门
验证配置是否正确: nginx -t 查看Nginx的版本号:nginx -V 启动Nginx:start nginx 快速停止或关闭Nginx:nginx -s stop 正常停止或关闭Nginx: ...
- java_day10_多线程
第十章:线程 1.进程和线程的概述 1)进程和线程定义 进程是具有一定独立功能的程序关于某个数据集合上的一次运行活动,进程是系统进行资源分配和调度的一个独立单位. 线程是进程的一个实体,是CPU调度和 ...
- java学习之—二叉树
package com.data.java.towtree; import java.io.IOException; /** * 二叉树 * @Title: uminton */ class Node ...
- 很有用的shell脚本
基础知识 expect基础知识 exp_continue是匹配一行后,从当前expect块第一行开始匹配 expect块的每一行匹配后,直接退出当前expect块,往下一个expect块开始匹配 ex ...
- Excutor线程池
文章:Java并发(基础知识)—— Executor框架及线程池 待完善……
- java8学习之Supplier与函数式接口总结
Supplier接口: 继续学习一个新的函数式接口--Supplier,它的中文意思为供应商.提供者,下面看一下它的javadoc: 而具体的方法也是相当的简单,就是不接受任何参数,返回一个结果: 对 ...
