第三章:Python基础の函数和文件操作实战
本課主題
- Set 集合和操作实战
- 函数介紹和操作实战
- 参数的深入介绍和操作实战
- format 函数操作实战
- lambda 表达式介绍
- 文件操作函数介紹和操作实战
- 本周作业
Set 集合和操作实战
Set 是一个无序且不容许重复的序列
创建集合有两种方式:
- 第一种是通过直接创建、例如:s = {11,22}
 >>> se = {11,222,11,222}

 >>> print(se)

 {11, 222}

 >>> type(se)

 <class 'set'>
创建集合 方法一
- 第二种是通过转换。从一个可迭代类型的数组、元组转换成集合 Set。例如:s = Set(list)
 >>> li = [11,22,11,33,11,44,55]

 >>> se = set(li) #把列表转换成集合

 >>> se

 {33, 11, 44, 22, 55}

 >>> type(se)

 <class 'set'>
创建集合 方法二
原理:在调用 Set 函数时,它会自动调用 __intit__ 方法,这叫构造方法 ,其实内部会执行一个 For 循环,循环这个"可迭代对象"里的所有元素,一个一个添加到集合里(什么是构造方法会在后期学到面向对象后再分享)
Set 集合的功能
这是Set 集合在 Python3.5.2的源码,我把它贴进来,里面有很多双下划线的方法,现在我都不知道是什么,让我了解后会回来补充一下。现在最主要的是要了解下面这几个集合的功能:我把它归类为添加、更新、找不同、找相同、删除和返回Boolean值六大类。
class set(object):

    """

    set() -> new empty set object

    set(iterable) -> new set object

    Build an unordered collection of unique elements.

    """

    def add(self, *args, **kwargs): # real signature unknown

        """

        Add an element to a set.

        This has no effect if the element is already present.

        """

        pass

    def clear(self, *args, **kwargs): # real signature unknown

        """ Remove all elements from this set. """

        pass

    def copy(self, *args, **kwargs): # real signature unknown

        """ Return a shallow copy of a set. """

        pass

    def difference(self, *args, **kwargs): # real signature unknown

        """

        Return the difference of two or more sets as a new set.

        (i.e. all elements that are in this set but not the others.)

        """

        pass

    def difference_update(self, *args, **kwargs): # real signature unknown

        """ Remove all elements of another set from this set. """

        pass

    def discard(self, *args, **kwargs): # real signature unknown

        """

        Remove an element from a set if it is a member.

        If the element is not a member, do nothing.

        """

        pass

    def intersection(self, *args, **kwargs): # real signature unknown

        """

        Return the intersection of two sets as a new set.

        (i.e. all elements that are in both sets.)

        """

        pass

    def intersection_update(self, *args, **kwargs): # real signature unknown

        """ Update a set with the intersection of itself and another. """

        pass

    def isdisjoint(self, *args, **kwargs): # real signature unknown

        """ Return True if two sets have a null intersection. """

        pass

    def issubset(self, *args, **kwargs): # real signature unknown

        """ Report whether another set contains this set. """

        pass

    def issuperset(self, *args, **kwargs): # real signature unknown

        """ Report whether this set contains another set. """

        pass

    def pop(self, *args, **kwargs): # real signature unknown

        """

        Remove and return an arbitrary set element.

        Raises KeyError if the set is empty.

        """

        pass

    def remove(self, *args, **kwargs): # real signature unknown

        """

        Remove an element from a set; it must be a member.

        If the element is not a member, raise a KeyError.

        """

        pass

    __hash__ = None

    def symmetric_difference(self, *args, **kwargs): # real signature unknown

        """

        Return the symmetric difference of two sets as a new set.

        (i.e. all elements that are in exactly one of the sets.)

        """

        pass

    def symmetric_difference_update(self, *args, **kwargs): # real signature unknown

        """ Update a set with the symmetric difference of itself and another. """

        pass

    def union(self, *args, **kwargs): # real signature unknown

        """

        Return the union of sets as a new set.

        (i.e. all elements that are in either set.)

        """

        pass

    def update(self, *args, **kwargs): # real signature unknown

        """ Update a set with the union of itself and others. """

        pass

    def __and__(self, *args, **kwargs): # real signature unknown

        """ Return self&value. """

        pass

    def __contains__(self, y): # real signature unknown; restored from __doc__

        """ x.__contains__(y) <==> y in x. """

        pass

    def __eq__(self, *args, **kwargs): # real signature unknown

        """ Return self==value. """

        pass

    def __getattribute__(self, *args, **kwargs): # real signature unknown

        """ Return getattr(self, name). """

        pass

    def __ge__(self, *args, **kwargs): # real signature unknown

        """ Return self>=value. """

        pass

    def __gt__(self, *args, **kwargs): # real signature unknown

        """ Return self>value. """

        pass

    def __iand__(self, *args, **kwargs): # real signature unknown

        """ Return self&=value. """

        pass

    def __init__(self, seq=()): # known special case of set.__init__

        """

        set() -> new empty set object

        set(iterable) -> new set object

        Build an unordered collection of unique elements.

        # (copied from class doc)

        """

        pass

    def __ior__(self, *args, **kwargs): # real signature unknown

        """ Return self|=value. """

        pass

    def __isub__(self, *args, **kwargs): # real signature unknown

        """ Return self-=value. """

        pass

    def __iter__(self, *args, **kwargs): # real signature unknown

        """ Implement iter(self). """

        pass

    def __ixor__(self, *args, **kwargs): # real signature unknown

        """ Return self^=value. """

        pass

    def __len__(self, *args, **kwargs): # real signature unknown

        """ Return len(self). """

        pass

    def __le__(self, *args, **kwargs): # real signature unknown

        """ Return self<=value. """

        pass

    def __lt__(self, *args, **kwargs): # real signature unknown

        """ Return self<value. """

        pass

    @staticmethod # known case of __new__

    def __new__(*args, **kwargs): # real signature unknown

        """ Create and return a new object.  See help(type) for accurate signature. """

        pass

    def __ne__(self, *args, **kwargs): # real signature unknown

        """ Return self!=value. """

        pass

    def __or__(self, *args, **kwargs): # real signature unknown

        """ Return self|value. """

        pass

    def __rand__(self, *args, **kwargs): # real signature unknown

        """ Return value&self. """

        pass

    def __reduce__(self, *args, **kwargs): # real signature unknown

        """ Return state information for pickling. """

        pass

    def __repr__(self, *args, **kwargs): # real signature unknown

        """ Return repr(self). """

        pass

    def __ror__(self, *args, **kwargs): # real signature unknown

        """ Return value|self. """

        pass

    def __rsub__(self, *args, **kwargs): # real signature unknown

        """ Return value-self. """

        pass

    def __rxor__(self, *args, **kwargs): # real signature unknown

        """ Return value^self. """

        pass

    def __sizeof__(self): # real signature unknown; restored from __doc__

        """ S.__sizeof__() -> size of S in memory, in bytes """

        pass

    def __sub__(self, *args, **kwargs): # real signature unknown

        """ Return self-value. """

        pass

    def __xor__(self, *args, **kwargs): # real signature unknown

        """ Return self^value. """

        pass

    __hash__ = None
Set集合的源码
添加: add( ), unions( )
更新: difference_update( ), symmeteric_difference_update( ), intersection_update( ), update( )
找不同: difference( ), symmeteric_difference( ),
找相同: intersection( )
删除: discard( ), remove( ), clear( ), pop( )
返回Boolean值: isdisjoint( ), issuperset( )
- 添加: add()
 >>> se = set() #创建空集合

 >>> se

 set()

 >>> se.add(123) #添加123到集合里

 >>> se

 {123}
集合功能:添加
- 清除所有在集合里的内容: clear()
 >>> se = set() #创建一个空集合

 >>> se.add(111)

 >>> se.add(222)

 >>> se.add(333)

 >>> print(se)

 {333, 222, 111}

 >>> se.clear() #清除集合里的所有元素

 >>> se

 set()
集合功能:删除
- 对比两个集合,找其中一方的不同,相当于 database 里的 left outer join: difference()
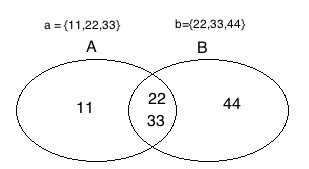
 >>> s1 = {11,22,33}

 >>> s2 = {22,33,44}

 >>> s3 = s1.difference(s2) # 在s1中存在, s2中不存在

 >>> s1

 {33, 11, 22}

 >>> s3

 {11}

 >>> s3 = s2.difference(s1) #在s2中存在, s1中不存在

 >>> s3

 {44}
集合功能:找不同
- 对比两个集合,取出双方不同的元素: symmetric_difference()
 >>> s1 = {11,22,33}

 >>> s2 = {22,33,44}

 >>> s3 = s1.symmetric_difference(s2) #找出双方都不存在的元素

 >>> s1

 {33, 11, 22}

 >>> s3

 {11, 44}
集合功能:找不同
更新: 对比两个集合,找其中一方的不同,然后直接把结果更新到原来的集合:difference_update()
 >>> a = {11,22,33}

 >>> b = {22,33,44}

 >>> a.difference_update(b) #对比两个集合,找其中一方的不同,然后直接把结果更新到原来的集合

 >>> a

 {11}
集合功能:更新
- 更新: 对比两个集合,取出双方不同的元素,然后直接把结果更新到原来的集合:symmetric_difference_update()
 >>> a = {11,22,33}

 >>> b = {22,33,44}

 >>> a.symmetric_difference_update(b)

 >>> a

 {11, 44}
集合功能:更新
- 刪除指定元素,不存在,不報錯!!:discard()
 >>> s1 = {11,22,33}

 >>> s2 = {22,33,44}

 >>> s1.discard(11)

 >>> s1

 {33, 22}
集合功能:删除
- 刪除指定元素,不存在,報錯!!!:remove()
 >>> s1 = {11,22,33}

 >>> s2 = {22,33,44}

 >>> s1.remove(11)

 >>> s1

 {33, 22}

 >>> s1.remove(1111)

 Traceback (most recent call last):

   File "<stdin>", line 1, in <module>

 KeyError: 1111
集合功能:删除
- 随机移取某个元素并获取这个元素: pop()
 >>> s1 = {11,22,33}

 >>> s2 = {22,33,44}

 >>> ret = s1.pop()

 >>> ret

 33
集合功能:删除
- 对比两个集合,找双方交集部份,相当于 database 里的 inner join: intersection()
 >>> s1 = {11,22,33}

 >>> s2 = {22,33,44}

 >>> s3 = s1.intersection(s2) #找s1和s2相同的元素

 >>> s3

 {33, 22}

 >>> s1

 {33, 11, 22}
集合功能:找相同
- 对比两个集合,找双方交集部份,相当于 database 里的 inner join,然后直接把结果更新到原来的集合:intersection_update()
 >>> s1 = {11,22,33}

 >>> s2 = {22,33,44}

 >>> s1.intersection_update(s2) #找相同然后直接更新 s1

 >>> s1

 {33, 22}
集合功能:找相同然后更新
- 判断两个集合有没有交集部份,如果有便返回 False ;如果没有,则返回 True: isdisjoint()
 >>> s1 = {11,22,33}

 >>> s2 = {22,33,44}

 >>> s1.isdisjoint(s2) #有交集部分

 False

 >>> s1 = {11,55,66}

 >>> s2 = {22,33,44}

 >>> s1.isdisjoint(s2) #没有交集部分

 True
集合功能:返回Boolean值
- 判断两个集合有没有父子关系,有是 True, 沒有則 False: issuperset()
 >>> s1 = {11,22,33}

 >>> s2 = {22,33,44}

 >>> s1.issuperset(s2) #s1 不是 s2 的父序列

 False

 >>>

 >>> s1 = {11,22,33}

 >>> s2 = {22,33}

 >>> s1.issuperset(s2) #s1 是 s2 的父序列

 True
集合功能:返回Boolean值
- 把两个集合连合然后去掉重覆的就是并集(这功能相当于 database, union 然后拿distinct value):union()
 >>> s1 = {11,22,33}

 >>> s2 = {22,33,44}

 >>> s3 = s1.union(s2)

 >>> s3

 {33, 22, 11, 44}
集合功能:添加
- 批量地把一托集合增加到目标集合,update()接收一个可以被迭代的对象 e.g. List、Tuple、String:update()
 >>> s1 = {11,22,33}

 >>> s2 = {22,33,44}

 >>> s1.update({77,88,99})

 >>> s1

 {33, 99, 22, 88, 11, 77}

 >>> s1.update(s2)

 >>> s1

 {33, 99, 22, 88, 11, 44, 77}

 >>>
集合功能:更新
difference( ) 和 difference_update( ) 的应用:
- s1 集合和 s2 集合的结果会保持不变,两个方法 difference() 和 symmetric_difference() 都会产生一个新的集合,所以在实际情景中如果需要重用 s1 和 s2 集合的时候,就不要用 differernce_updates() 和 symmetric_difference_update() 了。因为这两个函数会覆盖本來在 s1 里的结果。
- 如果以后不需要基於 s1 來操作,只需要拿最新结果的话,就可以用 differernce_updates() 和 symmetric_difference_update(),这里的好处是变量声明减少了就可以节省内存空间! ! !
案例实战
[更新中...]
函数介紹和操作实战
在还没有学函数之前,我们实现的代码是用很多条件判断(If-then-else)还有表达式的For 循环来实现功能,不免有很多重覆性的代码,其实这个过程叫"面向过程编程”,就是从上到下按照逻辑一点一点去写,如果遇到重覆的功能,最典型的操作就是复制和粘贴(Copy and Paste)
面向过程编程的缺点:
- 如果代码量多的话,不断的复制和粘贴,会导致代码缺乏了可阅读性;
- 不断使用重覆代码,代码量多,程序员也会很累,会导致代码缺乏了重用性。
**总结:基于以上两点的解决方安案是运用函数式编程!!函数是用来封装某些功能的,它的出现是为了增加代码的重用性,令代码更简洁,而且可以增加其可读性,以后如果要使用的话就直接调用这个函数就行啦! !
创建函数的步骤如下:
- 用 def 关键字来声明这是一个函数;
- 在 def 後面加一個空格,然后寫上一個名字代表函数名稱,以后就可以在内存里调用它;
- 名字加上后再加一个括号 ( );
- 然后在函数体里写上函数的内容:就是具体需要实现的功能;
- 然后加上返回值,如果沒有返回值的話 Python 会有一个默应的返回值 (None)
>>> def func():

...     print("")

...

>>> f1 = func()

123

>>> print("f1:",f1)

f1: None
沒有返回值
有返回值的意思是:函数可以被調用然後賦值到另外一個參數,也就是說一個函数可以像參數一樣被传递。
>>> def func():

...     return ""

...

>>> f1 = func()

>>> print("f1:",f1)

f1: 123
有返回值
- 函数可以在括号里面输入参数。
案例实战
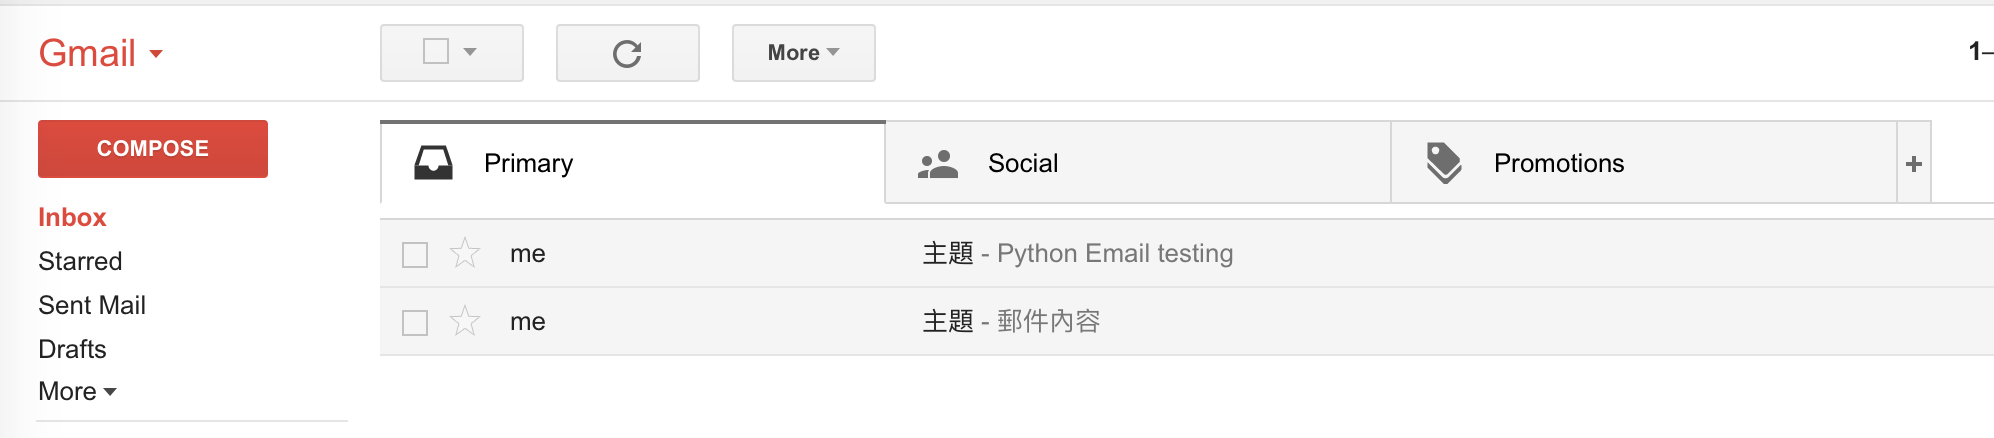
以下是一个发邮件的函数,把登录邮件和发邮件这个功能封装在一个叫 sendMail()的函数里,只要一调用这个功能,它就会运行同一样的代码来发送邮件,这就是函数。
def sendMail():

    import smtplib

    from email.mime.text import MIMEText

    from email.utils import formataddr

    msg = MIMEText("Python Email testing",'plain','utf-8')

    msg['From'] = formataddr(["Janice", "janicecheng.python@gmail.com"])

    msg['To'] = formataddr(["Janice", "janicecheng.python@gmail.com"])

    msg['Subject']='主題'

    server = smtplib.SMTP("smtp.gmail.com", 587)

    server.starttls()

    server.login("janicecheng.python@gmail.com","password")

    server.sendmail("janicecheng.python@gmail.com",["janicecheng.python@gmail.com",], msg.as_string())

    print("Mail Send Successfully")

    server.quit()

sendMail()
邮件发送函数代码
- def sendMail( ): 这叫声明函数
- sendMail( ): 这叫执行函数
 def sendMail():

     import smtplib

     from email.mime.text import MIMEText

     from email.utils import formataddr

     msg = MIMEText("Python Email testing",'plain','utf-8')

     msg['From'] = formataddr(["Janice", "janicecheng.python@gmail.com"])

     msg['To'] = formataddr(["Janice", "janicecheng.python@gmail.com"])

     msg['Subject']='主題'

     server = smtplib.SMTP("smtp.gmail.com", 587)

     server.starttls()

     server.login("janicecheng.python@gmail.com","password")

     server.sendmail("janicecheng.python@gmail.com",["janicecheng.python@gmail.com",], msg.as_string())

     print("Mail Send Successfully")

     server.quit()

 sendMail()
sendMail函数
注意:
- 当你在声明变量和函数之后,函数体在声明的时倏不会被执行的,它们分别会放在内存里,等待被调用!
- 在函数中一旦执行了 return, 函数的执行过程立即终止
返回值的补充说明
下面有一个例子,如果两个函数有相同的名称,然后在同一个程序里执行,运行结果会是多少呢?
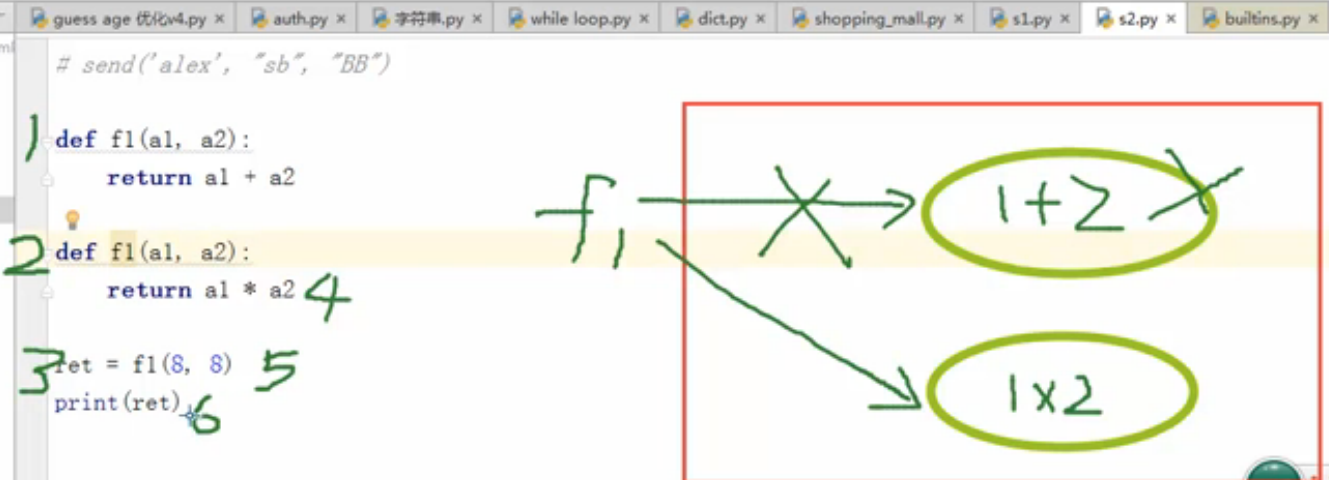
以下是程序运行時的顺序:
- 第一步:Python 运行程序的时候是从上而下执行的,在 f1 声明函数放在内存的时候,它把1+2 声明后,然后放在内存里
- 第二步:当程序运行时碰到第2个 f1函数时,它再次在内存中把1x 2 放在内存中,并且 f1 指向 (1 x 2)
- Python 有自己的垃圾回收机制,会定时把没有的变量或者函数删除掉。
- 第三步:声明一个变量把f1函数的返回值存储在里面
- 第四步:当调用 f1函数时,它实际上是运行 a1 * a2
- 第五步:然后实际运行 f1函数
- 第六步:打印出 ret 变量中的值
所以调用 f1函数时,它其实正在运行 a1 * a2的功能,这就是为什么答案会是 64的原因。
参数的深入介绍和操作实战
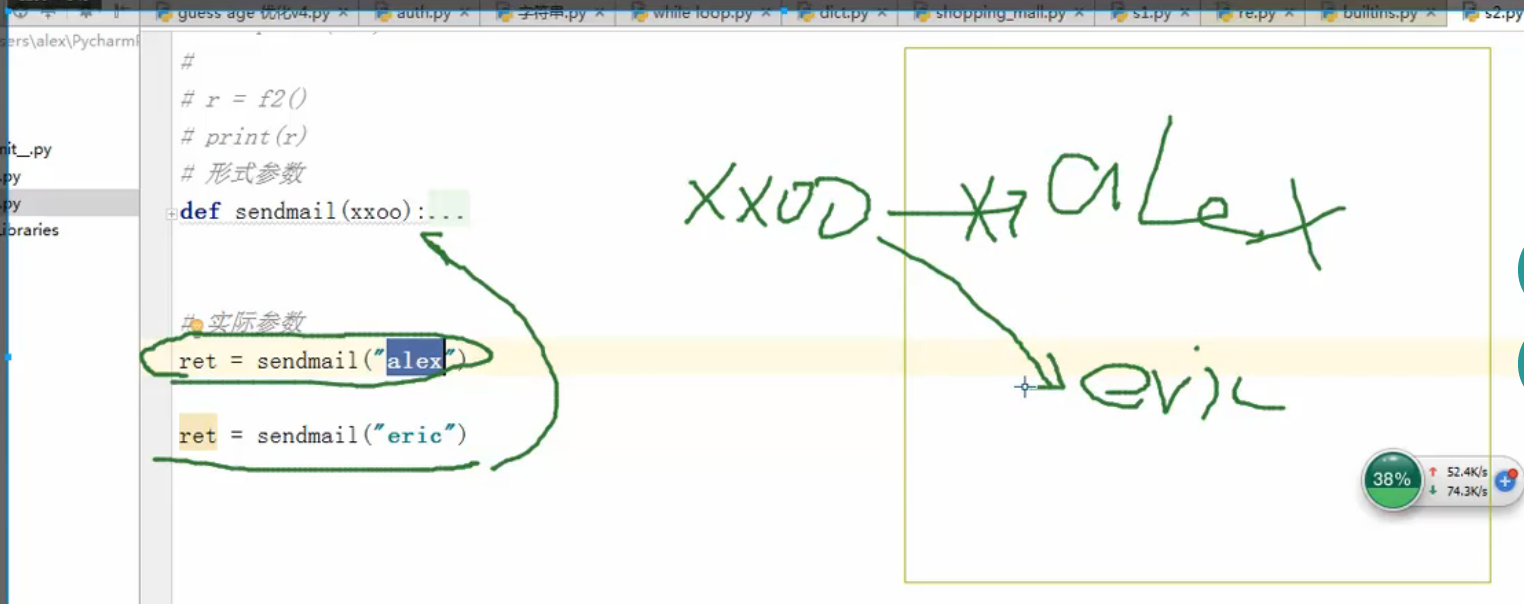
- 把参数传入然后在函数体里的内码块可以把这个参数当成变量的去使用,这种参数叫形式参数。当我们在调用程序的时候把参数传入然后执行,这种参数叫实际参数。在這個例子中,参数 target_email 叫形式参数;下面执行程序传入的 “Alex” 叫实际参数。
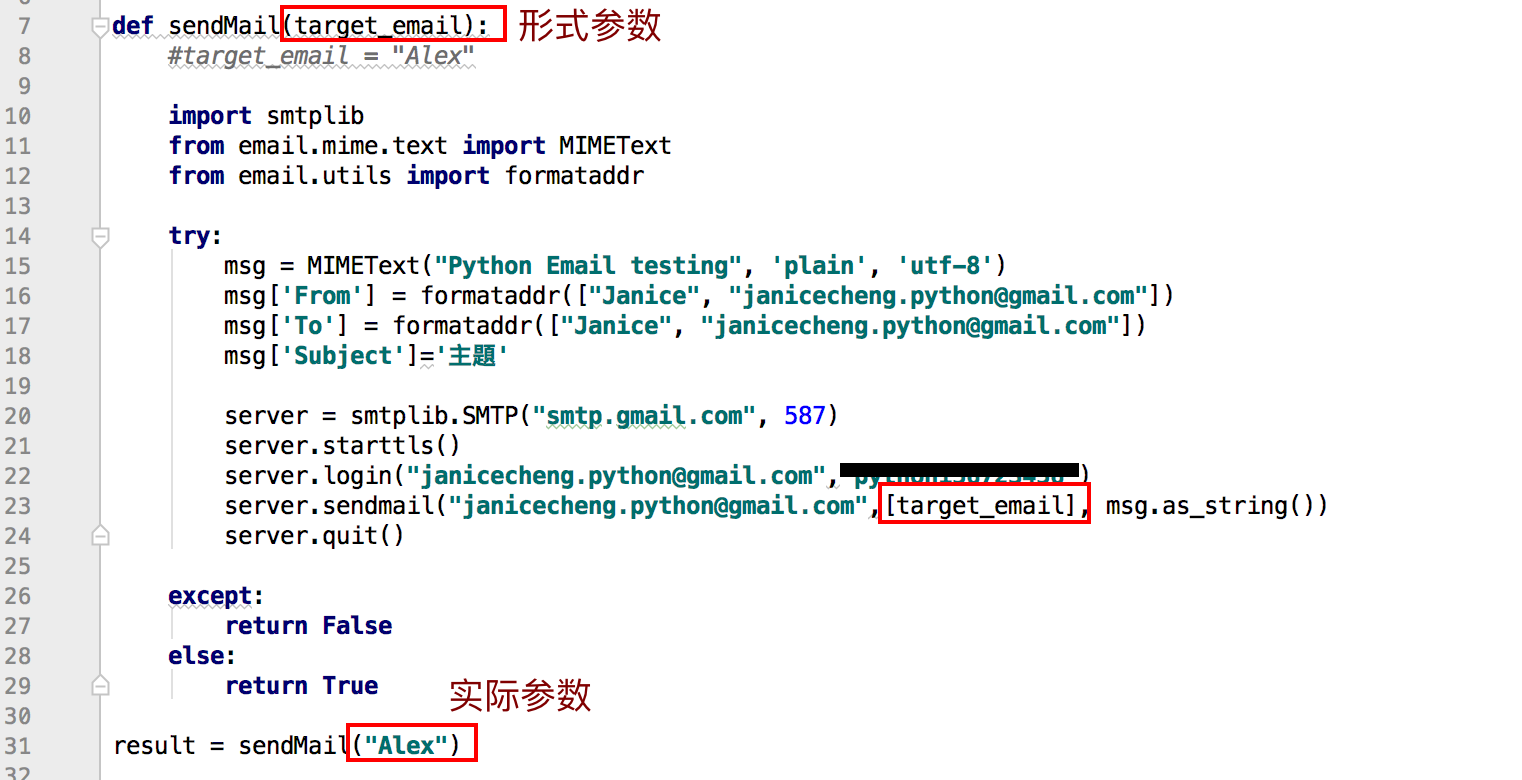
- 如果从内存的角度去看这两种参数的话,在调用sendmail( ) 然后传入“alex” 的时候,这个“alex” 的字符串就已经在内存中,这就相当于把“xxoo” 这个形式参数指向内存中的实际参数“alex”; 同样地;对于“eric” 这个实际参数,它在被调用的时候,”eric” 已经在内存中等待着,然后函数本身的形式参数就会指向“ eric ”,然后执行程序,这就是形式参数和实际参数的关系。
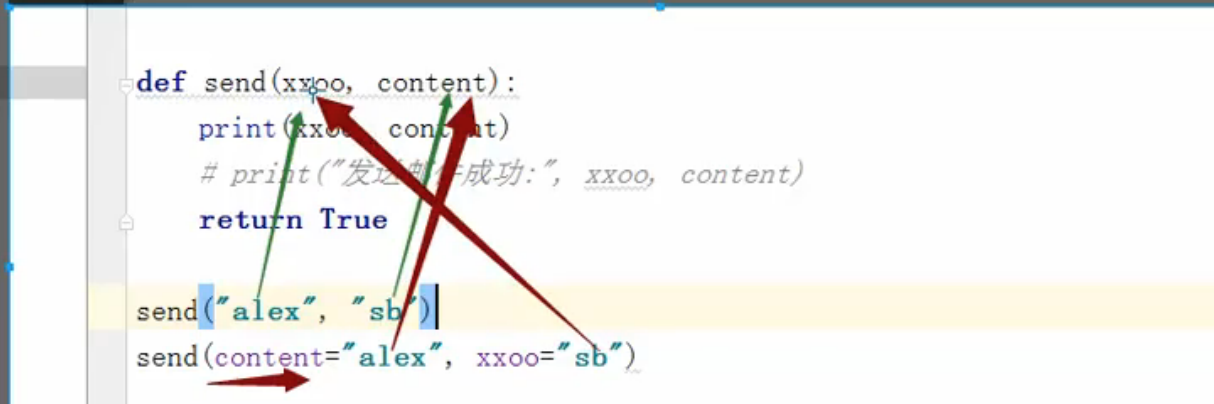
- 还有就是形式参数和实际参数的位置默认情况下是一一对应的

- 在Python中也可以定义默认参数,意思是在声明函数的时候,其中一些形式参数已经定义了一些默认值,注意:如果想要定义默认参数,必需把默认参数放在参数列表的最后位置! ! !
 #content="This is a testing email" 是默认参数

 def send(receipent,content="This is a testing email"):

     print("Email send to:",receipent,", Content:",content)

     print("Mail sent successfully")

     return True

 send("janice@abc-company.com") # 默认 content 用了 "This is a testing email"

 send("janice@abc-company.com", "Company Notice") # content 用了 "Company Notice"

 #Results:

 #Email send to: janice@abc-company.com , Content: This is a testing email

 #Mail sent successfully

 #Email send to: janice@abc-company.com , Content: Company Notice

 #Mail sent successfully
默认参数
- 也可以声明指定参数,在调用的时候输入 “”形式参数=实际参数” e.g. content=“alex",这样就可以在函数被調用時忽略参数顺序。
- 对于动态参数有两种类: * 和 ** (分别是一个星号和两个星号)
* 一个星号: 默认将传入的参数,全部放在一个元组中。 f1(*[11,22,33,44])
** 两个星号: 默认将传入的参数,全部放在一个字典中。 f1(**{"k1":"v1","k2":"v2”})动态参数 (*) 会返回一个元组,如果函数的形式参数有* 号就有特殊的功能 e.g. def f1(*args),就是按照顺序接受传入什么的值都会转换到元组里面,并且当做元组的一个元素;如果在传实际参数的时候加一個星 * 号 e.g. f1(*li),它的特殊的功能是将这个列表里的每一个元素都转化到元组的元素里,其实就相当于在内部做了一个 For 循环,把列表里的一个一个添加到元组里(Tuple)。
 def f3(*args):

     print(args) #返回一個元組

 li = [11,22,"Janice","dfghjk"]

 name = "Janice"

 f3(li)

 f3(*li)

 f3(*"Janice")

 f3(*name)

 #Results:

 #([11, 22, 'Janice', 'dfghjk'],)

 #(11, 22, 'Janice', 'dfghjk')

 #('J', 'a', 'n', 'i', 'c', 'e')

 #('J', 'a', 'n', 'i', 'c', 'e')
动态参数*
动态参数 (**) 会返回一個字典,如果函数的形式参数有** 号就有特殊的功能 e.g. def f1(**args),就是传入什么的值都会转换到字典里面,并且当做字典的value;如果在传实际参数的时候加上两个星** 号e.g. f1(**dic),它的特殊的功能是将这个字典里的每一个key, value 都给转化成字典的key, value,其实就相当于直接赋值到字典里。
 def f4(**args):

     print(args) #返回一個字典

 li = [11,22,"Janice","dfghjk"]

 name = "Janice"

 f4(n1="Janice")

 f4(n1="Janice", n2=20)

 dic = {"k1":"v1","k2":"v2"}

 f4(kk = dic)

 f4(**dic)

 #Results

 #{'n1': 'Janice'}

 #{'n1': 'Janice', 'n2': 20}

 #{'kk': {'k1': 'v1', 'k2': 'v2'}}

 #{'k1': 'v1', 'k2': 'v2'}
动态参数**
万能参数,def f5(*args, **kwargs) (注意:* 一个星号必须在前面, ** 两个星号必须在后面!)
 def f5(*args, **kwargs):

     print(args)

     print(kwargs)

 f5(11,22,33,44,k1="v1",k2="v2")

 #Results:

 #(11, 22, 33, 44)

 #{'k2': 'v2', 'k1': 'v1'}
万能参数*args, **kwargs
全局变量和局部变量
没有写到函数体里的变量叫全局变量,它在所有文件中都是可读;在f1函数里写的变量是 f1函数私有的,叫局部变量;变量会先找自己的局部变量,然后才找全局变量,如果你想修改全局变量(重新赋值),这时需要加入一个global 的关键字+ 它的变量名。如果以后要读一个全局变量的时候,直接打印 e.g. print() 一下就可以啦!重点一、[列表, 字典, 元组] 如果在函数体里进行修改/新增, 这是在修改全区列表,但列表不容许在函数体里重新赋值。
- 重点二、如果是全局变量,命名时都需要大写! ! !
补充:函数的参数在传入的时候,到底是传入引用还是再传入一份列表,現在来分析一下两种结果:
- 如果传入的是一份列表,Python 在传入参数的时候是重新赋值的话,打印的时候就不应该出现 999
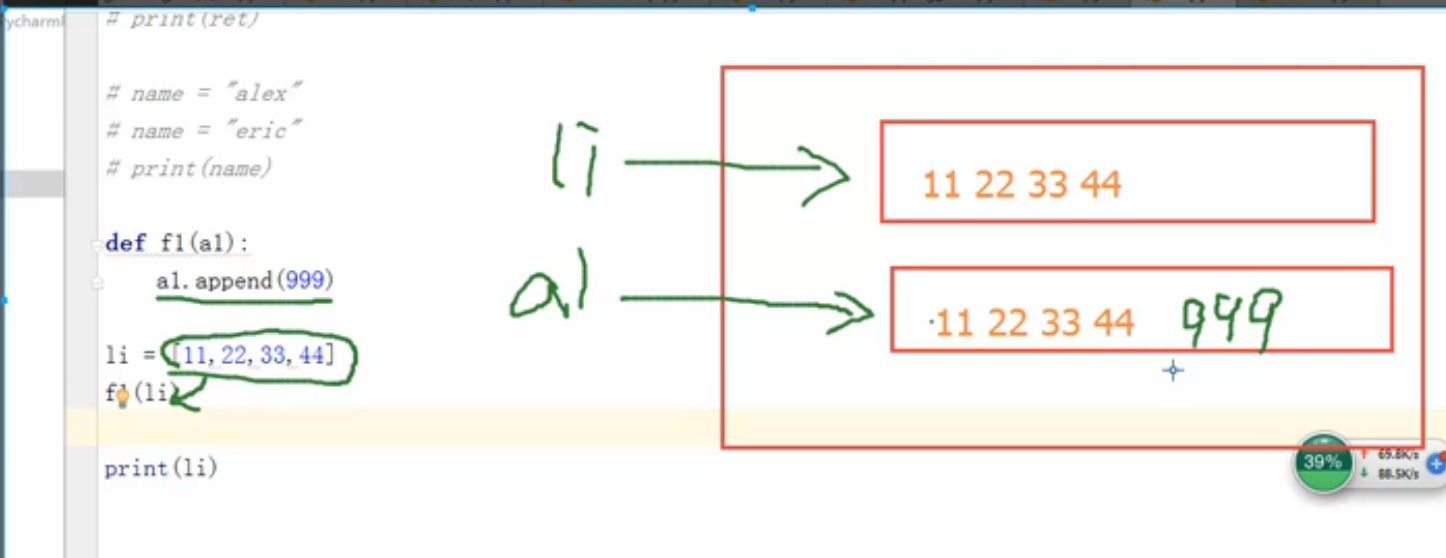
- 如果传入的是一个引用, li 和 a1 便会指向同一个列表
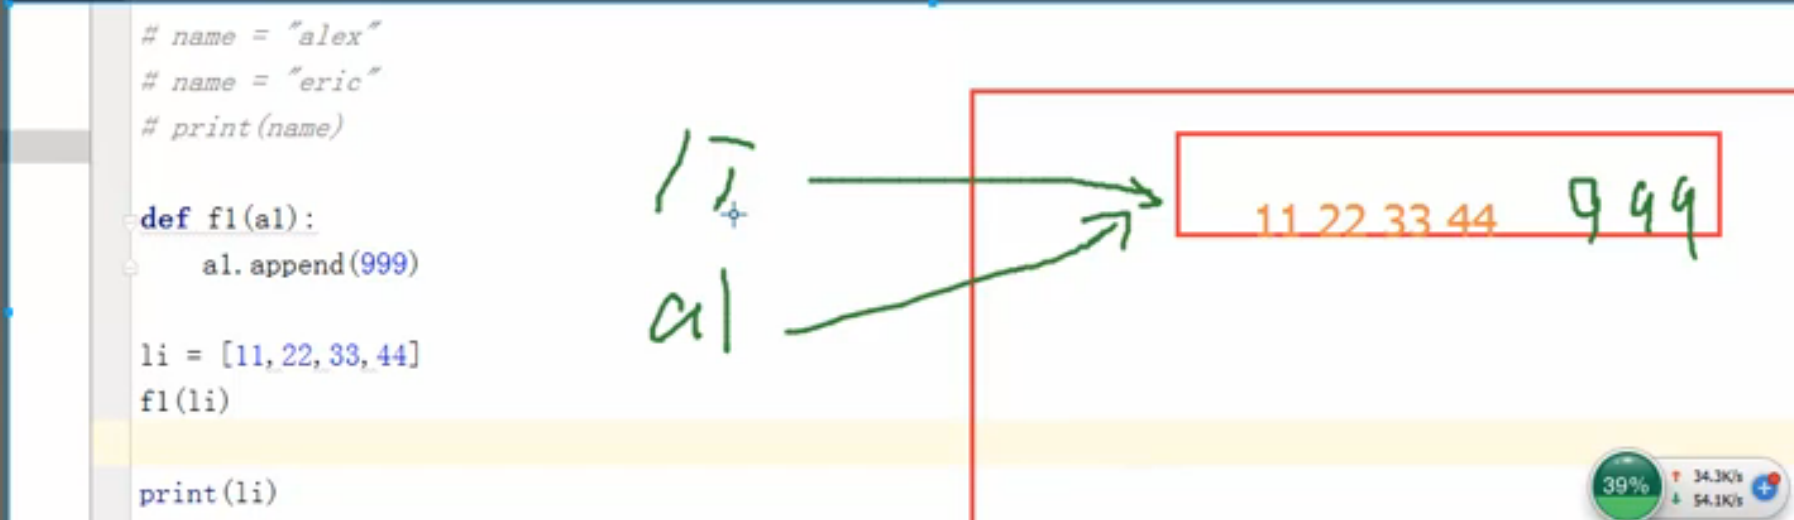
- 從运行后的结果可以总结:Python 在传参数的时候,其实是传入一个引用! ! !
 def f7(a1):

     a1.append(9999)

 li = [11,22,33,44]

 f7(li)

 print(li)

 #Results:

 #[11, 22, 33, 44, 9999]
运行后结果
- 如果传入的是一份列表,Python 在传入参数的时候是重新赋值的话,打印的时候就不应该出现 999
实战操作
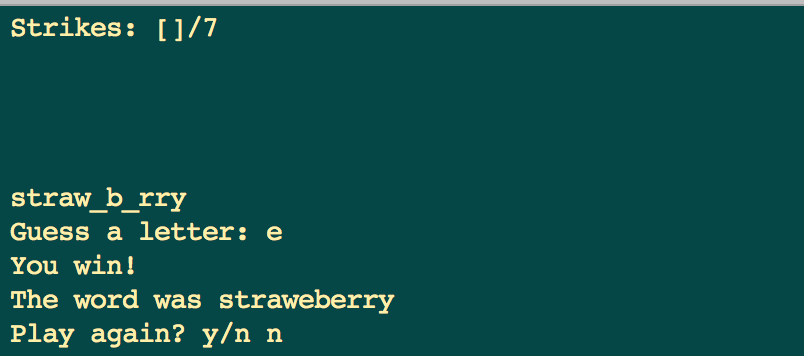
运用函数写一个简单的猜文字游戏
#!/usr/bin/env python

# -*- coding: utf-8 -*-

# Author: Janice Cheng

import os

import random

import sys

# make a list of words

words = [

    'apple',

    'banana',

    'orange',

    'coconuts',

    'straweberry',

    'lime',

    'graphefruit',

    'lemon',

    'kumquat',

    'blueberry',

    'melon'

]

def clear():

    if os.name == 'nt':

        os.system('cls')

    else:

        os.system("clear")

def draw(bad_guess, good_guess, secret_word):

    clear()

    print("Strikes: {}/7".format(bad_guess))

    print('')

    for letter in bad_guess:

        print(letter, end=' ')

    print('\n\n')

    for letter in secret_word:

        if letter in good_guess:

            print(letter, end='')

        else:

            print('_', end='')

    print('')

def get_guess(bad_guess, good_guess):

    while True:

        guess = input("Guess a letter: ").lower()

        if len(guess) != 1:

            print("You can only guess a single letter!")

        elif guess in bad_guess or guess in good_guess:

            print("You've already guess that letter")

        elif not guess.isalpha():

            print("You can only guess letters!")

        else:

            return guess

def play(done):

    clear()

    secret_word = random.choice(words)

    bad_guess = []

    good_guess = []

    while True:

        draw(bad_guess,good_guess,secret_word)

        guess = get_guess(bad_guess,good_guess)

        if guess in secret_word:

            good_guess.append(guess)

            found = True

            for letter in secret_word:

                if letter not in good_guess:

                    found = False

            if found:

                print("You win!")

                print("The word was {}".format(secret_word))

                done = True

        else:

            bad_guess.append(guess)

            if len(bad_guess) == 7:

                draw(bad_guess,good_guess, secret_word)

                print("You lost!")

                print("The word was {}".format(secret_word))

                done = True

        if done:

            play_again = input("Play again? y/n ").lower()

            if play_again != 'n':

                return play(done=False)

            else:

                sys.exit()

def welcome():

    print("Welcome to Letter Guess!!")

    start = input("Press enter/return to start or Q to quit >> ").lower()

    if start == 'q':

        print('Bye!')

        sys.exit()

    else:

        return True

if __name__ == "__main__":

    done = False

    while True:

        clear()

        welcome()

        play(done)
猜文字游戏
format 函数操作实战
ret = '{0} lives in Hong Kong for more than {1} years!!'.format('Janice',20)

ret = '{name} lives in Hong Kong for more than {year} years!!'.format(name='Janice', year=20)

# Janice lives in Hong Kong for more than 20 years!!
这是 Python format 函数的源码,它也是接受一个 *号的参数和 ** 两个星号的参数
    def format(self, *args, **kwargs): # known special case of str.format

        """

        S.format(*args, **kwargs) -> str

        Return a formatted version of S, using substitutions from args and kwargs.

        The substitutions are identified by braces ('{' and '}').

        """

        pass
- 一个 *星号的函数例子
>>> s = "My name is {} and I am {} years old".format("Janice",20)

>>> s

'My name is Janice and I am 20 years old'

# 在参数里加入*便可以接受列表类型

>>> s = "My name is {} and I am {} years old".format(*["Janice",20])

>>> s

'My name is Janice and I am 20 years old'

# 这里不受列表类型

>>> s = "My name is {} and I am {} years old".format(["Janice",20])

Traceback (most recent call last):

  File "<stdin>", line 1, in <module>

IndexError: tuple index out of range

# 在括号里定义{0}和{1},就不需要在format()函数里重覆定义传递的内容

>>> s = "My name is {0} and {0} and {0} I am {1} years old".format("Janice",20)

>>> s

'My name is Janice and Janice and Janice I am 20 years old'

>>> s = "My name is {} and {} and {} I am {} years old".format("Janice",21)

Traceback (most recent call last):

  File "<stdin>", line 1, in <module>

IndexError: tuple index out of range
一个*星号的函数
- 两个** 星号的函数例子
 >>> s = "My name is {name} and I am {age} years old".format(name="Janice",age=20)

 >>> s

 >>> s = "My name is {name} and I am {age} years old".format(**{"name":"Janice","age":20}) # 在参数里加入**便可以接受字典类型

 >>> s

 'My name is Janice and I am 20 years old'
两个**星号的函数
实战操作
运用函数式编程来进行登录或注册实战
[更新中...]
lambda 表达式介绍
这是一个简单的函数: f1(a) = a + 100
>>> def f1(a):

...     return a + 100

...

>>> ret = f1(10)

>>> print(ret)

110
普通函数
lambda a: a + 100

# a + 100 是函数体,a 是变量,整句意思是输入参数 a,然后对a进行操作:a + 100
就以上的代码,可以用 lambda 表达式来实现
>>> f2 = lambda a: a + 100 #自动返回

>>> ret2 = f2(10)

>>> print(ret2)

100
lambda 表达式例子一
>>> add = lambda a1,a2: a1 + a2 #可以传两个参数

>>> add(10,10)

20
lambda 表达式例子二
lambda 中的 filter 例子
>>> lst = [11,22,33,44]

#Option1

>>> def f(x):

...     return x > 22

>>> list(filter(f, lst))

[33, 44]

#Option2

>>> list(filter(lambda a: a > 22, lst))

[33, 44]
lambda 表达式例子三
lambda 中的 map 例子
>>> lst1 = [1,3,5,6,9]

>>> lst2 = [2,4,6,8,10]

>>> ret = map(lambda x,y: x+y, lst1, lst2)

>>> list(ret)

[3, 7, 11, 14, 19]
lambda 表达式例子四
大家都应该听过 Spark,在 Spark 里用了很多 lambda 表达式来实现 filter、map、flatMap 和 reduceByKey 的功能,以下是一個 Spark 的 wordcount 例子
wordCounts = textFile.flatMap(lambda line: line.split())\

    .map(lambda word: (word, 1))\

    .reduceByKey(lambda a, b: a+b)
文件操作函数介紹和操作实战
打開文件
##Operation

output = open(r'C:\spam', 'w') #Create output file ('w' means write)

input = open('data', 'r') #Create input file ('r' means read)

input = open('data') #Same as prior line ('r' is the default)

open('f.txt', encoding='latin-1') #Python 3.X Unicode text files (str strings)

open('f.bin', 'rb') #Python 3.X bytes files (bytes strings)

open('f.bin', 'rb') #Python 2.X bytes files (str strings)

for line in open('data'): #File iterators read line by line
操作文件
##Method

aString = input.read() #Read entire file into a single string

aString = input.read(N) #Read up to nextNcharacters (or bytes) into a string

aString = input.readline() #Read next line (including\nnewline) into a string

aList = input.readlines() #Read entire file into list of line strings (with \n)

output.write(aString) #Write a string of characters (or bytes) into file

output.writelines(aList) #Write all line strings in a list into file

output.close() #Manual close (done for you when file is collected)

output.flush() #Flush output buffer to disk without closing

anyFile.seek(N) #Change file position to offsetNfor next operation
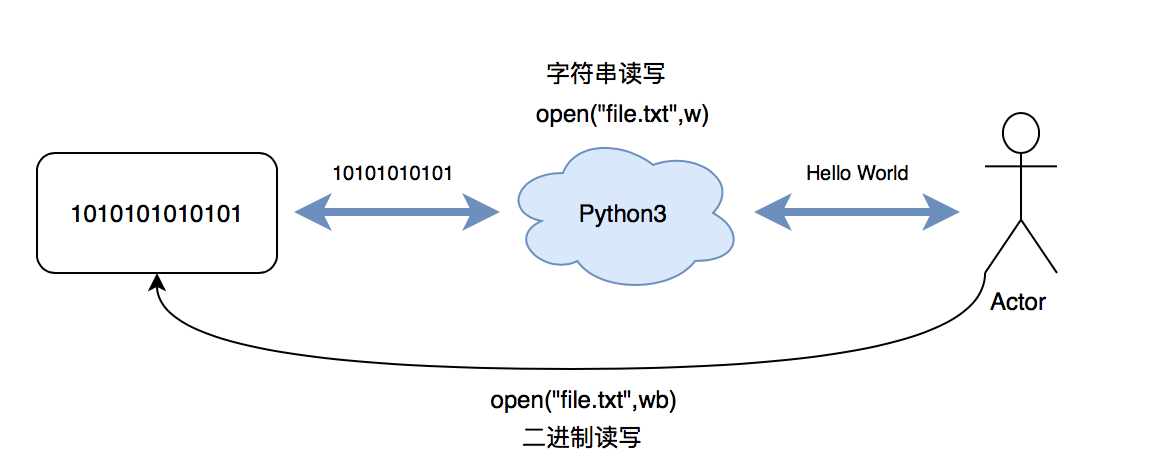
文件的打开方式不同就会对文件产生不同的影响,打开方式有几种:1) 以字符串类型读写文件; 2) 有加号的方式读写文件; 3) 以二进制(字节)类型读写文件;
# Remember to close the file after every file modification

f = open("readme.txt",'w') #open a file for writing

f.write("this is the first line\n") #write a line to the file

f.write("this is the second line\n") #write one more line to the file

f.close() #close a file

f = open("readme.txt",'r') #open a file for reading

f.read() # read the entire content of file at once

f.read(1) # read 1 char from the file

f.seek(1) # 调整指针到第一个位置

f.tell()

f.readable() # 是否是可读文件

f.readlines() # reading all lines as an array

f.readlines() # read only one line

f.close() #close a file

f = open("readme.txt",'a') #append data to the original file

f.write("this is the third line\n") #write a line to the file

f.close() #close a file
文件操作
以字符串类型打开:
- Append: "a" - 以追加的方式打开文件,(打开文件后的文件指针会自动移到文件末尾) 如果文件不存在则创建。
f = open("db","a")

f.write("Python")

f.close()

#Before: admin|123

#After: admin|123Python
Append:a
- Read: "r" - 以读的方式打开文件,可读取文件信息。
 >>> f2 = open("db","r")

 >>> data2 = f2.read()

 >>> print(data2)

 Admin|123

 Alex|alex3417

 >>> print(type(data2))

 <class 'str'>
Read:r
- Write: "w" - 以写的方式打开文件,如果文件存在,则清空该文件,再重新写入新内容。
 >>> import csv

 >>> f2 = open("db","w")

 >>> data = "admin|123"

 >>> f2.write(data)

 9

 >>> f2.close()
Write:w
- Extend: "x" - 如果这个文件存在就报错,如果不存在就创建并写内容 (跟 w 是一样的,只增加多一个条件判断,判断一下当前文件是否已经存在)
 >>> f2 = open("db","x") #如果文件已经存在,你会报错

 Traceback (most recent call last):

   File "<stdin>", line 1, in <module>

 FileExistsError: [Errno 17] File exists: 'db'

 >>> f2 = open("db_test","x")

 >>> data = "admin|123"

 >>> f2.write(data)

 9

 >>> f2.close()
Extend:x
有+號的打開模式
- Append: "a+" - 以读写方式打开文件,并把文件指针移到文件尾。
- Read: "r+" - 以读写方式打开文件,可以对文件进行读写操作,Python 在读完整个文件的时候,默认指针位置会在文件的末位,所以当 f.write("9999") 的时候,就会在文件最后的位置追加,所以如果用 "r" 打开时,可以配合 seek() 来指定写入的位置 (看下面seek()的例子)。
 >>> f = open("db","r+", encoding='utf-8')

 >>> data = f.read()

 >>> print(data)

 admin|123

 >>> f.write("")

 11

 >>> f.close()

 #Results:

 #Before: admin|123

 #After: admin|1239999
Read:r+
- Write: "w+" - 清除文件内容、然后以读写方式打开文件。可读可写,但會先清空,後再寫。
以二进制(字节)类型打开
- Append: "ab" - 如果使用二进制的方式写,必需也得传入字节类型
 >>> f = open("db","ab")

 >>> f.write(bytes("Python", encoding='utf-8'))

 6

 >>> f.close()

 #Results:

 #Before: admin|123

 #After: admin|123Python
Append:ab
如果使用二进制的方式去写数据,但传入的是一个字符串,这时候程序就会报错!
 >>> f3 = open("db","ab") #如果加b只能写入字节

 >>> f3.write("hello")

 Traceback (most recent call last):

   File "<stdin>", line 1, in <module>

 TypeError: a bytes-like object is required, not 'str'
Append:ab
- Read: "rb" - 只读,在读文件时自己去跟Python 底层的二进制沟通,你读的时候是读二进制,所以写的时候也需要写上二进制(字节),在硬盘上存储的是二进制格式,Python 在读的时候,默认把底层的二进制字节转转换成字符串,所以打印出来才会是字符串。
 >>> f1 = open("db","rb")

 >>> data1 = f1.read()

 >>> print(data1)

 b'Admin|123\nAlex|alex3417'

 >>> print(type(data1))

 <class 'bytes'>
Read:rb
**注意: encoding 这个参数,它是 Python 在把字节转化成字符串设定的一个编码,Python 会按照这个编码帮我们转换。意思就是说你用什么编码去存储文件(写)的同时,也应该用相同的编码去打开(读)文件。如果把 b 取掉读到的就是字符串类型,所以如果在打开文件的时候出现乱码,很大可能是这个 encoding 出现问题。
f=open("db","r",encoding="GBK") - Write: "wb"
文件操作的功能
- seek( ): 主动调整指针的位置,指针跳到指定位置 (永远以字符的方式找位置)
 >>> f = open("db","r+")

 >>> data = f.read(1)

 >>> print(data)

 a

 >>> f.seek(1) #调整指针到第一个位置

 1

 >>> f.write("") #当前指针位置开始向后覆盖,写数据,打开方式有 b 、只能写字节;无b就是写字符

 3

 >>> f.close()

 #Results:

 #Before: #admin|123

 #After: #a999n|123
seek()
- tell( ): 获取当前指针的位置(字节),因為一個中文是3個字節,所以當調用read(1)方法之後,再查看當前字節位置,就會返回3
 >>> f = open("db","r+")

 >>> data = f.read(1)

 >>> print(data)

 金

 >>> print(f.tell())

 3

 #db: 金|123
tell()
- read( ): 默认无参数,读全部,如果在打开文件的时候是"rb",读取的时候会按字节;如果在打开文件的时候是"r",读取的时候会按字符。
 >>> f = open("db","rb")

 >>> data = f.read(1)

 >>> print(data)

 b'\xe9'

 >>> f.close()

 >>> f = open("db","r+")

 >>> data = f.read(1)

 >>> print(data)

 金

 >>> f.close()
read()
- write( ): 写数据,如果在打开文件的时候是"rb",读取的时候会按字节;如果在打开文件的时候是"r",读取的时候会按字符。
- close( ):
- fileno( ):
- flush( ): 刷新,在文件还没有close()之前,f.write 的数据会存放在内存里而不直接写入文件,如果用了flush()的话,它就会在文件还没有调用close()的状况下强行把数据写入文件中。
 >>> f = open("db","a")

 >>> f.write("")

 3

 >>>

 >>> input("Please input a number: ") #等待着用户输入

 Please input a number:
flush()
- readable( ): 判断是否可读
 >>> f2 = open("db_test","w")

 >>> f2.readable()

 False

 >>> f1 = open("db_test","r")

 >>> f1.readable()

 True
readable()
- seekable( ):
- readline( ): 只读取一行(读取的过程指针会在移动)
 db.txt

 admin|123

 janice|janice123

 alex|alex123

 kennith|ken123

 >>> f1 = open("db","r")

 >>> f1.readline()

 'admin|123\n'

 >>> f1.readline()

 'janice|janice123\n'

 >>> f1.close()
readline()
- truncate( ):截断数据,只把指针位置后的清空
 f = open("db","r+",encoding='utf-8')

 f.seek(3)

 f.truncate()

 f.close()

 #admin|123

 #adm
truncate()
- for-loop:
 f = open("db","r+",encoding='utf-8')

 for line in f:

     print(line)

 f.close()

 #admin|123

 #alex|alex3417

 #kennith|ken3344
for-loop
關閉文件
- close( )
f = close()
- with 文件操作
 with open("db","r+", encoding='utf-8') as f:

     for line in f:

         print(line)

 #admin|123

 #alex|alex3417

 #kennith|ken3344
with f1
- with 同時操作兩個文件
 #從db1文件一个以只读的方法打开,從db2文件一个以只写的方法打开

 #从DB1读一行写一行到DB2

 with open("db1","r", encoding='utf-8') as f1, open("db2","w", encoding='utf-8') as f2:

     for line in f1:

         new_line = line.replace("alex","eric")

         f2.write(new_line)
with f1, f2
gzip
>>> import gzip

>>> with gzip.open('score.csv.gz','rt') as f:

...     print(f.read())

...

chinese,88

english,90

maths,85

computer science,90

chemistry,67

music,88

economics,75
gzip
本周作业
操作 haproxy.conf 文件
 global

         log 127.0.0.1 local2

         daemon

         maxconn 256

         log 127.0.0.1 local2 info

 defaults

         log global

         mode http

         timeout connect 5000ms

         timeout client 50000ms

         timeout server 50000ms

         option  dontlognull

 listen stats :8888

         stats enable

         stats uri       /admin

         stats auth      admin:1234

 frontend oldboy.org

         bind 0.0.0.0:80

         option httplog

         option httpclose

         option  forwardfor

         log global

         acl www hdr_reg(host) -i www.oldboy.org

         use_backend www.oldboy.org if www

 backend www.oldboy.org

         server 100.1.7.9 100.1.7.9 weight 20 maxconn 3000

 backend buy.oldboy.org

         server 100.1.7.90 100.1.7.90 weight 20 maxconn 3000
haproxy.cof
参考资料
金角大王:Python之路,Day3 - Python基础3
银角大王:Python开发【第四篇】:Python基础之函数
第三章:Python基础の函数和文件操作实战的更多相关文章
- Python自动化 【第三篇】:Python基础-集合、文件操作、字符编码与转码、函数
1. 集合 1.1 特性 集合是一个无序的,不重复的数据组合,主要作用如下: 去重,把一个列表变成集合实现自动去重. set可以看成数学意义上的无序和无重复元素的集合,因此,两 ...
- python基础3之文件操作、字符编码解码、函数介绍
内容概要: 一.文件操作 二.字符编码解码 三.函数介绍 一.文件操作 文件操作流程: 打开文件,得到文件句柄并赋值给一个变量 通过句柄对文件进行操作 关闭文件 基本操作: #/usr/bin/env ...
- Python基础-week03 集合 , 文件操作 和 函数详解
一.集合及其运算 1.集合的概念 集合是一个无序的,不重复的数据组合,它的主要作用如下 *去重,把一个列表变成集合,就自动去重了 *关系测试,测试两组数据之前的交集.并集.差集.子集.父级.对称差集, ...
- python学习笔记-(七)python基础--集合、文件操作&函数
本节内容 1.集合操作 2.文件操作 3.字符编码与转码 4.函数操作 1.集合操作 集合是一个无序的.不重复的数据组合: 1.1 常用操作 它的作用是: 1)自动去重:列表变成集合,自动去重: &g ...
- Python基础7:文件操作
[ 文件操作] 1 对文件操作流程 打开文件,得到文件句柄并赋值给一个变量 通过句柄对文件进行操作 关闭文件 现有文件如下: 昨夜寒蛩不住鸣. 惊回千里梦,已三更. 起来独自绕阶行. 人悄悄,帘外月胧 ...
- python基础学习笔记——文件操作
文件操作 初始文件操作 使用Python来读写文件是非常简单的操作,我们使用open()函数来打开一个文件,获取到文件句柄,然后通过文件句柄就可以进行各种各样的操作了 根据打开方式的不同能够执行的操作 ...
- Python基础知识(八)----文件操作
文件操作 一丶文件操作初识 ###f=open('文件名','模式',编码): #open() # 调用操作系统打开文件 #mode #对文件的操作方式 #encoding # 文件的编码格式 存储编 ...
- python基础八之文件操作
python的文件操作 1,打开文件 编码方式要和文件的编码方式相同! #open('路径','打开方式','指定编码方式') f = open(r'E:\pycharm\学习\day8\test', ...
- Python基础之 一 文件操作
文件操作 流程: 1:打开文件,得到文件句柄并赋值给一个变量 2:通过句柄对文件进行操作 3:关闭文件 模式解释 r(读) , w(写) ,a(附加)r+(读写的读), w+(读写的写),a+(读附加 ...
随机推荐
- Android Studio怎样选择查看指定进程的log?
今天说一个简单的东东,关于Android Studio在logcat中怎样查看指定进程的log. 关于过滤你自己所开发的应用的log.在这篇文章中:Android Studio怎样给log加入过滤项( ...
- python 中Dict 转 Json
近期在公司须要写个小工具.运用到的python,然后须要将Dict转成Json. 之前遇到转换Json失败,然后以为复杂的Entity结构.不能用Json的库Json.dump().进行转换. 自己些 ...
- 利用java mail发送邮件(转)
JavaMail是SUN提供给开发者在应用程序中实现邮件发送和接收功能而提供的一套标准开发类库,支持经常使用的邮件协议,如SMTP.POP3.IMAP.开发者使用JavaMail编写邮件程序时,无需考 ...
- zookeeper web ui-->node-zk-browser安装
眼下公司正在使用zookeeper做配置管理和其它工作,在网上找几个zookeeper管理工具,都不尽人意,要么功能不够强大,要么不能友好的浏览zk树形结构.我的想法是zk管理工具,应该有一个树形结构 ...
- webpack+babel项目在IE下报Promise未定义错误引出的思考
低版本浏览器引起的问题 最近开发一个基于webpack+babel+react的项目,一般本地是在chrome浏览上面开发,chrome浏览器开发因为支持大部分新的js特性,所以一般不怎么需要poly ...
- 爬虫新手学习2-爬虫进阶(urllib和urllib2 的区别、url转码、爬虫GET提交实例、批量爬取贴吧数据、fidder软件安装、有道翻译POST实例、豆瓣ajax数据获取)
1.urllib和urllib2区别实例 urllib和urllib2都是接受URL请求相关模块,但是提供了不同的功能,两个最显著的不同如下: urllib可以接受URL,不能创建设置headers的 ...
- xml概述(1)
本节要点: 标记语言的定义 XML简介 XML与HTML 比较 XML与数据库比较 XML的特点 XML结构 1 标记语言的定义 "XML.SGML.HTML"中的"ML ...
- Asp.net mvc 知多少(二)
本系列主要翻译自<ASP.NET MVC Interview Questions and Answers >- By Shailendra Chauhan,想看英文原版的可访问http:/ ...
- 数据从文件导入Elasticsearch
1.资源准备 1.数据文件:accounts.json 2.索引名称:bank 3.数据类型:account 4.批量操作API:bulk 2.导入数据 curl -XPOST 'localhost: ...
- 利用MJModel解决关键字
#import "CJAddressModel.h" @implementation CJAddressModel +(NSDictionary *)mj_replacedKeyF ...